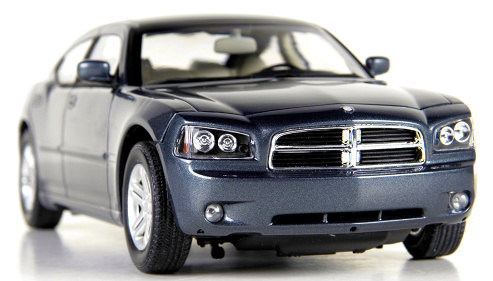
| KIT: | Testors 1/24 2006 Dodge Charger R/T |
| KIT #: | 5315 |
| PRICE: | $30.00 MSRP |
| DECALS: | Yes |
| REVIEWER: | Greg Hansel |
| NOTES: | New mold, First two section by Scott Van Aken |
| HISTORY |
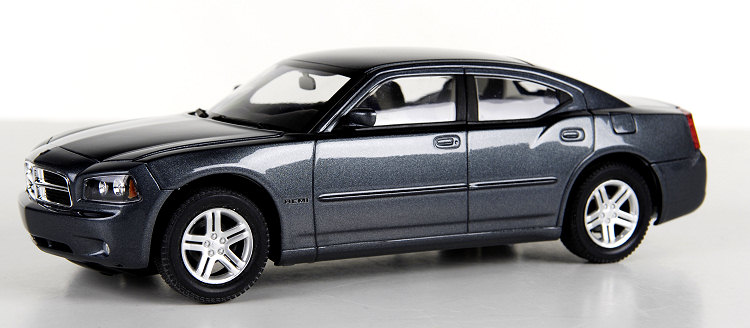
There have been many different Dodge vehicles, on three different platforms, bearing the Charger nameplate. The name is generally associated with a performance model in the Dodge range, however it has also adorned mundane hatchbacks and sedans and a personal luxury coupe. The name was also carried by a 1999 concept car that differed substantially from the Charger eventually placed into production for the 2006 model year.
 The Dodge Charger, in its current incarnation, is a
rear-wheel drive full-size automobile built by the DaimlerChrysler corporation
for its North American Dodge brand. The Charger name is an historical
one, borne by many other Dodge Charger models in the past. Introduced in
February 2005 for the 2006 model year, this new Charger shares the LX platform
of the Chrysler 300 and Dodge Magnum, which borrows component parts from the
Mercedes E-Class platform[1]; in fact,
the interior of the Charger is almost identical to that of the Magnum. It
replaced the Dodge Intrepid as Dodge's full-size sedan following falling sales
of the Intrepid. This Charger is a four-door sedan, disappointing many fans of
the previous two-door Chargers, who were looking for something like the 1999
concept car as a challenge to the Mustang. It is built at Brampton
Assembly in Canada.
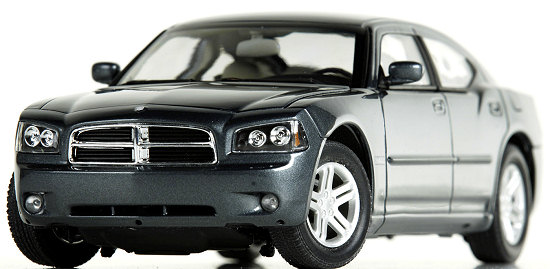
The Dodge Charger, in its current incarnation, is a
rear-wheel drive full-size automobile built by the DaimlerChrysler corporation
for its North American Dodge brand. The Charger name is an historical
one, borne by many other Dodge Charger models in the past. Introduced in
February 2005 for the 2006 model year, this new Charger shares the LX platform
of the Chrysler 300 and Dodge Magnum, which borrows component parts from the
Mercedes E-Class platform[1]; in fact,
the interior of the Charger is almost identical to that of the Magnum. It
replaced the Dodge Intrepid as Dodge's full-size sedan following falling sales
of the Intrepid. This Charger is a four-door sedan, disappointing many fans of
the previous two-door Chargers, who were looking for something like the 1999
concept car as a challenge to the Mustang. It is built at Brampton
Assembly in Canada.
| THE KIT |
After years of die-cast car kits from Testors, it was really a pleasant surprise to see that they have produced and honest injected car kit. What is even nicer is that this one is a car not yet kitted, the 2006 Dodge Charger R/T. I was rather surprised by the size of the box, but when I opened it I could see why. First thing that caught my eye is that there is quite a bit of reinforcement to protect the parts. Not only sections of cardboard on the inside of the box, but many of the more fragile bits are protected by sections of board held with ties.
 The
quality of the molding for this kit is top-notch. I did not find any flash,
nasty ejector pin marks, nor any sink areas. Detailing on the white plastic bits
is nice and crisp with the chrome bits very nicely done. Clear parts are also
well protected by cardboard. Sprues of a similar size were packaged together in
their own bags. The vinyl (or rubber) tires are in with the chassis and
the body was also bagged with only the interior nestled inside it to keep it
from being scratched. I have to confess that I even had difficulty finding the
normal mold seam line that one normally finds on car kit bodies.
The
quality of the molding for this kit is top-notch. I did not find any flash,
nasty ejector pin marks, nor any sink areas. Detailing on the white plastic bits
is nice and crisp with the chrome bits very nicely done. Clear parts are also
well protected by cardboard. Sprues of a similar size were packaged together in
their own bags. The vinyl (or rubber) tires are in with the chassis and
the body was also bagged with only the interior nestled inside it to keep it
from being scratched. I have to confess that I even had difficulty finding the
normal mold seam line that one normally finds on car kit bodies.
Those who build car kits nowadays expect a lot from their kits and this one seems to deliver. There is a separate engine and transmission, All of the various chassis bits are separate, including front suspension bits, drive train, rear chassis attachment points and suspension, exhaust and the whole deal. the nicely chromed wheels have an adapter that allows them to be clicked onto the axles. Interior consists of a tub where one installs the back seats, separate front seats with console and pedals. All of the windows are separate pieces that fit in from the outside so not only is there no need to mask a one-piece window assembly, but there is room on the overhead for the mirror and sun shades. Also makes it easier to paint the body. The hood is held in with plastic hinges. Final engine assembly is one with the body in place. This is followed by the addition of wipers, fuel cap, as well as front and rear body subassemblies.
The instructions are very well done with a complete parts layout, color information using Testors paints and 28 superbly drawn construction steps. A small decal sheet (not shown) is provided for logos and plates. There are a number of photos of the completed model on the back of the box that can be used for reference.
| CONSTRUCTION |
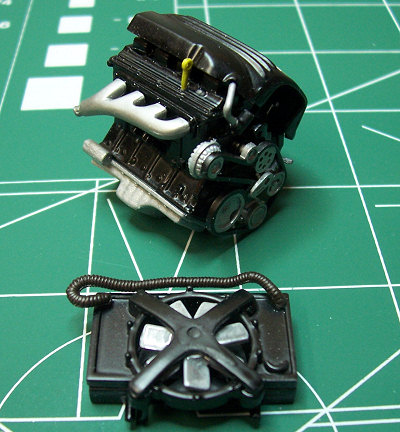 Wow, that’s the first word
that comes to mind as I started construction on this kit. This is an extremely
well engineered kit and the parts breakdown really makes painting easy. I
started with the engine and it went together well until I tried to attach the
completed accessory drive belt assembly. There is interference between part #
121 and the engine block. I ended up using 5 minute epoxy to mount it in place.
Wow, that’s the first word
that comes to mind as I started construction on this kit. This is an extremely
well engineered kit and the parts breakdown really makes painting easy. I
started with the engine and it went together well until I tried to attach the
completed accessory drive belt assembly. There is interference between part #
121 and the engine block. I ended up using 5 minute epoxy to mount it in place.
Another problem is that
the instructions mistakenly shows mounting the upper radiator hose to the
tensioner pulley instead of its correct location on the engine block just above
it. This became a common problem with the instructions of this kit. Other
mistakes I caught are mainly on the suspension. There is no mention of the
steering rod or retainers (parts 82-84) and in step 10 there is no indication
where to locate tie rod parts 86 & 87. I also found that in step 11 they have
parts 58 & 59 reversed, you will find they fit on the opposite side to that
shown. One nice thing about the instructions is that they offer a painting
guide on each page so you don’t have to constantly flip to the front of the
instructions to see the color key. I would recommend checking your references
for color though, the directions
 were not always correct. In step 24 the
instruction call for semi gloss black for part # 137, but that part is actually
the washer reservoir and should be white with a yellow cap.
were not always correct. In step 24 the
instruction call for semi gloss black for part # 137, but that part is actually
the washer reservoir and should be white with a yellow cap.
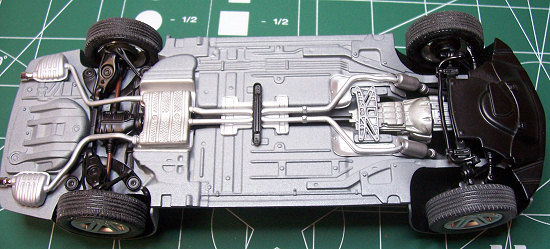
Other that those minor
errors, the instructions do a good job guiding you through the build, and what a
build it is! The suspension is a dream; all the heat shields are separate which
makes painting a breeze. Every part that can be separate is and the completed
assembly looks incredible! I primed my chassis plate and shot some overspray of
the body color which is how the real car is produced. I picked out the
suspension parts and exhaust in various shades of metallic and black which
really made the underside look real. An interesting design feature of the kit
is that the transmission and engine are not actually connected. The
transmission is installed first then the engine slips in right in front, they
barely touch. I’m
 curious as to why it was designed that way but it looks
convincing. The front wheels are steerable, but don’t forget the steering
linkage!
curious as to why it was designed that way but it looks
convincing. The front wheels are steerable, but don’t forget the steering
linkage!
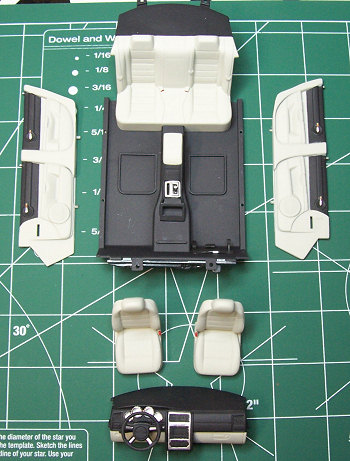
The interior is very well
laid out and the part breakdown makes it easy to duplicate the factory two tone
effect. Of special note is the extra touches not usually found in a model in
this scale. Testors went the extra mile and included such features as a
separate headliner, separate visors, B-pillar inserts, filler panels for the
C-pillars, separate chrome inner door handles, and seatbelt detail front and
rear. The only l et down in the interior is the instrument gauges, there are
none! The cluster is on the chrome tree and has no gauge detail. There should
have been decals for the faces, but none were provided. This would be a simple
fix for Testors so hopefully we will see corrected decal sheets in future
production runs. I simply painted mine white and added a drop of 5 minute epoxy
to each gauge to simulate the glass. The seats include what looks like the pull
ring to release the seatback (parts #52) but the instructions are vague as to
its placement and I ended up leaving them off. Other then the minor gauge
issue, the interior ranks among the best I’ve seen in any scale!
et down in the interior is the instrument gauges, there are
none! The cluster is on the chrome tree and has no gauge detail. There should
have been decals for the faces, but none were provided. This would be a simple
fix for Testors so hopefully we will see corrected decal sheets in future
production runs. I simply painted mine white and added a drop of 5 minute epoxy
to each gauge to simulate the glass. The seats include what looks like the pull
ring to release the seatback (parts #52) but the instructions are vague as to
its placement and I ended up leaving them off. Other then the minor gauge
issue, the interior ranks among the best I’ve seen in any scale!
| COLORS AND MARKINGS |
I used
PPG basecoat urethane
paint from KC Auto, a paint store that services the local body shops in the
Spokane area. The color I
chose was Magnesium Pearl from the 2006 Charger lineup. I also used urethane
based clear. It was a two part system that produced a deep gloss without having
to polish. I will detail the steps I took to achieve the finish. I start off
by cleaning up the body parts. The body in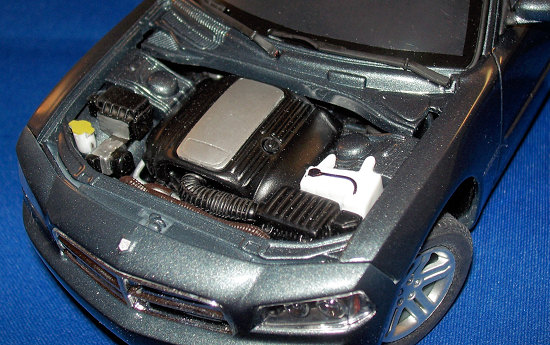 this kit was molded very well and
there were only a few minor mold lines to take care of. After removing the mold
lines I scuffed all the body parts with a Model Car Garage scuff pad. You can
also use 2400 grit micromesh, or the 600 Grit Testors sanding film. The purpose
of this is to give the primer something to adhere to. I found out the hard way
that primer can and will pull of at the worst moment if you skip this step.
After scuffing and washing the body I primed it with three coats from a spray
can. My preferred primer is from a company called Evercoat that I found at a
local Car Quest refinisher store. It goes on very smooth and does not bring out
ghosts of the mold lines like other primers I have tried. The most important
thing is that you get an automotive primer to protect the plastic from the hot
solvents in the automotive paint. Next, I wet sand the primer with 3600 grit
micromesh. This gives me a super smooth finish ready for color. I reduced the
PPG paint 1 to 1 with reducer and sprayed three medium coats through a single
action Badger airbrush. I laid all three coats pretty much one after the other,
with very little time in between. One of the nice things about the urethane and
lacquer paints is that they flash very quickly. I keep an old piece of 2400
grit micromesh handy to sand out any boogers that appear in the paint as I go,
this is possible due to how quickly this stuff dries. I have yet to get any
runs or sags with my method, but it’s possible. It’s important to build the
color up evenly and slowly. My first coat is like a mist coat, just a little
heavier. The second coat usually fills in most of the color, and then the third
coat provides depth and ensures consistency. With lighter colors and Kandys I
will spray more coats, as many as 15! But for this kit is only required three.
this kit was molded very well and
there were only a few minor mold lines to take care of. After removing the mold
lines I scuffed all the body parts with a Model Car Garage scuff pad. You can
also use 2400 grit micromesh, or the 600 Grit Testors sanding film. The purpose
of this is to give the primer something to adhere to. I found out the hard way
that primer can and will pull of at the worst moment if you skip this step.
After scuffing and washing the body I primed it with three coats from a spray
can. My preferred primer is from a company called Evercoat that I found at a
local Car Quest refinisher store. It goes on very smooth and does not bring out
ghosts of the mold lines like other primers I have tried. The most important
thing is that you get an automotive primer to protect the plastic from the hot
solvents in the automotive paint. Next, I wet sand the primer with 3600 grit
micromesh. This gives me a super smooth finish ready for color. I reduced the
PPG paint 1 to 1 with reducer and sprayed three medium coats through a single
action Badger airbrush. I laid all three coats pretty much one after the other,
with very little time in between. One of the nice things about the urethane and
lacquer paints is that they flash very quickly. I keep an old piece of 2400
grit micromesh handy to sand out any boogers that appear in the paint as I go,
this is possible due to how quickly this stuff dries. I have yet to get any
runs or sags with my method, but it’s possible. It’s important to build the
color up evenly and slowly. My first coat is like a mist coat, just a little
heavier. The second coat usually fills in most of the color, and then the third
coat provides depth and ensures consistency. With lighter colors and Kandys I
will spray more coats, as many as 15! But for this kit is only required three.
For clear I use a
two part urethane from Napa auto parts “Crossfire” brand. I have also used
PPG and some of my friends use Omni brand. Any good automotive refinishing
shop can provide the clear. Here is an important note, this stuff is
N-A-S-T-Y and you must take precautions before using it. I wear my
respirator even when I‘m mixing it up because the smell is kind of strong.
Also, it’s sticky, so if you get it on your hands it can be a mess. I even
 change my glasses before
spraying because at the end of the session the glasses are coated with
overspray. Did I mention this stuff is nasty? Wear safety glasses and
gloves if you use it!
change my glasses before
spraying because at the end of the session the glasses are coated with
overspray. Did I mention this stuff is nasty? Wear safety glasses and
gloves if you use it!
I use medical pipettes to transfer the clear and hardener into a small cup, the ratio is 4 parts clear to 1 part hardener. I use the same single action airbrush as before to apply it put 2-3 wet coats on the model. I do not mist coat this stuff because it does not work well that way. You have to be careful of runs so don’t go too heavy. The reason I put up with the hassle of this stuff is the results it produces are AMAZING!!! The depth of the gloss is incredible and if you laid it right you don’t need to polish it. Of course you CAN polish it with fantastic results. Another nice thing is you can spot polish out any boogers and not have to polish the whole car to match. Overall this urethane clear is really nice. It’s very easy to apply; you just need to treat it with a little more respect than normal hobby paints.
The kit decals are a disappointment. There are not many and the adhesive is not very good so you only get one chance to position them, any moving and they can simply fall off. I got mine on with little trouble and proceeded to final assembly.
| FINAL BITS |
 The sub assemblies all fit
well. I used 5 minute epoxy to ensure strength and the interior and chassis
went in perfectly. The front clip was another story, I had to do some creative
sanding to get the seams to line up, and at first I had a 2mm gap! I sanded
down the passenger side wheel well, and a little of the chassis plate and
finally got an acceptable fit. It was the only fit problem in the entire kit.
The sub assemblies all fit
well. I used 5 minute epoxy to ensure strength and the interior and chassis
went in perfectly. The front clip was another story, I had to do some creative
sanding to get the seams to line up, and at first I had a 2mm gap! I sanded
down the passenger side wheel well, and a little of the chassis plate and
finally got an acceptable fit. It was the only fit problem in the entire kit.
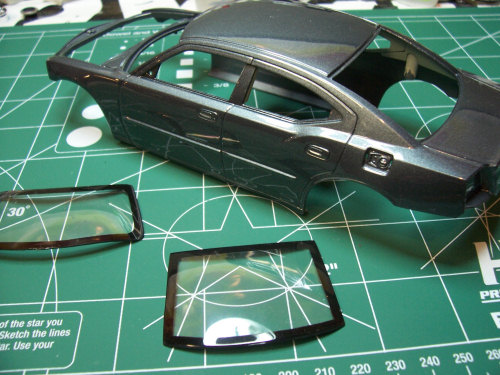
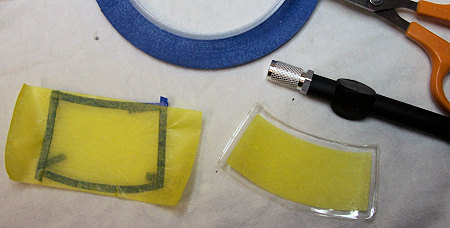
The glass was another minor disappointment in the kit. Testors did not provide a mold line for the black surround on the windshield or rear glass. Since the glass mounted from the outside and rested on a lip of the body, not having the black surround would have looked terrible. I thought about it for a bit and came up with an idea. I used flexible 4/32 tape around the rim of the glass, then I put Tamiya paper tape over the whole piece. I was then able to use the 4/32 tape as a cutting guide for the Tamyia tape to get a perfect 4/32 surround on the glass. The attached photo shows the process, it’s really easy and I have started using it on other kits as well. One caution on the glass, it’s thin and brittle! I cracked my windshield taking off the masking and had to get a replacement.
| CONCLUSIONS |
Wow….just Wow. I have been building model cars for over 30 years and this kit was a blast of fresh air! Testors really stepped up and produced an amazing kit that was a pure building pleasure. Even if the subject isn’t your style, you owe it to yourself to add this kit to your collection. It’s that good. I’ve already picked up the Daytona version and will be getting the police version when it comes out. I sure hope Testors continues and produces other cars as well. The problems with the instructions and glass are all minor and do not detract from the overall quality of this kit. I recommend it!
March 2007
| REFERENCES |
 2006
Dodge Charger brochure, www.Dodge.com,
and the Hobby Heaven message board where an
owner posted pictures of the engine and underside of the car.
2006
Dodge Charger brochure, www.Dodge.com,
and the Hobby Heaven message board where an
owner posted pictures of the engine and underside of the car.
Thanks to
 and DLV Company
for the review kit. You can find Testors kits at your favorite hobby shop
or on-line at www.testors.com
and DLV Company
for the review kit. You can find Testors kits at your favorite hobby shop
or on-line at www.testors.com
If you would like your product reviewed fairly and quickly by a site that has over 350,000 visitors a month, please contact me or see other details in the Note to Contributors.