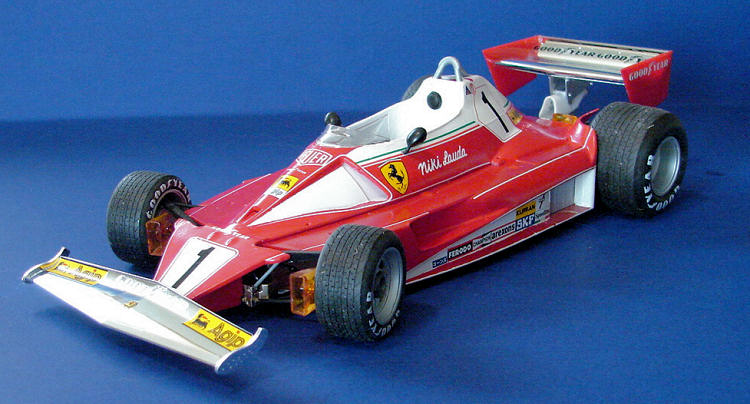
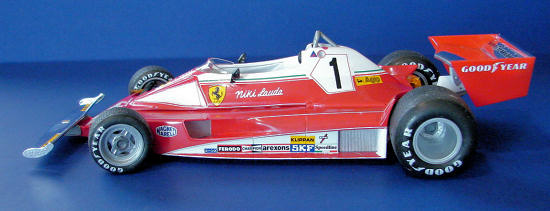
Hasegawa 1/20 Ferrari 312T2
| KIT #: | 20243 |
| PRICE: | $57.00 MSRP |
| DECALS: | Two options |
| REVIEWER: | Mark Hiott |
| NOTES: |
1976 |
| HISTORY |
The Ferrari
312T2, a development of the 312T, was introduced in 1976. The 312T2 was powered
by the same flat-12 engine as the 312T and produced 500hp.
In order to
comply with the revised aerodynamic rules, the car no longer featured the tall
airbox behind the cockpit. Instead "NACA shaped" air intakes were incorporated
into the cockpit sides, feeding air into each cylinder bank of the flat-12
engine. Nikki Lauda scored the type's
first win at the Spanish GP. Lauda also took wins at 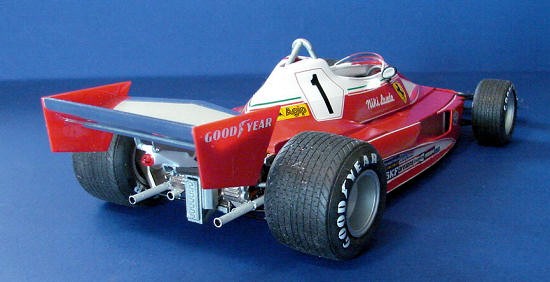 Monaco
The 312T2 was
also used for the 1977 season. One of the few visible changes was the addition
of Fiat logos to a Ferrari F1 car for the first time. Lauda was unhappy with the
performance of the car at the first two races of 1977, and this led an extensive
test programme to develop the car in the weeks between the Brazilian and South
African grands prix. These tests resulted in the introduction of several changes
to the car, including a new rear wing, revised bodywork and suspension. However,
despite its problems, the 312T2 was good enough to win the driver's championship
for Lauda, who won more through the car's reliability than outright speed. He
took 3 wins, while Reutemann won once. The constructors' championship was also
secured for a third successive season before Lauda left the team before season's
end.
The 312T2 was used for the first two races of 1978, before being replaced by the 312T3.
| THE KIT |
Modelers of
Formula 1 cars have been looking forward to the release of this kit and its
sister kit for the
 No
ignition wiring or injection hoses are included, but if you use the clear intake
boxes, they wouldn’t be all that visible anyway.
No
ignition wiring or injection hoses are included, but if you use the clear intake
boxes, they wouldn’t be all that visible anyway.
The
instructions are well written with a parts layout, 20 assembly steps and a
5-view for color and decal placement. Some of the steps are a bit confusing but
numbered sub-steps are given to make sure parts are installed in the correct
order. Take care to note where decals are needed in the various steps.
The decals are nicely printed and are done by Cartograft. Decals are included for Nikki Lauda or Clay Reggazoni. The carrier film is closely edged to the colors and should look good on the car. Some of the decals are marked “preliminary” and “final” in the placement guide, but I’m not sure what the difference is. Helmet decals are also provided, although no driver figure is in the kit. Nor is there any mention of them in the instructions.
| CONSTRUCTION |
Construction is pretty straightforward, it’s kinda like making a cake… start on
the inside and work your way out.
I
deviated from the instructions and started with the clear parts first. You will
need to paint the clear brake ducts and intake boxes, might as well it them
ready. Here you will need to decide if you are going to use the clear intake
boxes. Alternate parts are provided if you choose not to use them. I really wish
there was better way to do these, as the seams are impossible to hide.
 Building
the engine is simple, it a big flat square and only consists of 6 parts. Take
care fitting the intake boxes, as they will have to clear suspension parts
later. Speaking of suspension parts, that’s what we assemble next. Some of the
parts are a bit fiddly and, if not careful, you can get glue marks where you do
want them. Take note of the brake rotors, they are left and right handed.
Building
the engine is simple, it a big flat square and only consists of 6 parts. Take
care fitting the intake boxes, as they will have to clear suspension parts
later. Speaking of suspension parts, that’s what we assemble next. Some of the
parts are a bit fiddly and, if not careful, you can get glue marks where you do
want them. Take note of the brake rotors, they are left and right handed.
When
joining the gearbox to the engine, you have to work quickly to trap parts J1 and
D14 in between. If you used the intake boxes and installed them correctly, D14
should lay right along top the inner edge.
Next
up is the exhaust. Ignore the numbered assembly steps in step 8. They would have
you install the front tri-pipe on each side first and then the rear tri-pipe. I
tried… it can’t be done that way. Install the rear pipes first, let them dry,
then install the front pipes.
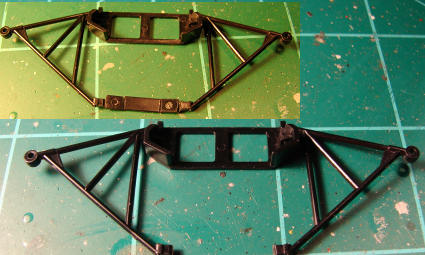 I also
deviated from the instruction in step 9. Part D9 is the front lower control
arms. You have to trap these between the upper and lower halves of the chassis
tub. IF you do, painting the tub, without painting the arms too, may be a
problem. I assembled the tub parts B1, B2, B7 and B8. Then I cut the rear
support (the part painted silver) off the lower suspension. Leave just a little
bit of the support on the rear arms. Once everything is painted, carefully
spread the arms and slide the bit of rear support left into its slot. The photos
show how/where to cut the lower suspension. The rest of the front suspension was
assembled per the instructions.
I also
deviated from the instruction in step 9. Part D9 is the front lower control
arms. You have to trap these between the upper and lower halves of the chassis
tub. IF you do, painting the tub, without painting the arms too, may be a
problem. I assembled the tub parts B1, B2, B7 and B8. Then I cut the rear
support (the part painted silver) off the lower suspension. Leave just a little
bit of the support on the rear arms. Once everything is painted, carefully
spread the arms and slide the bit of rear support left into its slot. The photos
show how/where to cut the lower suspension. The rest of the front suspension was
assembled per the instructions.
Next
I assembled what interior there is, F1 cars are not noted for their comfort! A
seat, some belts, pedals and a shifter make up the cockpit. I used the kit belt
as this is an OOB build and I wanted to show how they would look. Not too bad
really. The front cowl, steering wheel and shaft were then installed.
I
skipped step 13, preferring to install the wing last. Step 14 is joining the
engine/trans to the tub. You will have to trap the shifter linkage (part E23) as
you do. Use slow setting glue, as you will have to insert it around and under
several parts to get it in place. In this step you also install the oil cooler
and oil tank. As you do, install the side pods temporarily to set the coolers
correct positions.
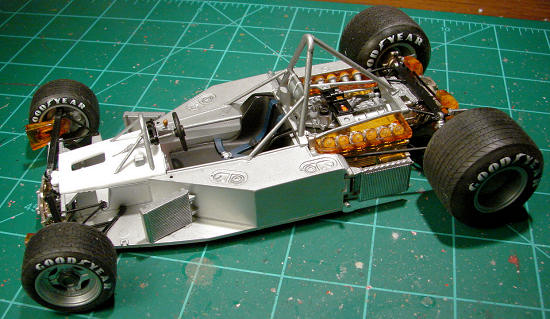 The
chassis panels are next. Glue parts A6 and A7 to the tub first, they will set
the locations of the side pods. The side pods and upper cowl are removable so no
need to attached them yet. Add the fiddly bit such as mirrors, front wing
mounting and windscreen and set the cowl off to the side. The rear wing is made
up of 4 chrome parts and 2 plastic end plates. I left the wings chrome as some
pictures show the wings highly polished and others show them rather dull. Plus
the chrome REALLY looks cool! The only part you have a problem with is G1.
Hasegawa put little “sprue balls” on the edge for some reason and they mar an
otherwise perfect wing. (If you check out Scott’s preview, look at the chrome
sprue in the pic. You can just see the 3 little balls on the part on the left
side of the chrome sprue.)
The
chassis panels are next. Glue parts A6 and A7 to the tub first, they will set
the locations of the side pods. The side pods and upper cowl are removable so no
need to attached them yet. Add the fiddly bit such as mirrors, front wing
mounting and windscreen and set the cowl off to the side. The rear wing is made
up of 4 chrome parts and 2 plastic end plates. I left the wings chrome as some
pictures show the wings highly polished and others show them rather dull. Plus
the chrome REALLY looks cool! The only part you have a problem with is G1.
Hasegawa put little “sprue balls” on the edge for some reason and they mar an
otherwise perfect wing. (If you check out Scott’s preview, look at the chrome
sprue in the pic. You can just see the 3 little balls on the part on the left
side of the chrome sprue.)
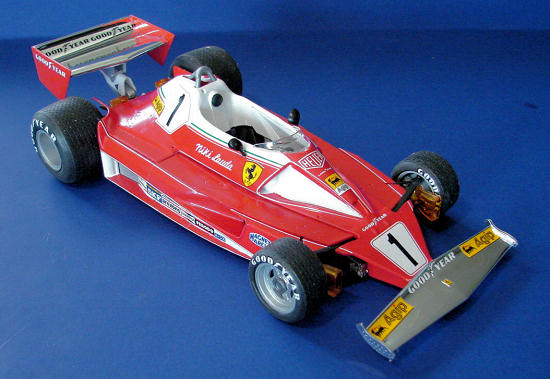
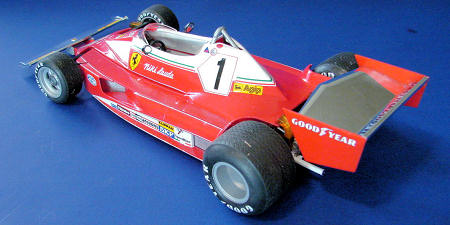
The front and rear wings and wheels were the last parts installed. I painted the rims and assembled them as called for in step 16 and then mounted the tires. At this point I added the tire emblems. They work like dry-transfers, but require water to stick. They are mounted to a backing that is removed from the main sheet. A protective “cover” sheet is then removed, exposing the reversed emblem attached to a see-through backing. The emblem is positioned on the tire and water applied. Gentle rubbing with a Q-tip will release the emblems from the backing. The backing is then carefully removed and the emblem sticks to the tire. I added water after positioning the emblem, but I suppose you could wet the tire first.
| COLORS & MARKINGS |
Painting:
Oh
my, where to start. Some self-induced screw-ups made it a bit of a chore. I
followed the painting guide in the instructions for the most part, but will
point out deviations.
When
painting the engine, Hasegawa recommends a 50/50 mix of gold and silver. I think
it is still a little too gold and could have used a bit more silver. When
painting the clear brake ducts and intake boxes, they recommend a 50/50 mix of
clear red and clear yellow. I think they are a bit too orange and could have
used a bit more red. The engine block was painted aluminum as an assembly, and
then the heads and end plates were painted gold.
The little bits and pieces were painted prior to assembly. The cockpit
tub was sprayed MM Aluminum with MM Chrome used on the various pipes. Chrome was
also used for the radiators and oil coolers. I chose not to paint the suspension
parts as they call for Semi Gloss Black and I feel that the unpainted plastic
looks the best for this color.
 The next
step is where I shot myself in the foot. I decided not to use the white decals
for the cowl and sprayed the body with MM Gloss White. After taping off the
parts to stay white, I sprayed on Tamiya TS-49 Bright Red. Now, I was told that
this is a good match for “Ferrari Red”, the instructions call for Mr. Color
“Super Italian Red”. Well, the red paint wrinkled badly, as seen in the photos.
I didn’t realize that Tamiya paints are Lacquers, and not compatible with MM
paints. DOH!!!
The next
step is where I shot myself in the foot. I decided not to use the white decals
for the cowl and sprayed the body with MM Gloss White. After taping off the
parts to stay white, I sprayed on Tamiya TS-49 Bright Red. Now, I was told that
this is a good match for “Ferrari Red”, the instructions call for Mr. Color
“Super Italian Red”. Well, the red paint wrinkled badly, as seen in the photos.
I didn’t realize that Tamiya paints are Lacquers, and not compatible with MM
paints. DOH!!!
After giving it some thought, I applied thinner to a rag and, working a small
spot at a time, I worked the thinner in, removing what red paint I could. I then
washed that area down with water and moved to the next spot. I then sanded away
what was left. I managed to get 90% of the red paint removed and then I washed
the body with soap and water. Then the body was sprayed with MM Gloss Red. Oh,
and since I do all my spray-painting outside, I managed to drop the cowl on the
way back into the house. Of course, it landed paint side down! The finished
result was not perfect and there is still a bit of wrinkling on the rear deck.
Perhaps I didn’t get all the thinner washed off. Anyway, on to the decals!
(If
you look closely, you will notice that the rear wing end plates are a slightly
different color then the chassis. The end plates are Tamiya TS-49 and the
chassis is MM Gloss Red.)
Decals:
 Not much
to say about the decals. They are made by Cartograft and went down with no
trouble. The tiny white stripes are a bit fiddly, and some of the stripes will
need to be trimmed to fit. The white of the decals is a bit translucent, but it
is really only noticeable on the rear cowl numbers. I suppose one could paint a
white area under the decal to solve that problem. The green and red side stripe
should not go under the cowl number. Apply the cowl number, then apply the
stripe over the number and trim it as needed before it dries. Some of the decals
are applied to the chrome wings and the carrier is quite visible. Also they
don’t adhere very well to the chrome. In fact, I had to glue the small Ferrari
emblem in the center of the front wing. This is another argument for painting
the chrome parts aluminum.
Not much
to say about the decals. They are made by Cartograft and went down with no
trouble. The tiny white stripes are a bit fiddly, and some of the stripes will
need to be trimmed to fit. The white of the decals is a bit translucent, but it
is really only noticeable on the rear cowl numbers. I suppose one could paint a
white area under the decal to solve that problem. The green and red side stripe
should not go under the cowl number. Apply the cowl number, then apply the
stripe over the number and trim it as needed before it dries. Some of the decals
are applied to the chrome wings and the carrier is quite visible. Also they
don’t adhere very well to the chrome. In fact, I had to glue the small Ferrari
emblem in the center of the front wing. This is another argument for painting
the chrome parts aluminum.
The area under the number on the cowl really should be painted. A number that you are not going to use could be used as a template to paint the white area. The white inner areas on the side pods should have a red outline, but not wanting to use the decals, I had to do without. The side pods also have a white stripe around the opening. The lower section of the decals stripe would not stay in place. I ended up cutting the lower part of the stripe off and painting the edge gloss white.
| CONCLUSIONS |
 I liked
this kit. If Hasegawa produces more F1 kits like this, they could give Tamiya a
run for their money. It builds easily, has good detail and looks great when
done. Most of the problems I encountered were of my own doing.
I liked
this kit. If Hasegawa produces more F1 kits like this, they could give Tamiya a
run for their money. It builds easily, has good detail and looks great when
done. Most of the problems I encountered were of my own doing.
I
really would recommend striping the chrome off the wings and painting them
aluminum. The decals would look better if nothing else.
I can’t really recommend to the younger people due to the fiddlyness of some of the assembly steps. However, F1 fans should find it worthwhile.
| REFERENCES |
Instructions and Wikipedia for the history
Photos off the net
My
reference library
N
If you would like your product reviewed fairly and fairly quickly, please contact the editor or see other details in the Note to Contributors.