| KIT #: | 3401 |
| PRICE: | $34.00 and currently OOP |
| DECALS: | Two options |
| REVIEWER: | Mark Hiott |
| NOTES: | Includes photo etch parts |
| HISTORY |
 The
envisioned Grand Sport would be the ultimate Corvette, a lightweight,
tremendously powerful factory built racer. Mounted with a 377cid small block
with Weber side-draft carburetors (see the photo, below), it dynoed at 550hp at
6400rpm and was designed to blow the hoods off Shelby's Cobras. And if the
Ferraris and Fort GT 40's were also left in the dust, so much the better.
The
envisioned Grand Sport would be the ultimate Corvette, a lightweight,
tremendously powerful factory built racer. Mounted with a 377cid small block
with Weber side-draft carburetors (see the photo, below), it dynoed at 550hp at
6400rpm and was designed to blow the hoods off Shelby's Cobras. And if the
Ferraris and Fort GT 40's were also left in the dust, so much the better.
|
After the
prototypes had proven their mettle -- and metal -- 125 production street
beasts were to be unleashed. But it never happened...
|
| THE KIT |
 Upon
opening the kit you will find a nicely molded model in white plastic. A small
fret of Photo-Etched parts is included for the louvers in the hood and various
other parts. Also included is a beautiful sprue of "aluminum" parts. They are
very nicely done and look fantastic. Unlike the McLaren kit, no hoses/fuel lines
are included in this kit.
Upon
opening the kit you will find a nicely molded model in white plastic. A small
fret of Photo-Etched parts is included for the louvers in the hood and various
other parts. Also included is a beautiful sprue of "aluminum" parts. They are
very nicely done and look fantastic. Unlike the McLaren kit, no hoses/fuel lines
are included in this kit.
The instructions are up to A/M’s normal standards and are very clear on
assembly.
| CONSTRUCTION |
While not as complicated as the McLaren, the GS has it problems as well.
Generally the fit is good with most of the kit. The biggest problem is the
chassis assembly.
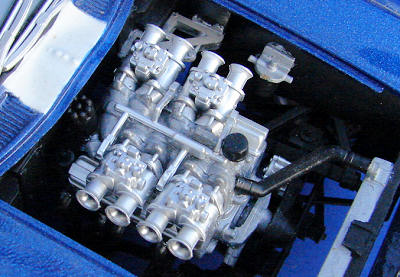 Engine:
Assembly begins as with any car...the engine. It goes together well and the
"aluminum" parts look very nice. One small tip; leave the left rear carburetor
off until the body has been installed. Otherwise there is a good chance you will
break it off...I did.
Be careful with the carb linkage piece, bending is required to fit it properly
and it is VERY easy to break.
The
exhaust headers do not fit, either they are too short, the engine sits too far
forward or I screwed something up during assembly. Whichever, they would not fit
up to the engine block. I could get them close, and as it is a tight fit, you
can’t really tell. I also had some trouble with the left exhaust pipe; it is too
long for the body. I had to cut and section it to make it fit.
Chassis:
For the most part the chassis went together ok. I had some trouble with all the
fiddly bits and it takes some test fitting to figure out where everything goes.
Take care with the steering linkage...make sure that the wheels are glued at the
correct angle, the linkage is installed in a later step and will not fit if the
angle is incorrect.
I had some trouble with the spare tire under the rear of the car. I ended shaving most of the tire away so that the body would fit correctly.
 Inside my
box was a "revision" of the instructions. It gave an improved way of installing
the roll bar mounts. I followed the revision and found that the interior would
no longer fit. I had to remove the braces and reinstall them the way the
original instructions said to. Not sure what that was all about...
Inside my
box was a "revision" of the instructions. It gave an improved way of installing
the roll bar mounts. I followed the revision and found that the interior would
no longer fit. I had to remove the braces and reinstall them the way the
original instructions said to. Not sure what that was all about...
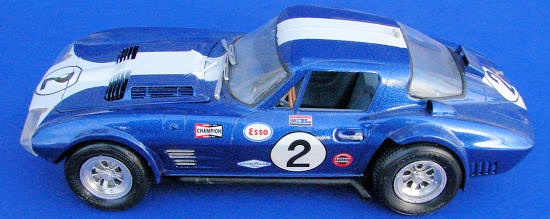
Body:
The body is the shinning star of the kit. Beautifully molded and free of
imperfections, there are a few mold seams that need to be taken care of, but
nothing serious.
The construction of the PE hood louvers is a real hand full as the parts are VERY small. Take your time here and test fit. The louvers are each made to fit in one certain spot...take care to make sure you have the right louver in the right place. Done correctly, they look beautiful and just couldn’t be done in plastic.
Depending on which version you are doing, you may have to fill in the holes in
the right front fender. My version did not use these and I had to fill the
opening. Accurate provides a plug for the hole and it just requires a little
filler to make it look right.
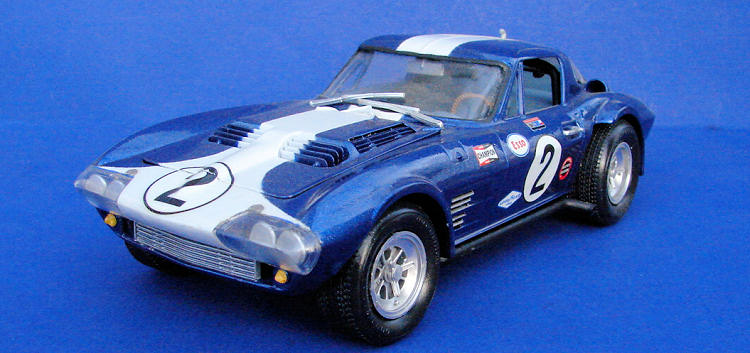
| COLORS & MARKINGS |
Painting is straightforward for this version. All Blue! I painted the body Viper
Blue and the interior Blue/Gray. The instructions call for the interior to be
French Blue, but I chose a lighter blue to set it off from the body.
The w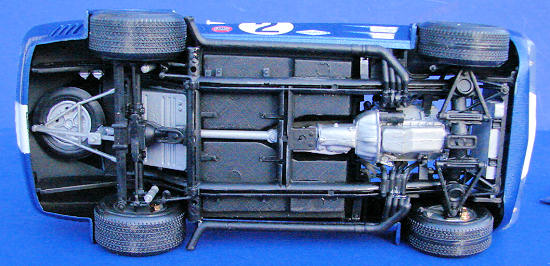 hite
stripe is provided as a decal, but I was unable to get it to conform to the
nose. Even after several application of MicroSet, it still lifted. There is no
decal supplied for the louvers. So, after painting it blue, I masked off the
white and painted it.
hite
stripe is provided as a decal, but I was unable to get it to conform to the
nose. Even after several application of MicroSet, it still lifted. There is no
decal supplied for the louvers. So, after painting it blue, I masked off the
white and painted it.
After painting, the PE bits are added to the body. I left off the lights on the
drivers’ door and the roof.
| CONCLUSIONS |
A wonderful kit with beautifully molded parts. Wonderful detail. A very nice detail set is made for this kit by Model Car Garage. It includes many parts that will go a long way in making this great kit even nicer.
It takes time and a lot of test fitting to get everything right, but in the end
the effort is worth it. It is an easier build then the M8B, but does not have
the detail of the McLaren.
| REFERENCES |
Just
some photos off the net
Mark Hiott
December 2011
If you would like your product reviewed fairly and fairly quickly, please contact the editor or see other details in the
Note to
Contributors.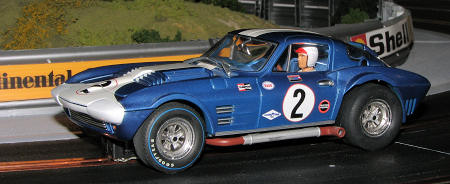 Final
Note from your editor. As you might guess, the Grand Sport has been well
represented in the slot car world. Though each of the five were by no means
identical, Revell has done several of them and got most of it right as well
(though they chickend out on doing the clear headlights). Here is a photo of the
car that Mark so ably built.
Final
Note from your editor. As you might guess, the Grand Sport has been well
represented in the slot car world. Though each of the five were by no means
identical, Revell has done several of them and got most of it right as well
(though they chickend out on doing the clear headlights). Here is a photo of the
car that Mark so ably built.