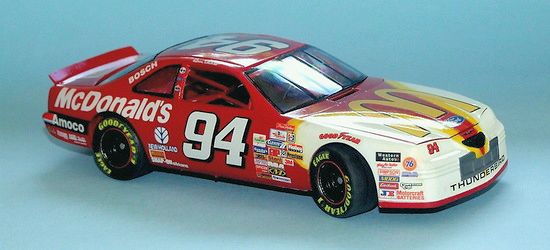
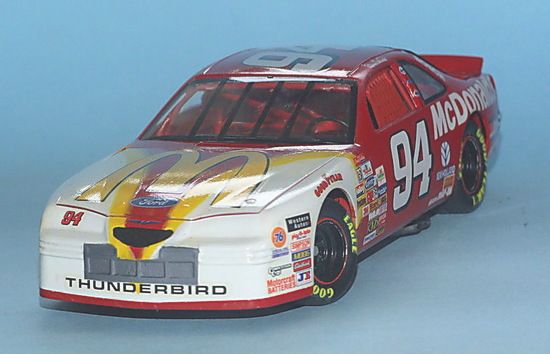
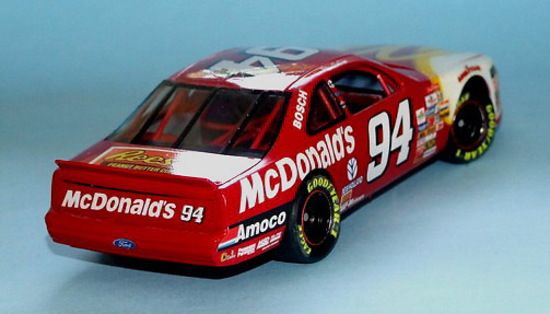
AMT 1/25 NASCAR #94 Ford Thunderbird
| KIT #: | 8402 |
| PRICE: | $12.50 in 2012 (obviously second hand) |
| DECALS: | One option |
| REVIEWER: | Ian Jackson |
| NOTES: | Straight from the box. |
| HISTORY |
 Back in 2012 I posted an build article for Monogram’s ‘Quaker State Buick’, I’d
returned to NASCAR model building simply because following a move of hemisphere
(from the UK to New Zealand) I was monumentally short of display space for my
hobby. Well things now are, space wise, a lot easier and I have built a number
of 1:48 & 1:32 aircraft. But every now-and-again I jump back into my stash
NASCAR kits.
Back in 2012 I posted an build article for Monogram’s ‘Quaker State Buick’, I’d
returned to NASCAR model building simply because following a move of hemisphere
(from the UK to New Zealand) I was monumentally short of display space for my
hobby. Well things now are, space wise, a lot easier and I have built a number
of 1:48 & 1:32 aircraft. But every now-and-again I jump back into my stash
NASCAR kits.
After leaving Johnson's team in 1994, Bill Elliott fielded his
own Winston Cup race team from 1995 to 2000
(Elliott-Hardy). In July 1996, the
partnership was dissolved, the team being renamed Bill Elliott Racing.
Later in the 1996, Elliott suffered
effects after an accident at Talladega earlier
in the year and he missed two races being replaced by Tommy
Kendall, and Bobby Hillin, Jr.
| THE KIT |
First thing to note is that this is one of AMT/Ertl’s kits not the Monogram one, therefore it’s in 1:25 scale, and that smaller scale does make a surprisingly noticeable difference when it stands alongside it’s 1:24 cousins on the shelf. However, like Monogram (and later Revell), AMT/Ertl adopted a generic interior for all of stock-car kits with just the bodies/instrument shrouds and ‘windows’ changing with each release. I have the 1995/97 Monte Carlo kit and the interiors are identical.
| COLORS & MARKINGS |
To start I glued the three major sections of the cage together and sprayed them Tamiya acrylic matt red as a base coat, I also sprayed the chassis and the
interior of the body at the same time. Once they were dry they received two
‘wet’ coats of Tamiya glossy red sprayed at around 20psi – quite high but I find
this works very well for large area coverage:
Once the body was dry and cured (three days is usually enough), I gently
sanded-back the mould seams and set about masking the inside of the windows,
then shot a coat of Tamiya white primer straight from the rattle can.

Just as the interior I first sprayed Tamiya matt red as a (heavy) undercoat,
sanded it back and sprayed another lighter coat, instead of sanding, this time I
polished the undercoat with an old cotton t-shirt scrap – same result and not as
time consuming.
I then applied just one light coat of Tamiya acrylic glossy red, two more ‘wet’ coats followed. When I removed the masking-tape from the nose I found what you see in the photo above.
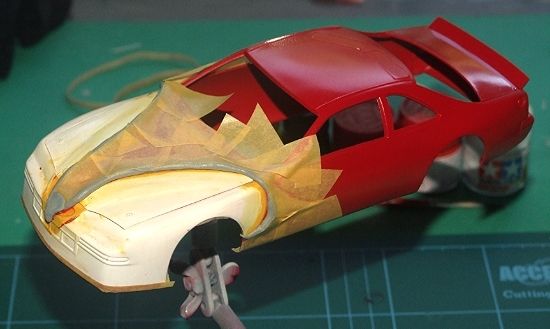 Not insurmountable but enough for me to relegate the project to the ‘Shelf of
Forgetfulness’ for two-and-a-half years! At the beginning of April this year
it returned to the bench following a lively, NASCAR related exchange between a
few of us on another forum. Obviously the first thing that needed sorting was
the mess I’d made of the nose, so I re-masked using Blu-Tack ‘sausages’ and
re-applied the yellow & white:
Not insurmountable but enough for me to relegate the project to the ‘Shelf of
Forgetfulness’ for two-and-a-half years! At the beginning of April this year
it returned to the bench following a lively, NASCAR related exchange between a
few of us on another forum. Obviously the first thing that needed sorting was
the mess I’d made of the nose, so I re-masked using Blu-Tack ‘sausages’ and
re-applied the yellow & white:
Other than a little residue left-behind by the masking tape this time things
went A LOT better, so, cheerfully, I moved-on to building-up the interior,
engine and chassis.
| CONSTRUCTION |
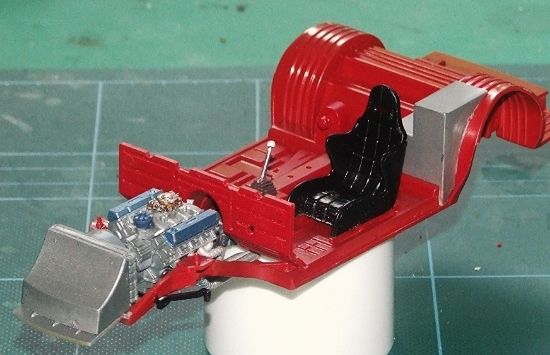 Following the instructions closely I was extremely impressed with just how
easily the complex cage came together and slotted through the firewall and on to
the front chassis. So much easier than the Monogram equivalent, however not as
detailed as the omnipresent cushioning rolls are not moulded with the cage,
shame really as they are very noticeable.
Following the instructions closely I was extremely impressed with just how
easily the complex cage came together and slotted through the firewall and on to
the front chassis. So much easier than the Monogram equivalent, however not as
detailed as the omnipresent cushioning rolls are not moulded with the cage,
shame really as they are very noticeable.
To step away from all the gluing for a couple of sessions, I laid the chassis/cage aside and went back to the body and began decaling. By way of preparation I brush painted a coat of Johnson’s Klear/Future to seal-in the paintwork.
Although a little thick, the decals – getting close to twenty years old, behaved
perfectly with excellent register and sufficient opacity to not make me wish I’d
invested in a set of Slixx or Wet works. High marks to AMT/Ertl for that.
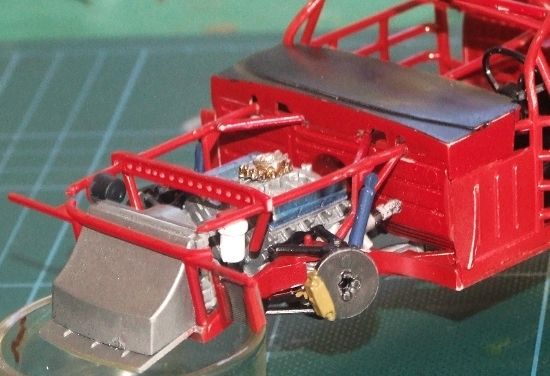 Back to construction and it was time to tackle my least favourite ‘discipline’ –
the suspension and steering sub-assemblies. And once again I was happily
surprised by AMT/Ertl’s engineering, the poseable front king-pins sandwiched
neatly between the A-arms and with the disc brakes sprayed Tamiya enamel
‘Gunmetal’ (X10) and attached all looked very, very good at the front end, I
also offset the wheel to the right to add visual interest.
Back to construction and it was time to tackle my least favourite ‘discipline’ –
the suspension and steering sub-assemblies. And once again I was happily
surprised by AMT/Ertl’s engineering, the poseable front king-pins sandwiched
neatly between the A-arms and with the disc brakes sprayed Tamiya enamel
‘Gunmetal’ (X10) and attached all looked very, very good at the front end, I
also offset the wheel to the right to add visual interest.
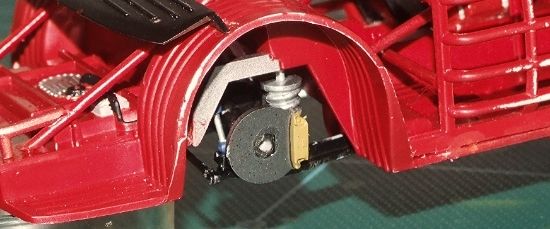
By now I was almost expecting the rear suspension to assemble without any
issues…
…It did the sub-frame, springs, shocks, axle and A-Frame all came together with
clean joins and very little ‘fiddling’. I have to say that these AMT/Ertl kits
really do surpass the Monogram kits of the same era for sheer ease of
construction.
 A little more decaling now, the tyres got their Good Year logos (a little too
large), and all was ready for final assembly.
A little more decaling now, the tyres got their Good Year logos (a little too
large), and all was ready for final assembly.
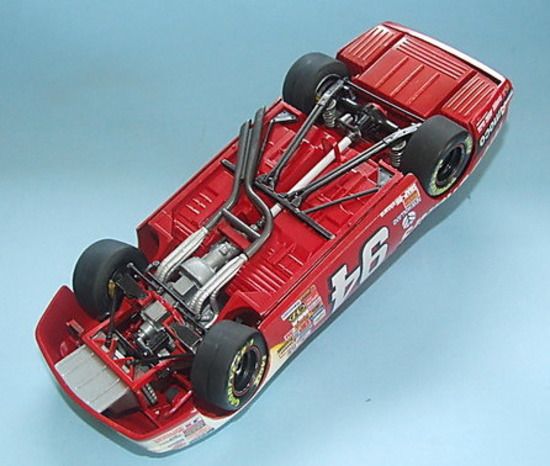
After a couple of ‘dry runs’ I found that there simply wasn’t enough space
between the body and the tyre to get the (turned) right wheel onto the kingpin
after bringing it all together, so I gingerly pushed the front-right into
place then even more carefully squeezed the tight fitting body over and on to
the chassis. After getting my breath back I pushed both back wheels on (model
resting on it’s roof using both index fingers and some ‘questionable’ language),
they behaved well, so I pushed my luck and added the front-left… A final gift
from AMT/Ertl… it dropped into place without drama.
| CONCLUSIONS |
 There are a lot of NASCAR builders on other forums and sites who appear to ‘look
down’ on AMT/Ertl kits and I really don’t understand why. Yes they aren’t as
detailed and there are some questions as to the ‘shapes’ of some of the kits,
but to be brutally honest, (and in my non-expert opinion), those questions are
really in the realms of nit-picking and rivet-counting.
There are a lot of NASCAR builders on other forums and sites who appear to ‘look
down’ on AMT/Ertl kits and I really don’t understand why. Yes they aren’t as
detailed and there are some questions as to the ‘shapes’ of some of the kits,
but to be brutally honest, (and in my non-expert opinion), those questions are
really in the realms of nit-picking and rivet-counting.
The kits build easier than their rivals, look right and when you can find them,
can be bought for a few pounds/dollars less so are fantastic value for money.
The proof - I enjoyed this build so much that I immediately went-out and bought
AMT/Ertl’s 89-92 Pontiac, 88/90 Oldsmobile (for future
 projects) and am
looking-out for their 89/91 Lumina kit – if anyone has the ‘Kodak’ boxing to
sell, please contact me via Scott.
projects) and am
looking-out for their 89/91 Lumina kit – if anyone has the ‘Kodak’ boxing to
sell, please contact me via Scott.
In the meantime, I’m looking forward to starting another NASCAR kit very soon.
Kia Ora, as the locals say.
May 2015
If you would like your product reviewed fairly and fairly quickly, please contact the editor or see other details in the Note to Contributors.