Monogram 1/24 1926 Mack
|
KIT #: |
2401 |
|
PRICE: |
$25-35.00 |
|
DECALS: |
One Option |
|
REVIEWER: |
Robert Myers |
|
NOTES: |
Resin triple rear wheels and headlights from
Industrial Model Design by Richard Mark were added. |
Mack Trucks, Inc. is an American truck
manufacturing company and a former manufacturer of buses and trolley buses.
Founded in 1900 as the Mack Brothers Company, it manufactured its first
truck in 1907 and adopted its present name in 1922.
 In
1916 Alfred Masury designed the AC model with the informal name "Bulldog",
which, rumor has it, was given for its massive tapered hood, low silhouette
and widely spaced wheels and ability to work in the toughest conditions.
In-line 4 cylinder engine with an output of 75 hp was located directly above
the front axle. The radiator was placed in front of the driver's seat and
cooled by air flow from the impeller, mounted in the flywheel. The
four-speed gearbox was placed in the middle of the chassis and combined with
the main gear and differential. The truck had chain drive. Options included
things like roof, head lights, tail lights and windshield. A lot of people
believed these trucks didn't have doors, but the doors dropped straight down
and were often left open for convenience of entry and to help cool the cab
since the radiator was part of the firewall. Another rumor is that the
radiator was located on the firewall because in the cities, trucks scared
horses and when the horse kicked around the front of a truck the radiator
was often a casualty. Interesting thought!
In
1916 Alfred Masury designed the AC model with the informal name "Bulldog",
which, rumor has it, was given for its massive tapered hood, low silhouette
and widely spaced wheels and ability to work in the toughest conditions.
In-line 4 cylinder engine with an output of 75 hp was located directly above
the front axle. The radiator was placed in front of the driver's seat and
cooled by air flow from the impeller, mounted in the flywheel. The
four-speed gearbox was placed in the middle of the chassis and combined with
the main gear and differential. The truck had chain drive. Options included
things like roof, head lights, tail lights and windshield. A lot of people
believed these trucks didn't have doors, but the doors dropped straight down
and were often left open for convenience of entry and to help cool the cab
since the radiator was part of the firewall. Another rumor is that the
radiator was located on the firewall because in the cities, trucks scared
horses and when the horse kicked around the front of a truck the radiator
was often a casualty. Interesting thought!
 This
kit started life as the older issue 1/24 1926 Monogram Log Hauler truck. It
is a nice kit molded in bright red. The parts fit well and are well
engineered for assembly. The parts are flash free with the sprue
attachment points well thought out. The multi-piece cab fits well with the
panel lines and multi-part cab piece lines being the same. No filler is
required as there would be a panel seam on the real cab.
This
kit started life as the older issue 1/24 1926 Monogram Log Hauler truck. It
is a nice kit molded in bright red. The parts fit well and are well
engineered for assembly. The parts are flash free with the sprue
attachment points well thought out. The multi-piece cab fits well with the
panel lines and multi-part cab piece lines being the same. No filler is
required as there would be a panel seam on the real cab.
The instructions were
very good. The assembly was presented in a straight forward and logical
manner with big drawings. The part I really liked was that the instructions
pointed out things like the roof was optional and showed where to cut it to
get rid of it. I was told the roofless cab was referred to as a Bermuda cab.
There is only one decal option for the Columbia Lumber Company and Mack
Truck Company. The decals are thin and apply very well, just take care you
don't rip them.
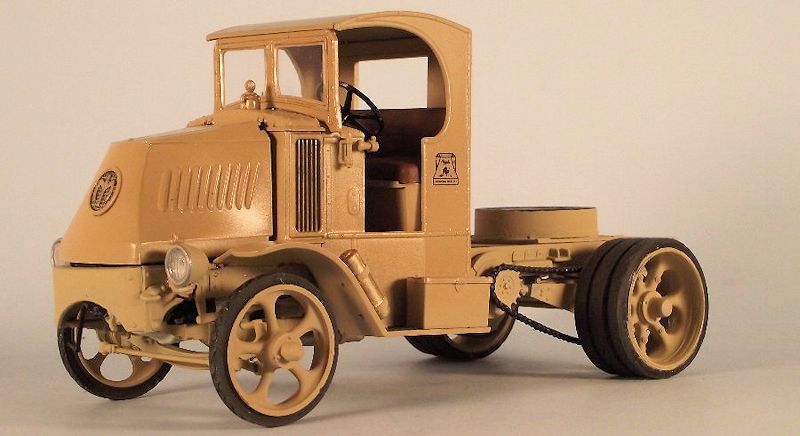
I dug this log truck out of the stash, but I
wanted something different. I was originally thinking of doing a U.S. Army
truck. After browsing the web I decided to make an early Mack tractor. I
started this conversion by cutting about 1 1/4 inches out of each frame rail
to get the proper wheel base (122 inches wheel hub to wheel hub). Next I
assembled the frame without the engine, along with all of the running
 gear
(except the rear wheels) and head lights. You must take care to get things
squared up. If you don't, this kit will be a nightmare later on.
gear
(except the rear wheels) and head lights. You must take care to get things
squared up. If you don't, this kit will be a nightmare later on.
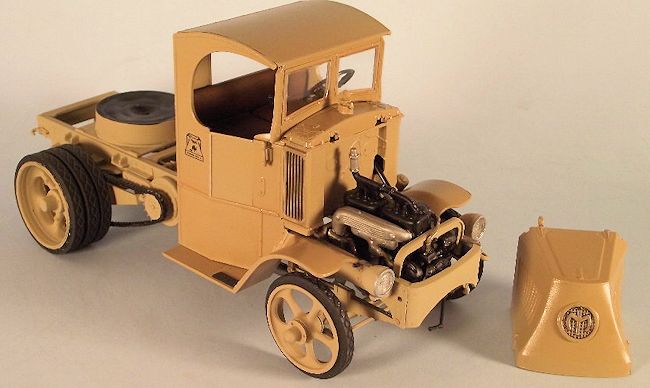
While the glue
dried on the frame, I built and painted the engine. It is pretty simple, but
with a little detail painting, it really looks the part. The instructions
want you to install the engine in the frame as you built it up, since the
engine mounts form part of the frame's cross braces. I didn't install it
until after painting the frame.
Instead of starting
with the cockpit, I ended with the cab. I chose to build the truck with the
roof, one door and a windshield. Everything, but the windshield was glued
together and fit well. The interior can be assembled, painted and detailed
before it slips into the cab. It is off to the paint booth. (I think I
forgot to tell you, the door was just cut from flat plastic.)
Everything was given several thin coats of
Krylon grey primer. It covered the red plastic well with no bleed through.
The resin wheels/tires were washed and painted at the same time. After
primer had dried for 48 hours I sprayed everything a flat Krylon tan.
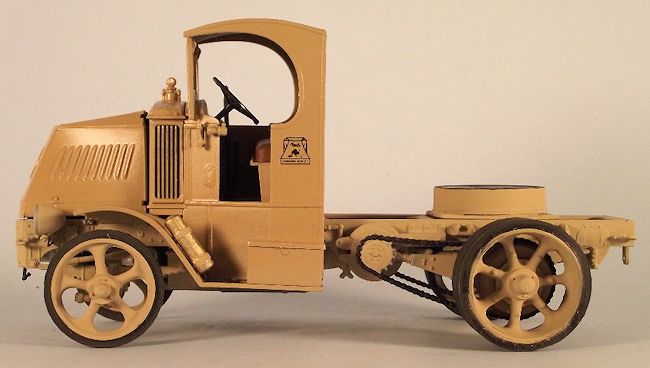
I wanted to have this Mack look like it had light use, so I left the chassis
and wheels in flat. The cab and hood were given a couple of thin coats of
Krylon gloss. I like the effect. Since the doors on the Mack AC
dropped straight down, I figured the
 paint
would have weathered differently not being exposed to the sun light, so the
door just got one coat of gloss.
paint
would have weathered differently not being exposed to the sun light, so the
door just got one coat of gloss.
The rear
wheels/tires are one piece, so I masked the wheels and sprayed the tires
Krylon primer black. The front tires are black rubber and just slip onto the
wheel. Since they didn't match the rear for color, I painted the front
tires, too. The Krylon primer dried on the rubber with no problem.
The radiator
and hood screen were given a couple washes of my flat black wash solution.
The chain was brush painted flat black and the teeth on the gears were given
a little steel paint on the tips to show wear. The seat was brush painted
leather with a flat black wash.
The only decals
I used were the Mack truck decals. They are thin and only required about 5
seconds soaking time in the water. I slipped them into place on a drop of
Micro Set. They snuggled down with no sheen or silvering. The Micro Set is
probably not needed, but I use it out of habit.
Hint for
painting the chrome headlight bezel on this type of headlight: shake your
chrome silver paint really well-take off the cap and place it paint side up
on a flat surface-drop the headlight bezel open end first into the paint
lid-lift it straight out and you will have a perfect silver ring around the
opening. Shake, drop and repeat for the other light.
Time for final assembly. I fit the motor into place,
with a little choice language. Hint: don't put any glue on the mounts until you
get everything in place, you will smear it all over. I just put a couple of
drops of thin superglue on the mounts and they are holding just fine.
I glued the
interior into the cab and the cab assembly to the chassis. Trying to fit the
hood was a test of patience. I lost. I had to take the cab off of the chassis,
remove the mounting supports and make new cab mounts and paint them. This was
all my fault, not the kit. I cut the frame under the cab and forg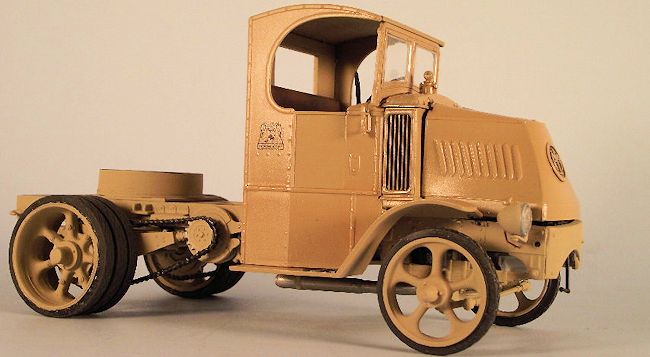 ot
to allow for the change. The glass was glued in the windshield frame with Elmers
glue and the assembly was just snapped into place. It holds right where it is
supposed to.
ot
to allow for the change. The glass was glued in the windshield frame with Elmers
glue and the assembly was just snapped into place. It holds right where it is
supposed to.
The resin
headlights were painted silver inside and the lenses from the kit headlights fit
right into them. A black wire was run to each headlight to simulate the wiring.
Since the hood was not perfect and I had sacrificed one tow hook to the carpet
monster; I glued the right headlight and bracket on slightly askew. Minor truck
damage from a careless driver. I dry brushed a little steel paint in the area to
show a paint scrape. It is too light to show in the picture.
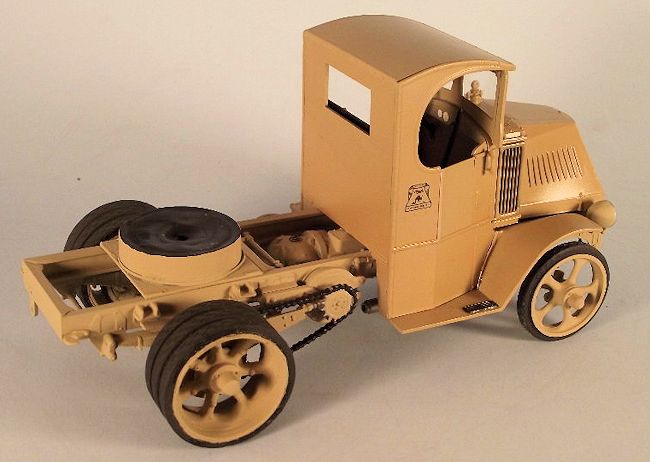
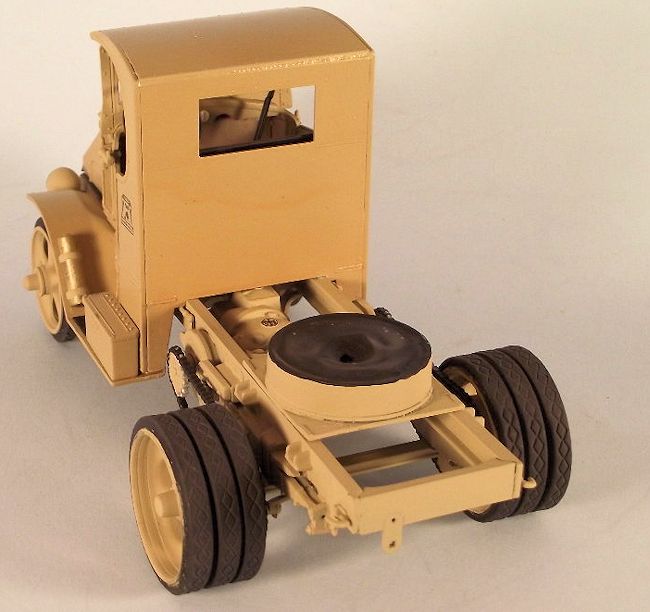
Strangely enough the
wheels were the last to go on. That included the fixed table fifth wheel. (You
could also model a Martin rocking table fifth wheel.) My fifth wheel is built
from the bottom of a round pill bottle set on a base of sheet plastic with some
thin plastic strips to add more detail. Since the bottom of the pill bottle had
a raised edge and writing I just filled it in with a couple layers of Elmers
glue, then painted it flat black. There is a thin coat of grease on it. I used
Vaseline petroleum jelly over the flat black for grease. A friend just had to
touch it because it looked like grease. Imagine his surprise to get a greasy
finger!
This was a simple conversion using a good Monogram kit
as a basis. The kit's dual wheels would work just fine without using resin
triples. The resin headlight conversion was just because I wanted to do it, the
kit lights would be just fine. You don't have to waste the truck bed. It would
be a good start for the trailer. I plan to build a Bermuda cab, with no roof or
windshield and the kit headlights. It will probably have dual wheels and a
Martin rocking table fifth wheel. This is a good kit worth building and
modifying.
Reference:
Mack drawings were supplied by a good friend.
The fifth wheel assembly was copied from early patent
drawings for a non-rocking, fixed table fifth wheel.
Robert Myers
February 2014
If you would like your product reviewed fairly and fairly quickly, please
contact
the editor
or see other details in the
Note to
Contributors.
Back to the Main Page
Back to the Review
Index Page