| KIT #: | 85-4260 |
| PRICE: | $22.00 MSRP |
| DECALS: | One option |
| REVIEWER: | Shawn Payne |
| NOTES: | New mold of an old kit |
| THE KIT |
 Monogram's reissue of an old
classic.
I have not had this kit
until this release came out, but I understand that the tooling for it has been
improved upon so I will take their word on that.
Overall the parts were clean of any flash and major mold lines.
No injector pin marks were visible where they would be seen in the finial
assembly.
All parts
were bagged with the chrome and clear parts bagged separate.
The chrome was nicely done with no flaws and the clear parts had no
defects either.
Monogram's reissue of an old
classic.
I have not had this kit
until this release came out, but I understand that the tooling for it has been
improved upon so I will take their word on that.
Overall the parts were clean of any flash and major mold lines.
No injector pin marks were visible where they would be seen in the finial
assembly.
All parts
were bagged with the chrome and clear parts bagged separate.
The chrome was nicely done with no flaws and the clear parts had no
defects either.
The
instructions were printed as Monogram usually does with step-by-step exploded
views.
The painting guide is
at the end with a list of what parts are to be painted what color.
They tell you to refer to the Box art for body color and other painting
details that is not covered in the instructions.
The decals were printed without flaws or alignment issues.
| CONSTRUCTION |
| COLORS & MARKINGS |
 I
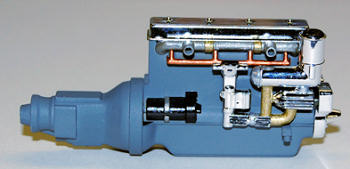
painted the engine and transmission Euro 1 Gray FS36081 and the molded in
components were then painted Flat Black.
The exhaust lines were molded in and painted Steel.
Copper and Brass was used to paint the other lines on the engine.
The spark plugs were painted Steel with the wires painted flat black.
To add dimension to the chrome parts and to hide the injection tabs I
painted chrome black, brass and chrome silver to pick out the detail on them.
Once the engine was all together I then weathered it with chalk.
I brushed in black chalk to all the recessed areas and blended it in,
then used a silver pencil to touch the high lights.
I tried to keep the weathering to a minimum as I did not want the overall
of the car done in heavy armor weathering.
I
painted the engine and transmission Euro 1 Gray FS36081 and the molded in
components were then painted Flat Black.
The exhaust lines were molded in and painted Steel.
Copper and Brass was used to paint the other lines on the engine.
The spark plugs were painted Steel with the wires painted flat black.
To add dimension to the chrome parts and to hide the injection tabs I
painted chrome black, brass and chrome silver to pick out the detail on them.
Once the engine was all together I then weathered it with chalk.
I brushed in black chalk to all the recessed areas and blended it in,
then used a silver pencil to touch the high lights.
I tried to keep the weathering to a minimum as I did not want the overall
of the car done in heavy armor weathering.
For the
crew compartment I started with Euro Gray 1 as the base.
Flat black was used for the roof cover.
Again I weathered with the chalks starting with the black.
I brushed in the black into all the corners and then brushed up and away
from those areas to fade and blend the chalk over the whole surface.
Then I went back with dark tan chalk and repeated the process.
To high light
 the middle areas I blended in an even lighter tan chalk to
help give these areas depth.
For
the anti-skid patches on the floor I used a black sharpie.
Once this was done I sprayed the compartment with Testors Dull Coat.
This did help take the shine off the anti-skid patches I used the sharpie
on but it also diluted the chalk weathering somewhat.
So I just re-did the chalk weathering to those areas again and in no time
it was back to a look I liked.
To
help bring out the roof cover I weathered with light ta
the middle areas I blended in an even lighter tan chalk to
help give these areas depth.
For
the anti-skid patches on the floor I used a black sharpie.
Once this was done I sprayed the compartment with Testors Dull Coat.
This did help take the shine off the anti-skid patches I used the sharpie
on but it also diluted the chalk weathering somewhat.
So I just re-did the chalk weathering to those areas again and in no time
it was back to a look I liked.
To
help bring out the roof cover I weathered with light ta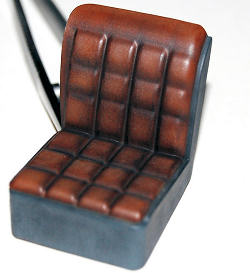 n chalk and blended it
over the whole surface but left it heavy in the folds.
I painted the seats with Model Master Leather and again using the same
system of chalk weathering I repeated the same steps only this time I added some
purple chalk to help add the effect to the seats.
n chalk and blended it
over the whole surface but left it heavy in the folds.
I painted the seats with Model Master Leather and again using the same
system of chalk weathering I repeated the same steps only this time I added some
purple chalk to help add the effect to the seats.
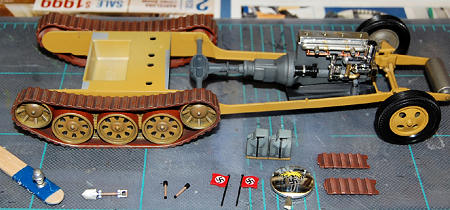
For the ammo cans, jerry cans and tool boxes I painted them medium gray and weather with the chalks and highlighted with the silver pencil. With the seat and ammo cans glued in the crew compartment it was not complete. I went on and glued together all of the other subassemblies and got everything ready for primer and paint.
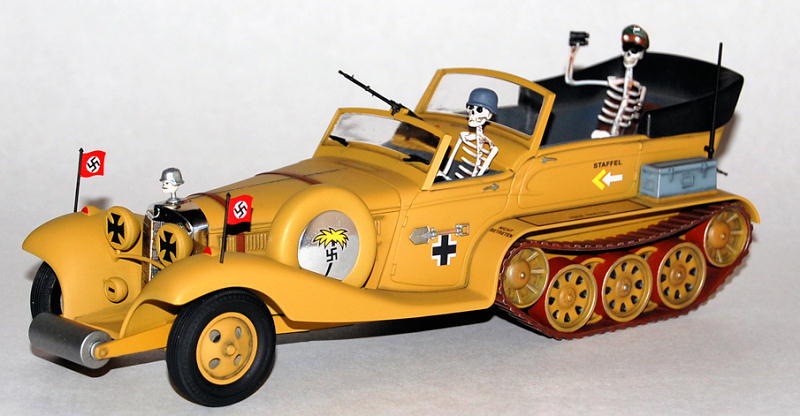
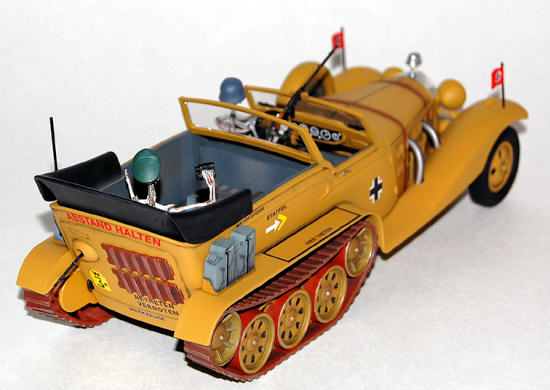
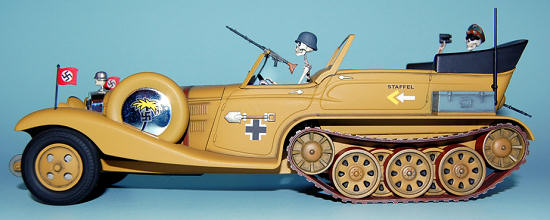
The main color of the body and chassis was an 80-20 % mixture of RLM 79
(Sand Gelb) and Insignia Yellow FS 33538. This produced a mustard color that I
thought matched the box art.
The chassis was molded with the engine pan, fuel tank and bell housing as one
part.
Flat black was used for the
engine pan and the underbody panel with Euro Gray 1 for the bell housing and
fuel tank.
Light Gray chalk was
blended over the engine pan and floor panel and the silver pencil used to hit
the high lights.
Black chalk was
used to weather the chassis and front suspension and fuel tank.
Tan chalk was also applied over the fuel tank to add to its appearance.
With the chassis done I set it aside and went back to the main body
parts.
I used
Future Floor wax to gloss all of the body parts, even the parts that were not
going to have decals added to them later.
I did this so that when the dull coat was applied all the parts would
have an even scheme.
Now came
the decals, these went on with
 no problems.
I had no issues with silvering and the whites did not have any
transparent look to them.
The
only kit decals I did not use were for the running flags.
I decided to use some small swastikas I had instead.
I reasoned that since the kit came with a swastika on the palm tree that
went on the tire cover, the flags would tie in.
With the decals done I airbrushed Testors Model Master Dull Coat over all
the body parts giving them a good even flat appearance.
no problems.
I had no issues with silvering and the whites did not have any
transparent look to them.
The
only kit decals I did not use were for the running flags.
I decided to use some small swastikas I had instead.
I reasoned that since the kit came with a swastika on the palm tree that
went on the tire cover, the flags would tie in.
With the decals done I airbrushed Testors Model Master Dull Coat over all
the body parts giving them a good even flat appearance.
The
running gear was painted overall with the body color then masked off and the
tracks were painted with Testors Rust.
Now came the fun part.
I
brushed painted the rest of the tracks and running gear, covering the areas I
could not get with the airbrush and masking.
Once the wheels and track areas were cleaned up and the flat black was
added to the wheels it was time to weather.
I first brushed in the black chalk into the recessed areas of the tracks.
Then I dry brushed over the tracks with Steel.
For the inside of the tracks I blended in black chalk then highlighted
the upper track areas with the silver pencil.
Black chalk was used to weather the inside of the wheels and the silver
pencil again to hit the high lights.
To finish up the body parts I painted the hood straps leather, and the piano hinge along with the door handles Testors Oiled Steel. The insides of the engine panels and hood were airbrushed with steel. On the body Black chalk was lightly brushed into the corner areas and around the hood straps and engine cover vents. This gave the model a slight weathered look that I wanted to achieve.
| FINAL CONSTRUCTION |
 Now it was ready to put all the parts together.
Everything went onto place with no problems.
I started with joining the crew compartment to the main body, then that
to the chassis.
Once those were
done I glued in the engine, wheels, running gear, engine side walls and grill.
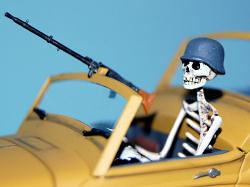
The only thing left to do now were the figures.
Now it was ready to put all the parts together.
Everything went onto place with no problems.
I started with joining the crew compartment to the main body, then that
to the chassis.
Once those were
done I glued in the engine, wheels, running gear, engine side walls and grill.
The only thing left to do now were the figures.
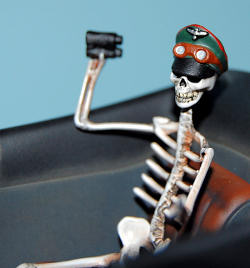
The driver and Rommel skeleton were painted flat white for the base then given a wash of black ink. I then added Burnt Siena oil paint over them and removed most of that with a cotton swab. I painted the eye and nose openings with flat black and the teeth were picked out with ivory. The “bones” were done. Rommel’s hat was painted to match the box art and the completed figures were set into place. I did not glue them in just placed them in their seats.
| CONCLUSIONS |
This was a rather easy build. No fit problems, no surprises, just follow the instructions and anyone no matter what skill level can finish up with a nice model. The only weak area for me was the skeleton figures; they were a little too simplistic. A full rib cage would have added to the overall look to the model, but with a little effort that could be built and added on.
| REFERENCES |
 Nazi
Skeltons at War: part 6 - Afrika Korps, Crypt Publishing.
Nazi
Skeltons at War: part 6 - Afrika Korps, Crypt Publishing.
December 2009
Copyright ModelingMadness.com
If you would like your product reviewed fairly and fairly quickly, please contact the editor or see other details in the Note to Contributors.