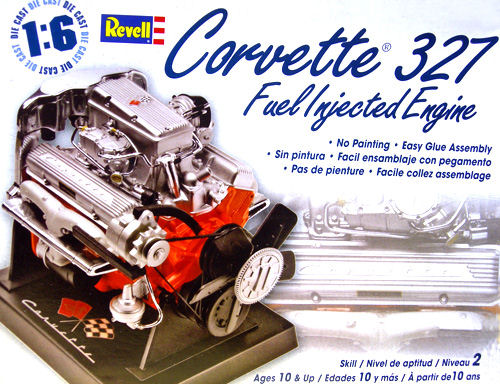
| KIT #: | 85-1594 |
| PRICE: | $32.50 MSRP |
| DECALS: | options |
| REVIEWER: | Blair Stewart |
| NOTES: | Pre-painted/decaled 'screw and glue' engine |
| HISTORY |
50 years ago, Chevrolet introduced
its entry into the V-8 motor craze that was sweeping Detroit. Designed by Ed
Cole’s group, the engine went from drawings to production in 15 weeks. Chevy’s
new small block engine had a shorter stroke than other V-8s and a
 lightweight valve train,
which gave it the ability to rev higher than existing V-8 designs. Chevrolet
introduced the 162 horsepower, 265 cubic inch engine in the 1955 Chevy, and the
rest is “history.” The small block Chevy motor is now in its fourth generation
and almost 90 million have been produced. The engine has found it’s way into
everything from family sedans and pickups to hot rods, boats, and even
motorcycles.
lightweight valve train,
which gave it the ability to rev higher than existing V-8 designs. Chevrolet
introduced the 162 horsepower, 265 cubic inch engine in the 1955 Chevy, and the
rest is “history.” The small block Chevy motor is now in its fourth generation
and almost 90 million have been produced. The engine has found it’s way into
everything from family sedans and pickups to hot rods, boats, and even
motorcycles.
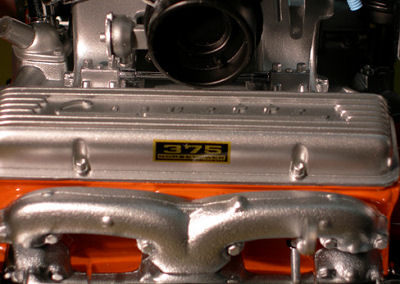
In 1957, Chevrolet expanded the displacement to 283 cubic inches and introduced a version equipped with a Rochester constant flow fuel injection (FI) system. Chevrolet claimed that the “fuelie” motor developed 283 HP, or 1 HP per cubic inch, which was unheard of at the time. In the face of increasing vehicle weight and power-driven options, Chevrolet bumped up the small block’s displacement in 1962 to 327 cubes by boring the motor out to 4.00 inches. Again, the hottest performing version of this motor was fuel-injected, and it was available only in the Corvette as the L84 option. The 1963 fuelie Vette had a compression ratio of 11.25:1 and produced 365 HP. For 1964, Chevy engineers managed to tweak another 10 horses out of the motor for a whopping 375 HP.
The fuel injected 327 engine remained a Corvette option until the 1966 model year when it was discontinued. The Rochester Ramjet FI had a reputation for being somewhat finicky and hard to keep tuned, so a lot of people who ordered or purchased them as options later opted to replace them with a carburetor. Coupled with it’s relatively high option price (~$540) and the introduction of big block Chevy motors in the 1965 Corvette, the fuelie Vette died a natural death.
The small block Chevy remains a staple in the V-8 world: it will be interesting to see how long this motor continues to power Chevy’s products, hot rods, and other machines.
| THE KIT |
 Talk
about the Dark Side: this is BENEATH the dark side! Before I get banned
from Modeling Madness, let me explain that I had been caught once again
in a nearly terminal case of advanced modeling syndrome (AMS). I would start a
kit, and then the AMS would kick in, slowly forcing me to put the partially
assembled kit back in the box or on the shelf. But after over 50 years in this
hobby (and with a basement stash of 1200+ kits), I wasn’t quite ready to abandon
modeling, so I began to search for something that might rekindle my interests.
Low and behold, my local Hobby Lobby came to the rescue. On one of my frequent
visits, I noticed an intriguing Revell box with a beautiful engine pictured on
the top. The more I stared, the louder the modeling sirens wailed, until I
finally succumbed to their tantalizing call and brought
Talk
about the Dark Side: this is BENEATH the dark side! Before I get banned
from Modeling Madness, let me explain that I had been caught once again
in a nearly terminal case of advanced modeling syndrome (AMS). I would start a
kit, and then the AMS would kick in, slowly forcing me to put the partially
assembled kit back in the box or on the shelf. But after over 50 years in this
hobby (and with a basement stash of 1200+ kits), I wasn’t quite ready to abandon
modeling, so I began to search for something that might rekindle my interests.
Low and behold, my local Hobby Lobby came to the rescue. On one of my frequent
visits, I noticed an intriguing Revell box with a beautiful engine pictured on
the top. The more I stared, the louder the modeling sirens wailed, until I
finally succumbed to their tantalizing call and brought
 it
home (entering the house in the clandestine way some of us modelers now have to
employ.
it
home (entering the house in the clandestine way some of us modelers now have to
employ.
In 2005, Revell introduced a
series of 1/6 scale multi-media (vinyl, rubber, plastic, metal) pre-painted
kits of historic automobile engines (along with this kit, they have released the
Ford 427, the Chevy 302 Z/28, and a Chevy small block street rod en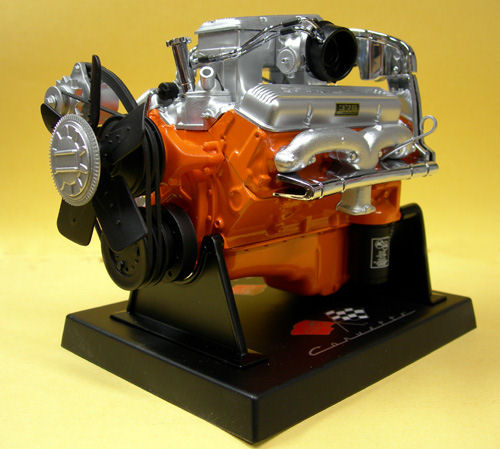 gine).
Given the fact that I have finally gotten back into the REAL Corvette world
after a 32 year hiatus (the new C6 is THE ultimate Corvette, and I’ve owned 5
Vettes since 1967), I find myself drawn to anything Corvette. So naturally, I
couldn’t resist the chance to build a model of one of the more famous Corvette
powerplants. Besides, the kit looked like a “quick build” of the first order,
which would definitely help my AMS.
gine).
Given the fact that I have finally gotten back into the REAL Corvette world
after a 32 year hiatus (the new C6 is THE ultimate Corvette, and I’ve owned 5
Vettes since 1967), I find myself drawn to anything Corvette. So naturally, I
couldn’t resist the chance to build a model of one of the more famous Corvette
powerplants. Besides, the kit looked like a “quick build” of the first order,
which would definitely help my AMS.
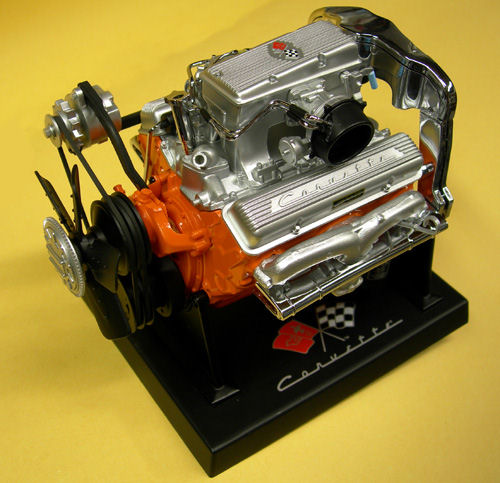
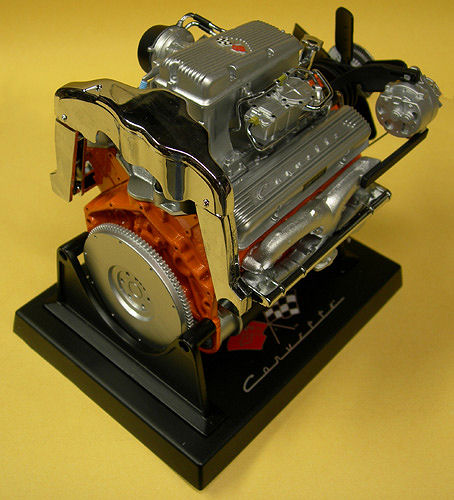
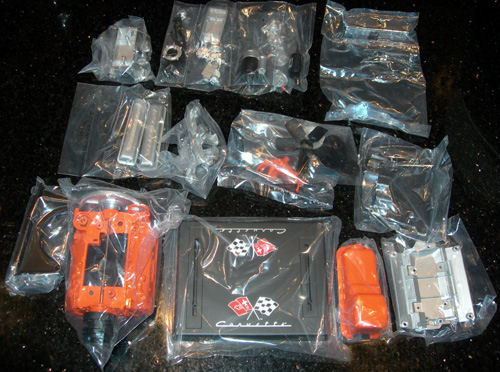
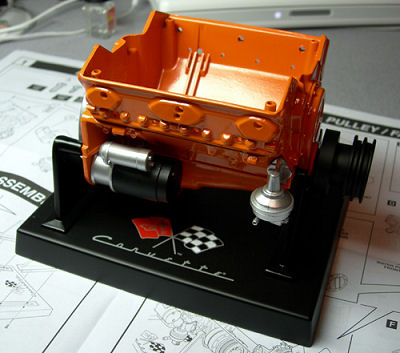
Upon opening the box, one is greeted (hello!) by a number of clear plastic bags housing the 100+ parts and a well-designed cardboard separation system to keep the various bags isolated from each other. The parts include molded color plastic and painted metal parts, actual rubber drive belts, plated fuel lines and ignition wiring shields (I like to say the Corvette Stingray was the first vehicle in the world protected against high altitude electromagnetic pulse [HEMP], but the real reason was to cut down on the ignition interference to the radio: that fiberglass firewall was light-weight, but contributed “zip” in terms of absorbing RF interference emanating from the engine’s distributor, coil and ignition wires), spark plugs, and a nice display stand. The Rochester FI system is particularly well detailed with all fuel lines and connectors. Another nice touch is the distinctive Corvette cast aluminum (not chrome!) valve covers. The front of the motor is completed with an alternator and fan, all connected by scale rubber drive belts.
After my initial examination, I was even more convinced this was just the ticket for my AMS, so I launched into kit assembly.
| CONSTRUCTION |
 parts aren’t numbered, so I
had to double check the not so clear instructions several times to make sure I
had the right part, especially with the various fuel lines into and out of the
fuel injection assembly. Another drawback for me was the fact that this kit does
require a lot of gluing, which ordinarily is not a problem for me, but after
examining all the types of parts, I decided that Super Glue was the best
approach. My problem is I am not a great fan of Super Glue: yes, it has its
place in modeling, but I find it messy to work with and not very convenient.
Using an accelerator was a must for this project.
parts aren’t numbered, so I
had to double check the not so clear instructions several times to make sure I
had the right part, especially with the various fuel lines into and out of the
fuel injection assembly. Another drawback for me was the fact that this kit does
require a lot of gluing, which ordinarily is not a problem for me, but after
examining all the types of parts, I decided that Super Glue was the best
approach. My problem is I am not a great fan of Super Glue: yes, it has its
place in modeling, but I find it messy to work with and not very convenient.
Using an accelerator was a must for this project. 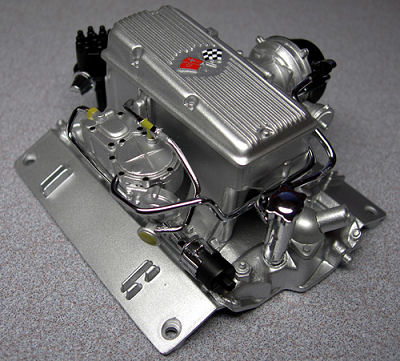 I glued the distributor and
oil filler tube to the manifold, and then attached the FI system. At this point,
I screwed the completed manifold to the top of the metal engine block.
I glued the distributor and
oil filler tube to the manifold, and then attached the FI system. At this point,
I screwed the completed manifold to the top of the metal engine block.
| CONCLUSIONS |
I spent probably a total of five or six hours assembling this kit, and I thoroughly enjoyed it. Revell is to be commended for issuing these types of kits as alternative arena for the modeling hobby. When you finish one of these, you are left with a beautiful display model that is sure to draw many comments from admirers. And if you are cursed with AMS, these kits are the cat’s meow: I can’t think of a better prescription!
| REFERENCES |
 James
Miles, “Chevy Small-Block V-8: 50 Years of High Performance,” Vette Magazine,
February 2006.
James
Miles, “Chevy Small-Block V-8: 50 Years of High Performance,” Vette Magazine,
February 2006.
“Chevrolet Small Block Engine,” Wikipedia webpage, 2005.
Chevythunder, webpage, 2005.
“Chevrolet Corvette History – Second Generation, 1963-1967,” webpage, 2005.
February 2006
Dopyright ModelingMadness.com
If you would like your product reviewed fairly and fairly quickly, please contact the editor or see other details in the Note to Contributors.