KIT # |
5001 |
|
PRICE: |
Out of Production |
|
DECALS: |
1964 Sebring Racer |
|
REVIEW & PHOTOS BY: |
|
|
NOTES: |
Includes photo-etched detail parts |
HISTORY |
The Grand Sport Corvette was the brainchild of chief engineer and Corvette creator Zora Arkus Duntov. In 1962, with the full blessing of Chevrolet’s top management, Duntov set out to create a competitive road racer based on
the newly designed
Corvette C-2 Stingray, slated for introduction for the 1963 model year.
Duntov’s objective was to suddenly and surprisingly unleash on the
international road racing community 125 very fast, high horsepower, great
handling race cars, all based on a street capable production car
footprint. The plan was to make these cars available to a select number
of independent road racers who could successfully race the cars without
“official” General Motors
 endorsement. Five Grand
Sport Vettes were initially produced in preparation for the upcoming
racing season (unfortunately, that was the final number of these cars
that Chevrolet produced).
endorsement. Five Grand
Sport Vettes were initially produced in preparation for the upcoming
racing season (unfortunately, that was the final number of these cars
that Chevrolet produced).
Duntov wanted these cars to compete directly with racers like the Carroll Shelby-Ford AC Cobras that were already on the racing circuit. But doing this right required Duntov and his design team to reduce the factory Corvette’s curb weight by some 1100 pounds. In its racing debut early in 1963, the car sported a production 360 HP, 327 CID fuel injected motor and a “stock” appearance. But when it raced at Nassau in the season finale, it had been transformed into a thoroughbred. Externally, the Grand Sport was outfitted with flared fender, hood and body scoops, and wider wheels and tires. But the real changes were under the hood: an all-aluminum 377 CID small block engine fed by 58 mm side draft Weber carburetors. The three Grand Sports won just about everything that week at Nassau and let the racing community know that there was a “new kid in town.”
After this impressive debut, all three coupes were entered in the 1964 12 Hours of Sebring. Roger Penske and Jim Hall entered Coupe No. 004, sporting a new white paint job. Penske and Hall’s Grand Sport had one of the first pneumatic systems installed on a racecar to feed air-driven jacks. This not only reduced times in the pits, but it greatly lessened the possibility of damaging the fiberglass body and tube frame during tire changes.
All five of the Grand Sport Vettes raced successfully for nearly four years. 3 of the five received several body modifications and different paint schemes over those years, and the remaining two were modified into roadsters by chopping off their roofs and windshields.
All five of these vehicles survive today, and since they were designed and produced by Mr. Duntov himself, they have been valued by some collectors at over $1.5 million each! (Naturally, Blair owns two..... :oÞ Ed!)
THE KIT |
Okay, guys, I confess:
I have once again crossed over to the dark side and constructed a car
model! But you have to concede, if there’s anything as cool as a modern
fighter aircraft, it’s got to be a Corvette, especially an
 exotic one pumping out
a zillion horsepower. As another “come-on” for you airplane modelers,
this kit was produced by Accurate Miniatures, and it has the same legacy
as their aircraft kits: fantastic molding and intricate detail! Before
its demise, AM had produced five 1/24th scale car kits: two
Grand Sport Corvettes and three McLaren M8s – all racing models. Rumors
had it that other car kits were in the works, but, alas, the company
bellied-up before we were able to see additional releases.
exotic one pumping out
a zillion horsepower. As another “come-on” for you airplane modelers,
this kit was produced by Accurate Miniatures, and it has the same legacy
as their aircraft kits: fantastic molding and intricate detail! Before
its demise, AM had produced five 1/24th scale car kits: two
Grand Sport Corvettes and three McLaren M8s – all racing models. Rumors
had it that other car kits were in the works, but, alas, the company
bellied-up before we were able to see additional releases.
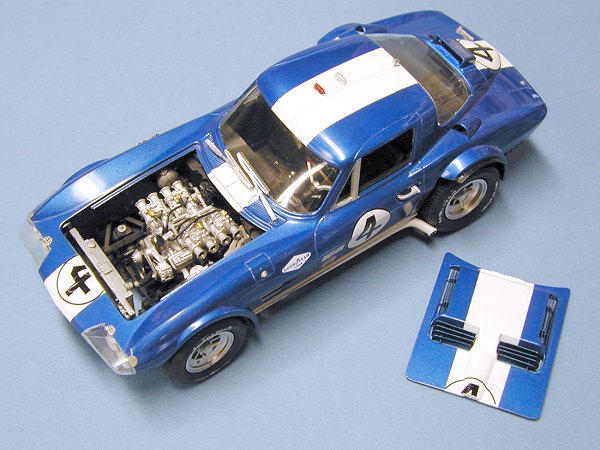
AM’s Grand Sport consists of over 140 plastic parts molded in white and clear plastic, and a sprue of “aluminum-plated” plastic parts. Also included in the box are a host of photo-etched parts for added detail, and four rubber racing tires. The decal sheet includes markings for the 1964 Sebring Grand Sport Vette (a nice touch is small decals for the engine compartment). As per the usual AM standards, there is little or no flash on the parts, and their comprehensive instruction booklet guides you through all the steps necessary to assemble and detail the model.
CONSTRUCTION |
 As usual, I attacked
this kit in subassemblies: the body, frame, engine, and interior. I
assembled all of the parts onto the body that would be painted the
overall color, including the photo-etched hood louvers, which I attached
using CA glue (and as I recall, these were not a lot of fun to attach).
Once assembled, I sent the body and hood off to the paint shop (with car
models, I like to paint the body and associated parts early in the
process to allow them sufficient drying time).
As usual, I attacked
this kit in subassemblies: the body, frame, engine, and interior. I
assembled all of the parts onto the body that would be painted the
overall color, including the photo-etched hood louvers, which I attached
using CA glue (and as I recall, these were not a lot of fun to attach).
Once assembled, I sent the body and hood off to the paint shop (with car
models, I like to paint the body and associated parts early in the
process to allow them sufficient drying time).
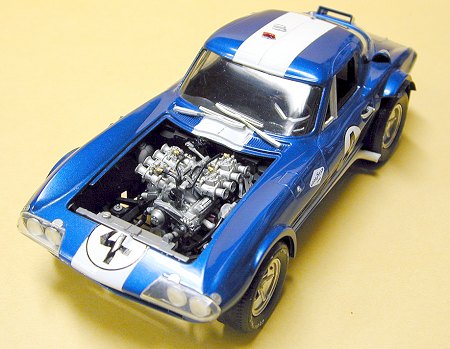
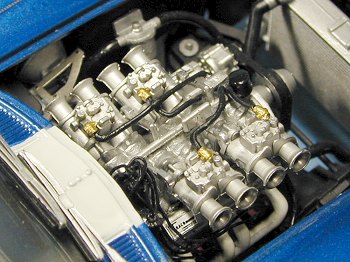 The next subassembly
was the engine. This baby is really detailed, and the carburetor/fuel
delivery system is a work of art. I assembled the block and intake
manifold and painted it with Model Masters non-buffing aluminum metalizer.
The only detailing I added to the engine was a wired distributor using
old phone wire and painted black. I also cut small pieces of slightly
larger wire insulation to serve as sparkplug boots, glued these to the
engine block, and then inserted each sparkplug wire using CA glue.
Various fuel system fittings were t
The next subassembly
was the engine. This baby is really detailed, and the carburetor/fuel
delivery system is a work of art. I assembled the block and intake
manifold and painted it with Model Masters non-buffing aluminum metalizer.
The only detailing I added to the engine was a wired distributor using
old phone wire and painted black. I also cut small pieces of slightly
larger wire insulation to serve as sparkplug boots, glued these to the
engine block, and then inserted each sparkplug wire using CA glue.
Various fuel system fittings were t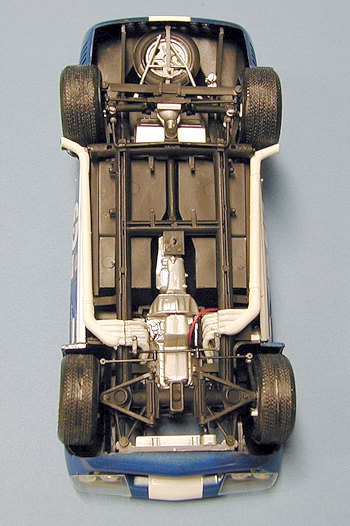 hen
brush-painted with MM brass. The final engine pieces were the headers,
which I painted MM flat white.
hen
brush-painted with MM brass. The final engine pieces were the headers,
which I painted MM flat white.
Setting the engine aside, I then attacked the detailed frame assembly. I assembled all the cross members and frame elements and then painted the finished assembly with MM flat black. The rear and front suspension elements were then assembled, and after I painted them with flat aluminum, I attached the rear frame assembly. At this point, it was time to complete the drive train, so I glued the flat black drive shaft to the rear of the transmission, glued in the flat aluminum differential housing, connected the whole assembly, and then glued the engine to the frame. The spare tire was mounted to its rim and then glued onto the rear frame, along with the electric fuel pump.
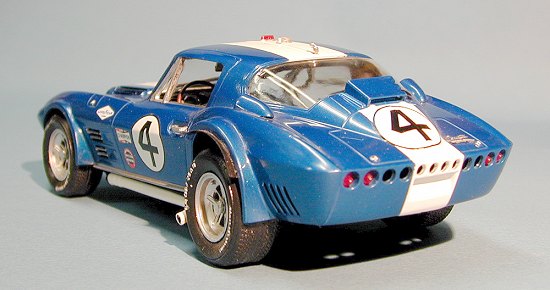
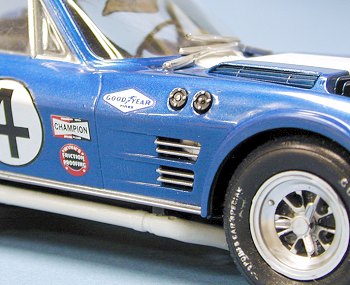
The wheels and tires were next. I mounted the rubber racing tires to the wheels and glued in the knockoff hubs. I used acrylic flat white paint to dry brush the lettering on the tires (acrylic paint won’t attack the rubber, and, unlike enamel or lacquer, will actually dry on the rubber). After assembly, I attached the four wheels to the completed frame. I then glued the side exhaust pipes, painted flat white, to the headers and the frame.
Finally, I assembled the interior, which I painted flat black, followed by a light coat of Testors Glosscote to give it a semi-gloss finish. I brushed MM wood onto the steering wheel to give it that Corvette C-2 wood finish look. I installed the dashboard after dry brushing all the instruments with flat aluminum. I constructed the two parts of the seatbelt using the supplied photo-etched parts and paper and then attached them to the driver’s seat using white glue. At this point, I attached the gas tank, which I had sprayed MM non-buffing aluminum metalizer, to the rear underside of the interior bucket.
PAINT & FINAL ASSEMBLY |
Before heading to the paint shop, it was necessary to decide on a color
for the car. The original #4 Grand Sport Vette depicted by this
particular AM kit was gloss white when it raced at Sebring in 1964, but
for some reason I just couldn’t bring
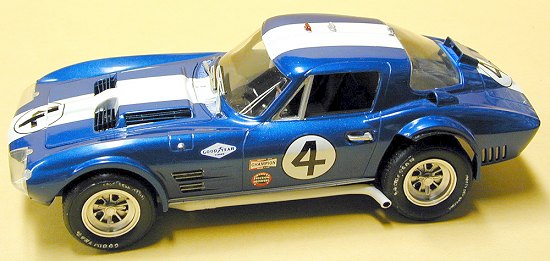 myself to go with a
white finish. I have seen pictures of Grand Sports painted in a metallic
blue, and, since I once owned a 1966 Marina Blue Corvette Coupe, I
decided to take a little license here and go that route (besides, the
five cars did receive a variety of paint jobs over their four year racing
career). Once I made this decision, the particular paint type was easy:
Testors by Boyd’s True Blue Pearl enamel, which, as always, I thinned
with lacquer thinner (it speeds up the drying time and cuts down on
orange peel effects common with enamel paints). I sprayed this color on
the body and the hood, and, after achieving as high a gloss finish as
possible, I set both aside to dry.
myself to go with a
white finish. I have seen pictures of Grand Sports painted in a metallic
blue, and, since I once owned a 1966 Marina Blue Corvette Coupe, I
decided to take a little license here and go that route (besides, the
five cars did receive a variety of paint jobs over their four year racing
career). Once I made this decision, the particular paint type was easy:
Testors by Boyd’s True Blue Pearl enamel, which, as always, I thinned
with lacquer thinner (it speeds up the drying time and cuts down on
orange peel effects common with enamel paints). I sprayed this color on
the body and the hood, and, after achieving as high a gloss finish as
possible, I set both aside to dry.
I next used Scotch tape to mask off the stripe down the center of the body and hood, and painted that stripe with Testors Gloss White.
Once the body and hood were dry, I polished out the finishes using a Micromesh polishing kit, then gave both their final high gloss finish using The Treatment Model Car Wax (applied with an old, dampened tee shirt and then polished out using a piece of felt cloth).
At this point, I attached the clear windows to the inside of the body
using Tacky Glue, and then attached the rearview mirror to the inner
roof. I then glued the interior bucket to the frame, and slipped the body
over the interior and engine
 compartment (this is
always a tricky process with car models, so patience is in order here!).
The wing window frames were brush painted using my old metal small parts
standby, Humbrol #11 Silver.
compartment (this is
always a tricky process with car models, so patience is in order here!).
The wing window frames were brush painted using my old metal small parts
standby, Humbrol #11 Silver.
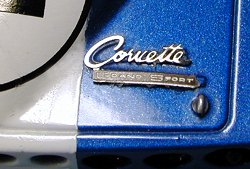
I applied the kit decals using Microset and Microsol and let them dry. Rather than overcoat the decals with Future or some other clear coat, I decided to apply another coat of Treatment wax instead. I finished out the body by attaching a host of small detail parts, including photo-etched headlight cover securing pins, rear fender flares, and a very nicely done Corvette nameplate for the rear deck.
CONCLUSIONS |
 This is one of the
most detailed car kits I have ever had the pleasure of building (and an
added benefit was a trip down memory lane to a distant time when I owned
vehicles other than SUVs or minivans). While not exactly suited to the
faint of heart, there are no major showstoppers in the model’s overall
construction, and AM’s instructions will guide you through the assembly
to the final product if you just hang in there. It’s too bad AM didn’t
make it, because they obviously had a commitment to both accuracy and
detail in all of their kits. Car modelers can only hope that AM’s
resurrection includes plans to bring back their fabulous car kits along
with the aircraft kits. (It does. Ed)
This is one of the
most detailed car kits I have ever had the pleasure of building (and an
added benefit was a trip down memory lane to a distant time when I owned
vehicles other than SUVs or minivans). While not exactly suited to the
faint of heart, there are no major showstoppers in the model’s overall
construction, and AM’s instructions will guide you through the assembly
to the final product if you just hang in there. It’s too bad AM didn’t
make it, because they obviously had a commitment to both accuracy and
detail in all of their kits. Car modelers can only hope that AM’s
resurrection includes plans to bring back their fabulous car kits along
with the aircraft kits. (It does. Ed)
REFERENCES |
1. “The Grand Sport Corvette Legend,” Website, http://www.zlx.com/corvette/grandspr.htm, 2003.
2. “1963 Corvette Grand Sport,” website, http://rowleycorvette.com/gs.html, 2003.
3. “National Corvette Museum: Corvette Timeline,” website, http://www.corvettemuseum.com/library-archives/timeline/1960.shtml, 2003.
June 2003
Copyright ModelingMadness.com
If you would like your product reviewed fairly and fairly quickly, please contact the editor or see other details in the Note to Contributors.
Back to the Reviews Index Page
2019