Mach 2 1/72 Vickers Viscount
| KIT #: | ? |
| PRICE: | £45.51 |
| DECALS: | Two options |
| REVIEWER: | Carmel J. Attard |
| NOTES: |
Injection
molded with two decal options G-AMOG (BEA) N7429, Capital Airlines. |
| HISTORY |
 The
Viscount 700 was the original version of this widely used transport, the first
production model being the Viscount 701 for BEA. The Viscount 700D has the same
airframe, but 1,760 ehp. Dart 510
supplant the Dart 506s,and the 770D is the basic North American version. The
passengers reaction to the Viscount’s speed, comfort, and quietness, together
with the airline’s appreciation of its operating economy and ability, affirmed
BEA interests in the larger model, and an order of twenty six Viscount 701s was
placed. By the time these entered service in April 1953, substantial orders for
the Viscount 700 variants had been placed by Air
The
Viscount 700 was the original version of this widely used transport, the first
production model being the Viscount 701 for BEA. The Viscount 700D has the same
airframe, but 1,760 ehp. Dart 510
supplant the Dart 506s,and the 770D is the basic North American version. The
passengers reaction to the Viscount’s speed, comfort, and quietness, together
with the airline’s appreciation of its operating economy and ability, affirmed
BEA interests in the larger model, and an order of twenty six Viscount 701s was
placed. By the time these entered service in April 1953, substantial orders for
the Viscount 700 variants had been placed by Air
| THE KIT |
A quick look at the parts will
show that the Viscount characteristic nose, tailfin and rudder are well captured
and represented. There is a good amount of surface detail in the form of
recessed panel lines on all major components, including the fuselage, engine
nacelles and wing parts. Apart from a tiny long fin that runs the length of the
upper fuselage, and which is easily scraped away, the rest of kit parts are
clean. Another minor defect concerns the engine nacelle part that is integrated
to the wing. This had sink marks that required little filling. There are no
locating or guiding pins or interlocking ridges to ensure proper alignment when
parts are glued but with little extra care it can be build into a delightful
airliner, as the fit of components is very good.
| CONSTRUCTION |
 amount
of interior detail. There are two sets of canopies since the British one differs
from that fitted to the U.S. Viscount, which has a different side cabin window.
There is also a rear-side cabin window that is left on in the event the
amount
of interior detail. There are two sets of canopies since the British one differs
from that fitted to the U.S. Viscount, which has a different side cabin window.
There is also a rear-side cabin window that is left on in the event the
I went for the British version.
These were the most common types in Maltese airspace in the good old days after
it replaced the Airspeed A.S.57 Elizabethan in the BEA airline service. The
first thing I did was blank the triangular shaped cabin side windows, one on
each side. For the Capital Airlines version these are painted black or drilled
open, shaped with a triangular file and glazed with Kristal
Kleer. Important to note
that if this second option is taken then one has to ensure that the window does
not interfere
 with
the cockpit bulkhead inside. There is a misprint in part of the instructions
that shows that version ‘A’ has the two small windows as well. Only version ‘B’
had them. Before the fuselage was closed I made sure that the passenger cabin
windows were cleaned of tiny fins and also added an extra bulkhead to the
forward fuselage so that in between the two bulkheads I could add lead weight
ensuring that the aircraft rested on its nose wheels.
with
the cockpit bulkhead inside. There is a misprint in part of the instructions
that shows that version ‘A’ has the two small windows as well. Only version ‘B’
had them. Before the fuselage was closed I made sure that the passenger cabin
windows were cleaned of tiny fins and also added an extra bulkhead to the
forward fuselage so that in between the two bulkheads I could add lead weight
ensuring that the aircraft rested on its nose wheels.
There is still room for improvement on the model. The two air intakes fitted to the inner engine nacelles at the root required cleaning first using a round needle file. In the middle of the intake a reinforcing web was cut to fit, using plastic card, and inserted. This was best added when the nacelle piece was not yet fixed in place. Each engine nacelle comes in three longitudinal pieces and a front piece. This later needed some filing at the end to allow it to be fixed at right angles to the wings. I also made sure that the air intake that the air intake fitted to the upper nacelle front ring is at the top, since no location guide is provided. For the nacelle to fit in the correct position. There may be a little play when fitting the four nacelles, and again I made sure these were all parallel to the fuselage axis when cementing in place. There are four rectangular ducts/vents to fit at the right side of each nacelle.. These come in two different shapes on the inside depending which type one builds. The instruction states that each part has to be reduced in thickness. In addition I also filed flat the area they rest upon on the nacelle side in order to provide the flush fit apparent in photographs of Viscounts.
 When
fitting the nose wheel well box to the front bulkhead square slot I found it is
best to fit a spacer piece made from 4mm thick sprue from the kit itself between
the cockpit floor and the wheel well space. This will ensure that the
cockpit/nose wheel well assembly retains the correct shape when set and before
these are inserted in the forward fuselage. When it came to positioning the wing
undercarriage legs I referred to Aviation News scale plans, as the instructions
were not clear enough regarding the exact position. There is an under fuselage
air scoop for an air-conditioning heat exchanger. This is well represented and
easy to locate at its correct position if photographs or scale plans are
referred to. Although the passenger cabin windows were clear I did not use them
for the simple reason that these would require delicate masking during painting
of the model. Instead I resorted to Kristal Kleer and the window aperture was
ideal for its application after all the paintwork was complete. One other item
worth mentioning is that the tail planes fit very loosely. So I made a
triangular guide piece from plastic card with an angle of 101 degrees to the
vertical and used it as a template so that the tail planes retain this setting
when glued.
When
fitting the nose wheel well box to the front bulkhead square slot I found it is
best to fit a spacer piece made from 4mm thick sprue from the kit itself between
the cockpit floor and the wheel well space. This will ensure that the
cockpit/nose wheel well assembly retains the correct shape when set and before
these are inserted in the forward fuselage. When it came to positioning the wing
undercarriage legs I referred to Aviation News scale plans, as the instructions
were not clear enough regarding the exact position. There is an under fuselage
air scoop for an air-conditioning heat exchanger. This is well represented and
easy to locate at its correct position if photographs or scale plans are
referred to. Although the passenger cabin windows were clear I did not use them
for the simple reason that these would require delicate masking during painting
of the model. Instead I resorted to Kristal Kleer and the window aperture was
ideal for its application after all the paintwork was complete. One other item
worth mentioning is that the tail planes fit very loosely. So I made a
triangular guide piece from plastic card with an angle of 101 degrees to the
vertical and used it as a template so that the tail planes retain this setting
when glued.
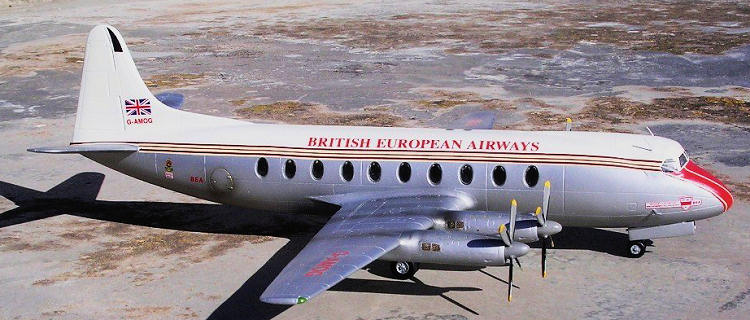
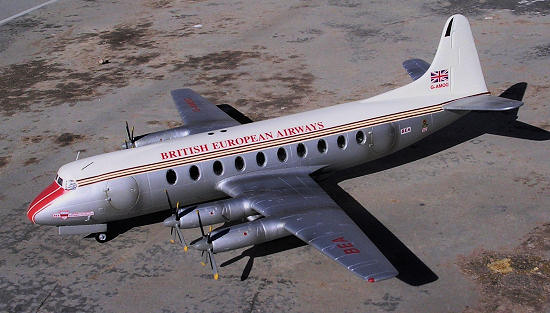
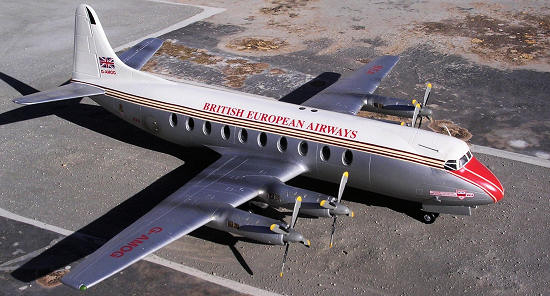
| COLORS & MARKINGS |
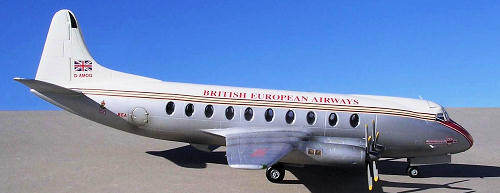 The
completed Viscount model was completed in the basically white top and silver the
rest of the fuselage and wings. A coat of Klear was applied to the silver areas
making them shinier in appearance. The decals are excellent in quality, but are
slightly erroneous in that the registration of the British aircraft is
incorrect. It has an extra ‘G’ and should be G-AMOG and not G-GAMOG. G-AMOG is a
Viscount 701, BEA ‘Discovery’ class, Robert Falcon Scott. The decal also doesn’t
include the long trim in red and white. This is not an easy trim to make., but
was found in the spare decal box.
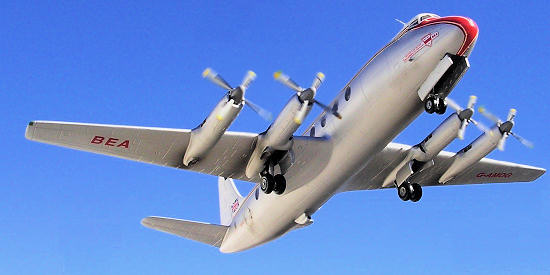
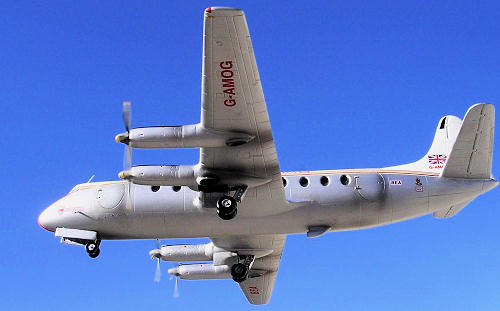
In view of this, representing the radar equipped Viscount in the livery of
Capital Airlines would be easier than completing the BEA machine.
The
completed Viscount model was completed in the basically white top and silver the
rest of the fuselage and wings. A coat of Klear was applied to the silver areas
making them shinier in appearance. The decals are excellent in quality, but are
slightly erroneous in that the registration of the British aircraft is
incorrect. It has an extra ‘G’ and should be G-AMOG and not G-GAMOG. G-AMOG is a
Viscount 701, BEA ‘Discovery’ class, Robert Falcon Scott. The decal also doesn’t
include the long trim in red and white. This is not an easy trim to make., but
was found in the spare decal box.
In view of this, representing the radar equipped Viscount in the livery of
Capital Airlines would be easier than completing the BEA machine.
| CONCLUSIONS |
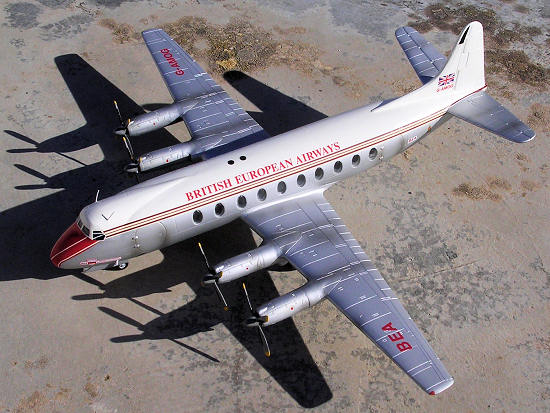
Generally speaking this is a most
welcome kit and is well worth building, representing the aircraft that gave BEA
some of its most profitable years. Despite the few comments I have raised in the
end it turned out as a very pleasing scale model. I spent a total of 16 hours on
construction, masking and painting which is about average for a kit of this size
and type.
June 2011
If you would like your product reviewed fairly and quickly, please contact me or see other details in the Note to Contributors.