Academy 1/360 Tu-144
| KIT #: | 1699 |
| PRICE: | $2.50 (on sale) |
| DECALS: | One option |
| REVIEWER: | George Oh |
| NOTES: |
|
| HISTORY |
Beginning in the 1950, the
English started to explore supersonic flight, and in 1956, a Supersonic
Transport (SST) Committee was formed. France also had an SST program, so
co-operation was an economic sensibility. The result was the Concord/e, which
took flight in Mar 69, and began operational flights in Jan, 1976. Soon, h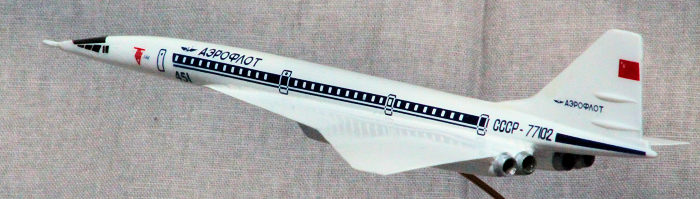 undreds
of protests about its sonic boom, came pouring-in, so Concord only went
supersonic away from population centres.
undreds
of protests about its sonic boom, came pouring-in, so Concord only went
supersonic away from population centres.
Russia is a BIGGGG place. Travel from one side to the other took a week in a train, or long plane-flight. So, supersonic travel over vast empty spaces seemed to offer a solution, and protests could be ignored. The result was the Tu.144 (NATO name CHARGER, but Concordski to the rest of the world). It first flew in Dec 68 and commenced operational flights in Dec 75. Conspiracy theorists allege that the Russians obtained a copy of the plans of Concord, but the engineering is so incredibly different.
Both were present at the 1973 Paris Air Show, where Concord performed a rather sedate flight. The Tu.144 put-on a more energetic demonstration ("Just wait until you see us fly, then you'll see something.), before it stalled and broke apart in mid-air.
| THE KIT |
This kit of the Tu.144 is one in Academy’s “Sky
Giants” series (They are small-scale models of quite large aircraft - eg,
Academy/Minicraft 1/300 XB-70 Valkyrie, by George Oh).
It comes in a small (hand-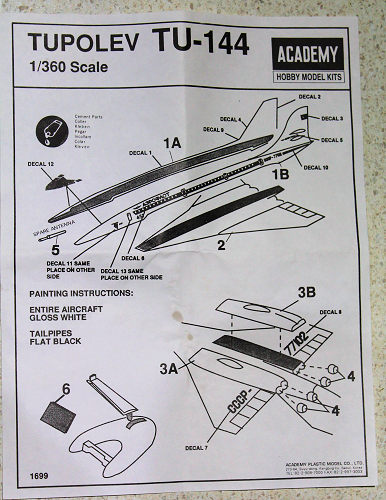 sized),
but sturdy, lid-&-tray box that contains a single sprue of 10 parts, plus a
3-part stand. The fuselage is (typically) in 2 halves, and the whole wing is a
single piece, as is each engine nacelle (= 5 parts). The white plastic is hard,
but smooth, with extremely-fine raised details. Lacking is the option of a
dropped nose (understandable in this small scale), undercarriage, or the canards
– all of-which dictates an in-flight pose. Engine intakes are cast with
relatively-thick edges, but it is nothing that a lot of sanding won’t fix. The
only reason I’m bothering MM with this small review, is because, while the
(over-scaled) nose pitot is cast with the port fuselage half, the kit supplies a
spare. I’ve only ever seen a kit provide a spare vacformed canopy. The
instruction sheet is on one side of a short A4-sized sheet and shows 2
construction steps – 3, if you count the stand. The decal sheet is a masterpiece
of clarity, and I hope they work better than the real aircraft.
sized),
but sturdy, lid-&-tray box that contains a single sprue of 10 parts, plus a
3-part stand. The fuselage is (typically) in 2 halves, and the whole wing is a
single piece, as is each engine nacelle (= 5 parts). The white plastic is hard,
but smooth, with extremely-fine raised details. Lacking is the option of a
dropped nose (understandable in this small scale), undercarriage, or the canards
– all of-which dictates an in-flight pose. Engine intakes are cast with
relatively-thick edges, but it is nothing that a lot of sanding won’t fix. The
only reason I’m bothering MM with this small review, is because, while the
(over-scaled) nose pitot is cast with the port fuselage half, the kit supplies a
spare. I’ve only ever seen a kit provide a spare vacformed canopy. The
instruction sheet is on one side of a short A4-sized sheet and shows 2
construction steps – 3, if you count the stand. The decal sheet is a masterpiece
of clarity, and I hope they work better than the real aircraft.
I bought this on the strength of other models I have in the series, and because it’s price was in the realm of small change. I started building it because, when all my family had deserted me for the week (‘cept the dog), I took the opportunity to sort through my (rather extensive) stash. After I had restacked the cartons, I discovered that I’d forgotten to stow this one (and another, but THAT is another story).
| CONSTRUCTION |
 This started
when I test-fitted the fuselage halves together (while watching TV) and found
the fit to be terrific in some areas (= the fin) and OK in others (= the spine).
So I applied some glue. The one-piece wing needed the sprue gates trimmed and
the under-fuselage construction seam sacrped back, before the wing attached
smoothly to the fuselage. This completed the airframe. I sanded back the thick
lips of the engine intakes and splitter plate, with frequent pauses to ensure
that I didn’t go too far. The two engine pods fit quite precisely under the
wings. They ARE handed, so just ensure that the slight bulge on each goes to the
outside.
This started
when I test-fitted the fuselage halves together (while watching TV) and found
the fit to be terrific in some areas (= the fin) and OK in others (= the spine).
So I applied some glue. The one-piece wing needed the sprue gates trimmed and
the under-fuselage construction seam sacrped back, before the wing attached
smoothly to the fuselage. This completed the airframe. I sanded back the thick
lips of the engine intakes and splitter plate, with frequent pauses to ensure
that I didn’t go too far. The two engine pods fit quite precisely under the
wings. They ARE handed, so just ensure that the slight bulge on each goes to the
outside.
OK – I had to use some filler – to fill the slight upper wing/fuselage gap (Perfect Plastic Putty), where the wing extensions faired into the fuselage underside (Tamiya grey), and along some parts of the spine (ditto). But none was needed around the engine pods. The most delicate part of the build was fairing the nose down to the pitot tube. Stuff the intakes with sponge, and he was ready for paint.
| COLORS & MARKINGS |
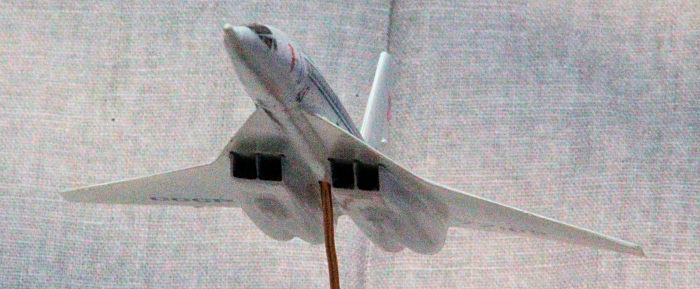
This was easy. I misted-on several coats of Tamiya gloss white. The 4 engine cans were chamfered to thin the lips, yet retaining the basic thickness of the parts. They were brush-painted with CM Boltgun metal, and they'd be attached later.
The instructions don't contain a decal placement
diagram as such, but their placement was shown is the assembly diagrams. I
started with the underside decals. They were very robust, and they went down
really well onto the glossy paint. Unfortunately, 2 hours later, they could
be moved with a little gentle pressure - Rats!! The cure was to paint over
them with Future - carefully. I did one end first, and a little while later,
the other. The added benefit is that the Future imparts a glossy coat to the
model. 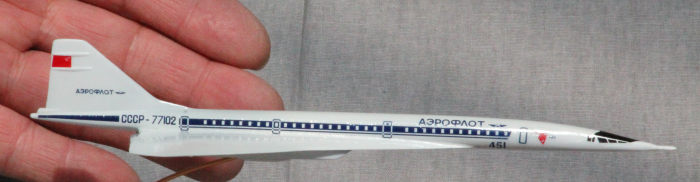
The ones that proved a real challenge were the long passenger window ones, because they have to be straight. The fix was to first ensure that the door frames juuuuust touched the top of the wings. Then, I looked along each, from in-front of the nose, so that any deviation was visibly obvious. The other challenge was to ensure that the pieces were directly opposite each other - by looking down on them.
| FINAL CONSTRUCTION |
Attaching the 4 tail cones was easy because they went onto round surfaces that I'd sanded flat, with a few swipes apiece.
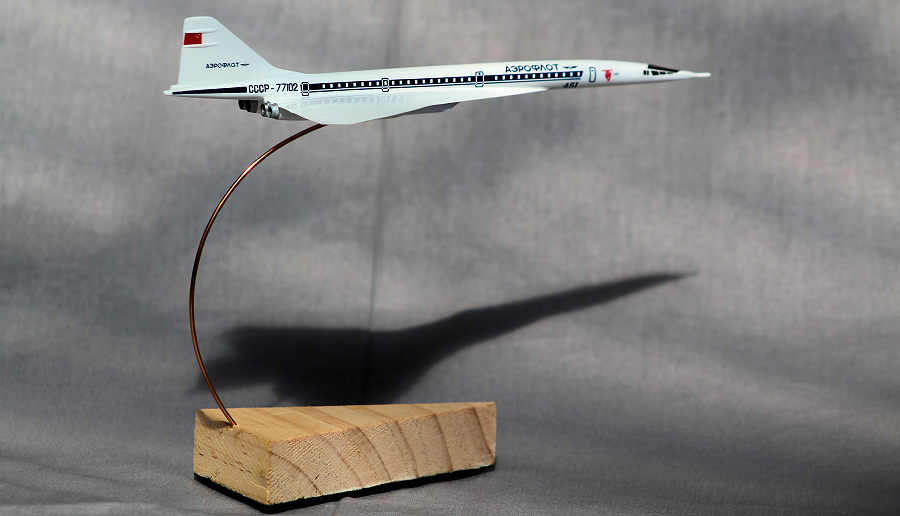
I had already decided to dump the kit stand. Instead, I cut a triangular piece from a the end of a board (shoulda' made it bigger - double rats!!). I drilled a hole in it to accept a length of resin-coated copper wire (that shouldn't tarnish in the near future). It was bent sideways along a groove cut into the underside, so that it wouldn't twist sideways. It was locked in there with 5-minute epoxy glue. The visible portion was curved around a can, then the upper end was shoved into a hole (drilled into the groove where the kit stand should have been placed) and right up into the plane's cockpit (for stability). Finally, I glued a piece of felt to the underside of the wood.
| CONCLUSIONS |
OK - I like to do a little modelling. In all, I finished this in a week of only occasional work here and there, so I have no idea of the number of hours it took. Apologies for not showing you the parts, but I started this build without any consideration to MM readers. Hopefully, the instructions will suffice for you. For a small, simple model, this was a viceless, and hence a very enjoyable build. I'm happy to recommend it to any modeller, though there are some who wouldn't bother with it. Each to their own.
| REFERENCES |
Just a bit of internet research.
19 December 2025 Copyright ModelingMadness.com. All rights reserved. No
reproduction in part or in whole without express permission. If you would like your product reviewed fairly and fairly quickly, please
contact the editor or see other details in the
Note to
Contributors.