| KIT #: | 72174 |
| PRICE: | $26.00 |
| DECALS: | One option |
| REVIEWER: | Chris Peachment |
| NOTES: |
The box has the title of HAI-1, which is initially baffling, but all
becomes clear on the instructions. In the Cyrillic alphabet the
aircraft's name name begins with a capital X
(ХAИ-1),
and, as in Greek, it is pronounced as a guttural CH sound, like the
ending of the Scottish word Loch. In English is is more usually rendered
Kh, and the maker's name as Kharkov. |
| HISTORY |
The
Kharkov KhAI-1
was major step forward in aviation history in that it was the first airliner, of
clean design, to feature a retractable undercarriage, and it had a top speed
better than most fighters of its time.
 The
prototype was designed by students as an exercise, under supervision from the
chief designer of Kharkov, IG Nyeman. In fact two teams of students were set to
work to produce two designs for a high speed airliner from simple material, and
the KhAI-1 was the winner. It was constructed from wood, with fabric control
surfaces, and was completed in 1932. By 1933 it had flown and was accepted by
Aeroflot, who went on to use about 40 examples. Its high speed and good handling
gave it a 50 per cent better performance than the Kalinin K-5 airliner of the
day. The interior featured sound proofing and, possibly another first, a
lavatory. Everyone was so pleased with the results that Nyeman won and Order of
the Red Star for his work. A military version was mooted but came to nothing.
The
prototype was designed by students as an exercise, under supervision from the
chief designer of Kharkov, IG Nyeman. In fact two teams of students were set to
work to produce two designs for a high speed airliner from simple material, and
the KhAI-1 was the winner. It was constructed from wood, with fabric control
surfaces, and was completed in 1932. By 1933 it had flown and was accepted by
Aeroflot, who went on to use about 40 examples. Its high speed and good handling
gave it a 50 per cent better performance than the Kalinin K-5 airliner of the
day. The interior featured sound proofing and, possibly another first, a
lavatory. Everyone was so pleased with the results that Nyeman won and Order of
the Red Star for his work. A military version was mooted but came to nothing.
| THE KIT |
| CONSTRUCTION |
Anyone familiar with Amodel kits will know what to expect. In fact the usual
problems caused by warped parts and more flash than the plastic parts to which
it is attached are rather fewer in this case. One suspects a few improvements
have been taking place around the Amodel plant lately. Although their signature
marks are still in evidence. A canopy which looks more like a glass brick. And
transparent side windows which have no locating flanges and do not fit any of
the apertures. To get around this
 problem,
I left all the fuselage windows until last.
problem,
I left all the fuselage windows until last.
There is minimal cockpit detail, just a seat and a stick, but don't worry about
this. Nothing but a faint impression will be seen through the canopy, which
seems to have been taken from the sides of a beer bottle. Unless you are going
to try plunge moulding your own (a technique which still eludes me) then just
paint the seat leather and the interior a tasteful shade of dark blue and leave
it at that. The same goes for the four seats of the passenger compartment. Once
the seats were dried, the two fuselage halves were cemented and, when dried, the
seams were sanded smooth. I have often written that sentence in the past with
respect to almost any kit, but devotees of Amodels will know that it will entail
at least an hour of scraping and sanding before the seams disappear. It is worth
noting at this point that the windows do not in fact match up, the port side row
being higher than the starboard row. It doesn't show on the finished aircraft,
and I didn't see much point in doing anything about it. Any Amodel is an
exercise in tolerance. There is always a large amount you have to live with.
Much the same applies when attaching the wings, which came in three pieces, a
single underwing half and two upper wings. There is a secret process here which
applies to all Amodel wings. If you attach the two wing halves together first,
then you will be left with a gap at the upper joint between wing roots and
fuselage. In fact it is not so much a gap as a canyon. The cunning trick
is to cement the lower single wing to the bottom of the fuselage first, then
remove all locating lugs. This isn't hard as there aren't any.
Then cement the upper wing halves so that they are snug against the wing roots.
This will leave you with a good few tenths of an inch all round of the lower
wing protruding beyond the upper wing. Get to work again with a coarse sanding
block and make sure the leading and trailing edges finally blend.
 Once
again, you will end up with a good deal of plastic dust on the floor and a model
which is several scale inches undersize. I suspect most of my Amodel kits come
out at 1/74 scale. No matter, there is no other way.
Once
again, you will end up with a good deal of plastic dust on the floor and a model
which is several scale inches undersize. I suspect most of my Amodel kits come
out at 1/74 scale. No matter, there is no other way.
You can now leave aside the engine and undercarriage and get on with the
painting and decaling. Once everything has been smoothed off with wet and dry,
and the window holes carefully plugged with wet tissue paper, I blasted it with
Humbrol Matt white primer, and remembered to give the undercarriage doors, front
engine cowl and Townend ring the same treatment.
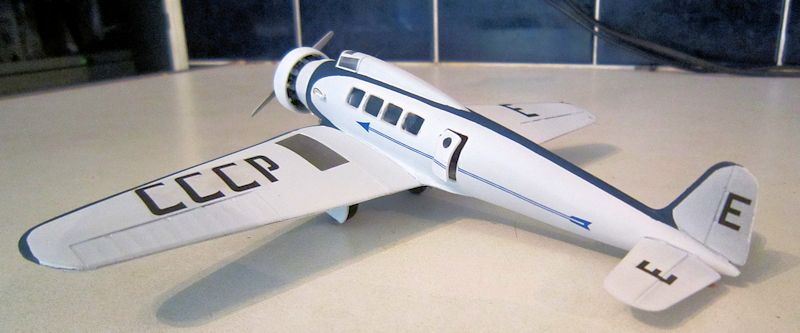
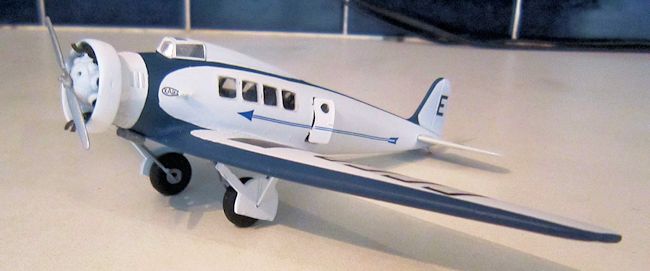
Now careful masking of the blue areas can begin. Various slightly different schemes can be found on the internet, the chief difference being that some examples seem to have the whole streamlined top decking in blue, while others just had the flashes down at the root. I went with the instructions and also the box art, just to make life more difficult.
For the blue I used Lifecolour Matt Royal Blue FS35050, which is a pleasing hue,
though slightly darker than the box art. One dried, I was faced with the problem
of the side windows, and toyed with the idea of filling them in with Clearfix.
This can work although it sometimes leaves windows looking a little medieval.
So I employed a technique which previously I had only ever used for covering
wing landing light apertures. Old fashioned clear sticky tape. (Sellotape
to us in the UK, Scotch tape to you in the US.) The one thing which makes life
hard is that it is extremely high tack. And so only cut squares of it that
 slightly
overlap the window space, keep it well clear of any decals, such as the arrow
which I had already applied down the sides, and also make sure your white paint
is thoroughly dry.
slightly
overlap the window space, keep it well clear of any decals, such as the arrow
which I had already applied down the sides, and also make sure your white paint
is thoroughly dry.
Stick the tape down over your window space and and then run around the edges
with a brand new scalpel blade. Very carefully peel off the excess and you are
left with brand new shiny windows. I dare say in a few years time, the dust will
settle inside the interior and attach itself to the sticky side of the tape,
leaving them looking like an ancient museum piece. But then that happens to us
all.
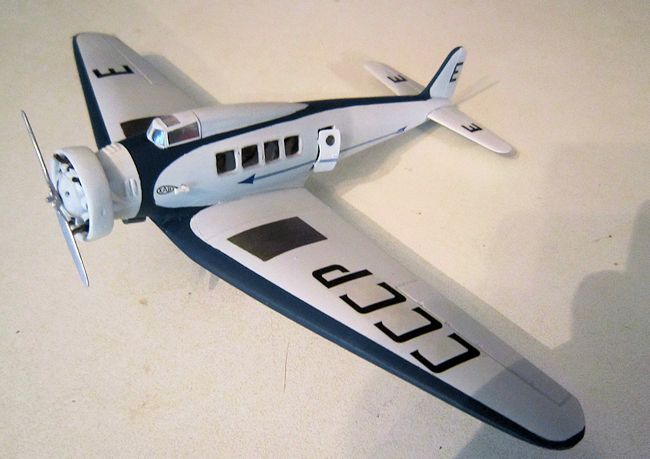
You can now turn attention to the engine, which is matt black with some gunmetal
dry-brushing to lift the detail. The front moulded cowl covers most of the
cylinders anyway. Fit the engine to the fuselage first, and then attach the
pre-painted Townend ring. Some fiddly work is now necessary to attach the tiny
exhaust pipes, noting that the upper and lower pair are routed around the front
of the Townend ring before curving upwards and back. I dare say this was to
spare the front of the cockpit glazing becoming blackened too quickly. Paint the
exhausts dark rust and then attach a propeller. The kit provide two example, one
wood, and one metal which had variable pitch. As far as I can see from the few
photos of the aircraft, the ones with Townend rings used the metal prop and so
did I.
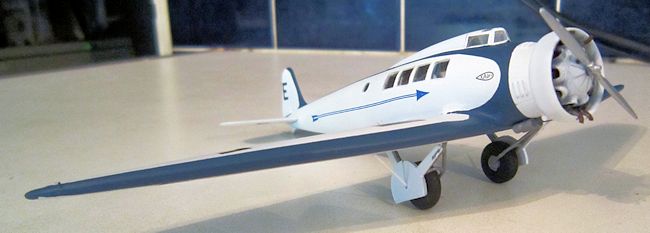
The undercarriage is straightforward, though the struts are a little spindly
after removing the seams, which thanks to Amodels usual habits are larger than
the strut itself. I replaced them here and there with plastic rod. The wheels
seem to be all tire, apart from tiny hubs, which I painted silver, though white
might be an option. The tail skid is well moulded as a two strut, one skid
affair, and I painted the struts white and the skid wood brown.
| COLORS & MARKINGS |
Now you have the delicate task of going around the aircraft correcting those
annoying blobs where the blue had crept under the masking tape. I used a very
fine brush and some Vallejo off-white which seems a good match and doesn't show
up with any co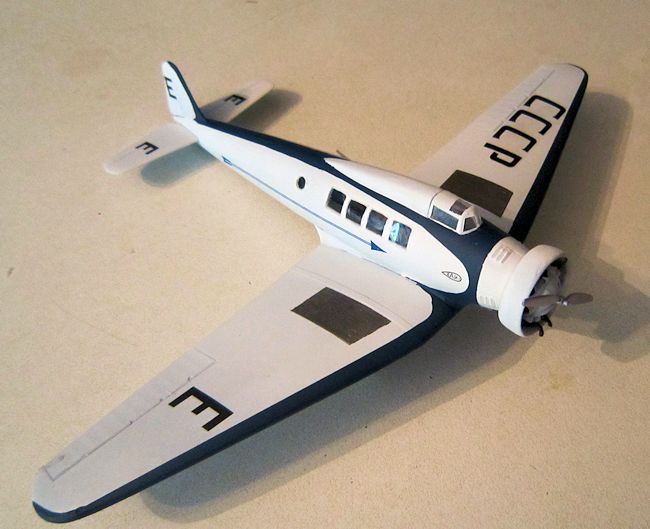 ntrast.
A quick coat of Klear and then the decals, which go on fine. Anxiety is the
default setting when applying Amodel decals, but while these were very thin, and
wrinkly when wet, they did settle down in one piece, and after a coat
of the new Humbrol Decalfix, there was no silvering. I then gave it an
overall blast of Citadel Satin Sheen, an excellent varnish in a rattle can,
which comes out more matt than satin.
ntrast.
A quick coat of Klear and then the decals, which go on fine. Anxiety is the
default setting when applying Amodel decals, but while these were very thin, and
wrinkly when wet, they did settle down in one piece, and after a coat
of the new Humbrol Decalfix, there was no silvering. I then gave it an
overall blast of Citadel Satin Sheen, an excellent varnish in a rattle can,
which comes out more matt than satin.
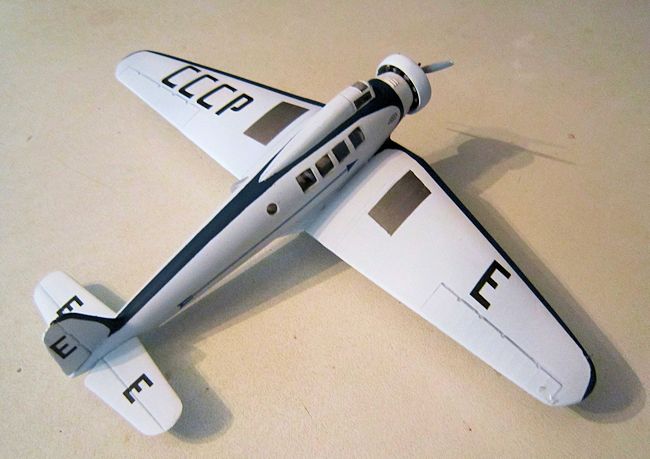
After that it is a simple task to mask off the metal panels on the upper wings,
paint them gunmetal and give them a polish.
The final touch was to add the passenger door in an open position. This was not to show of my exquisite interior details, complete with passenger lavatory. It was because there was no way the door was going to fit in its aperture. The shape is all wrong, and sanding it down would have resulted in great chasms, so I went with the only option. Think about it all beforehand however, as the arrow stripe decal down the side will have to be cut to fit so that the door gets a length of it just below the circular window. Mercifully, the door was moulded in clear plastic, so it was just a question of masking off the window rather than trying to get a tiny blob of clear plastic to fit.
| CONCLUSIONS |
I am very pleased with this one, as it is hard enough to find any kit of
anything from th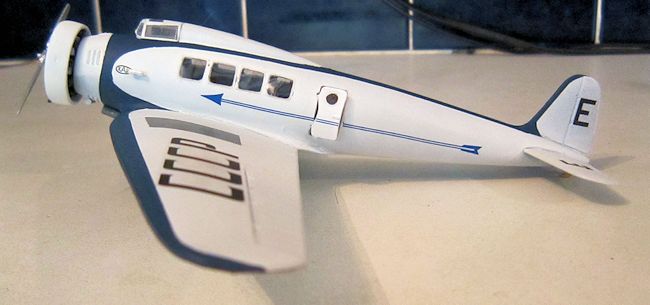 e
Golden Era of the 1920s and 30s,
let alone an airliner. And a little known Russian airliner to boot.
Added to which it is an elegant and pleasing shape of great design.
e
Golden Era of the 1920s and 30s,
let alone an airliner. And a little known Russian airliner to boot.
Added to which it is an elegant and pleasing shape of great design.
I have perhaps over-emphasised the horrors of Amodel kits. In fact I am coming
to love them because they insist on so much extra work, and that makes me feel
the kit is mine, and not something that has been glued together straight from
the box like a thousand other kits. Moreover, if you want a very good range of
Soviet types, including rarities such as this one, then Amodel is the only game
in town.
| REFERENCES |
Including a short one from Youtube which features the aircraft flying and also
some close-up detail of engine and cockpit.
http://en.wikipedia.org/wiki/Kharkov_KhAI-1
http://www.youtube.com/watch?v=vm6EV15qEEY
http://www.ctrl-c.liu.se/misc/ram/khai-1.html
http://basilzolotov.com/side-views/neman-khai-1/
September 2013
If you would like your product reviewed fairly and quickly, please contact the editor or see other details in the Note to Contributors.