Minicraft 1/144 Boeing 737-300
| KIT #: | 14481 |
| PRICE: | $25.00 street price |
| DECALS: | One option |
| REVIEWER: | Blair Stewart |
| NOTES: | Skyline Decals No. SKD1431 |
| HISTORY |
Following its success with the Boeing 737-200 Advanced, Boeing wanted to increase capacity and range, incorporating improvements to upgrade the aircraft to modern specifications, while also retaining commonality with previous 737 variants. Boeing began development in 1979, and in 1980 released preliminary aircraft specifications at the Farnborough Airshow. In March 1981, USAir and Southwest Airlines each ordered 10 aircraft, with an option for 20 more.
The new series featured CFM56 turbofan engines, which
produced significant gains in fuel economy and noise reduction, but also
posed an engineering challenge given the low ground clearance of the 737 - a
trait of its fuselage that was derived from the Boeing 707. Boeing and
engine supplier CFM International solved the problem by placing the engine
ahead of (rather than below) the wing, and by moving engine accessories to
the sides (rather than the bottom) of the engine pod, giving the 737 a
 distinctive non-circular air intake.
Boeing also made several changes to the -300 wings to improve its aerodynamics. These included: a 9-inch (23 cm) wing tip extension; and adjusted leading-edge slats and trailing-edge flaps. Boeing improved the flight deck with the optional EFIS (Electronic Flight Instrumentation System), and incorporated a passenger cabin like those on the Boeing 757.
The prototype of the -300 rolled out of the Renton plant on January 17, 1984, and first flew on February 24, 1984. After it received its flight certification on November 14, 1984, USAir received the first aircraft on November 28. A very popular aircraft, Boeing received 252 orders for it in 1985, and over 1,000 throughout its production. The 300-series remained in production until 1999 when the last aircraft was delivered to Air New Zealand on December 17, 1999, registration ZK-NGJ.
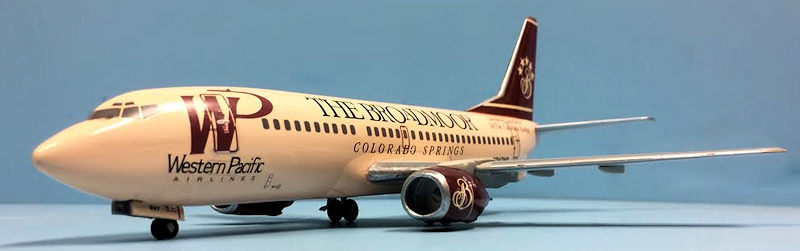
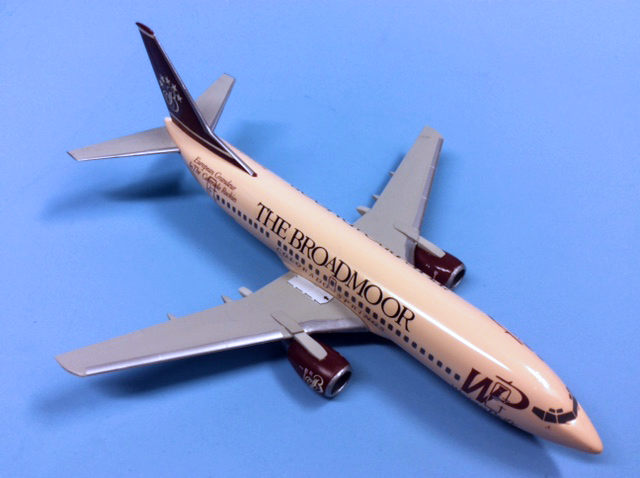
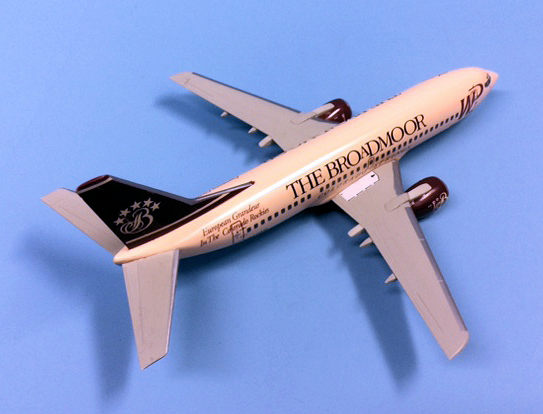
Another airline that selected the 737-300 was Western Pacific, or “WestPac.” WestPac began scheduled passenger flights on April 28, 1995, with eight Boeing 737-300s. The low-cost airline was formed in 1994 under the name Commercial Air, changed to Western Pacific. Edward Gaylord of Gaylord Entertainment Company was involved in the formation and management of WestPac. Its headquarters were in unincorporated El Paso County, Colorado, near Colorado Springs.
While WestPac had a simple red/blue billboard livery, it was their "LogoJet" program that made the airline well-known amongst travelers and enthusiasts. For the first time, the entire exterior of an airliner was put up for rent as a flying billboard. The first customer to sign up for what WestPac called the "AirLogo Program" was the five-star Colorado Springs hotel, the Broadmoor, which was incidentally owned by one of the major investors in WestPac. But the most famous and most-photographed of the LogoJets was the Simpsons Jet. In May 1995 FOX Television needed an advertising coup for that month's Nielsen ratings sweeps for their long-running animated sitcom, The Simpsons. After a meeting with WestPac's marketing staff, FOX paid the airline $1 million to wear a scheme designed by FOX's ad department to bring attention to the TV show during the sweeps week and beyond.
| THE KIT |
 Minicraft has released a number of civilian and military
aircraft in 1/144 scale. This kit is molded in white plastic and has 46
white plastic parts and one clear part. The kit includes a set of Scale
Master decals for a Continental Airlines scheme. One minor complaint for me
is that the cockpit window is molded in clear plastic, but the decal set
also includes cockpit window decals. Since there is no cockpit detail
included in the kit, I don’t get why Minicraft molded the cockpit glass in
clear plastic. Not only does this require a lot of sanding and filling to
integrate the cockpit window with the fuselage, but, in my opinion, in this
scale the decals look sooo much better than painted clear plastic. Oh well,
that’s one modeler’s opinion!
Minicraft has released a number of civilian and military
aircraft in 1/144 scale. This kit is molded in white plastic and has 46
white plastic parts and one clear part. The kit includes a set of Scale
Master decals for a Continental Airlines scheme. One minor complaint for me
is that the cockpit window is molded in clear plastic, but the decal set
also includes cockpit window decals. Since there is no cockpit detail
included in the kit, I don’t get why Minicraft molded the cockpit glass in
clear plastic. Not only does this require a lot of sanding and filling to
integrate the cockpit window with the fuselage, but, in my opinion, in this
scale the decals look sooo much better than painted clear plastic. Oh well,
that’s one modeler’s opinion!
Minicraft released its 737-300 kit in 2001, shortly after the 1998 demise of WestPac, and since I live in Colorado Springs and often flew out of the Springs airport, I remember seeing the colorful paint schemes on the WestPac aircraft. One of the more memorable was the Broadmoor scheme, so when I discovered that Skyline Decals produced a decal set for that aircraft, I was ready to build the kit with that paint and decal scheme.
| CONSTRUCTION |
 I began by assembling the fuselage halves. Before gluing them, I
added about a ½ ounce of lead to the nose. At this point, I skipped over to step
5 and installed the cockpit clear part. Since I opted to use the window decals,
I wasn’t too worried about scuffing this part as I puttied its seams with the
fuselage and then sanded them smooth. Once I was satisfied with the fit, I
returned to step 2 and assembled the two engines. These also required some putty
to smooth out their seams.
I began by assembling the fuselage halves. Before gluing them, I
added about a ½ ounce of lead to the nose. At this point, I skipped over to step
5 and installed the cockpit clear part. Since I opted to use the window decals,
I wasn’t too worried about scuffing this part as I puttied its seams with the
fuselage and then sanded them smooth. Once I was satisfied with the fit, I
returned to step 2 and assembled the two engines. These also required some putty
to smooth out their seams.
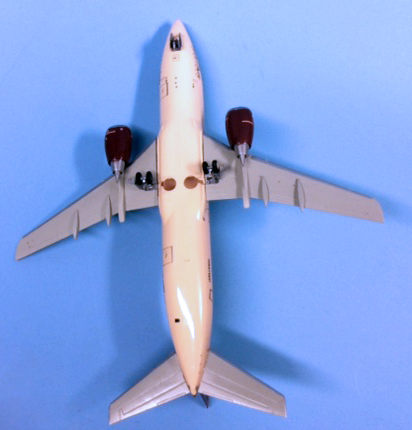
I then assembled the wing assemblies, but left off the engine pylons and engines until after painting. Next, I tackled the main landing gear, which have a surprising number of parts (7 each). I then assembled the front gear, and put all three gear aside for later painting.
| COLORS & MARKINGS |
Having chosen the Broadmoor scheme, I needed to find a paint that
closely replicated the exterior color. The Skylines decal sheet calls for “Light
Peach,” which roughly corresponds to FS 13613. Testors makes an acrylic peach
paint, but since I am primarily an enamel/lacquer guy, I looked for other
options. It turns out that Testors makes a radome tan – FS33613 – in its Model
Master line, so
 this would be close enough for the fuselage. For the tail and
engine nacelles, the suggestion was “Bordeau Red”, so I opted for Floquil Tuscan
Red, which appeared to be a close match.
this would be close enough for the fuselage. For the tail and
engine nacelles, the suggestion was “Bordeau Red”, so I opted for Floquil Tuscan
Red, which appeared to be a close match.
I painted the fuselage, then masked off the tail and sprayed it with the Tuscan Red. I painted the wings and horizontal stabilizers with Testors Light Aircraft gray, and then masked off the leading edges and painted them with Testors aluminum. Once these were dry, I coated them all with Testors Glosscote.
I then applied the intricate Skyline decals. The decals went on with little trouble and settled down nicely with an application of Walthers Solvaset. While the decals dried, I hand-painted the landing gear.
I then attached the wings to the fuselage, glued the engine/pylon assemblies to the wings, attached the horizontal stabilizers, and glued on the landing gear and gear doors.
| CONCLUSIONS |
This is a nice kit from Minicraft. My only “complaint” is the cockpit window approach, but other than that, I found this to be a pleasure to assemble. I now have a great replica of an aircraft that has local significance for me. I highly recommend this kit to those who like civilian aircraft models.
| REFERENCES |
Boeing 737, Wikipedia, December 2016.
The Short But Colorful Life of Western Pacific Airlines, Tails Through Time, Worldwide Web, December 2016.
10 January 2017
Copyright ModelingMadness.com If you would like your product reviewed fairly and fairly quickly, please
contact
the editor
or see other details in the
Note to
Contributors. Back to the Main Page
Back to the Review
Index Page
Back to the Previews Index Page