Revell
1/144 L-1049G Super Constellation
|
KIT #: |
04252 |
|
PRICE: |
$24.25 MSRP |
|
DECALS: |
Seven options: 3 TWA and 4 Lufthansa |
|
REVIEWER: |
|
|
NOTES: |
The best Connie model available in 1/144 |
|
HISTORY |
The Lockheed Constellation, known as the “Connie,” was born
in 1939 out of Trans World Airlines’ (TWA) request for a 40 passenger
transcontinental airliner with a 3,500 mile range. The driving force behind the
requirement was Howard Hughes, who was a major TWA stockholder. Lockheed’s
answer, the L-049 Constellation, was designed by Clarence “Kelly” Johnson (whose
design contributions included the PV-1, P-38, F-80, F-94, F-104, C-130, U-2,
SR-71, F-117) and Hall Hibbard, Lockheed’s chief engineer.
The design effectively employed the same wing as the P-38, only scaled up. Another feature taken from the P-38 design was the outboard vertical fins. The distinctive triple tail was used to reduce the overall height of the aircraft, thereby allowing it to fit in existing hangars. Lockheed also incorporated new features such as hydraulically-boosted controls and a thermal de-icing system. The plane could achieve top speeds of over 340 mph, cruise at 300 mph, and had a service ceiling of 24,000 feet.
 At the
start of World War II, Lockheed converted its TWA-ordered Constellations to the
C-69 military transport aircraft. The first prototype flew on January 9, 1943 as
NX25600. At the end of the war, Lockheed finished C-69s already in production as
civilian airliners, and TWA received its first Constellation on October 1, 1945.
TWA flew the first transatlantic Connie flight from Washington, DC to Paris on
3-4 December. TWA then opened regular intercontinental service with the Connie
on February 6, 1946.
Later in June, 1947, Pan American World Airways
launched the first round-the-world regular service using an L749 Connie.
TWA eventually owned 156 Connies, more than any
organization other than the US Navy.
At the
start of World War II, Lockheed converted its TWA-ordered Constellations to the
C-69 military transport aircraft. The first prototype flew on January 9, 1943 as
NX25600. At the end of the war, Lockheed finished C-69s already in production as
civilian airliners, and TWA received its first Constellation on October 1, 1945.
TWA flew the first transatlantic Connie flight from Washington, DC to Paris on
3-4 December. TWA then opened regular intercontinental service with the Connie
on February 6, 1946.
Later in June, 1947, Pan American World Airways
launched the first round-the-world regular service using an L749 Connie.
TWA eventually owned 156 Connies, more than any
organization other than the US Navy.
Initial
Connie operations were not without difficulties, as there were three accidents
in the first 10 months of operation.
These accidents resulted in the suspension of the
Connie’s airworthiness certificate until Lockheed made appropriate modifications
to the aircraft’s design. One of the persistent problems was engine failures,
and some called it the “world’s finest trimotor.”
The Connie set a number of records in its early years,
including California to Washington, DC in 6 hours and 57 minutes in April, 1944.
In 1957, a Connie flew from Los Angeles to London in 18 hours and 32 minutes,
and the Connie still holds the record for the longest-duration non-stop
passenger flight: San Francisco to London in 23 hours and 19 minutes (man, am I
glad I wasn’t on THAT flight!).
Lockheed introduced the L-1049 Super Constellation, which is
the subject of this review, in 1951. The version included more powerful
R-3350-34 engines and a fuselage that was 21 feet longer than the original
Connie. The L-1049G had a maximum speed
 of 377 mph
and cruised at 340 mph. The Super Connie’s range was extended to 5400 miles,
helped in part by the addition of wingtip-mounted external fuel tanks. Lockheed
introduced the model in 1951.
of 377 mph
and cruised at 340 mph. The Super Connie’s range was extended to 5400 miles,
helped in part by the addition of wingtip-mounted external fuel tanks. Lockheed
introduced the model in 1951.
The
Connie’s fate as an ocean hopper was sealed with the introduction of jet
airliners like the de Havilland Comet, the Boeing 707, the Douglas DC-8, and the
Convair 880. Connies continued to operate on domestic routes, but it was only a
matter of time before they would be overcome by technology. The last Connie
passenger service ended in 1968 with Eastern Airlines’ shuttle service between
New York, Boston, and Washington.
According to
the Goleta Air & Space Museum's website
there are 19 surviving Super Connies in the
I can proudly say that I had the privilege of flying in a
government-contract air Connie from North Island NAS, California, to Hill AFB,
Utah in the summer of 1965 while an Air Force Academy cadet, and it was quite a
thrill. I must admit I don’t miss the extra flying time from place to place, but
I sure do miss the constant drone of those piston engines!
|
THE KIT |
I
am ashamed to admit that, to date, I have not built a single 1/144 civilian
airliner model (I started a couple, but never finished them). Although I already
had both the box scale (1/131) Monogram Super Constellation (#6058, Heritage
Edition) and the Minicraft 1/144 kit (#14491) in my stash, I was drawn to the
recently released Revell of Germany kit, especially since it offered the
distinctive TWA markings as part of the out-of-the-box decal set. Alas, as is
common with us afflicted kit hoarders, I opted to invest in just
one more
kit.
 When I
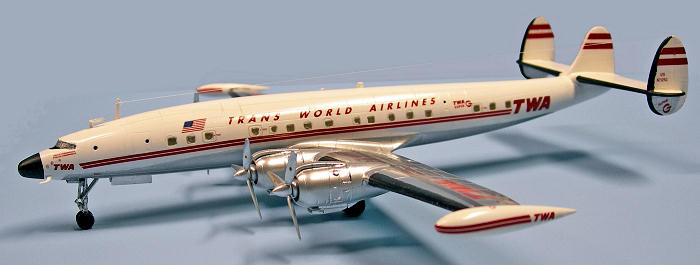
opened the box, I was pleasantly surprised, and decided that I had to build the
kit rather than just toss it on the stash shelves. The kit contains four sprues
of parts in white plastic and a single clear plastic sprue. The beautifully
rendered decal sheet includes markings for three TWA registrations and four
different Lufthansa aircraft.
When I
opened the box, I was pleasantly surprised, and decided that I had to build the
kit rather than just toss it on the stash shelves. The kit contains four sprues
of parts in white plastic and a single clear plastic sprue. The beautifully
rendered decal sheet includes markings for three TWA registrations and four
different Lufthansa aircraft.
There is more than the usual amount of cockpit detail for this scale, but it is
difficult to see when the model is finished. The cockpit consists of three
seats, two control yokes, and an instrument panel/hood. Overall, the recessed
panel lines are very fine and the landing gear detail is outstanding. Options
include the tip mounted wing tanks and the blunt original nose or the longer
radar nose. Due to the tricycle landing gear and the long, graceful fuselage,
you will need to add about 15 grams of weight to the front of the model if you
want it to sit properly on its landing gear (more about that later).
Note also that the main gear doors are all separate
pieces, but the nose gear doors are molded as one, so you will need to cut the
doors apart if you display the model with the gear down.
The passenger windows are molded in long, clear-plastic strips, and I must admit
that in 1/144th
scale, I prefer the decal black windows that some kits provide, simply because
it’s a job to accurately mask these clear ones for painting (and, in my opinion,
the decaled windows look better in this scale).
|
CONSTRUCTION |
 I had
already decided to build the TWA long-nosed version, so I surveyed the parts to
make sure I knew which optional parts would be needed. For the most part, I
followed the step-by-step instructions and started with the cockpit. Once
assembled, I glued the cockpit to the top of the nose gear well, which in turn
glues into one of the fuselage halves. At this point, I added what I thought
would be sufficient weight to the nose, but I later found out my guess was not
enough to make the model sit right on its gear. I discovered this after I had
glued the fuselage halves together and attached the tail assembly and wings,
along with the engines. My only option at this point was to tear the engines off
the wings and place lead weights in the engine cowls. Fortunately, by using all
four engines, I was able to get enough weight to balance the model.
I had
already decided to build the TWA long-nosed version, so I surveyed the parts to
make sure I knew which optional parts would be needed. For the most part, I
followed the step-by-step instructions and started with the cockpit. Once
assembled, I glued the cockpit to the top of the nose gear well, which in turn
glues into one of the fuselage halves. At this point, I added what I thought
would be sufficient weight to the nose, but I later found out my guess was not
enough to make the model sit right on its gear. I discovered this after I had
glued the fuselage halves together and attached the tail assembly and wings,
along with the engines. My only option at this point was to tear the engines off
the wings and place lead weights in the engine cowls. Fortunately, by using all
four engines, I was able to get enough weight to balance the model.
 The
fuselage halves went together nicely, and only required light wet sanding to
finish the seams. I rescribed a couple of panel lines that disappeared due to
the sanding, but no modeling putty was required, and that was a plus. The mating
of the finished wing to the fuselage also required no putty.
The
fit of the engine halves was my only real assembly problem with this kit. I
should have test fit them before gluing, but in my haste to finish the model, I
didn’t do this.
The two cowling halves trap the engine inside. The
good news is that the upper and lower scoops, when glued onto the engines, hide
a lot of the mismatched seams. Additionally, the engine cylinders are hardly
visible when the silver cover plate is installed between the engine and the
prop, so I wouldn’t spend a lot of time detailing the engines, at least on
versions using these plates.
The landing gear is amazingly detailed for this scale. Since
they would be painted silver, I went ahead at this stage and assembled the
landing gear, and then glued them into the gear wells. I also glued on the
landing gear doors, after cutting the nose wheel door into its three separate
parts for the “gear down” configuration.
|
COLORS
& MARKINGS |
One
of the difficulties with civilian airliners is the paint scheme. These require
not only gloss colors but also intricate masking to replicate. The TWA Super
Connie scheme is no different.
I started out painting the natural metal surfaces,
but in hindsight I should have reversed the process. At any rate, I used Humbrol
011 Silver for the natural metal areas. As I have stated in other reviews, this
paint is the best I have seen, and finishes as well as any of the metalizer
paints on the market to date (and you can
 mask over
it and handle it once it is dry). I then masked off the wings and the lower
fuselage for the white paint. I used pin-striping tape to create the curved
demarcation line between the natural metal area and the white area on the
fuselage sides. For the passenger windows, I decided to try white Tacky Glue to
mask these. I carefully squeezed drops of glue into the window recesses and let
these dry. I then sprayed Testors Boyd’s Hi-Gloss White on the upper fuselage
and tail and set the model aside to dry. As usual for gloss paints, I used a
little Modeler’s Wax to rub out and smooth the white paint once it was dry.
mask over
it and handle it once it is dry). I then masked off the wings and the lower
fuselage for the white paint. I used pin-striping tape to create the curved
demarcation line between the natural metal area and the white area on the
fuselage sides. For the passenger windows, I decided to try white Tacky Glue to
mask these. I carefully squeezed drops of glue into the window recesses and let
these dry. I then sprayed Testors Boyd’s Hi-Gloss White on the upper fuselage
and tail and set the model aside to dry. As usual for gloss paints, I used a
little Modeler’s Wax to rub out and smooth the white paint once it was dry.
I decided to mask off the wing and tail de-icers with
pin-striping tape and then hand-paint them with Testors flat black. This was not
necessarily the best option, but it got the job done with only a little touch up
required afterwards.
I
removed the Tacky glue using a pair of fine tweezers. For the most part, this
worked fairly well, but I still prefer the decal black windows used by some
1/144th
scale kit makers. Next, I applied the TWA decals. These are very thin, so a
little caution is in order (in fact, I ripped one of the long side stripes and
had to spend some time getting it to line up once I got it back together). I
used Solvaset to set the decals once they were in place.
The
final assembly step was to glue a stretched sprue antenna from the fuselage to
one of the outboard vertical fins.
|
CONCLUSIONS |
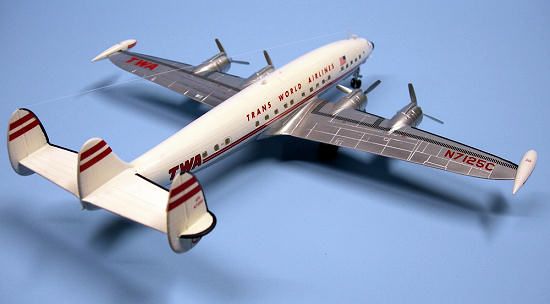
 Strictly
from in-box comparisons, I would say this is by far the best 1/144th
scale Connie available, and some modelers have said they think it even rivals
the Heller 1/72 kit. The decals are exceptional, and this was a pleasure to
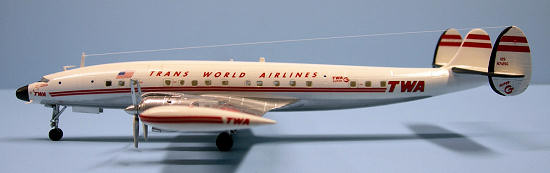
build. The finished model looks great and I would recommend
this kit to anybody who wants to have a nostalgic
replica of one of the great civilian airliners in our aviation history.
Strictly
from in-box comparisons, I would say this is by far the best 1/144th
scale Connie available, and some modelers have said they think it even rivals
the Heller 1/72 kit. The decals are exceptional, and this was a pleasure to
build. The finished model looks great and I would recommend
this kit to anybody who wants to have a nostalgic
replica of one of the great civilian airliners in our aviation history.
|
REFERENCES |
1.
“Lockheed
Constellation,”
Wikipedia, 2009.
2.
“Lockheed Super Constellation Survivors,”
Goleta Air And Space Museum,
2009.
3.
“Clarence Johnson,”
Wikipedia, 2009.
4.
“The Lockheed Super Constellation,”
California
Classics, 2009.
5. March 2009
Copyright ModelingMadness.com. All rights reserved.
C