1/32 Bede BD-5J
| KIT #: | Scratch built |
| PRICE: | Free (Scrap wood) |
| DECALS: | Leftovers |
| REVIEWER: | Bryan Bodily |
| NOTES: |
| BACKGROUND |
You will not believe how this all began, but allow me tell you… it was a fun and interesting beginning.
My beginning experience with scratch building all started on a camping trip with my family. I was going stir-crazy sitting in the middle of the forest thinking of all the things I needed to be done at home and work. I love spending time with my family, but when you are not use to “doing nothing” it does something to your psyche.
It was not until the second day, out in the sticks, when I finally started to relax. I picked up a broken limb from one of the local trees. I whipped out my trusty pocketknife and started to whittle. I made a little bear and kids thought it was great. This encouraged me to make a little rabbit. Soon my kids wanted to try their hand at it. There were wood chips a flying in our camp! I am glad to say there was not a finger lost.
 I thought that it was fun whittling.
Moreover, I do not necessarily like little animal figures. I do love planes! So
I grabbed a piece of scrap lumber (which was a piece of a 2 x 4 gathered from a
construction site for fire wood) and split it with and axe. I found the flattest
rock I could locate and started to sand the sides flat. I then traced an outline
of a CAP 232 on the slab of wood and started a whittl’en. I was not able to
finish the project by the end of the camping trip, so I completed later at my
home.
I thought that it was fun whittling.
Moreover, I do not necessarily like little animal figures. I do love planes! So
I grabbed a piece of scrap lumber (which was a piece of a 2 x 4 gathered from a
construction site for fire wood) and split it with and axe. I found the flattest
rock I could locate and started to sand the sides flat. I then traced an outline
of a CAP 232 on the slab of wood and started a whittl’en. I was not able to
finish the project by the end of the camping trip, so I completed later at my
home.
I mentioned my project to Phil Gladstone (he is a member of our local modeling club (NUSMA - Northern Utah Scale Model Association) and one great guy. He asked if I would bring it to our next meeting. The night of our meeting came and the project examined. I received far too much praise for what I thought was something that no one would have an interested in. Phil encouraged me to enter it in the next “The Gathering” model contest, and to my surprise…IT WON! The next year I constructed a Midget Mustang that was 1/72 scale and it won. I do not believe I have to say… that this encouraged me further.
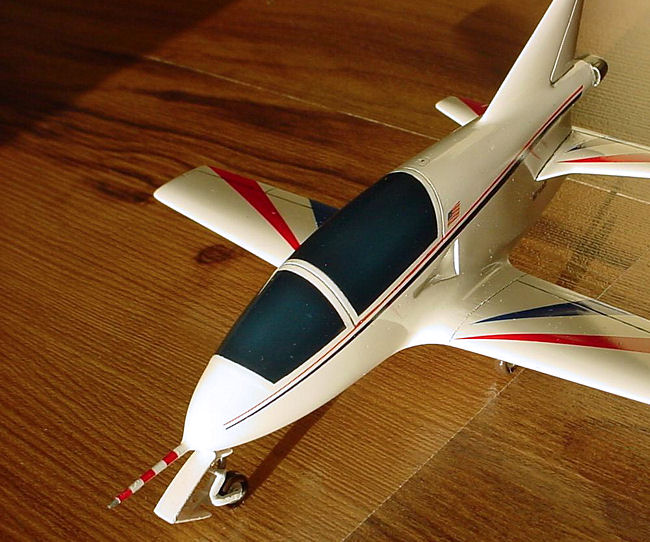
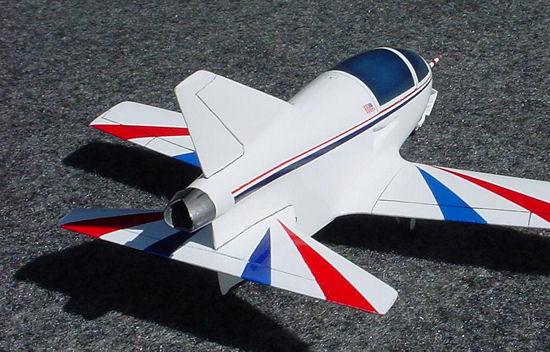
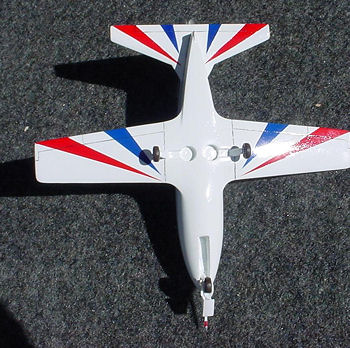
So this Year I constructed a 1/32 scale Bede BD-5J. Even at 1/32 scale, the wing is only about six inches long. This is a small jet and is known as the worlds smallest manned jet, as per Guinness Book of World Records. If you have seen the James Bond movie, “Octopussy” you would have seen this jet or even as the Coors Silver Bullet.
One more note on the history of modeling. Along time ago (maybe longer than most of us have been alive) (I looked this up and I am not lying), the “model kits” were wood. They were not the high tech injection molded models as we have today. Therefore, for all those who say a wood model shouldn’t be displayed with plastics, I need to note that wood models are the mothers of this hobby. Any way, most of the higher end models are not just made with plastic. Why not wood!!
| THE KIT |
 The kit is very simple. You need a good piece of wood that you can pick up at a
construction site (or wood of your choosing), a good 3-view (or more) drawing. I
must add that not always (and most of the time) are the 3-views accurate
regarding the shape or contour. The basic outlines are usually correct, but you
may want to verify it before you start. You also need many pictures. If you can
view the real thing, it would be better. You also need to think ahead about the
detail parts; like the antennas, landing gear, etc and what to make out of and
how to make them.
The kit is very simple. You need a good piece of wood that you can pick up at a
construction site (or wood of your choosing), a good 3-view (or more) drawing. I
must add that not always (and most of the time) are the 3-views accurate
regarding the shape or contour. The basic outlines are usually correct, but you
may want to verify it before you start. You also need many pictures. If you can
view the real thing, it would be better. You also need to think ahead about the
detail parts; like the antennas, landing gear, etc and what to make out of and
how to make them.
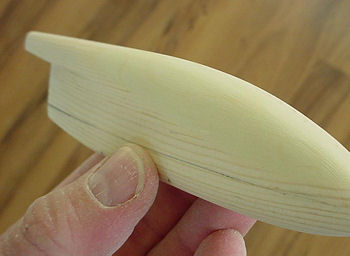
The fuselage is made from a piece of pine 2” x 4” without knotholes. The knothole is where a branch grows out of the main trunk of a tree. If I need to explain that the trunk is not part of a car and the tree is not the sprue that the plastic parts come on, you really need to get out more often.
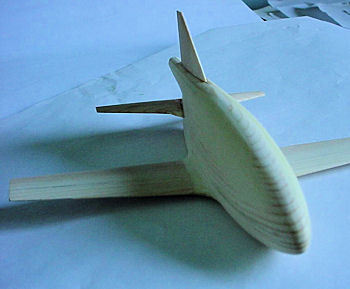
The wings and tail sections are from the leftovers from the fuselage or you may just pick up another piece of board at the construction sight.
| CONSTRUCTION |

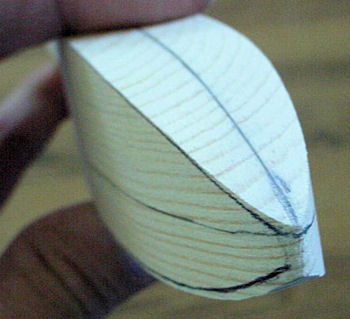 The construction is simple. Draw the
outline of the plane and cut away everything that does not look like a plane!
Seriously, it is not that far from the truth!
The construction is simple. Draw the
outline of the plane and cut away everything that does not look like a plane!
Seriously, it is not that far from the truth!
The most critical part about cutting
out the rough shape is to maintain a flat side and reference line. The reference
lines on a full size aircraft are called a “waterline or stations”. The
waterlines run horizontal and the stations run vertical. These are important
because you
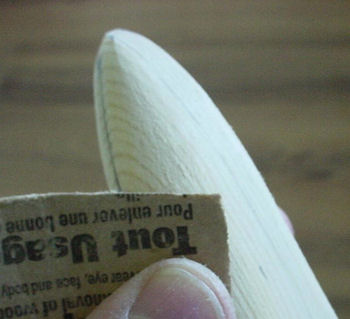 cannot rely on just your vision. The grain of the wood creates an
optical illusion and it is important to verify your work as it progresses. The
rounding is the last thing you will do. So, get it as close as you can before
the final shaping.
cannot rely on just your vision. The grain of the wood creates an
optical illusion and it is important to verify your work as it progresses. The
rounding is the last thing you will do. So, get it as close as you can before
the final shaping.
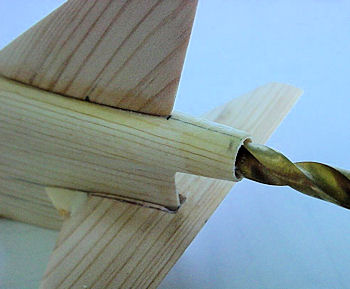
If there are any gaps, you can use
standard model putty or what ever you feel will work. This is one of the great
things about scratch building. Remember that it is your model and you can use
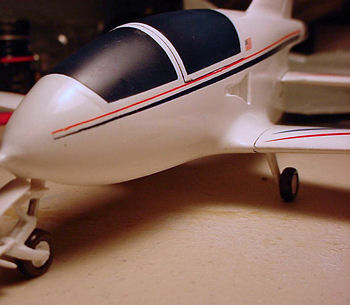
what ever you what, to make it! I used wire for the Pitot and to strengthen the
nose wheel. The wheels are from leftover plastic kit parts. Everything
 else is
wood.
else is
wood.
 My favorite saying is, “The longer
it takes, the faster it gets done”. To some it may sound like I have been around
the glue and paint too long, but please let me explain. If you have been
modeling for some time, you know that you have hurried and messed up big time!
At that point, you wish you had waited a little longer for the glue or paint to
dry!! Now there is
My favorite saying is, “The longer
it takes, the faster it gets done”. To some it may sound like I have been around
the glue and paint too long, but please let me explain. If you have been
modeling for some time, you know that you have hurried and messed up big time!
At that point, you wish you had waited a little longer for the glue or paint to
dry!! Now there is
 sanding, stripping, and/or reassembling to perform! You would
have taken less time to build if you didn’t rush things. This is where I came up
with the saying.
sanding, stripping, and/or reassembling to perform! You would
have taken less time to build if you didn’t rush things. This is where I came up
with the saying.
| COLORS & MARKINGS |
You first need to seal the wood to prevent the wood grain from showing through the model’s finish. You can prime it, sanding sealer dope (a type of paint), or even smear wood glue on the outside. Any way you choose, you will need to perform a final sanding before painting.
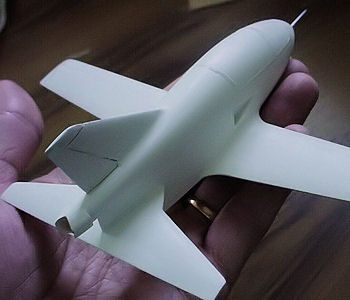 After the sealing and final sanding,
I spray a coat of flat white paint on the entire model. This eliminates the
optical illusion of the grain and helps identify the errors you may have. If
there’s an error, just simply fix it. Once everything looks good, spray it with
the base color and let it dry for about seven days. The drying time will help
prevent masking tape marks in the paint and help reduce possible paint
peeling/chipping off when adding other colors. Use good masking tape. I get my
supplies at my favorite local hobby store – Earls’ Hobby Hangar.
After the sealing and final sanding,
I spray a coat of flat white paint on the entire model. This eliminates the
optical illusion of the grain and helps identify the errors you may have. If
there’s an error, just simply fix it. Once everything looks good, spray it with
the base color and let it dry for about seven days. The drying time will help
prevent masking tape marks in the paint and help reduce possible paint
peeling/chipping off when adding other colors. Use good masking tape. I get my
supplies at my favorite local hobby store – Earls’ Hobby Hangar.
Put on the final colors and decals if you wish. The decals can be from other model leftovers. Remember it is your model and you are the manufacturer. Now spray the entire model with a clear coat to seal it all up. Now here comes the best part. Sit back and enjoy what you have created. It is yours. There isn’t another like it. Now sing out LOUD…and I did it MY WAY!!
| CONCLUSIONS |
Scratch building is another rewarding aspect of this hobby. Just think of all the cool things you can make! If you have ever wanted a model that no one has ever made, now you can. The model can be real, or futuristic fantasy, or even one of those “it could have been”. You can learn to make parts that will make the plastics better.
Enjoy and don’t cut your self!!
October 2006
| REFERENCES |
Phil Gladstone – One of the greatest persons I have known and my mentor
Copyright ModelingMadness.com. All rights reserved.
If you would like your product reviewed fairly and fairly quickly by a site that has over 325,000 visitors a month, please contact the editor or see other details in the Note to Contributors.
Back to the Review Index Page 2021