| KIT: | Welsh Models 1/144 Boeing™ 757 |
| KIT #: | SL46a |
| PRICE: | Current offering about $60.00 |
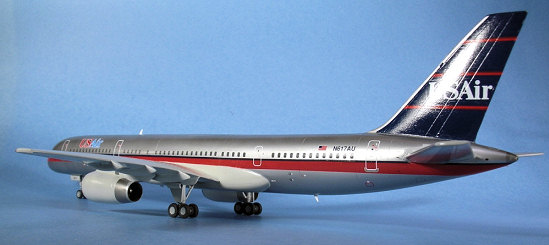
| DECALS: | One option; U.S. Air |
| REVIEWER: | Ben Brown |
| NOTES: | Vacuform and injection-molded plastic with white metal detail parts, Bra.z resin engines, Flying Colors window decals |
| HISTORY |
First flown on
Feb. 19, 1982, the Boeing 757-200 was intended to be a more fuel-efficient
replacement for the 727 as a medium range airliner. With a maximum take-off
weight of 255,000 pounds, the 757 can carry between 200 and 228 passengers. It
could be fitted with either Rolls-Royce or Pratt & Whitney engines, ranging from
36,600 to 43,500 pounds of thrust. With these engines, the 757 is quieter,
flies higher, and uses 43% less fuel than the 727. When the prototype first
flew, Boeing didn’t have much experience with high-bypass engines, and employees
were surprised by how quiet they were. These new engines gave the 757
 outstanding single-engine performance, and could launch the jet up to a maximum
altitude of 42,000 feet. The 757 can cruise at up to 493 knots and has a range
of almost 4000 miles at maximum take-off weight.
outstanding single-engine performance, and could launch the jet up to a maximum
altitude of 42,000 feet. The 757 can cruise at up to 493 knots and has a range
of almost 4000 miles at maximum take-off weight.
The 757 was designed in conjunction with the wide-body 767; they share the same cockpit and have a common pilot type rating. The 757 design was originally to have a T-tail, but Boeing eventually settled on a conventional tail. The new jet had the same fuselage cross-section as the 707, 727, and 737, but with an updated wing, nose, “glass” cockpit, and high-bypass fan engines. The design of the cockpit was partly influenced by the September, 1978 mid-air collision between a PSA 727 and a light civil plane. Boeing decided to study the “vision-capability” of the 727’s cockpit and make changes in cockpit design to help the crew “see and avoid” other traffic. The 757 would only have a two-pilot crew instead of the 727’s two pilots and a flight engineer.
Boeing officially launched development of the 757 in 1979, with orders from Eastern Airlines and British Airways. Initial sales were slow, but then ramped up during the 1980s. Sales peaked in 1989, with 166 orders. In 1996, Boeing decided to add a stretched version to the line: the -300. Unfortunately, this version wasn’t successful, with only 55 being sold. US airlines accounted for most of the 757s and sales continued to drop during the ‘90s, as the US airlines started their slow, agonizing financial decline. After 9/11, 757 sales dried up completely, with ATA being the only US airline to order a 757. The last 757, serial number 1050, rolled out of Boeing’s Renton, WA plant on October 18, 2004.
| THE KIT |
I bought this multi-media kit back in the mid-90s, but lack of time and too many other modeling projects kept it on the shelf. Then Minicraft released their 757 kits, which seemed to spell the end of this kit’s hopes of ever getting built. When I finally got around to building a 757, I learned that the Minicraft kit isn’t much of a replacement for the Welsh kit after all. Welsh’s 757 is more accurate, and to my eye it looked like it wouldn’t take much more work to build than it would to correct the many faults of the Minicraft kit. Welsh is currently reworking their 1/144 line to have injected resin parts instead of vacuformed plastic, although I understand the initial re-release of the 757 is supposed to have a vac fuselage. Personally, I’d be happy staying with a vac fuselage (without the windows!) with detailed resin wings, wheels, wheel wells, and engines. That would keep the cost down a little.
Welsh’s 757 comes with a single vacuformed sheet containing two fuselage halves with indentions for windows and recessed panel lines, and four bulkheads for strengthening the long, thin fuselage. According to information I’ve found on a couple of airline modeling forums, the fuselage is accurate in shape and dimension.
The wings, horizontal stabilizers and Rolls-Royce engines are molded in tan, low-pressure injected plastic. Typical of low-pressure-molded parts, these need some clean-up and tweaking to get everything to fit. They definitely won’t click together like Tamiya parts. The wings and stabs look pretty good and have scribed panel lines. The trailing edges are a little thick, but nothing a little sanding won’t fix. The wings are molded in upper and lower pieces, but instead of the lower section nesting inside the upper, the upper nests inside the lower, probably so Welsh would not have to include the flap fairings as separate pieces. This causes a rather nasty seam on top of the wing that runs along the panel line that makes up the ailerons and spoilers. The engines have the right shape, but one must hollow out the exhaust section and build the interior details from scratch.
 A small bag of white metal
parts includes landing gear, wheels, gear doors, and the front sections of the
engines containing the fans. These parts are all nicely-cast, with good
detail and not much cleaning up required. The gear doors are a little
thick for this scale, and the main gear struts are missing the retraction arms.
The flat plate at the top of each main gear strut needs some trimming to fit in
the gear well openings. The engine faces look good, but a little
test-fitting showed that it would take quite a bit of work to get them to fit
the engine nacelles.
A small bag of white metal
parts includes landing gear, wheels, gear doors, and the front sections of the
engines containing the fans. These parts are all nicely-cast, with good
detail and not much cleaning up required. The gear doors are a little
thick for this scale, and the main gear struts are missing the retraction arms.
The flat plate at the top of each main gear strut needs some trimming to fit in
the gear well openings. The engine faces look good, but a little
test-fitting showed that it would take quite a bit of work to get them to fit
the engine nacelles.
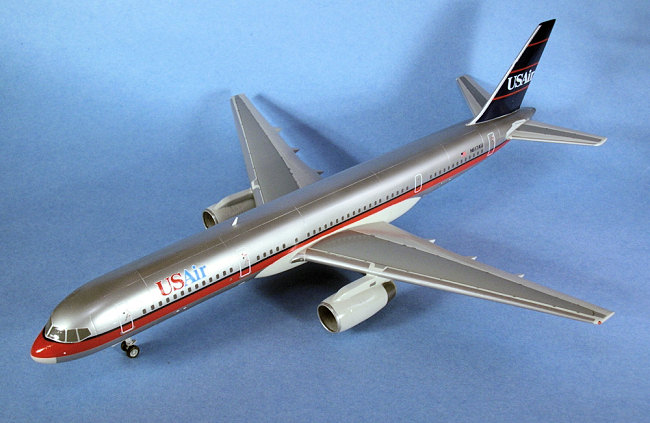
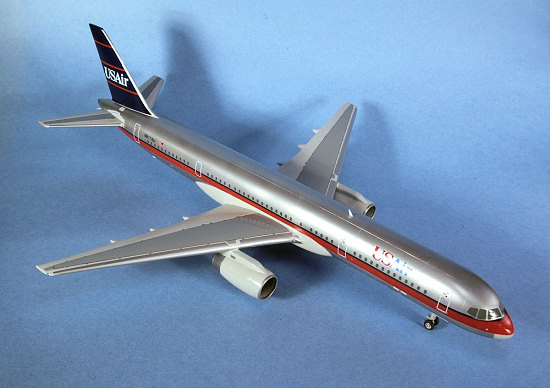
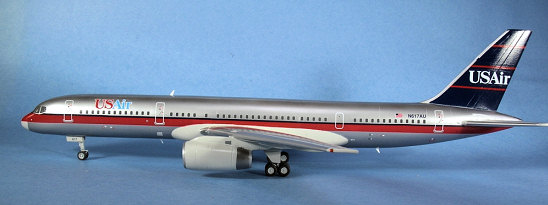
A large decal sheet includes tail markings, stripes, and doors for a natural metal USAir jet. In addition to the USAir livery, this kit has also been released with markings for Icelandair, British Caledonian, and Royal Air Maroc (with Pratt & Whitney engines). There are no windows provided on the decal sheet, Welsh intending that the modeler either cut out or paint all 108 of the model’s windows.
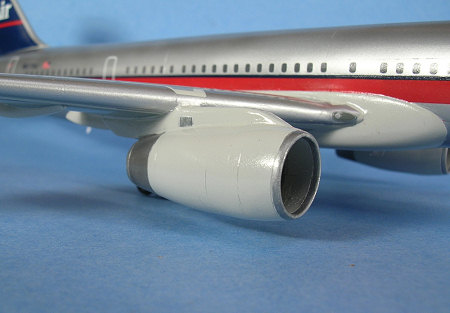
Bra.z has released some beautiful Pratt & Whitney and Rolls-Royce engines for the Minicraft 757 kits, and these make building the Welsh kit much easier. Bra.z’s resin engines are beautifully cast in front and rear sections, and include the engine pylons. The exhaust detail is especially good. The only problem with these engines is that the main sections of engine nacelles are 1mm wider than the fan section, but this can be fixed with some sanding.
In case you’re wondering, here are a few of the most obvious problems with the Minicraft kit:
-The entire kit has fit problems, especially with the fuselage and where the wings attach.
-The fairings where the wings attach don’t match, with one wing sitting higher than the other, so the model will not sit straight on its landing gear.
-The airfoil of the right wing at the fuselage joint is 1mm thicker than the left one.
-According to a couple of internet sources, Minicraft’s fuselage is 5mm too long aft of the wing. Assuming Welsh’s drawings are accurate, the leading edge of the Minicraft kit’s tail starts the correct distance from the tip of the nose, and the trailing edge hits the correct distance from the aft tip of the fuselage, so the tail ends up being 5mm too long in chord. Someone using aftermarket decals meant for the Welsh kit may have some fit problems when using them on the Minicraft kit.
-The engines point up at an angle when attached to the wing.
-I’ve seen several reviews mention that the forward fuselage around the cockpit has shape problems.
Bra.z makes a lot of correction parts for this kit, as well as a conversion for a 757-300.
| CONSTRUCTION |
 Welsh’s kits are
a good place to start in the search for a cure for “vacuphobia,” the fear of
building vacuformed kits. 1/144 airliners are pretty simple to begin with, and
in many of Welsh’s kits, the only vac bit is the fuselage.
Welsh’s kits are
a good place to start in the search for a cure for “vacuphobia,” the fear of
building vacuformed kits. 1/144 airliners are pretty simple to begin with, and
in many of Welsh’s kits, the only vac bit is the fuselage.
Construction begins by cutting the fuselage halves out of the sheet. I used a Sharpie marker to draw around the fuselage parts, making sure the ink went into the crease between the part and the waste. I then scribed around the edge of the parts with a new Xacto blade, and gently broke the parts free. You don’t need to cut all the way through the plastic, just score it. When you bend the plastic slightly, it will break along the score. If you accidentally cut into the part, it’s usually a good idea to go back and carefully cut completely through the plastic in that area. Otherwise, when you try to break the part free from the sheet, the break will follow the score you made, right into the part. Once the parts were cut out, I used a coarse sanding stick to remove the exposed white plastic around the edges of the parts. When there was no edge of white left around the black marker, I was done. An hour’s work, and then I could carry on almost as if I were building an injection-molded kit.
I didn’t want to fill 108 individual passenger windows, so I tried a method I had seen suggested on one of the modeling forums. Following the panel lines that run above and below the windows, I cut strips out of the fuselage and replaced them with strips of scrap styrene. These were backed with wider strips and super glue to help keep them in place and to reinforce the thin plastic of the fuselage. I filled the gaps with Super glue and sanded everything smooth, then repeated the process several times until all traces of the surgery had been removed. This turned out to be the most time-consuming task of the build, at least doubling the kit’s construction time. I should have just filled the windows with super glue and been done with it!
The four bulkheads provided would have worked great, but only the front and rear ones fit. The two mid-fuselage bulkheads were too small by several millimeters, so I went with another method suggested in the instructions of Dynavector’s Scimitar kit. I cut several rectangles of scrap styrene that were slightly smaller than the height of the fuselage. After beveling what would be the outboard edges of the scraps to give the glue more surface area to bite, I glued one forward and one aft of the wing fairing in each fuselage half so I had four vertical plates running parallel to the fuselage seam (perpendicular to the fuselage bulkheads), a few millimeters outboard of the seam. If you squeeze the fuselage sides, the plates will keep the top and bottom of the fuselage from expanding, and they resist if you try to squeeze the top and bottom of the fuselage in. It’s usually a good idea to do this before you cut the parts out of the sheet, so the parts are the correct shape and not distorted, but I couldn’t since they would have interfered with my “fixing” the passenger windows. I used the three-view drawings on the instruction sheet and the kit’s landing gear struts to figure out how deep the nose gear well should be, then built one with scrap plastic. Since I wasn’t going to use the kit engines, I used the white metal engine faces as ballast to make sure the model wasn’t a tail-sitter. Why let a couple of perfectly good chunks of metal go to waste? Before closing everything up, I glued strips of styrene around the edges of the fuselage to give a stronger bond and help the two fuselage halves line up. I was expecting a little mismatching of the two halves when I glued them together, but they popped together perfectly, with every panel line matching up! Minicraft’s 757 fuselage doesn’t come close to fitting together this well. I needed a touch of super glue in one small spot to fill a gap where I had removed a little too much plastic, but the rest of the seam required just a little Mr. Surfacer. I drilled a hole in the aft tip of the fuselage (spitting the seam in the process) and inserted a short section of thin-wall brass tube for the APU exhaust.
The fuselage turned out to be pretty sturdy, except for the flat belly at
mid-fuselage, and the seam on top of the fuselage directly above it. I cut a
hole in o ne of the indentions where the wings attach and passed a couple of
styrene “plates” and an I-beam made from scrap through it to reinforce the
plastic in the wing area. There was still a little more flex there than I
wanted, and I was afraid I’d pop a seam loose when I masked the model, so I
dumped some five-minute epoxy in through the hole to reinforce the belly and the
top of the fuselage. This helped a lot, but it’s just a fact of life that a vac
kit is not going to be as sturdy as an injected one.
ne of the indentions where the wings attach and passed a couple of
styrene “plates” and an I-beam made from scrap through it to reinforce the
plastic in the wing area. There was still a little more flex there than I
wanted, and I was afraid I’d pop a seam loose when I masked the model, so I
dumped some five-minute epoxy in through the hole to reinforce the belly and the
top of the fuselage. This helped a lot, but it’s just a fact of life that a vac
kit is not going to be as sturdy as an injected one.
Each wing consists of an upper and lower half, with shallow indentions for the gear wells. These need to be deepened so the model will not sit too high on its landing gear. I cut the plastic out of the kit wells and then glued some styrene scrap to the inside of the wing to for a new “ceiling.” The plastic of the lower wing half is think enough that this makes a nice, deep wheel well. I sanded the mating surfaces of the wings flat before gluing them together, but there were still some large gaps here and there. I filled the large seams on the tops of the wings, then sanded everything smooth. I also thinned the overly-thick wing trailing edges, then rescribed all of the lost panel lines. The wings are supposed to plug into indentions in the fuselage sides but they don’t quite match up. I sanded the ends of the wings down so they would fit better, but I never could get them to fit into the indention. I ended up holding them against the fuselage, dousing the joint with liquid cement, then filling the gaps with lots of super glue.
Once the wings were on, I assembled the Bra.z resin engines. The only casting flaw I found on either engine was an air bubble at the tip of one pylon, which I fixed with a little super glue. As previously mentioned, one nacelle was much wider than the fan section, so I glued the fan in place and sanded the nacelle to match. Be very careful when sanding these engines. The hot section details go almost all the way up to the pour block and it is very easy to sand right through the paper-thin resin is in this area. Fortunately, the resin you need to remove is all forward of the thin area. The tops of the pylons are shaped to fit the Minicraft kit, so I had to do some minor reshaping on them to get them to fit the curvature of the Welsh kit’s wings. Finally, I added the horizontal stabilizers and filled the gaps with putty and Mr. Surfacer.
| COLORS & MARKINGS |
This model had a simple paint scheme of natural metal and Boeing Grey, with everything else taken care of with decals. I painted the natural metal areas with Alclad II, which is so idiot-proof even I can get good results with it. I first sprayed the entire model with Alclad’s grey primer. Once this was dry, I polished the model by wet sanding it with 600- and 1200-grit sand paper then let everything dry for a couple of days. I used Alclad II Aluminum for the fuselage and Dark Aluminum for the exhaust areas of the engines and APU. I then masked off the metal areas and painted the wings, stabilizers, wing fairings, and landing gear parts with Xtracolor Boeing Grey.
After letting the Xtracolor dry
for a couple of days, I applied the kit decals. They fit great and laid down
into every panel line. Unfortunately, the red wasn’t very opaque, so you could
see the grey radome and silver paint on the tail through the red. Had I known
this beforehand, I would have just cut around the red parts of the decals with
an Xacto and then sprayed a thin coat of red paint over them before applying
them to the model. Since the Welsh decal sheet is identical to Flight Path’s
USAir 757 sheet, I scoured the internet and found a second decal sheet so I
could double-layer the red and white markings. I had originally just painted
the windscreen openings molded into the fuselage dark grey rather than try to
fill them, but once the fuselage stripes were in place, it finally dawned on me
that the windows were much too small. This led to a semi-successful emergency
effort to fill the 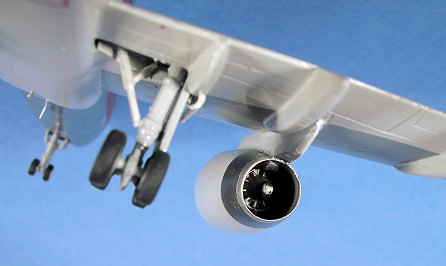 indented windows with .005 styrene and super glue without
damaging the surrounding paint and decals. I thought I had all of the seams
between the fuselage and the styrene sheet filled, but you can still see some
faint outlines under the windscreen decal and there are curves where there
should be flat glass.
indented windows with .005 styrene and super glue without
damaging the surrounding paint and decals. I thought I had all of the seams
between the fuselage and the styrene sheet filled, but you can still see some
faint outlines under the windscreen decal and there are curves where there
should be flat glass.
In addition to the above-mentioned windshield decal, the detail sheet from Flying Colors (FC44-043, available from Airline Hobby Supplies and Modelairliners.com) also has windows, doors, stencils, and corogard panels for the wings. These look great and worked fine on flat areas, such as the tops of the wings and the fuselage sides, but I had a lot of trouble getting them to conform over any kind of curved surface, especially since they appeared to be resistant even to Solvaset. I had trouble with the silver decals for the leading edges of the wings and tail, as well as the corogard panels for the undersides of the wings. They were very difficult to cut, even with a new Xacto blade. I ended up replacing the silver decal on the tail with a couple of sections cut from Microscale silver decal film. I had to be careful handling the model after the decals were applied, because the Flying Colors decals tended to lift off very easily. The Welsh/Flight Path decals stayed put. Rather than try to mask for multiple colors inside the intakes, I just painted the fans and the intake lips, then used strips of decal film that I had painted Gull Grey to take care of the composite areas between them.
Once the decals were dry, I sprayed the model with a coat of Future. The Future cut down on the Alclad’s natural metal look, but it was the best way I could come up with to keep the Flying Colors decals on the model.
| FINAL CONSTRUCTION |
Final assembly involved gluing the landing gear, doors, red anti-collision beacons, and antennae on the model. The main gear didn’t include retraction struts, so I made these with styrene left over from the kit. That’s one of the good things about vac kits; you have tons of scrap styrene to build extra bits with, so you don’t have to buy a lot of Evergreen strip and sheet. The main gear struts have flat plates molded to the tops of the struts, but the gear wells I made were not quite deep enough to just glue the struts in place. I cut the plates off and drilled holes in the top of the gear wells to accept the struts. This also let me adjust the length of the struts so the model wouldn’t sit too high or too low on its landing gear. I’m not sure any two main gear wheels in the kit were the same diameter (or even round, for that matter), probably due to limitations in casting white metal. I filed the wheels down a little in a futile attempt to get all ten wheels on the ground. I cut the antennae from .010 sheet, as well as a couple of sabre drains that are visible in walk around photos.
| CONCLUSIONS |
 As I’ve
previously said, Welsh makes some of the best vacuform kits in the business.
Even with a few minor engineering problems to solve, this kit gave me less
trouble than some injection-molded kits I’ve built, and I’ve used quite a bit
more filler on other kits than I used on this one. Replacing the kit engines
with the excellent resin ones from Bra.z makes the construction much easier, and
if I had used super glue to fill the windows, I could have saved myself many
hours of extra work. I was a little disappointed with the Flying Colors
decals. They look great, but they are temperamental to apply and didn’t stick
well to the model.
As I’ve
previously said, Welsh makes some of the best vacuform kits in the business.
Even with a few minor engineering problems to solve, this kit gave me less
trouble than some injection-molded kits I’ve built, and I’ve used quite a bit
more filler on other kits than I used on this one. Replacing the kit engines
with the excellent resin ones from Bra.z makes the construction much easier, and
if I had used super glue to fill the windows, I could have saved myself many
hours of extra work. I was a little disappointed with the Flying Colors
decals. They look great, but they are temperamental to apply and didn’t stick
well to the model.
While not for beginners, Welsh’s vac kits, like Koster’s and Dynavector’s, are a good place to start for modeler with a little experience wishing to have a go at a vacuform kit. I hope Welsh re-releases this one very soon!
The new version is kit SL177P and replaces the injection molded plastic parts with injected resin, which fixes the only problem areas in the kit (mainly, the engines). Current livery is the new, post Wavy Gravy Delta Airlines livery. Price is £28.51p (about $60US). The kit is also available as a 757-300. Welsh's web site is: http://www.welshmodels.co.uk/
Model and decals courtesy of my wallet.
| REFERENCES |
Airliners.net http://www.Airliners.net
Airliners In Detail http://members.tripod.com/~aravm98/reference/AIDindex.htm
Boeing, Commercial Airplanes web site http://www.Boeing.com
Seattle Post-Intelligencer “Last 757 is ready to roll.” Monday, October 25, 2004 http://www.seattlepi.com
Sources:
Welsh
Models
densilwade@welshmodels.co.uk
Airline Hobby Supply
http://www.airline-hobby.com/
Modelairliners
http://modelairliners.hypermart.net/merchant.mv?Screen=SFNT&Store_Code=M
July 2007
If you would like your product reviewed fairly and quickly by a site that has over 300,000 visitors a month, please contact me or see other details in the Note to Contributors.