High Planes 1/72 DH.94 Moth Minor
|
KIT #: |
7281 |
|
PRICE: |
$25.00 SRP |
|
DECALS: |
Five options |
|
REVIEWER: |
Peter Burstow |
|
NOTES: |
Resin kit |

 Designed
as a low wing monoplane replacement for the Moth series, the Moth Minor was
first flown in 1937.
Around 100 were built at De
Havilland's Hatfield factory before WW2. Production was shifted to de
Havilland's Australian subsidiary in 1939, were about 40 more were produced.
Designed
as a low wing monoplane replacement for the Moth series, the Moth Minor was
first flown in 1937.
Around 100 were built at De
Havilland's Hatfield factory before WW2. Production was shifted to de
Havilland's Australian subsidiary in 1939, were about 40 more were produced.
Many
were impressed by various air forces during WW2, being used for training,
liaison work and as squadron hacks. The aircraft saw service with the RAF, RAAF,
RNZAF, USAAC, Indian and South African air forces. Some are still flying in the
UK and Australia.
Coming in a small end opening box, there are 25 pink coloured resin parts, and
four vac-formed windshields. The one piece lower wing casting was a little
warped. There are no visible bubbles.
The parts have a smooth surface finish, with fine but soft raised panel
lines. The prominent stringer is moulded nicely as are the anti-spin strakes.
There is fabric detail on the control surfaces.
 Cockpit detail is sparse, with seats and control
sticks to be attached to a floor, and instrument panels. There is some structure
moulded on the inside of the cockpit walls, that a bit of painting should bring
out. A bit more detail may be wanted as there is a relatively large cockpit
opening and no crew figures supplied, although crew are shown on the box top. Some
of the small parts were detached from the pouring stub and supplied attached to
a piece of tape.
The vac-formed windshields are tiny, delicate and very clear. A nice
touch is the provision of spares.
Cockpit detail is sparse, with seats and control
sticks to be attached to a floor, and instrument panels. There is some structure
moulded on the inside of the cockpit walls, that a bit of painting should bring
out. A bit more detail may be wanted as there is a relatively large cockpit
opening and no crew figures supplied, although crew are shown on the box top. Some
of the small parts were detached from the pouring stub and supplied attached to
a piece of tape.
The vac-formed windshields are tiny, delicate and very clear. A nice
touch is the provision of spares.
The decal sheet, printed by Wessex Transfers,
supplies markings for five RAAF aircraft in a variety of schemes, all yellow,
all silver, and some camouflaged examples.
The instructions are two sheets of A4, clearly printed on both sides in
English, showing a short history, assembly notes with details of extra bits
needing scratch built, exploded diagrams, colour painting and decalling guide
with coloured profiles and plans. It includes paint references with FS numbers.
It does not show placement of the smaller parts, but most of these are shown on
the profiles.
 The
usual start for a resin kit was done, the parts were all washed in warm soapy
water to remove any release compounds, and the remains of pouring stubs were
removed from the major components. All cutting, sanding and filing was done wet
to minimise dust. The pink resin was slightly soft and flexible, much more like
polystyrene than the usual resins. It was easy to sand and shape.
The
usual start for a resin kit was done, the parts were all washed in warm soapy
water to remove any release compounds, and the remains of pouring stubs were
removed from the major components. All cutting, sanding and filing was done wet
to minimise dust. The pink resin was slightly soft and flexible, much more like
polystyrene than the usual resins. It was easy to sand and shape.
The one
piece lower wing casting was a little warped and both the upper wing castings
had a small twist. The warp and twists were easily fixed with very hot water and
gentle pressure. The mating surfaces were given a light sand to clean them up. Unusual
for a resin kit, locator pins were cast on the fuselage and wing halves,
assisting in positive location.
The
seats and control sticks were attached to the floor, which had rudder pedals
moulded. There were lugs moulded into the floor matching slots in the base of
the seats, ensuring a positive location.
There was a small bubble on one seat, easily filled with
a drop of superglue, and then hidden under a masking tape seat belt. The
instrument panels were added to one fuselage half. I then painted the cockpit a
light brown, to represent plywood. Then I picked out details and the instrument
panels in dark brown, black and silver. There is some structure moulded on the
inside of the cockpit walls, including a throttle and other unidentified
controls, that detail painting brought out. I added masking tape seat belts.
I had to
thin the cockpit floor slightly to allow the fuselage to close up. I also had to
remove some of the fuselage side detail which interfered with the front seat. I
think I mounted the seat a little off centre on the
 floor.
The floor fitted positively into lugs cast into one of the fuselage halves. Once
the fuselage was closed up I ran a bead of superglue around the joint and left
it to harden. Later I sanded and cleaned up the joint.
floor.
The floor fitted positively into lugs cast into one of the fuselage halves. Once
the fuselage was closed up I ran a bead of superglue around the joint and left
it to harden. Later I sanded and cleaned up the joint.
I joined
the two upper wing halves to the one piece lower half, there were a couple of
small bubbles and one large bubble in the wing parts, all were filled with
superglue. The leading edge joint needed a little filling and cleaning up. The
wing to fuselage fit was not good, with a large gap between the wing top
surfaces and the fuselage. It took a couple of sessions to fill this, first with
Squadron green, then superglue.
I then added the tail surfaces, the undercarriage main legs and
the cowling nose, which was short and needed built up at the bottom and faired
in to the fuselage.
A thorough wash in warm soapy
water to remove any dust, superglue catalyst and crud and it was ready for
painting.
The
supplied decal sheet, printed by Wessex Transfers, has markings for five RAAF
aircraft in a variety of schemes, one all yellow, two all silver, and two
camouflaged examples.
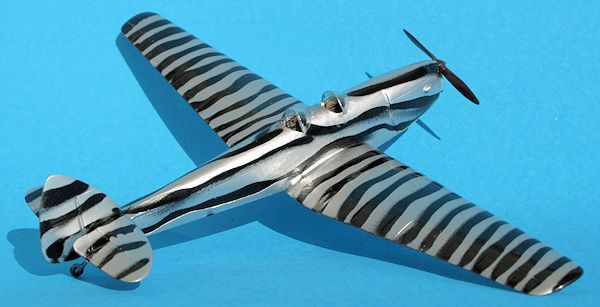
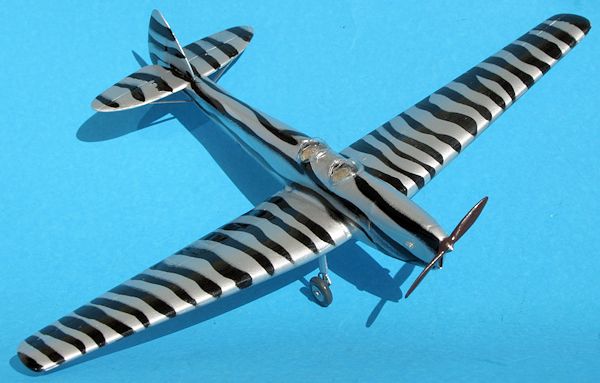
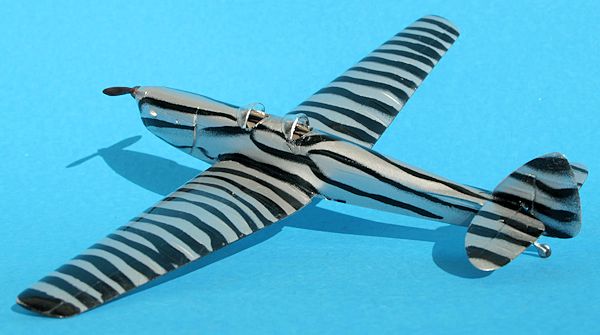
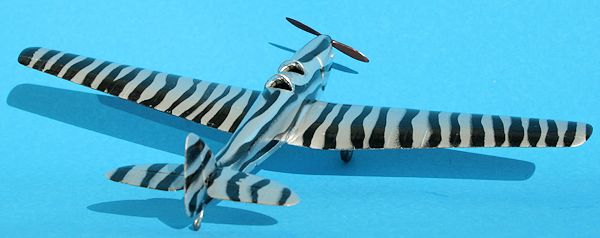
Though
the supplied options were tempting, I wanted to try something different. In
1941, inspired by a 'local artist' several RAAF aircraft were painted in
experimental schemes designed to make them more difficult targets. It must not
have worked well as the RAAF used much the same schemes as RAF or USAAF
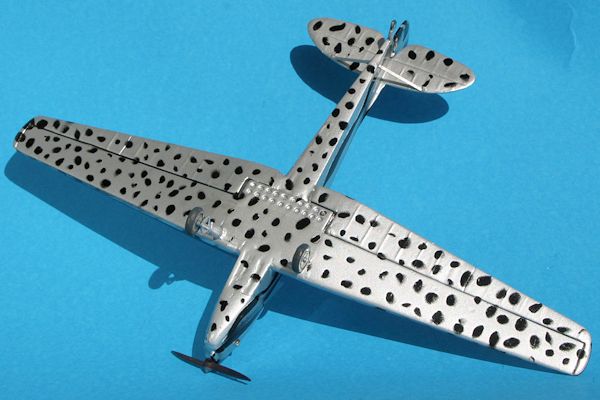
aircraft, though with generally darker colours. A Moth Minor was painted or more
probably doped, overall a light colour then had dark wavy longitudinal stripes
on the upper surface and fuselage, the lower surface being
 spotted.
Two rather poor photos are in Pentland, and an interpreted profile, shown as
silver background with black stripes. I have seen another photo of this
aircraft, even poorer than the ones in the book, it was in the background and
under some trees, which didn't help much. One advantage of this scheme is that
no markings were applied to this aircraft, meaning I could put the whole decal
sheet into the stash.
spotted.
Two rather poor photos are in Pentland, and an interpreted profile, shown as
silver background with black stripes. I have seen another photo of this
aircraft, even poorer than the ones in the book, it was in the background and
under some trees, which didn't help much. One advantage of this scheme is that
no markings were applied to this aircraft, meaning I could put the whole decal
sheet into the stash.
I primed
the model in gloss black enamel, my standard approach to metallic finishes, then
after fixing a few glitches, started masking with blue-tack. After a number of
sessions I finally finished the masking. Small lines over the upper surfaces and
lots of tiny balls, about 150, over the lower surfaces. Small bits of blue-tack
seem to stick to anything except gloss paint. The masked model looked very
silly, and I was beginning to have doubts about my choice of schemes.
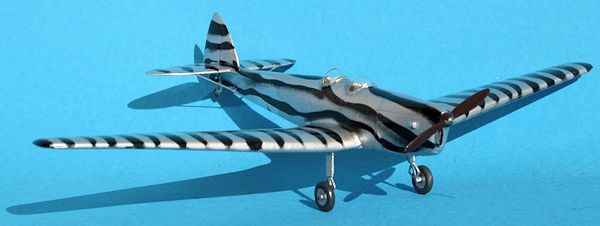
 I then
sprayed with Tamiya TS-30 “silver leaf” with a rattle can. I gave it three or
four light coats. This paint gives a finish very like silver dope, and does not
dissolve blue-tack, but I wasn't sure how well it would stick to the gloss
enamel primer.
I then
sprayed with Tamiya TS-30 “silver leaf” with a rattle can. I gave it three or
four light coats. This paint gives a finish very like silver dope, and does not
dissolve blue-tack, but I wasn't sure how well it would stick to the gloss
enamel primer.
I left
it alone for about a week, to let the paint harden up, and because I kept
putting it off. One morning I got stuck in and removed all the blue-tack balls
and sausages, expecting disaster, but it all looked good. The Tamiya spray
covered the black enamel well, it could easily be scraped off with a toothpick,
but was strong enough for careful light handling. After a light clean with a
cotton bud to get rid of traces of the glue balls, I gave it a coat of floor
polish to protect the finish.
I
pre-painted and then added the little bits and pieces, the wheels and propeller.
I replaced the resin tail struts with evergreen strip. The supplied vacformed
windscreens were a little big, and needed some coercion to fit neatly. I didn't
fit the tiny venturi and mass balances, they were just too small for me to
handle. A tiny bit of touch-up painting around the cockpits, and another coat of
floor polish and it was done.
A easy
and enjoyable build of a small resin model. There were no construction problems,
other than the expected tiny parts and clumsy hands, and only the usual filling
and sanding. I can't comment on the kit
 decals as
I didn't use them, but they look OK.
decals as
I didn't use them, but they look OK.
I
complicated the build by choosing a difficult paint scheme, the masking was
tedious and seemed to take forever. No doubt the 'rivet police' will complain
about the stripes being too wide, the profile I copied shows about 18 stripes on
each wing, I've only got 14. The weird camouflage makes it really stand out from
the crowd in the display case. While it looks like it would only be effective if
the plane was surrounded by zebra, the aircraft outline disappears against a
dark and varied background.
A nice
addition to my De Havilland Moth collection. Recommended for anybody, and a good
first resin kit with it's small parts count.
http://en.wikipedia.org/wiki/De_Havilland_DH.94_Moth_Minor
Geoffrey
Pentland, RAAF Camouflage & Markings Volume 1, Kookaburra, Melbourne, 1980
Flight magazine,
July 29, 1939 issue. (this article has a cut-away drawing and several good
detailed photos, essential for the super-detailer)
http://www.flightglobal.com/pdfarchive/view/1939/1939%20-%202007.html
Kit
Instructions.
Peter
Burstow
May 2013
If you would like your product reviewed fairly and fairly quickly, please contact the editor or see other details in the
Note to
Contributors.
Back to the Main Page
Back to the Review
Index Page