Monogram 1/133 TWA Super Connie
|
KIT # |
6058 (Heritage Edition) |
|
PRICE: |
$? |
|
DECALS: |
One aircraft |
|
REVIEW : |
|
|
NOTES: |
|
|
HISTORY |
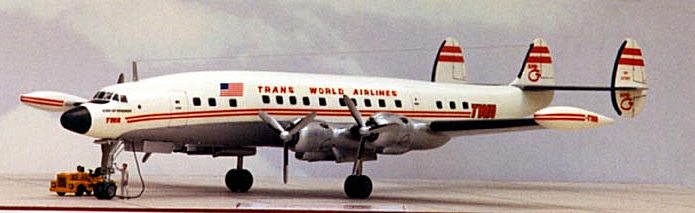
Design of the Lockheed Model L-49 began in 1939 to meet the requirement of Pan American Airways and Transcontinental & Western Air (now Trans World Airlines) for a 40-passenger airliner to use on domestic routes. Manufacture was initiated, but with the outbreak of World War II, aircraft on the production line were commandeered for service with the USAAF as transports under the designation C-69.The first was flown on January 9, 1943 and 22 entered USAAF service before the contract was canceled following VJ-Day. Production of civil aircraft began under the company designation L-049 Constellation, using components that had been intended for the C-69's, but with the interior finished to airline standards and the basic accommodations for 43 to 48 passengers, or a maximum of 60 in a high-density layout. The first Constellation was certified for civil operations on December 11, 1945, the type entering service with Pan Am and TWA. TWA inaugurated the first US-Paris service on February 6, 1946.
 The first true
civil Constellations were Model L-649 aircraft with four Wright 749C-18BD-1
engines rated at 2,500 bhp each. There were far more luxurious interiors
seating 48 to 64 passengers as standard and 81 in a high-density arrangement.
This version was replaced in the production line in 1947 by the longer-range
L-749, but by the end of 1949, the demand for air travel was increasing and
airlines were looking for aircraft of greater capacity. This brought the
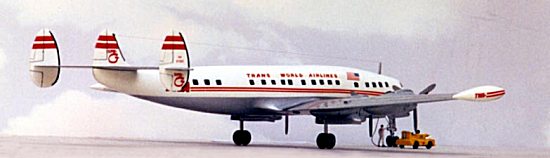
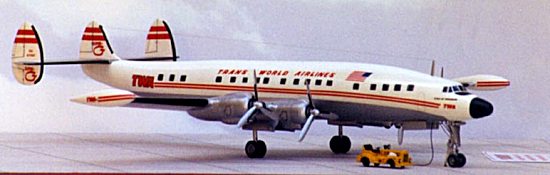
development of the L-1049 Super Constellation; with the fuselage lengthened by
18-foot 4- inches and Super 'Connies' entered service with a variety of
interior layouts that could seat a maximum of 109 passengers. The model
represents the Model 1049 Super Constellation.
Last of the civil Constellation derived aircraft was the Model L-1649A
Starliner, with a completely new wing of increased span and far greater fuel
capacity, providing a range far in excess of any of its predecessors. There
were many variants used by the USAF and US Navy after World War II. When
production ended in the late 1950's, a total of 856 aircraft in all versions,
both military and civilian, had been built.
The first true
civil Constellations were Model L-649 aircraft with four Wright 749C-18BD-1
engines rated at 2,500 bhp each. There were far more luxurious interiors
seating 48 to 64 passengers as standard and 81 in a high-density arrangement.
This version was replaced in the production line in 1947 by the longer-range
L-749, but by the end of 1949, the demand for air travel was increasing and
airlines were looking for aircraft of greater capacity. This brought the
development of the L-1049 Super Constellation; with the fuselage lengthened by
18-foot 4- inches and Super 'Connies' entered service with a variety of
interior layouts that could seat a maximum of 109 passengers. The model
represents the Model 1049 Super Constellation.
Last of the civil Constellation derived aircraft was the Model L-1649A
Starliner, with a completely new wing of increased span and far greater fuel
capacity, providing a range far in excess of any of its predecessors. There
were many variants used by the USAF and US Navy after World War II. When
production ended in the late 1950's, a total of 856 aircraft in all versions,
both military and civilian, had been built.
|
CONSTRUCTION |
 The propellers needed
much clean up to present them in an airfoil shape, as they were completely
flat in the back and a little too thick for my liking. The spinners needed
quite a bit of work in the rear of the blades. Landing gear assemblies had
only moderate mold seams, which I was able to remove with a deft hand and the
backside of an X-Acto #11 blade. Wheel seams were sanded smooth. I cut out the
support struts for the main gear struts and the nose gear strut. The nose gear
strut was rebuilt using fine wire. A small hole was drilled in the center
vertical tail to accept a small aerial attachment I constructed by wrapping
extremely small phono pick up wire around a sewing needle until I achieved the
size required. It was then attached to the predrilled hole with super glue.
The aerial wiring was done with smoke-colored invisible thread, a very fine
(.004-inch) nylon monofilament.
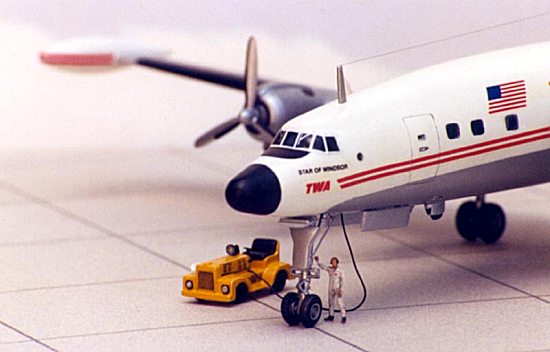
Tractor
- The utility tractor came with the kit, but I did a bit of modification on
it. I first removed all the tires, steering wheel and spotlight (only the
spotlight was reused, after I carefully drilled out and contoured the
opening). The tires were rebuilt with two sizes of Waldron punched disks. A
slab of .040 sheet styrene, which was cut to fit the inside opening once the
tractor halves were cemented together, represented an engine block and the
joint filled and sanded. Strips of sheet styrene were attached to except the
tires, but I positioned the front strips so that the tire would appear turned.
A steering wheel was made using a photoetched ring gunsight and a piece of
copper wire. This was painted black and set aside for final assembly into a
predrilled hole.
The propellers needed
much clean up to present them in an airfoil shape, as they were completely
flat in the back and a little too thick for my liking. The spinners needed
quite a bit of work in the rear of the blades. Landing gear assemblies had
only moderate mold seams, which I was able to remove with a deft hand and the
backside of an X-Acto #11 blade. Wheel seams were sanded smooth. I cut out the
support struts for the main gear struts and the nose gear strut. The nose gear
strut was rebuilt using fine wire. A small hole was drilled in the center
vertical tail to accept a small aerial attachment I constructed by wrapping
extremely small phono pick up wire around a sewing needle until I achieved the
size required. It was then attached to the predrilled hole with super glue.
The aerial wiring was done with smoke-colored invisible thread, a very fine
(.004-inch) nylon monofilament.
Tractor
- The utility tractor came with the kit, but I did a bit of modification on
it. I first removed all the tires, steering wheel and spotlight (only the
spotlight was reused, after I carefully drilled out and contoured the
opening). The tires were rebuilt with two sizes of Waldron punched disks. A
slab of .040 sheet styrene, which was cut to fit the inside opening once the
tractor halves were cemented together, represented an engine block and the
joint filled and sanded. Strips of sheet styrene were attached to except the
tires, but I positioned the front strips so that the tire would appear turned.
A steering wheel was made using a photoetched ring gunsight and a piece of
copper wire. This was painted black and set aside for final assembly into a
predrilled hole.
|
PAINT & DECALS |
 Kit decals were used
throughout, with exception of the door openings, which I riffled from an old
Airfix sheet. Windshield framing was represented with strips of white decal
trim film. The wing walks and all de-icing boots were done with black decal
trim film. A little touch up was needed with steam power black, which blended
perfectly. Rectangles of black trim film were applied to the wheel bays to
give a somewhat deeper appearance. I used three data placard decals for the
gear struts from Reheat Models sheet for such in 1/72 scale. The decals went
on with no hassle, but sad to say have a very slight hint of yellow in their
clear coats, which distinctly shows on the glossy white background. Once the
decals had dried, I had to touch up a few areas at the tip tank fronts and the
rear of the vertical tails.
The
entire model was lastly given another two coats of FUTURE (it is recommended
to let the first coat dry at least 24 hours before applying the second).
Kit decals were used
throughout, with exception of the door openings, which I riffled from an old
Airfix sheet. Windshield framing was represented with strips of white decal
trim film. The wing walks and all de-icing boots were done with black decal
trim film. A little touch up was needed with steam power black, which blended
perfectly. Rectangles of black trim film were applied to the wheel bays to
give a somewhat deeper appearance. I used three data placard decals for the
gear struts from Reheat Models sheet for such in 1/72 scale. The decals went
on with no hassle, but sad to say have a very slight hint of yellow in their
clear coats, which distinctly shows on the glossy white background. Once the
decals had dried, I had to touch up a few areas at the tip tank fronts and the
rear of the vertical tails.
The
entire model was lastly given another two coats of FUTURE (it is recommended
to let the first coat dry at least 24 hours before applying the second).
Ink washes were applied to the control recesses and engine areas. Windshield wipers were simulated with thin cut strips of silver auto stripping tape and stuck into position. The tractor was also primed in flat white at the same time as the plane. Once done, it was given three coats of Polly Scale Reefer Yellow (yep, you guessed it, a model RR paint). The wheels, engine, and seat were paint steam power black, with the tires later receiving a coat of Polly Scale Tire Black. The tractor was also given two coats of FUTURE and ink washes applied to the recesses and grill. The headlights were painted ModelMaster Chrome Silver and given a drop of Krystal Klear once the paint had set up. The battery charging wire was done with coating copper wire attached to predrilled holes in the tractor and the plane. Lastly I added two navigation lights to the tips tanks with small disks of Bare-metal foil (one painted clear red and the other clear green) and drops of Krystal Klear.
If you would like your product reviewed fairly and fairly quickly , please contact the editor or see other details in the Note to Contributors.
Back to Reviews Page 2020