|
KIT: |
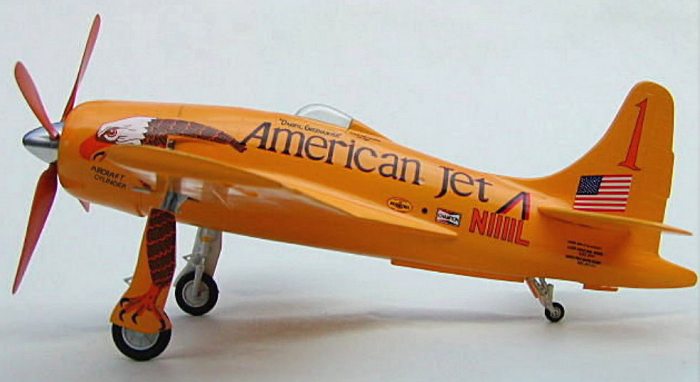
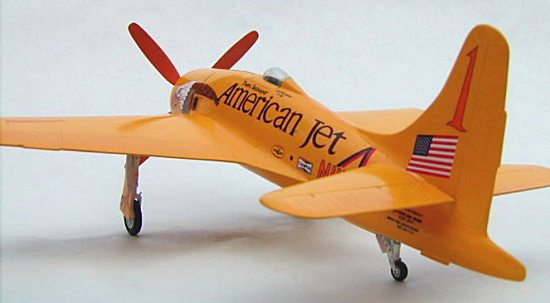
High Planes 1/48 "American Jet" F8F |
|
KIT # |
4906 |
|
PRICE: |
$46.00 |
|
DECALS: |
One aircraft |
|
REVIEW & |
Mark Gran |
|
NOTES: |
Short Run` |
|
BACKGROUND |
 About 3 months ago I was contacted by my good friend Steve Mesner to see if I
was interested in doing an online build/kit review with him. Having never done
this sort of thing before and since I only consider myself an average builder, I
was a tad nervous but shot the moon and said what the heck. The kits were from
High Planes and were of their 48th Bearcat Racing series. The two
kits represented Darryl Greenameyer’s racing Bearcat "Conquest 1" and in its
later guise as "American Jet." After some discussion, Steve decided he wanted to
do Conquest 1 which gave me American Jet (I like the nice bright yellow scheme
anyhow). Since Steve has already given us the history of this aircraft, let’s
get on with the build/review.
About 3 months ago I was contacted by my good friend Steve Mesner to see if I
was interested in doing an online build/kit review with him. Having never done
this sort of thing before and since I only consider myself an average builder, I
was a tad nervous but shot the moon and said what the heck. The kits were from
High Planes and were of their 48th Bearcat Racing series. The two
kits represented Darryl Greenameyer’s racing Bearcat "Conquest 1" and in its
later guise as "American Jet." After some discussion, Steve decided he wanted to
do Conquest 1 which gave me American Jet (I like the nice bright yellow scheme
anyhow). Since Steve has already given us the history of this aircraft, let’s
get on with the build/review.
|
THE KIT |
When I first got the kit in the mail, oh boy was I excited. I had been doing my research (which only led to 3 actual pictures-Steve provided an additional 2) and was eager to get started. Little did I know what was in store for me over the next couple of months. The kit (as Tom Cleaver warned me) is a limited run injection mold that comes in a light blue plastic (some of my pictures here look tan due to the background). The sprues were rather thick as were the attach points for the parts. To say there was a lot of clean up to do is an understatement. The main gear is cast out of white metal and looked rough at first glance. The canopy was beautifully vacuum formed and very clear. Well, it was time to get started.
|
CONSTRUCTION |
Fuselage
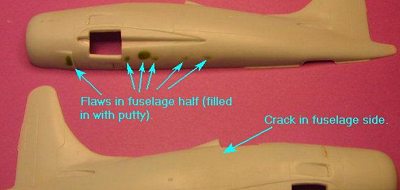 What I noticed first on my kit were some flaws in the right fuselage half due
to the plastic not flowing completely into the mold. The right fuselage half was
cracked about ½" where the aft portion of the canopy opening is. Some CA,
filler, and sandpaper remedied the flaws mentioned here. In fact, CA, filler and
sandpaper could be the theme of this build. After cleaning up the cockpit
opening, wheel wells and engine cowl opening, I sanded the fuselage halves
flush. I also ended up drilling out the exhaust stacks that were also molded as
part of the fuselage. I contemplated cutting these out and replacing them with
brass tubing but opted not to. The tail wheel openings didn’t match up when the
fuselage halves were taped together, so I ended up breaking out the Dremel and
after getting the openings close to match, went to work with a file and got this
little problem taken care of.
What I noticed first on my kit were some flaws in the right fuselage half due
to the plastic not flowing completely into the mold. The right fuselage half was
cracked about ½" where the aft portion of the canopy opening is. Some CA,
filler, and sandpaper remedied the flaws mentioned here. In fact, CA, filler and
sandpaper could be the theme of this build. After cleaning up the cockpit
opening, wheel wells and engine cowl opening, I sanded the fuselage halves
flush. I also ended up drilling out the exhaust stacks that were also molded as
part of the fuselage. I contemplated cutting these out and replacing them with
brass tubing but opted not to. The tail wheel openings didn’t match up when the
fuselage halves were taped together, so I ended up breaking out the Dremel and
after getting the openings close to match, went to work with a file and got this
little problem taken care of.
Wings
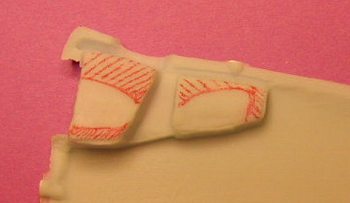 Where to start with the wings? Just to get the wing halves glued together,
one must shave down the wheel well from the inside of the lower wing. The area
shown in red cross hatch represents the areas that had to be ground down in
order for the wing halves to fit together. The wing tips on the actual aircraft
were concave and High Planes suggests that you glue the wings together and then
sand them to shape. This is exactly what I did and it turned out very well. The
radiator intakes on American Jet were filled in, so I took some scrap styrene,
glued it in and then filled this in with some additional gap filling CA. This
was hit with a little accelerator with more filler and sanding done. Once this
was cleaned up both wings were completed for the time being.
Where to start with the wings? Just to get the wing halves glued together,
one must shave down the wheel well from the inside of the lower wing. The area
shown in red cross hatch represents the areas that had to be ground down in
order for the wing halves to fit together. The wing tips on the actual aircraft
were concave and High Planes suggests that you glue the wings together and then
sand them to shape. This is exactly what I did and it turned out very well. The
radiator intakes on American Jet were filled in, so I took some scrap styrene,
glued it in and then filled this in with some additional gap filling CA. This
was hit with a little accelerator with more filler and sanding done. Once this
was cleaned up both wings were completed for the time being.
Cockpit
The cockpit parts given are crude to say the least. Now there are two trains of thought here on this one. You could use the cockpit parts given or you could use a resin cockpit set and go for the detail. I did the latter. I originally planned on leaving the canopy off to see inside of this beast. I purchased the Cutting Edge 48th F8F-2 set and proceeded to paint it up. There are nothing in the fuselage halves that give any indication as to where the cockpit floor is supposed to mount, kit parts or added accessories, so there is a lot of trial fitting. With the relative position of where I wanted to mount the completed cockpit, I cut a few 1/8th wide styrene strips to add as mounts for the cockpit assembly. Cockpit was glued in but the sidewalls would not even come close to matching the kit contour. At this point it was decided that I would attach the canopy and cover all of this lovely detail. I at least have the satisfaction of knowing that the aircraft has a complete nicely detailed cockpit that you can’t see. In hindsight, the kit parts would work just fine for the amount of detail you can see through the canopy.
Mounting the Wings, Horizontal Stabilizer and Wing Fillets
 After some minor sanding, the wings were able to fit into the recesses
provided by High Planes. To get them lined up, I ended up taping the wings to
the fuselage and adjusting the dihedral from there by tensioning the tape. All
that was needed for the horizontal stabs was to clean them up and mount them on
the fuselage (this was done after the fuselage halves were glued together). Very
little filler was needed on the stabilizers.
After some minor sanding, the wings were able to fit into the recesses
provided by High Planes. To get them lined up, I ended up taping the wings to
the fuselage and adjusting the dihedral from there by tensioning the tape. All
that was needed for the horizontal stabs was to clean them up and mount them on
the fuselage (this was done after the fuselage halves were glued together). Very
little filler was needed on the stabilizers.
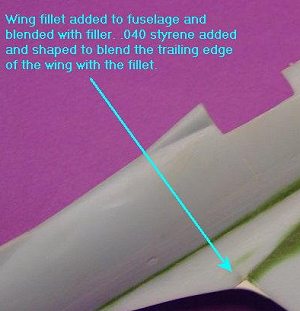
Now came where I spent most of my time. High Planes suggest that you sand the fillets to a fine-feathered edge where they meet the wings and fuselage. I thought I had but it was obvious after mounting them that I hadn’t sanded enough. Here is where I can sum up about 12 hours worth of work with the phrase "filler, sand, check, more filler, sand, check and yet more filler, sand and check." I think if you take your time, there wouldn’t be this much work since Steve told me his fillets fit like a glove. I also added some styrene shims to blend in the trailing edge of the wing with the fillet. All of the pictures that I have (5) don’t give a clear indication whether this is right or wrong but it looked good to me, call it artistic license.
Prop and Engine
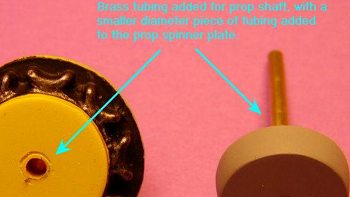 Wanting to add as much detail as I could, I purchased an R3350 from Engines
N’ Things but in reality, the engine supplied by High Planes is more than
satisfactory since the engine is hidden behind a backing plate for the spinner.
The kit spinner was used (shades of a P-51) but the kit blades were replaced
with Skyraider blades from Cutting Edge. The kit blades were about 1/16th
inch to long and way to narrow in chord. There is no way for the spinner backing
plate to attach to the engine other than glue it. So to make it easier to
transport, I mounted some brass tubing in the engine part and then glued a short
piece of smaller brass tubing to the spinner backing plate. The spinner itself
was glued together, painted gloss white, then painted Testors Buffing Aluminum
and buffed with SNJ. The blades took a while to paint only due to the little
template that I had to make for the yellow warning areas on the prop tips.
Wanting to add as much detail as I could, I purchased an R3350 from Engines
N’ Things but in reality, the engine supplied by High Planes is more than
satisfactory since the engine is hidden behind a backing plate for the spinner.
The kit spinner was used (shades of a P-51) but the kit blades were replaced
with Skyraider blades from Cutting Edge. The kit blades were about 1/16th
inch to long and way to narrow in chord. There is no way for the spinner backing
plate to attach to the engine other than glue it. So to make it easier to
transport, I mounted some brass tubing in the engine part and then glued a short
piece of smaller brass tubing to the spinner backing plate. The spinner itself
was glued together, painted gloss white, then painted Testors Buffing Aluminum
and buffed with SNJ. The blades took a while to paint only due to the little
template that I had to make for the yellow warning areas on the prop tips.
Assembly
Since the wings were already on the fuselage halves, the cockpit was glued in, as was the engine plate, with a little trial and error, the fuselage halves went together pretty well. The opening for the engine cowl was not completely round even after some careful clean up so a 3/32nd inch wide strip of .005 styrene was added and blended into the leading edge of the cowl. The stabs were then glued as mentioned previously and now it was time to see what all of my handy work had accomplished. There were the usual amount of seams to be filled, panel lines rescribed, primer coats added, more gap filling CA, more sanding, more primer (told you this was a common theme) but by God this was starting to look like a racing Bearcat. In the entire build, mounting the canopy is where you want to take your time since you only get one shot at it. After some trial and error and the better part of 1.5 hours later, the canopy fit on reasonably well.
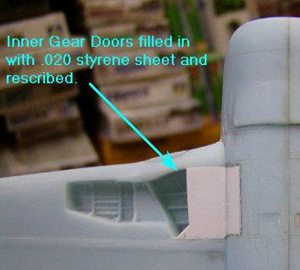 My attention then turned to the landing gear. All of the pictures I have of
American Jet show the inner gear doors closed, so this is how I show mine. The
kit doors were discarded since they were no where close to fitting the gear bay
opening. I filled this in with .020 sheet styrene and gap filling CA, then
rescribed the outline of the gear doors. All in all this wasn’t that hard to do
and looks much better than if I had tried the use the kit doors. The outer gear
doors were pretty straightforward and little clean up was needed. The white
metal main gear was polished with my Dremel and darn if they didn’t start to
look better than what I had originally thought. After a coat of Mr. Surfaces
500, they looked very nice. The kit tires were discarded and replaced with tires
from an old Testors Bearcat I had lying around. Now, I know they are to skinny
but I did this so that the outer gear doors would mount on the main gear
properly. If I had used the kit tires, I would have had to add new attach points
to the mains to get the proper look and I didn’t feel like messing around at
this point of the build.
My attention then turned to the landing gear. All of the pictures I have of
American Jet show the inner gear doors closed, so this is how I show mine. The
kit doors were discarded since they were no where close to fitting the gear bay
opening. I filled this in with .020 sheet styrene and gap filling CA, then
rescribed the outline of the gear doors. All in all this wasn’t that hard to do
and looks much better than if I had tried the use the kit doors. The outer gear
doors were pretty straightforward and little clean up was needed. The white
metal main gear was polished with my Dremel and darn if they didn’t start to
look better than what I had originally thought. After a coat of Mr. Surfaces
500, they looked very nice. The kit tires were discarded and replaced with tires
from an old Testors Bearcat I had lying around. Now, I know they are to skinny
but I did this so that the outer gear doors would mount on the main gear
properly. If I had used the kit tires, I would have had to add new attach points
to the mains to get the proper look and I didn’t feel like messing around at
this point of the build.
|
PAINT & DECALS |
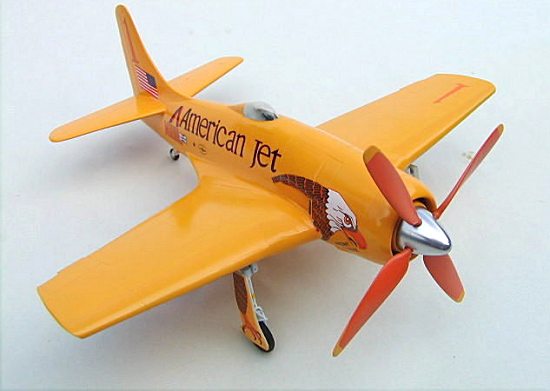 American Jet was painted overall yellow (and it looks like it had a touch of
orange). So I mixed up my own custom batch or yellow/orange using Model Masters
Insignia Yellow and Floquil Reefer Yellow. After several coats of paint, I
sprayed on 3 layers of Testors Gloss Coat and got ready to decal. This was the
best part of the kit. The decals went on absolutely beautifully and worked very
well with Micro Set/Sol. The only area that I deviated from the instructions was
where they indicated to place the decal showing the aircraft’s records on the
starboard side underneath the horizontal stab. The pictures I have show this
detail under the port side stab so this is where I placed that decal. After
about a day placing all of the decals on, it was time for the final gloss coat.
American Jet was painted overall yellow (and it looks like it had a touch of
orange). So I mixed up my own custom batch or yellow/orange using Model Masters
Insignia Yellow and Floquil Reefer Yellow. After several coats of paint, I
sprayed on 3 layers of Testors Gloss Coat and got ready to decal. This was the
best part of the kit. The decals went on absolutely beautifully and worked very
well with Micro Set/Sol. The only area that I deviated from the instructions was
where they indicated to place the decal showing the aircraft’s records on the
starboard side underneath the horizontal stab. The pictures I have show this
detail under the port side stab so this is where I placed that decal. After
about a day placing all of the decals on, it was time for the final gloss coat.
Final Assembly
After the gloss coat was dry it was time to mount the gear. Since there are no attach points or indications where the gear mounts in the wheel well, I used the researched SWAG (Scientific Wild A** Guess) method and mounted the gear with 5 minute epoxy. The tail wheel on my kit was not completely molded so now came my first attempt at cast resin molding. The master was the tail wheel from the Hobbycraft kit. A slight wash was added to the gear to bring out the detail. A small pitot tube was scratch built and added to the underside of the left wing, the prop was slipped into place and viola; I had a fairly decent looking representation of Darryl Greenameyer’s Bearcat "American Jet."
|
CONCLUSIONS |
 Well, after roughly 3 months (with a couple of trips up to Alaska to do some
salmon fishing) and roughly 45 hours of build time into the kit which only has
36 parts used in it, what do I think? If you expecting to just shake the box and
have a kit pop out i.e. Tamiyagawa, this may not be the kit for you. If you’re
not afraid of putting a little elbow grease, time and patience (and for me some
language that would have made a Navy Senior Chief VERY PROUD) into this kit then
I would recommend High Planes offering of this unique Bearcat for you. It makes
a nice and different addition to my model collection amongst the other warbirds
on the shelf. I would like to sincerely thank Tom Cleaver for the opportunity to
review and build this kit and Steve Mesner for trusting me to build High Planes
offering.
Well, after roughly 3 months (with a couple of trips up to Alaska to do some
salmon fishing) and roughly 45 hours of build time into the kit which only has
36 parts used in it, what do I think? If you expecting to just shake the box and
have a kit pop out i.e. Tamiyagawa, this may not be the kit for you. If you’re
not afraid of putting a little elbow grease, time and patience (and for me some
language that would have made a Navy Senior Chief VERY PROUD) into this kit then
I would recommend High Planes offering of this unique Bearcat for you. It makes
a nice and different addition to my model collection amongst the other warbirds
on the shelf. I would like to sincerely thank Tom Cleaver for the opportunity to
review and build this kit and Steve Mesner for trusting me to build High Planes
offering.
If you would like your product reviewed fairly and quickly by a site that averages thousands of visits a day, please contact me or see other details in the Note to Contributors.