| KIT #: | 112 |
| PRICE: | $15.00 long out of production |
| DECALS: | One option |
| REVIEWER: | Mark Hiott |
| NOTES: | Ex Artiplast kit |
| HISTORY |
The Macchi
Castoldi MC 72 was an
experimental seaplane designed and built by the Italian aircraft company Macchi
Aeronautica. The M.C. 72 held the world speed record for all aircraft for five
years. In 1934, it set a world record speed for internal combustion powered
seaplanes which still stands to this day. The M.C. 72 design was unique with a
fuselage partly metal to the cockpit and wood monocoque bolted to the front
tubular portion by four bolts. The streamlined nose contours enclosed an oil
tank with its outside wall exposed to the airstream. The wing was all metal with
flat tubular water radiators smoothly faired into the wings. The twin pontoons
had three smoothly-faired radiators on the outer surfaces, the forward radiator
for water and the centre and rear radiators for oil cooling. The float struts
also featured
 water
radiators and another radiator was fitted during hot conditions under the
fuselage running from cockpit to tail.
water
radiators and another radiator was fitted during hot conditions under the
fuselage running from cockpit to tail.
The M.C. 72
was built in 1931 with the idea of competing for what turned out to be the final
Schneider Trophy race, but due to engine problems, the M.C. 72 was unable to
compete. For two years, the M.C. 72 suffered from many mechanical defects, as
well as the loss of two test pilots who died trying to coax world class speed
out of the M.C. 72 (first Monti and then Bellini). The final design of M.C. 72
used double, contra-rotating propellers powered by a modified FIAT AS-6 engine
V24 engine generating some 1,900-2,300 kW (2,500-3,100 hp) thanks to
supercharging.
After 35
flights, the engines were overhauled in preparation for a record attempt. The
aircraft finally lived up to expectations when it set a new world speed record
(over water) on 10 April 1933, with a speed of 682 km/h (424 mph). It was
piloted by Warrant Officer Francesco Agello (the last qualified test pilot). Not
satisfied, development continued as the aircraft's designers thought they could
break 700 km/h (430 mph) with the M.C. 72. This feat was in fact achieved on 23
October 1934, when Agello piloted the M.C. 72 for an average speed of 709 km/h
(440 mph) over three passes. This record remains (as of 2012) the fastest speed
ever attained by a piston-engine seaplane. After this success, the M.C.72 was
never flown again.
One M.C. 72, the aircraft that took the world record, survives. It is on display at the Italian Air Force Museum, near Rome.
| THE KIT |
 Crudely
molded in a light crème plastic, detail is somewhat lacking. It looks, at first,
to be a simple kit with just 21 parts. Later I found out it is typical SMER.
There is flash on most of the parts and they will require work to clean up.
Although there are numbers on the instructions, there are no part numbers on the
sprues. Holes are predrilled for the rigging.
Crudely
molded in a light crème plastic, detail is somewhat lacking. It looks, at first,
to be a simple kit with just 21 parts. Later I found out it is typical SMER.
There is flash on most of the parts and they will require work to clean up.
Although there are numbers on the instructions, there are no part numbers on the
sprues. Holes are predrilled for the rigging.
The
instructions are typical SMER... a simple exploded view showing where the parts
go. All the typing is in Czech, so I have no idea what any of it says. The back
page has a out-of-register color 3 view drawing. A small piece of acetate is
included for the windscreen.
A small decal sheet contains Tricolors for the tail and Macchi ID's for the fuselage. It also has a decal for the included stand. Unfortunately, the decals in my kit were unusable.
| CONSTRUCTION |
First thing I did was remove all the parts from the sprues and clean them up. I
found that the long brace parts were not going to be usable, so I made new ones
out of round stock. Careful test fitting is required to get all the parts to fit
together reasonable well, but filler will still be needed.
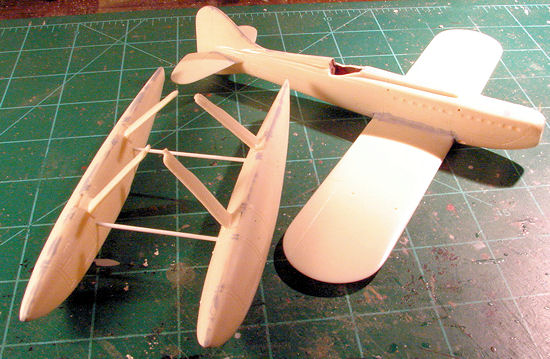 I
decided to start with the floats. I squared up the holes for the strut mounts as
best I could, then glued the 2 halves together. Be careful when fitting the
float struts, because they are left, right and front, rear handed. It took me
awhile to figure out which one when where. After attaching them, I filled the
gaps with 3M Spot and Glazing Putty... and there are a
I
decided to start with the floats. I squared up the holes for the strut mounts as
best I could, then glued the 2 halves together. Be careful when fitting the
float struts, because they are left, right and front, rear handed. It took me
awhile to figure out which one when where. After attaching them, I filled the
gaps with 3M Spot and Glazing Putty... and there are a
Turning to the fuselage, I glue the 2 halves together, leaving the prop until
later. There is no interior to speak of and I didn't bother to add one. Some
folks will want to remedy this, but I am more interested in the aircraft then
the details. The 2 one piece wings were then added. More filler was required
here as well.
Joining the floats to the fuselage is a study in dexterity. It's times like this one wishes they had 4 hands. There are 4 small holes in the lower fuselage that accept small pins on the float struts. I had to open these holes with micro files to even come close how they should fit. Even then, I had to work slowly and carefully fitting the floats. I made a simple jig out of paint bottles to hold the plane while the glue set. Out came the 3M here as well.
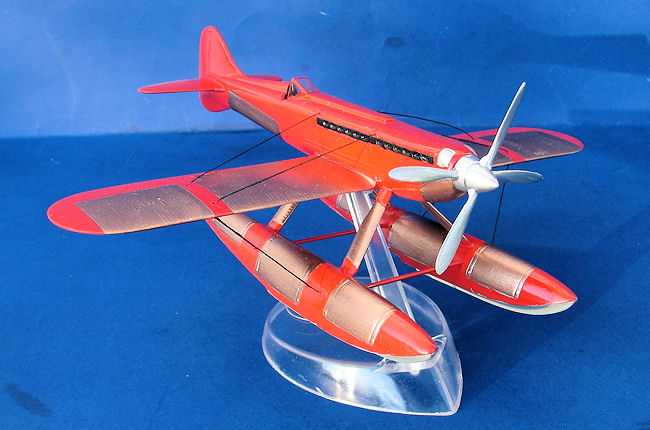
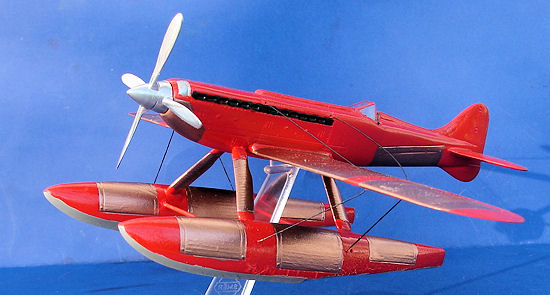
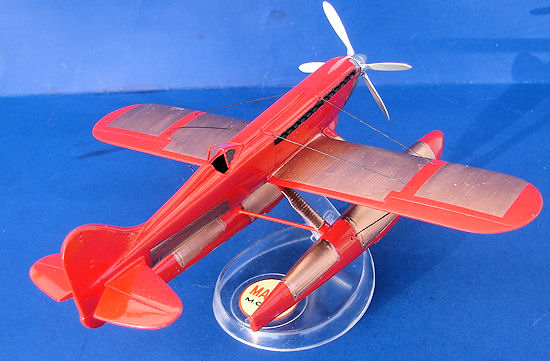
| COLORS & MARKINGS |
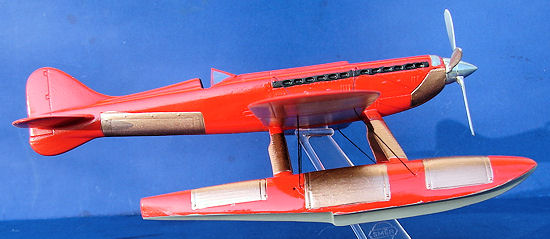 When the
plane was fully assembled, I shot it with Krylon Italian Red. Being assembled
makes it a bit harder to paint, but doing so beforehand, would have made
mounting the floats even more of a job. Once the red had dried a few days, I
painted the bottoms of the floats light gray. I painted the surface radiators MM
Copper. I suppose brass would have been a better choice, but I thought the
copper just looked nicer. I have seen photos of other models with the radiators
outlined in white, but shots of the plane on display do not show the white. You
can't really tell from period photos, but I chose not to add the white stripes.
Exhaust details were painted MM Flat Black. The props were painted with MM
Chrome.
When the
plane was fully assembled, I shot it with Krylon Italian Red. Being assembled
makes it a bit harder to paint, but doing so beforehand, would have made
mounting the floats even more of a job. Once the red had dried a few days, I
painted the bottoms of the floats light gray. I painted the surface radiators MM
Copper. I suppose brass would have been a better choice, but I thought the
copper just looked nicer. I have seen photos of other models with the radiators
outlined in white, but shots of the plane on display do not show the white. You
can't really tell from period photos, but I chose not to add the white stripes.
Exhaust details were painted MM Flat Black. The props were painted with MM
Chrome.
| FINAL BITS |
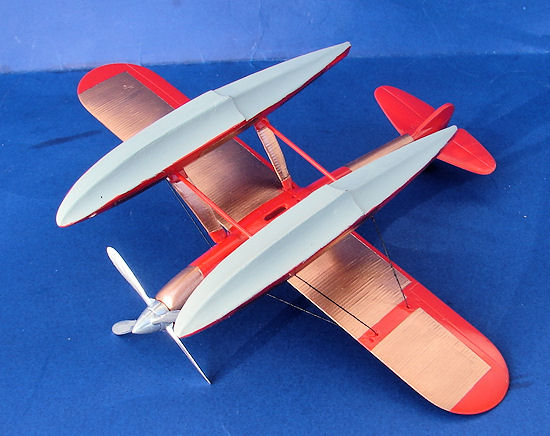 The
rigging was done with .8mil nylon monofilament. There should be more rigging
between the float struts, but I forgot to set the rigging holes before
installing them, so, no rigging. After the rigging was all in place, I tightened
it with a bit of heat and painted it flat black. The 2 props were glued together
and the press fitted to the nose. (you can see one of the down sides to
monofilament in the photos. I took the photos outside and it was bit chilly and
one of the lines began to sag. It tightened back up when I bought the model back
inside)
The
rigging was done with .8mil nylon monofilament. There should be more rigging
between the float struts, but I forgot to set the rigging holes before
installing them, so, no rigging. After the rigging was all in place, I tightened
it with a bit of heat and painted it flat black. The 2 props were glued together
and the press fitted to the nose. (you can see one of the down sides to
monofilament in the photos. I took the photos outside and it was bit chilly and
one of the lines began to sag. It tightened back up when I bought the model back
inside)
| CONCLUSIONS |
This is not a kit for the novice builder, but then most SMER kits are like that. The amount of filling and sanding that is required would drive them out of the hobby. However, it does build into a very nice looking MC72 and I believe the only other choice is a rather expensive resin kit.
December 2012
Copyright ModelingMadness.com. All rights reserved. No reproduction in part or in whole without express permission from the editor.
If you would like your product reviewed fairly and fairly quickly, please contact the editor or see other details in the Note to Contributors.
Back to the Review Index Page 2024