In the early 80's there were three TV shows that featured Helicopters.
ABC had both Riptide and Blue Thunder and over on CBS flew Airwolf. Airwolf
is far and above my favorite of the group. It was fun, fast and had good
writing to boot. For the first three yea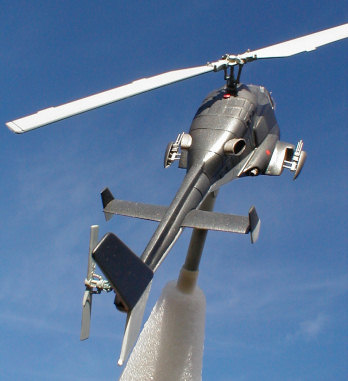 rs anyways. After the third season
CBS cancelled it even though it was doing great in the ratings and USA
Network took it over. Well not so much took it over as just outright killed
it. It was the second time that Barry Van Dyke had a hand in killing one of
my favorite shows. He had been on Galactica 1980 too. I'm rambling aren't
I.
rs anyways. After the third season
CBS cancelled it even though it was doing great in the ratings and USA
Network took it over. Well not so much took it over as just outright killed
it. It was the second time that Barry Van Dyke had a hand in killing one of
my favorite shows. He had been on Galactica 1980 too. I'm rambling aren't
I.
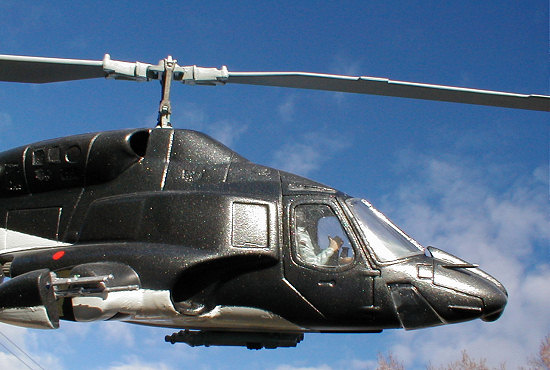
Starting with a Bell 222 the magic of Helicopter Make-up artist turned
one of the best looking helicopters in the world into THE best looking
helicopter in the world, bar none. At least in my opinion. After the
series the make-up was taken off and the helicopter eventually became an air
ambulance in Germany. It crashed in 1991 killing three people.
AMT/ Ertl came out with their Airwolf model in 1984 and I just had to
have it. The preview that Scott did was of the version that I did as a
kid. This remake is mostly the same but with a few differences. Originally
you could build it as the civilian Bell 222 but in the one I got you can't
do that. Instead this one came with pilots. Not too bad of a trade-off if
you ask me but some would want to have the parts to go civilian for sure.
One thing that didn't change was the panel lines and rivets. The panel
lines are really deep and wide and the rivets are huge.
My first goal was to make a plan. Or at least as much of a plan as I
could muster. I figured that I would have to do this as three projects.
The lighting system, the back seat and the rest of the model. If you read
my thread about this build you may already know what I missed, if not you
may be as surprised as I was.
The model it's self was the place to get this project going. The 'Lady'
as they called her on the show was smooth and sleek, not bumpy and grooved.
I decided that I could live with the panel lines but the rivets had to go.
So like my General Lee this was going to be, at least start as life in
sanding. And sanding. And guess what, more sanding. But it was worth it,
she was smooth and sleek again. And in staying with that train of thought I
would not be using the guns or rocket pod.
 To break the monotony and to get feeling back in my arms I switched to a
different task. I felt the screens molded into the sides of the fuselage
were not great so I figured that I could replace them. So I cut them out.
Then I started to think about what to use in their absence. That showed me
that pre-planning is important. It didn't show me what else I failed to
pre-planned so I thought I was in the clear once I found my replacement
screens. I used little chunks of umbrella that wife had thrown away. I
glued the umbrella pieces to plastic backing and they turned out OK enough
for me. Like many modelers out there the family garbage can is a great
place to find future model parts. Don't tell my wife I took something else
out of the garbage, she doesn't need to know.
To break the monotony and to get feeling back in my arms I switched to a
different task. I felt the screens molded into the sides of the fuselage
were not great so I figured that I could replace them. So I cut them out.
Then I started to think about what to use in their absence. That showed me
that pre-planning is important. It didn't show me what else I failed to
pre-planned so I thought I was in the clear once I found my replacement
screens. I used little chunks of umbrella that wife had thrown away. I
glued the umbrella pieces to plastic backing and they turned out OK enough
for me. Like many modelers out there the family garbage can is a great
place to find future model parts. Don't tell my wife I took something else
out of the garbage, she doesn't need to know.
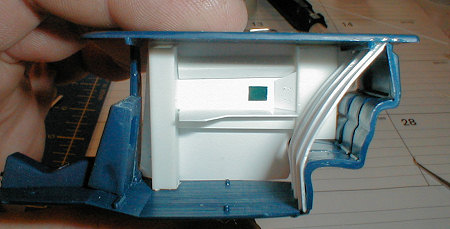 Next I started the back seat. You know that really cool area where
Dominic sat. This is where I had to do most of my research for this
project. There were quite a lot of pictures and info online in various
places, just use any search engine. Anyways I decided to keep it pretty
simple back there and mostly stick with just major shapes. I used a lot of
Evergreen Styrene on this and I'm very glad that I had a lot of different
shapes to work with. I thought I was happy with what I had done but through
the magic of dry-fitting I realized that I really needed to build something
to replace the back wall and the left side wall. I put a little bit of
detail on the back wall but I had no real good pictures of the left wall so
I left it plain. Oh, and then I painted all of them light grey. But I
didn't glue any of the new pieces in place I still had to get them ready for
lighting.
Next I started the back seat. You know that really cool area where
Dominic sat. This is where I had to do most of my research for this
project. There were quite a lot of pictures and info online in various
places, just use any search engine. Anyways I decided to keep it pretty
simple back there and mostly stick with just major shapes. I used a lot of
Evergreen Styrene on this and I'm very glad that I had a lot of different
shapes to work with. I thought I was happy with what I had done but through
the magic of dry-fitting I realized that I really needed to build something
to replace the back wall and the left side wall. I put a little bit of
detail on the back wall but I had no real good pictures of the left wall so
I left it plain. Oh, and then I painted all of them light grey. But I
didn't glue any of the new pieces in place I still had to get them ready for
lighting.
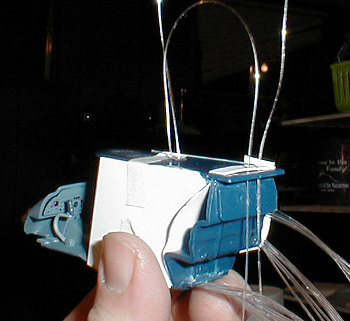 Now to the lighting. I knew that I could get a small pipe and run the
fiber optics through that to get into the model. I would figure out the how
later. But for now I would just focus my light works on the panels. I
drilled out most of the instruments on the main panel and I drilled holes
about where I thought they should be on the back panels. Then came the fun
part, I finally got work with the fiber optics. I counted how many holes I
had and pulled the proper number of fiber lines and
Now to the lighting. I knew that I could get a small pipe and run the
fiber optics through that to get into the model. I would figure out the how
later. But for now I would just focus my light works on the panels. I
drilled out most of the instruments on the main panel and I drilled holes
about where I thought they should be on the back panels. Then came the fun
part, I finally got work with the fiber optics. I counted how many holes I
had and pulled the proper number of fiber lines and
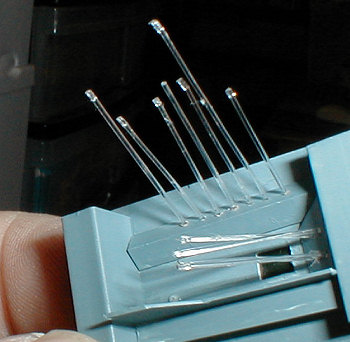 then started, shall we
say, stringing up the lights. I ran the lights long and kind of left them
there because I didn't know exactly how to glue them. I was worried that
the CA might eat the lines and ruin the whole project. But what is life
without taking chances, so I went ahead and glued them, and thank goodness,
they didn't go to heck on me. I cut them flush and put a drop of future
highlighted with food coloring on each one.
then started, shall we
say, stringing up the lights. I ran the lights long and kind of left them
there because I didn't know exactly how to glue them. I was worried that
the CA might eat the lines and ruin the whole project. But what is life
without taking chances, so I went ahead and glued them, and thank goodness,
they didn't go to heck on me. I cut them flush and put a drop of future
highlighted with food coloring on each one.
Now how to get the fiber optics out to the light source. Well first I
had to, oh wait, did I just say light source. Crap I hadn't really put
much, any thought into that yet. OK I could handle this little lack of
pre-planning. I would figure out how to get the lines ran out of the model
then I would have all the time in the world to think about it.
At some point I did make the decision that it would be in flying mode so
I would be using the pilots. Now the ones that came with the kit were
actually 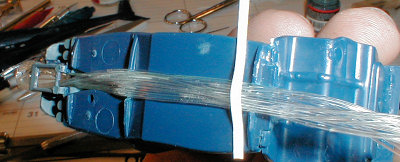 really decent. There had been at least some amount of effort put
into their helmets but they still needed some assistance. Just a bit of CA
and some very careful sanding and the helmets were the right shape for Airwo
really decent. There had been at least some amount of effort put
into their helmets but they still needed some assistance. Just a bit of CA
and some very careful sanding and the helmets were the right shape for Airwo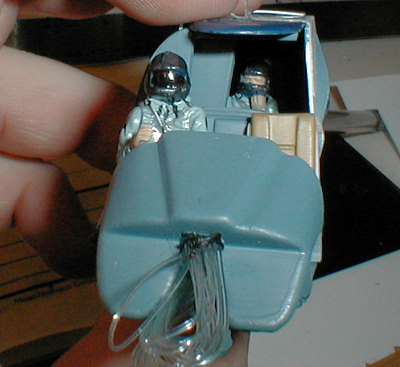 lf. As far as painting them I just tried to make them look like the
uniforms from the show. I think I did a pretty good job on that count.
lf. As far as painting them I just tried to make them look like the
uniforms from the show. I think I did a pretty good job on that count.
Lucky for me the fiber optics coming out of the back panel had a lot of
room in the inside of the helicopter. The ones in the front weren't so easy
to work with. With those I had ran the lines just like in the back but the
amount of room I had to work with was just not there. After securing the
fiber optics to the front panel I had to thread the whole bunch through
the back of the panel housing and make a really really tight u-turn back and
under the floor to the back. On the way there I used a piece of plastic to
tie down,or up in this case, to the bottom of the floor to help keep it from
moving around. I even put one in the ceiling in the back to help light up
the Dominic figure but it broke off sometime later while doing major
assembly.
Now was the time to put all of the inside items together. This step went
without any real problems other than the pilot. His one leg was angled
wrong for putting him in so I cut his leg off and repositioned it to fit
right. A little bit of repainting but nothing too traumatic for me.
For the optics to get out I finally got an idea on how to do it. I could
cut a hole in the side of the pipe and then run the lines through this and
down and out of the bottom of the pipe. Shove the top of the pipe to the
roof of the model and who knows what I'll do with lower end of it. But at
least I got the top half issue solved. Ah, progress.
Putting the halves together wasn't as bad as I thought it would be but it
wasn't without a bit of heartache either. The back half where the model has
nothing to do with fiber optics it went lick-i-ty split great. The rest of
the bird tied to convince me to throw it
 off of bridge while shooting it. I
had gaps all up the forward roof and pretty much the entire nose seam. But
with the power of lots of CA and even more sanding I filled those evil
gaps. I worked really hard to get the top of the nose to look good and near
perfect. Then I remembered that there is a cowling that goes over the top
of the nose. At least I know that it's really really pretty under that
cowling. Which by the way I had to use CA and putty to make fit right, thus
more sanding.
off of bridge while shooting it. I
had gaps all up the forward roof and pretty much the entire nose seam. But
with the power of lots of CA and even more sanding I filled those evil
gaps. I worked really hard to get the top of the nose to look good and near
perfect. Then I remembered that there is a cowling that goes over the top
of the nose. At least I know that it's really really pretty under that
cowling. Which by the way I had to use CA and putty to make fit right, thus
more sanding.
Now to start putting on the parts that make this a bit more than your
average Bell 222, the side do-hicky-things. Before I could slap those on I
needed to insert the intakes and see the big time filling and sanding that
would have to be done. After lots of CA and filing with needle files and
then following that up with some delicate sandpaper work they were ready to
go on. I had decided early on to not put the jet slash side thingies on
until the main halves were together. I did this because I was worried that
if I put them on before hand that they might pop off if I had to twist the
body to make it fit. I don't know if this helped or not but I didn't have
any problems doing it this way so I'll rack that one up as a success and
even go as far as to call it a great idea. I added the stub caps on and oh
my, more sanding. How lucky for me.
I also had the need to build the front landing gear doors. Wow not that
hard.
Next were the caps on the gun pods. All I had to do was just put them on
and be happy. But she kept calling out to me to arm her like the
wonderfully beautiful killing she is. I gave in and decided armed her, and
it felt good. So I guess now I would need to hollow out the guns and the
rocket pod. They would be readied now but they would find their way on to
her until a little closer to the end of the overall build
A few pieces here and there for that extra touch. Lastly I added on the
rear wing things that for some reason look well lined up from some angles
but really screwy from other angles. I was now ready for primer and paint.
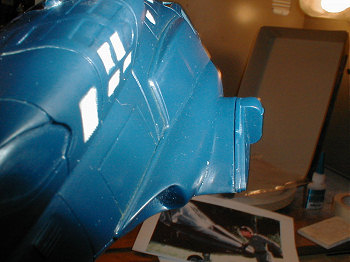
With as dark blue as the plastic is I felt that I would be wise to
prime this bird before thinking that I could paint anything white. I don't
normally prime my models so this was a big step for me. The next step
would have been painting it white but two things came up. 1. Ugly seam
lines showed their ugly heads. 2. This stinking primer wouldn't dry. Once
the primer did dry it was time to deal with those seam lines, then prime
again, then wait for that to primer coat to dry.
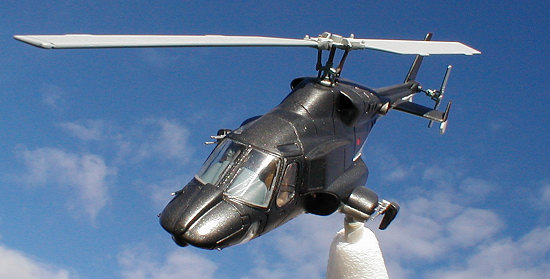
It finally did dry and I could get to the white paint. I kind of liked
how that dried, in less than a week. I gave it a wonderful coat of tape in
very strategic places and applied flat black. It looked almost like Airwolf
at that point. But a few days later I sprayed on Model Master Graphite
Metallic and she looked down right dangerous.
 Weapons were the first of the last things to do go on. That went very
well. Next on the list was the rotors. I painted those in somewhat boring
light grey and silver to match the pictures I had found and the episodes I
had watched.
Weapons were the first of the last things to do go on. That went very
well. Next on the list was the rotors. I painted those in somewhat boring
light grey and silver to match the pictures I had found and the episodes I
had watched.
Lastly were the windows. The main windshield and the curved lower
windows were the only kit windows I used. The rest I cut out of clear
plastic.
I really shouldn't have said lastly in reference to the windows, that
needed to be reserved for the base which was not pre-planned at all.
This is the base that would not only hold the helicopter up but it would
also contain the business end of the fiber optics. I didn't really know how
this was going to look but I was sure it would better having the model
perched on top of a paper towel roll. I went with a cone shaped piece of
Styrofoam mounted on a large Styrofoam disk that is bigger around. All of
the light workings run down the middle of the cone and sit on top of the
disk. I separated the front panel lines from the back panel lines and each
set is contained in a short piece of pipe. This way I can light up all of
the front lights or the back lights without any real problems.
 I liked this model. Would I build one again? Oh heck yes. Would I
recommend this kit? If you don't mind some scratch building and lots of
sanding to get the prettiest bird from 80's TV. If you could get the AMT/
Ertl one I would say buy it. This may have been more of a passion build
than a logical build but that's a good thing. Not to mention it's the only
Airwolf model I know of.
I liked this model. Would I build one again? Oh heck yes. Would I
recommend this kit? If you don't mind some scratch building and lots of
sanding to get the prettiest bird from 80's TV. If you could get the AMT/
Ertl one I would say buy it. This may have been more of a passion build
than a logical build but that's a good thing. Not to mention it's the only
Airwolf model I know of.
My opinion of Fiber Optics is a good one. I'm fairly happy with my first
time out with this stuff, not done to perfection by any means but not a
disaster either. The lights in the front are a little dim for my likening
but the ones in the back look about right. Yes I had a few of them break
off or otherwise become non-working but since I have more than 30 of these
things I'm not complaining too bad. Besides most, OK all, of the failures
are probably my own fault.
Also pre-planning is a good thing to put a bit more amount of time into.
I wish I would have.
This kit is from my own wallet.
Wyll Jones
November 2007
