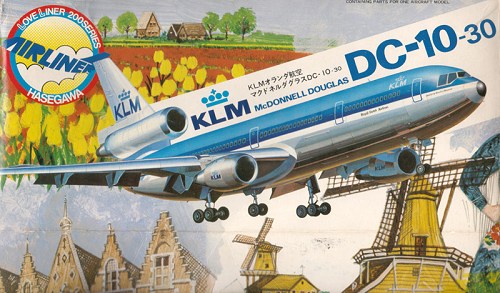
Hasegawa 1/200 DC-10-30
|
KIT # |
LC-006 |
|
PRICE: |
700 yen when new |
|
DECALS: |
One option: KLM |
|
REVIEWER: |
Diane Kraus |
|
NOTES: |
Love Liner series |
|
HISTORY |
The McDonnell-Douglas DC-10 was one of the great wide-bodied tri-jets of the 70’s and 80’s, along with the more graceful Lockheed TriStar. Both aircraft were designed to make American Airlines happy, and the DC-10 provided a long-range, high-capacity ship that eventually came to be used by many airlines, as well as the USAF and freight carrier FedEx. The DC-10-30 could carry a whopping 161,000lbs. or up to 380 passengers for international flights and extended cross-country journeys. In the military the DC-10 is known as the KC-10 Extender, used for in-air refueling, cargo and transport.
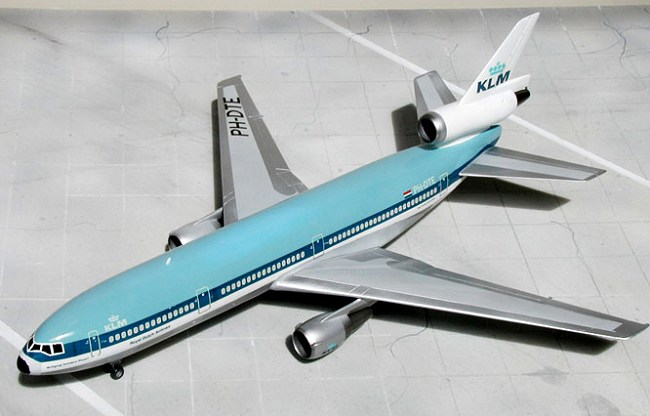
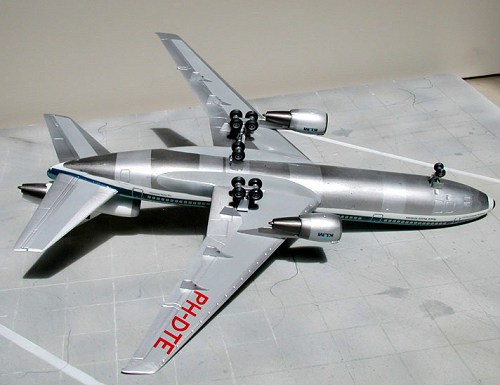
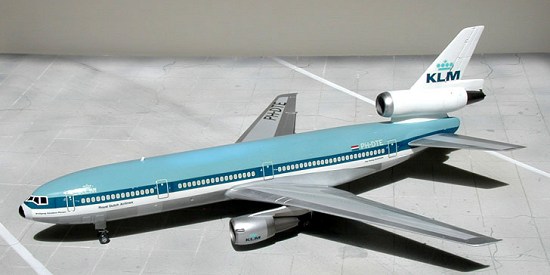
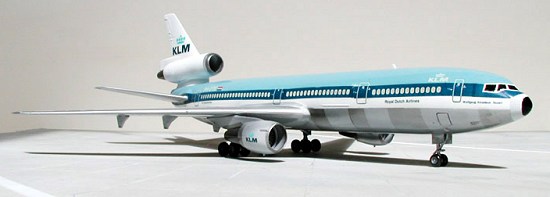
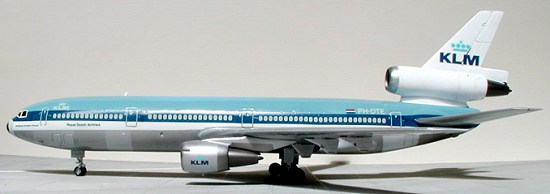
KLM stands for the Dutch “Koninklijke Luchtvaart Maatschappij voor Nederland an Kolonien” which translates more simply into “Royal Dutch Airlines”. It’s one of the oldest airlines as it was started in 1919, and also the longest continually operating airline. They began using DC-10-30’s in the 1970’s, eventually replacing them with MD-11’s in the 1990’s. Two things I liked very much about the airline’s livery was the stunning blue top and bare metal bottom, and also how KLM named their aircraft according to make and model. All of the DC-10’s were named after composers, and the decal sheet just happens to offer “Wolfgang Amadeus Mozart” – my favorite composer – for this kit.
|
THE KIT |
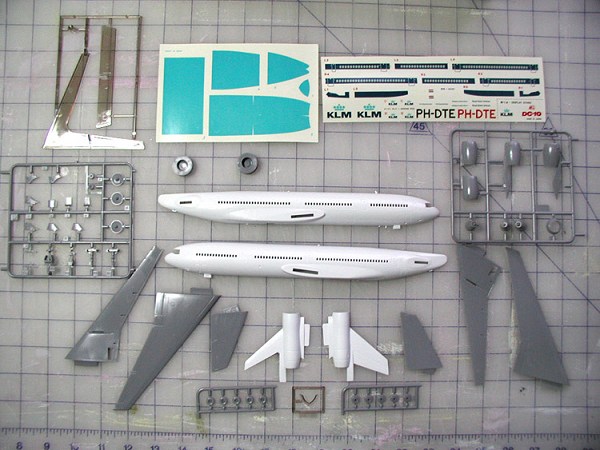
I’ve built three Hasegawa 1/200 airliners and have liked all of them – good fit, simple engineering, nice detail, etc. This one promised more of the same, but being of an older mold disappointed me with two things: first, raised panel lines – I’m not a fan of them on anything and really don’t like panel lines at all on airliners; and secondly, open windows. Open windows are a pain to say the least, and I knew that filling them on a fuselage this size would take a good amount of putty.
Redeeming itself a tad, the fuselage and tail are molded in white to facilitate easy painting, and all the sprues are free of flash and crisp. There is a translucent stand provided if one doesn’t have the patience for the dozen tiny wheels, and the windscreen is the same brownish translucent styrene. The decals seemed a little old (they were) and slightly yellowed (ditto) but thin and in register. They were definitely useable – my only peeve being that for some reason they had printed Mozart’s first name as “Wolfgaug” instead of “Wolfgang.” Ah well, an understandable mistake, no? The famed “blue top” of the KLM fleet was provided on a separate sheet, printed in a lovely, er… neon hue. Sort of greenish, too. Sort of not what the real color was, at least according to the half-dozen photos I had downloaded from Airliners.net. I decided it would probably be best to mix that color later on.
|
CONSTRUCTION |
Guess what? No cockpit to start on! So I started on those windows. Each side first got a strip of styrene along the inside of the fuselage, and then I started filling from the outside. It takes a bit – you don’t want any air spaces in there – and there was quite a lot of sanding involved. In fact, I could have sworn there were horizontal ridges running the length of the plane before I started filling the windows… Anyway, the job got done, at least to the point where the body of the plane was no longer perforated. I don’t mind a slight “dimple” as it helps align the decals later on, and gives the windows a bit more of a highlight.
In the meantime (as the
layers of putty were drying) the engine pods received their fans and were
all glued up. The fan for the tail is waaaaaay back in there, and there
are all sorts of alignment pins and other model give-aways in that area.
I know there are ways to deal with this, inserting tubes into the tail
and such, but I figure no one is going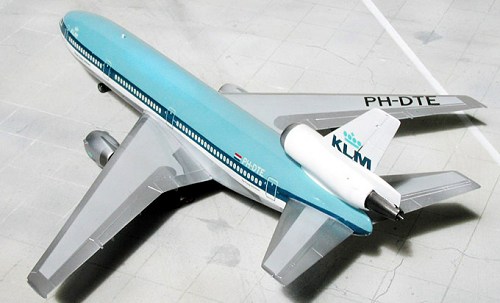 to be sticking their nose down
there anyway. All these bits lined up nicely and needed only minimal
sanding and filling to smooth out the seams.
to be sticking their nose down
there anyway. All these bits lined up nicely and needed only minimal
sanding and filling to smooth out the seams.
The wings were a bit of a different story, having a seam line about a quarter of an inch above the engraved line for the flaps and ailerons. Why Hasegawa can’t line these up I’ll never know, but it took a bit of filling and sanding to smooth all that out, too. By this time I had the fuselage ready; the provided weights were inserted in the cockpit area and the fuselage glued up. The windscreen was carefully glued in last (only lost it twice in the fuselage!) and as it had a rough fit, got a good slathering of filler.
Now came the long dark tedious part of the model’s construction. Because of the NMF on the wings, engine pods and belly, I knew this fella had to be smooth. So it was filled and sanded and the process repeated until every crack and seam was apparently banished. Then I broke out the toothpaste – Crest Multicare to be exact. Everything got a good polish with toothpaste and an old t-shirt until the model had a nice sheen to it, almost a semi-gloss. The windscreen had been totally obliterated, which sort of worried me as I had no decal and now no lines to follow as to where the windows should be. Ah well, something to deal with later.
At this point – and I know better now – I should have dry-fit the wings and tail to make sure they would be a tight fit then moved on to painting and decaling before final assembly. But in my naïveté I did not do this; I followed instead the habits of a 1/48 warbird modeler and completely assembled the airframe, save for the engine pods and small bits. After spending a good bit of time getting the wing-to-fuselage joins smoothed and polished, I at last looked over the decals and painting instructions again. That’s when I began to really worry.
|
COLORS AND MARKINGS |
 Striving forward
nevertheless, I gave the little DC-10 several light coats of Tamiya flat
white until it was nicely covered. Everything looked very good with only
a few minor misses in the filling. I then began to wonder how I would
paint it – the NMF belly and wings, the light blue top, the white tail –
with the airframe intact. I didn’t even want to think about the blue
decal with the windows that was made to go under the wings and
tailplanes, not around. I was flummoxed. I was befuddled. I was
discombobulated. I put the thing back in its box and shoved it under the
table for the next five months.
Striving forward
nevertheless, I gave the little DC-10 several light coats of Tamiya flat
white until it was nicely covered. Everything looked very good with only
a few minor misses in the filling. I then began to wonder how I would
paint it – the NMF belly and wings, the light blue top, the white tail –
with the airframe intact. I didn’t even want to think about the blue
decal with the windows that was made to go under the wings and
tailplanes, not around. I was flummoxed. I was befuddled. I was
discombobulated. I put the thing back in its box and shoved it under the
table for the next five months.
Perhaps five months is the average gestation period for a model, because when I next pulled it out and dusted it off, something said it could indeed be completed after all. So, with a fan in the window and a roll of Tamiya tape in hand, I attacked the belly first, carefully masking it off and shooting Alclad Aluminum first, then masking off some bits and shooting some Steel light enough to give some panel contrast. I did the engine pods, wings, horizontal tail, and the metal ring around the tail engine inlet at the same time. Sadly I found it wasn’t my polished filler that marred my NMF but the coat of white, which I had left terribly rough in some spots when I had put it away. Ah well, we say again. I next masked off the inspar areas of the wings and tailplanes. I’m not sure if this area was Coroguard or just gray paint – the instructions only said “Light Gray” – so I mixed white with a little Tamiya Metallic Gray, so that the metallic look of Coroguard is there if one should look for it. Things were looking better. I masked off the light blue top. Looking at some photos I took up several jars of available paint – Tamiya White, Light Blue and J.A. Green, as well as Model Master Acryl Dark Blue. I don’t know if one should mix brands like that, but, well, I did. It ended up about half and half White and Light Blue, with a third then of Dark Blue and just a touch of J.A. Green. Close enough! Once sprayed on it looked great on the plane. I let it cure up, gave it a coat of Future, and went onwards to decals.
 They were indeed old, and
in fact very gooey. I’ve never experienced decals so gooey. It took
forever for them to loosen up (even using very warm water) and then the
amount of glue on the paper was tremendous. Their thinness and age also
lent itself to fragility, and more than once the long blue window strips
tore as I tried to align them. The tail was the most harrowing
experience, having to slice the decal in two lengthwise then carving it
up once it was on the plane. There were many rips and tears and naughty
words mumbled at the workbench that evening. I gave in eventually and
went on with the rest of the little decals, which went on fine with just
water and no solvent. And sure, maybe I could have cut out the “u” in “Wolfgaug”,
turned it upside-down and properly repositioned it, but these letters are
only about a millimeter high, and I’d like to get another good 25 years
out of these eyeballs.
They were indeed old, and
in fact very gooey. I’ve never experienced decals so gooey. It took
forever for them to loosen up (even using very warm water) and then the
amount of glue on the paper was tremendous. Their thinness and age also
lent itself to fragility, and more than once the long blue window strips
tore as I tried to align them. The tail was the most harrowing
experience, having to slice the decal in two lengthwise then carving it
up once it was on the plane. There were many rips and tears and naughty
words mumbled at the workbench that evening. I gave in eventually and
went on with the rest of the little decals, which went on fine with just
water and no solvent. And sure, maybe I could have cut out the “u” in “Wolfgaug”,
turned it upside-down and properly repositioned it, but these letters are
only about a millimeter high, and I’d like to get another good 25 years
out of these eyeballs.
Another coat of Future! It’s starting to get shiny and look like an airplane now. I had work to do on the nose – masking, drawing out and at last painting in the windscreen. According to the one photo I had of PH-DTE, the gray and black on the tip of the nose was a little different than the instructions, so I masked and painted it according to the photo.
|
FINAL CONSTRUCTION |
I had painted all the
tires and gear bits early on so they just needed clean-up, touch-up,
assembly and installation. This is where the BIG mistake came to pass.
I had just put on a heavy final coat of Future and the plane was drying
as I put the wheels on the gear legs. I touched a wingtip, I touched the
belly – it seemed dry. In fact, it was, and I turned it over and glued
in the gear legs. Not so fast, though – as I turned it back over I found
this big smudge in the Future along the spine.
 Probably from my shirt
sleeve. I thought I could smooth it out with a little Windex on a
q-tip. Alas, it went straight through to the white undercoat. Agh. I
had to mix that color again, and blend it in, and Future over it. What
a mistake. Lesson learned: DO NOT PICK IT UP. DON’T!!! NOT YET!!!!
Probably from my shirt
sleeve. I thought I could smooth it out with a little Windex on a
q-tip. Alas, it went straight through to the white undercoat. Agh. I
had to mix that color again, and blend it in, and Future over it. What
a mistake. Lesson learned: DO NOT PICK IT UP. DON’T!!! NOT YET!!!!
The rest of the small bits and the engine pods went on okay, but I wasn’t extremely happy about the fit of the little under-wing fins. I guess I should have dry fit them all better before painting. The antenna on top and the nose gear doors had been lost during all the sanding and polishing, so they had to be replaced with some sheet styrene bits. There are still two tiny, tiny antennas missing from the ventral surface, but I’ve yet to figure out how to cut out bits that small and have the correct shape. Let’s all take a moment now to pretend they’re in place…
|
CONCLUSIONS |
 I love these little
Hasegawa airliner kits – they’re wonderfully fun to build, even if there
are frustrating moments. (But aren’t there always frustrating moments?)
Airliner kits on the whole are relatively simple and a nice break from
more detailed, larger scales. Something about having such a small
replica of the real thing is very neat, and I was just thrilled with how
this one came out to take its place between the DC-9 and MD-11 on the
shelf. No, it’s not a perfect build, but I just try to do a little
better with each one. That’s what keeps it fun, and keeps them from
collecting dust under the workbench, too!
I love these little
Hasegawa airliner kits – they’re wonderfully fun to build, even if there
are frustrating moments. (But aren’t there always frustrating moments?)
Airliner kits on the whole are relatively simple and a nice break from
more detailed, larger scales. Something about having such a small
replica of the real thing is very neat, and I was just thrilled with how
this one came out to take its place between the DC-9 and MD-11 on the
shelf. No, it’s not a perfect build, but I just try to do a little
better with each one. That’s what keeps it fun, and keeps them from
collecting dust under the workbench, too!
|
REFERENCES |
Airliners.net
Various forgotten websites
April 2004
Copyright ModelingMadness.com. All rights reserved.
Thanks to all the M2 readers and contributors who have inspired and helped me out these past few years. Special thanks to Jodie Peeler for the kit and untiring encouragement of my love for all things 1/200.
If you would like your product reviewed fairly and quickly, please contact the editor or see other details in the Note to Contributors.