Revell 1/144 Airbus A320
|
KIT # |
04201 |
|
PRICE: |
£8.95 retail. |
|
KIT DECALS: REVIEW DECALS: |
2 versions, Thomas Cook and SwissAir BrasilDecals BD144-69 £13.00 |
|
REVIEWER: |
|
|
NOTES: |
Revell are currently the benchmark for airliner models – but could do better. |
|
HISTORY |
The Airbus A320 is literally the F-16 of airliners. Not for sheer performance – but for the technological milestone that both made. While the F-16 was the first Fly-By-Wire military aircraft – that same advance, into the computer age, for the airline industry - was made by the A320.
I remember seeing the prototype A320 demonstrate its FBW flight-envelope protection capabilities at Farnborough in 1986. The pilot hauled his then unique - sidestick back, and the nose rose to a seemingly impossible angle. The angle of attack was limited by the computerised FBW system to account for available engine and lifting power – to prevent a stall. The demonstration involved crawling down the runway at this attitude – at ridiculously low speed and altitude. The commentator said this was in perfect safety – I was sceptical – but thought it an unrealistic test for normal airline operation.
A couple of years later I saw the Habsheim crash on TV, where a similar flypast finished up in the trees at the end of the runway! Hopefully airlines don’t do this manoeuvre in normal operation.
 This review is largely as a
result of having the opportunity for a cheap flight on an A320 –
then building a model of the aircraft afterwards. This is a bit different
to most reviews of military subjects – where the reviewer has
extremely limited access to the subject – and no possibility of a
ride.
This review is largely as a
result of having the opportunity for a cheap flight on an A320 –
then building a model of the aircraft afterwards. This is a bit different
to most reviews of military subjects – where the reviewer has
extremely limited access to the subject – and no possibility of a
ride.
Around Feb 2003, the Daily Mirror (UK tabloid newspaper) offered FREE (subject to tax) flights to various European destinations on BMI airlines - from London Heathrow. I collected the necessary tokens, and sent for the qualifying voucher. Of the destinations - my favourite was Dublin – however my son Thomas had his sights set on Paris! I noted all his school holidays, and the limitations of the offer, and hoped for a flight during Easter 2003. After putting him to bed one evening, I dialled the booking number – and waited on hold . . . . . . . . for about an hour. Eventually I was answered – and started to go through the booking process. All flights at Easter were fully booked, we were off to Tenerife for the next school holiday, and the offer was closed during the summer (paying bums on the seats!). Last chance was Autumn Half-Term during the last week of October. Were there two places for two nights on a Paris flight? – it would be a great birthday treat for a boy who would be 9 the following week! YES so I booked onto BD177 outbound and BD176 return. A week later I had booked a hotel, airport car-parking and Paris Metro tickets. Look out Paris – here we come!
At this point I had no idea what plane we would be flying in – but the advert showed an A320, and perusal of the BMI website revealed a fleet of A320, A321, B737s and Embraris. Possibly a model could be made.
I also had no idea what our Tenerife ‘plane would be – but that would be Thomas Cook Airlines and website perusal revealed a fleet of B757 and A320s.
Just before we went to Tenerife I became aware of the Revell A320 kit with Thomas Cook markings. At Birmingham International we boarded a Boeing 757-200 in livery almost identical to that of the Revell A320 kit – a decal-swap idea was germinating in my mind.
On return from Tenerife – I bought the cheapest Thomas Cook A320 I could find on Ebay for £6 (normal retail £9.99). This would be close enough to our Tenerife jet – and I wasn’t going to commit to a Minicraft 757 until I knew which airliner we were on for Paris.
 On 27 October I drove to a
Park’n’Ride on the northern boundary of Heathrow ready for our lunchtime
flight to Paris. After check-in we were instructed to proceed to a gate,
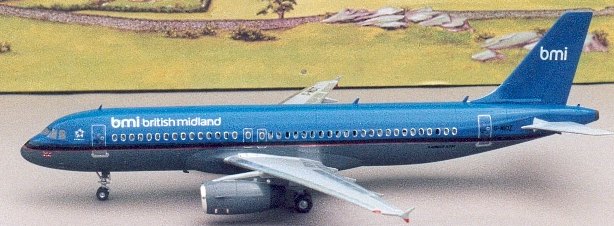
where an Airbus 320 in the new BMI livery was waiting. Unfortunately (for
me), we entered the plane through a folding jetty – so there was no
opportunity to photograph it at Heathrow. We took our seats on the
starboard side at the back and eagerly awaited takeoff.
On 27 October I drove to a
Park’n’Ride on the northern boundary of Heathrow ready for our lunchtime
flight to Paris. After check-in we were instructed to proceed to a gate,
where an Airbus 320 in the new BMI livery was waiting. Unfortunately (for
me), we entered the plane through a folding jetty – so there was no
opportunity to photograph it at Heathrow. We took our seats on the
starboard side at the back and eagerly awaited takeoff.
As with most modern airliners – this plane stormed down the runway, and shot into the sky. A gentle left turn and we were pointing towards Paris. A few minutes later we watched the English south coast underneath – as the cabin-crew delivered a can of coke each and a packet of inedible crisps. A few more minutes we saw the French coast – we were near Dieppe, and I could see the artificial D-Day harbour of Arromarches in the distance. About 10 minutes later we passed over a bank of cloud that was like a sheet of paper over a map. A few minutes later the engines were throttled-back as we began to descend – into the cloud. Inside the cloud it was noticeably darker, and turbulent. We were in there for several minutes, before emerging at about 2000 feet over a very murky Charles de Gaul airport. Landing was smooth – deceleration swift, and soon the plane was at the gate being coupled to another folding jetty – another no photo opportunity! Total flying time 45 minutes. I had avoided ‘tales of the baggage carrousel’ by travelling light and taking our bags into the cabin – so that we could walk straight out of the airport at the other end. About an hour later we were admiring the Arc de Triumphe – under an overcast sky.
The next day the weather was cold but clear. We went up the Eiffel Tower, visited Napoleon’s tomb and army museum at Palais de les Invalides, viewed Notre Dame, and enjoyed a dusk boat-trip down the Seine. The following day we departed immediately for CDG and our return flight. We were in plenty of time – our flight was delayed by weather in the UK. Waiting at the gate was a BMI F-28, this could make the modelling project interesting, if we could get onto it. Unfortunately it wasn’t going to Heathrow – so we had to wait. During the wait Tom told me that he’d remembered that Napoleon was enshrined in Paris from a History Channel documentary, and realised that we could visit him – if I got us there. I had to applaud his resource.
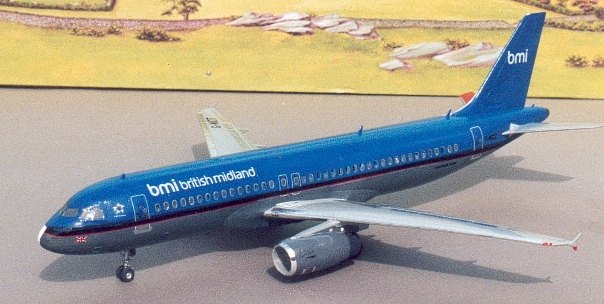
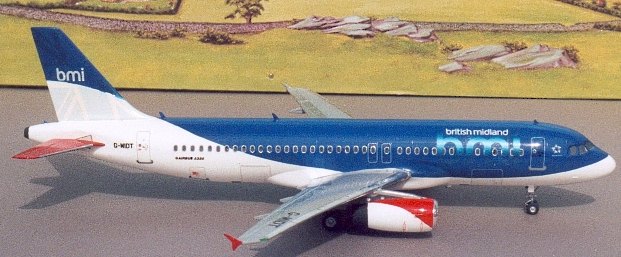
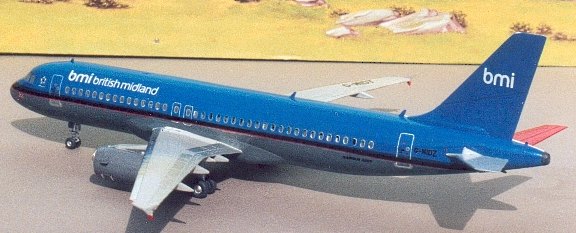 Just before our plane arrived
it started to rain. The plane which arrived was another A320 in the
previous livery of blue upper and grey lower fuselage. Our seats were on
the port side over the wing. I noted that the control surfaces were metal,
and the fixed section grey.
Just before our plane arrived
it started to rain. The plane which arrived was another A320 in the
previous livery of blue upper and grey lower fuselage. Our seats were on
the port side over the wing. I noted that the control surfaces were metal,
and the fixed section grey.
After loading - we were backed out of the gate and pointed to the taxiway. As the plane headed for the runway it was quickly immersed in murk. Having never taken-off under such conditions – I was curious to see what happened to the water lying on the wing surface. Takeoff was equally brisk – and the rain was blown off the wing well before rotation. Just off the ground a condensation cloud briefly closed visibility from our porthole, then the plane proceeded upwards – until we emerged into a beautiful clear sky with patchy undercast. The rest of the flight was smooth and uneventful – but sitting right in the centre of the aircraft on such a short flight – the catering trolleys never got to us, result one disgruntled child on landing.
Back in Blighty we were even quicker getting off the plane, through customs out of the terminal and on the first bus back to the car-park. Here I discovered my previously clean black car had been splashed in a muddy puddle by the parking crew – now Dad was disgruntled.
|
THE KIT |
I gather from an IPMS(UK) review and Ebay items, that the Revell A320 kit has been with us since 1988 – though without wing endplates. My kit’s instructions are copyright 2003 – which is when I became aware of the Thomas Cook example.
The A320 kit has been released with marking for 6 operators to my knowledge – and is well served by the decal market, enabling about 20 other airlines to be displayed.
Moulded in crisp white plastic, with 46 parts and engraved detail – Revell sets the current moulding standard for modern airliner kits that the rest should match.
However the kit is NOT perfect: it has minor flash, and some aerials are moulded to the fuselage – making the fuselage impossible to sand without removing them. Also the fuselage has portholes in the cabin, most airliner modellers prefer these to be filled – and represent windows with decals.
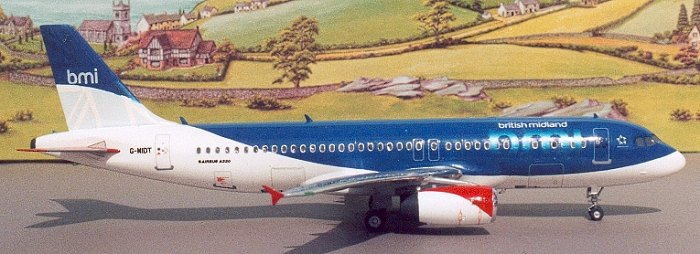
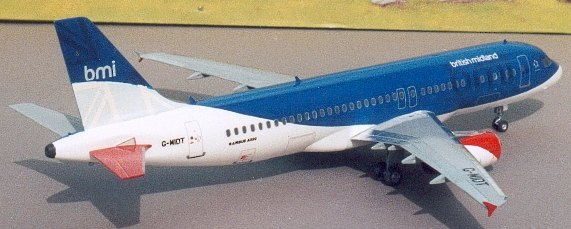
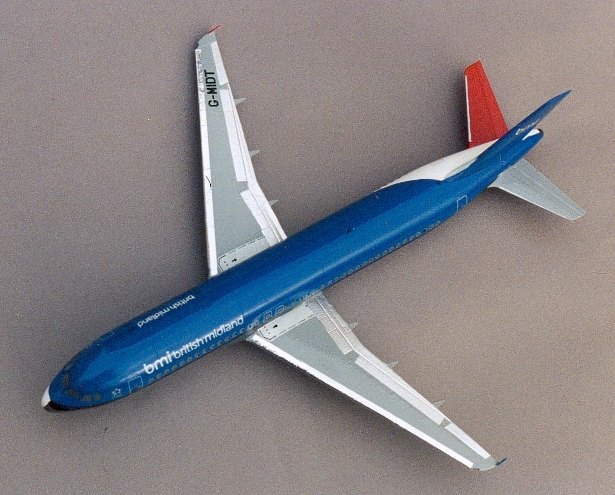
 My kit has decals for Thomas
Cook airline, and SwissAir – but I chose to complete it with BrasilDecals
set BD144-69 for British Midland International. This enabled me to finish
one side in the scheme for out trip to
Paris – and offered decals
for the return on the other side (strictly for a B737-400).
My kit has decals for Thomas
Cook airline, and SwissAir – but I chose to complete it with BrasilDecals
set BD144-69 for British Midland International. This enabled me to finish
one side in the scheme for out trip to
Paris – and offered decals
for the return on the other side (strictly for a B737-400).
This kit has alternate engines of type IAE V2500 and CFM-56 for different versions of the A320. Both legs of our journey were powered by IAE V2500s.
An unfortunate legacy of my shoestring acquisition of this model – was that it was a VERY used kit. In fairness it was advertised as having been sprayed white, it didn’t say quite how badly!
No problem – I had some modelstrip, so set about stripping off the white paint back to the grey plastic. At this point I discovered that the grey was actually primer – and the plastic was white!
The exterior and mating parts of the kit were cleared with modelstrip, toothbrush and water – but some parts were knocked off their sprues. The only one that was lost down the sink, was a wing endplate – which I duplicated in plasticard (but I’m not telling which side!).
The IPMS(UK) review mentioned that the main undercarriage is too long – to give adequate engine clearance – but raises the tail too high. Remedy was to reduce a plinth under the wings for the engines, to correct the clearance – then shorten the gear legs – this corrects the tail height.
 The kit I had – had no plinths
under the wings, infact the engine/wing mounting is recessed, suggesting
that it’s been re-engineered since the IPMS(UK) review – to correct the
flaws. We’ll see how successfully when I measure the tail height. However
this kit is built following instructions – until the livery is applied.
The kit I had – had no plinths
under the wings, infact the engine/wing mounting is recessed, suggesting
that it’s been re-engineered since the IPMS(UK) review – to correct the
flaws. We’ll see how successfully when I measure the tail height. However
this kit is built following instructions – until the livery is applied.
Decals
As stated – this kit is currently marketed with decals for Thomas Cook and SwissAir, the previous release was Condor, and the IPMS review mentions Lufthansa, Air France and British Airways. My Thomas Cook decals finished up on a Minicraft Boeing 757 (surprise, surprise), and I can say that they behaved perfectly.
BrasilDecals set BD144-69 offers markings for:
A Blue/White BMI Boeing 737-500 (requires a shortening of the MINICRAFT 737-300 kit),
An all white BMI Baby Boeing 737-300 (Minicraft kit),
A Blue/White A320, as we travelled in to Paris,
And a Blue/Grey BMI Being 737-300 (same scheme as the A320 we returned in).
A bonus is that Revell offer cockpit frames, and BD offer 4 cockpit decals – so that cockpit windows can be applied after smoothing the cockpit glazing into the rest of the fuselage.
|
CONSTRUCTION |
Fuselage
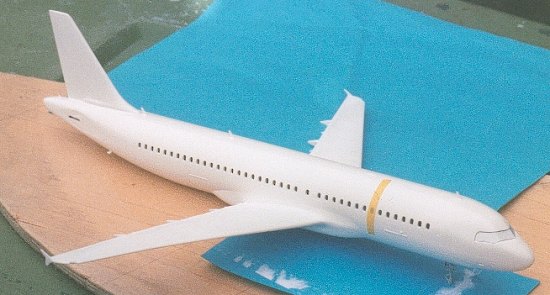 This consists of two halves,
and requires insertion of the nose undercarriage and ballast. The
undercarriage does complicate the finishing of the fuselage – and makes it
vulnerable to damage during construction. The cockpit glass is also
inserted. I paint the inside of my airliner cockpits black – as there’s
nothing to see inside anyway. I filled the fuselage seam with
correction-fluid and smoothed it down.
This consists of two halves,
and requires insertion of the nose undercarriage and ballast. The
undercarriage does complicate the finishing of the fuselage – and makes it
vulnerable to damage during construction. The cockpit glass is also
inserted. I paint the inside of my airliner cockpits black – as there’s
nothing to see inside anyway. I filled the fuselage seam with
correction-fluid and smoothed it down.
Wings
These consist of a one piece underwing and separate uppers – this configuration eliminates dihedral problems. The underwing requires some minor surgery for removal of un-needed actuator fairings. Once constructed the wing fits snugly into the opening in the fuselage belly.
Again I used correction fluid on this join.
Additionally the wing has winglets, but the instructions would have you fit these the wrong way round – with the locationg lug outwards!
Finally there are separate clear navigation lights. These look very oversize to me, and are very difficult to fit – I lost both mine, and had to replace them with Humbrol Clearfix.
|
COLORS & MARKINGS |
Paint
Now the fun really starts! I painted the starboard fuselage and engine with aerosol Appliance White Gloss from Halfords (car DIY store) - easy.
The starboard side of my model requires a blue curved section – assumed to be circular, sweeping from just ahead of the cockpit, through the wing, to a point at the forward point of the fin. Looking at lots of photos I realised that the lowest point of this arc was on a panel line around the cargo door.
 After a few measurements – a lot of thought, and my
first practical use of Pythagoras’ theorem since school, I
calculated an arc of radius of 245mm. How could I create this arc, it’s
bigger that my dividers? After carrying a tape-measure for a day – and
measuring EVERYTHING, I found a section of cable-drum of 500mm diameter in
my garage – close enough to try. This is the curved section of plywood
shown in some paint sequence photos. Another photo shows the painted
fuselage with a section of masking tape to indicate the lowest point of the
arc.
After a few measurements – a lot of thought, and my
first practical use of Pythagoras’ theorem since school, I
calculated an arc of radius of 245mm. How could I create this arc, it’s
bigger that my dividers? After carrying a tape-measure for a day – and
measuring EVERYTHING, I found a section of cable-drum of 500mm diameter in
my garage – close enough to try. This is the curved section of plywood
shown in some paint sequence photos. Another photo shows the painted
fuselage with a section of masking tape to indicate the lowest point of the
arc.
I used the drum to cut a section of blue card - to hold on the model and see how it looks, OK for starters. Then I cut out an inset for the wing and fixed the card to the model with photomount spray adhesive – this is looking promising.
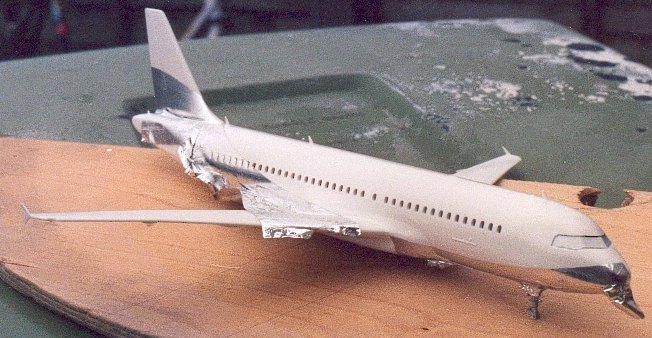 Next I used kitchen-foil to
mask the fuselage lower section – using the card as a knife guide. The
card was removed, fuselage cleaned of adhesive, this is looking very good.
Next I used kitchen-foil to
mask the fuselage lower section – using the card as a knife guide. The
card was removed, fuselage cleaned of adhesive, this is looking very good.
Hurriedly I traced the lower tail decal onto more foil, and masked that – now I’m ready to spray.
I airbrushed both sides (port unmasked) of the upper fuselage with Xtracolor X336 British Midland Blue, and was delighted with results when the masking was removed.
The port lower fuselage completed by masking and brush painting with Humbrol 27 at the same time as the port engine.
At this point I noticed a dark
stripe between the blue upper fuselage and the red stripe.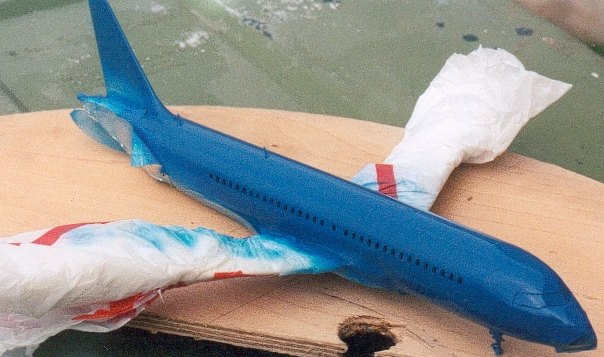
After a perusal of www.jetphotos.net – my best guess approximated to Humbrol 15, which I masked and applied (and then discovered to be part of the decals).
Wings, engine pylons and port stabilizer were painted Xtracolor X17 Barley grey, and to finish major painting - the starboard stabilizer and upper engine were painted Humbrol 19 Red.
Decal Application
As stated the kit decals were applied to a Minicraft Boeing 757 painted with the same white – where they performed very well.
 I was not quite as pleased
with BrasilDecals though. The decals are probably based on rougher paper,
giving an under surface which catches air – making them prone to silvering.
After discovering this – I applied them over wet Klear, which eliminated
the air space and much of the silvering (and any advantages of gloss
paint!). Next problem was that the metallic blue BMI letters, which showed
up so well at Heathrow, are translucent and come out much darker over the
recommended BMI blue paint. Don’t really know how to solve that one – BUT
as I was only doing one side of my model, I used two decals – one over the
other. Couldn’t do that with the tail though! For an absolute purist –
the baggage door legends and engine stencils are inaccurate, and the Airbus
placards should say AIRBUS A320-200.
I was not quite as pleased
with BrasilDecals though. The decals are probably based on rougher paper,
giving an under surface which catches air – making them prone to silvering.
After discovering this – I applied them over wet Klear, which eliminated
the air space and much of the silvering (and any advantages of gloss
paint!). Next problem was that the metallic blue BMI letters, which showed
up so well at Heathrow, are translucent and come out much darker over the
recommended BMI blue paint. Don’t really know how to solve that one – BUT
as I was only doing one side of my model, I used two decals – one over the
other. Couldn’t do that with the tail though! For an absolute purist –
the baggage door legends and engine stencils are inaccurate, and the Airbus
placards should say AIRBUS A320-200.
Cabin windows are supplied in long strips to go over the apertures. I chose to use BrasilDecals as they were optimised for these schemes. Unfortunately some have got knocked through by continual handling to complete the kit.
The white lettering was also not dense enough – and again I doubled over as much as I could.
|
FINAL CONSTRUCTION |
Accuracy
For review purposes I measure my review models, multiply them by the scale factor – and compare them with quoted dimensions for the real aircraft. With this one I’m particularly interested in the tail height, to see if re-engineering has corrected the sit.
Span 233mm * 144 = 33.55M Quoted 33.9M. Difference 350mm or about 2.5mm on kit.
Length 258mm * 144 = 37.3M Quoted 37.6M. Difference 300mm or about 2mm on kit.
Height 80mm * 144 = 11.52M Quoted 11.8M. Difference 220mm or about 1.5mm on kit.
So yes – it’s an accurate kit in size, but I am troubled by the inner wing area, where the taper changes – it just doesn’t look right to me, and is impossible to change. The sit looks spot-on though.
|
CONCLUSIONS |
I have to say that I found this kit to be over-fussy with detail – which made it fragile during construction. Anybody who thinks I was fed-up with this project by the end of it – is correct! Some of that is frustration with the decals, which didn’t really match my expectation – and some with the kit, which makes life difficult for the modeller.
How would Tim the modeller change this kit – if he worked at Revell?
1. Eliminate window apertures – the kit supplies window decals already.
2. Modify forward fuselage, so that undercarriage can be fitted last – rather than first.
3. Eliminate aerials moulded to fuselage halves – make them separate parts for final assembly.
4. Eliminate those nav lights completely – they’re far too easy to lose.
What I didn’t say is that I already had an earlier (Condor airline) version of this kit – stockpiled ready for when Thomas is invited to a birthday party. I was tempted to build it immediately – but wrapped it up and forgot about it – until near the end of this project.
Is it still in danger of not becoming a birthday present? NO – I’m going to give it away as soon as I can!
Am I pleased with the result of the project? YES – but one reminder of our trip to Paris is enough!
July 2004
Copyright ModelingMadness.com. All rights reserved.
If you would like your product reviewed fairly and fairlly quickly, please contact the editor or see other details in the Note to Contributors.