Heller 1/72 Caudron C.561 Racer
| KIT #: | |
| PRICE: | |
| DECALS: | |
| REVIEWER: | Chris Peachment |
| NOTES: | Heller C.714 used as a basis |
| HISTORY |
The Caudron C.561 was
the last of a successful line of racers designed by Marcel Riffard at Caudron in
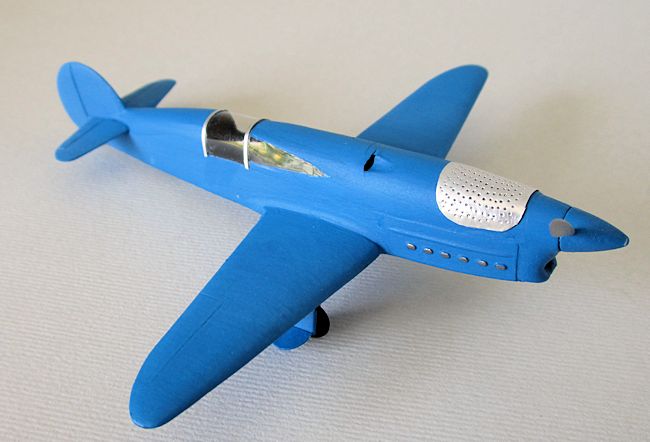
the 1930s. It is easily the most handsome of all of them, but also the most
eccentric with that canopy which follows the line of the fuselage, and affords
the pilot no forward view. Sadly, it was also the least successful, as it failed
to qualify for the 1939 Coupe Deutsch de la Meurthe. This was a 2,000 km race
 around a triangular course, first set up in 1933 by Suzanne Deutsch de la Meurthe for aircraft with engines smaller than 8 litres. The plane was not
entered for the earlier 1937 race because of teething problems with the engine.
It was later reduced 6.5 litres for the 1938 race, but this rendered it
ineligible.
around a triangular course, first set up in 1933 by Suzanne Deutsch de la Meurthe for aircraft with engines smaller than 8 litres. The plane was not
entered for the earlier 1937 race because of teething problems with the engine.
It was later reduced 6.5 litres for the 1938 race, but this rendered it
ineligible.
The wings, tailplane and undercarriage of the C.561 were the same as its predecessors, the C.450 and C.460. The redesign involved the long fuselage, and did away with the previous upright canopy and imprisoned the pilot beneath a hood flush with the top of the fuselage. It would be interesting to know by how much drag was reduced, although I can find no information on this. Caudron had it in mind to make an attempt on the world speed record, though this was abandoned along with the engine problems.
I think most modellers of a certain age will be acquainted with the lovely 1/32 scale Williams Brothers kits of the Caudron 450 and 460 racers. I made several back in the early 1980s, and they were just about the best kits of their time. The recent re-release was very welcome and showed how far we have advanced since then.
|
THE KIT |
 This model came about
because of the kindness of a friend of mine who gave me the old Heller kit of
the Caudron 714 fighter. Of which you will find a very nice build by Tom Draper
on this site. And a 1/48 one by our very own editor. Since I am cursed with this
disease of polystyrosis, or modelling madness, I cannot open a box of plastic
parts these days without wondering how I can modify them. I do not know where
this mental illness comes from, but at least it is harmless.
This model came about
because of the kindness of a friend of mine who gave me the old Heller kit of
the Caudron 714 fighter. Of which you will find a very nice build by Tom Draper
on this site. And a 1/48 one by our very own editor. Since I am cursed with this
disease of polystyrosis, or modelling madness, I cannot open a box of plastic
parts these days without wondering how I can modify them. I do not know where
this mental illness comes from, but at least it is harmless.
The old Heller kit is still around and easily available. They were very nice kits in their day, and gave a good range of otherwise unavailable French aircraft. Though if anyone knows of the whereabouts of their 1/72 Arc en Ciel, I would be pleased to hear of it. The last time I saw one on ebay, it was fetching a king's ransom, and I am too old for another mortgage.
|
CONSTRUCTION |
The fuselage presented the gravest problems and so I started on that, with the thought at the back of my mind that if that went wrong, then I need not waste time on any of the rest. An idle plan as it happened, like most plans in life. Have you ever wondered what makes God laugh? It is men making plans.
 A very nice set of plans
was found on a website below and a few copies printed out and cut up for
templates. What is soon obvious is that the fighter's fuselage is too long, too
fat, and needs radical re-shaping along the top. The nose part which holds the
propeller is fine, although the inlet needs opening and shaping. Then the whole
tailplane was cut off at its root, and the two fuselage halves were sanded down
on their edges to reduce their width, increasing the sanding towards the rear
which becomes very narrow. Then the top of the fuselage was cut off, from the
rear engine panel line, just behind the the wing root, to the very rear of the
cockpit, just ahead of the tail.
A very nice set of plans
was found on a website below and a few copies printed out and cut up for
templates. What is soon obvious is that the fighter's fuselage is too long, too
fat, and needs radical re-shaping along the top. The nose part which holds the
propeller is fine, although the inlet needs opening and shaping. Then the whole
tailplane was cut off at its root, and the two fuselage halves were sanded down
on their edges to reduce their width, increasing the sanding towards the rear
which becomes very narrow. Then the top of the fuselage was cut off, from the
rear engine panel line, just behind the the wing root, to the very rear of the
cockpit, just ahead of the tail.
I wondered whether to skin these areas with thin card, but realised that the two gouges down the side, which allowed the pilot some limited forward vision, were going to present a problem. So I made up two blocks from laminated 40 thou card, and started sanding.
After many hours I had entered a trance-like state, and had reduced the skin my finger tips by a couple of millimeters.
Before fitting the forward block, make that small air intake with a half round file. Then once fitted, use the same half round, rat-tailed file to make the gouges along the sides. While sanding the rear section, always keep looking at the upper profile line of the fuselage. It forms one continuous, sinuous, swooping curve. Get that right and it is the making of the model.
The tail section was reduced in width, the fin was reduced to the oval shape you see, than mated to the cut down fuselage. It is not a bad fit, although the rear fabric grooves don't match and so will have to be sanded off and then re-sanded to shape. The elevators have to be reduced in size, and their moulded roots also filled and sanded. Watch how the mounds of plastic granules form around your feet, like the drifting sands of the Sahara, and wonder how the hell you are going to do the canopy.
 Distract yourself from
this troubling thought by turning to the wings. I wondered whether to build them
from scratch, but am always loathe to waste whatever plastic is given to me, and
so cut down the Heller wings to the right shape, sanded off the ailerons and
then spent a lot of time scribing new ones. The underside will have to be
re-skinned since you have obviously cut off the two bulging wing mountings for
the fighter's machine guns.
Distract yourself from
this troubling thought by turning to the wings. I wondered whether to build them
from scratch, but am always loathe to waste whatever plastic is given to me, and
so cut down the Heller wings to the right shape, sanded off the ailerons and
then spent a lot of time scribing new ones. The underside will have to be
re-skinned since you have obviously cut off the two bulging wing mountings for
the fighter's machine guns.
Again, the moulded wing roots are too large and will have to be carved off at the rear, and filled. The wings can be attached and two little fillets of card were added at the rear and moulded in using filler.
Turn the aircraft over and notice that the original wheel wells in the fuselage will have to be reduced in radius and that you ought of have thought about this before attaching the wings. Detach the wings once you have finished screaming foul oaths, and go to work with card and filler. You can also cut out new wheel wells on the wing undersides, at the same time. Do not give a thought to the undercarriage. All will be well there. All that you need to do is reduce the legs to the right height, and cut new doors from card. The wheels from the kit are the right diameter.
| COLORS AND MARKINGS |
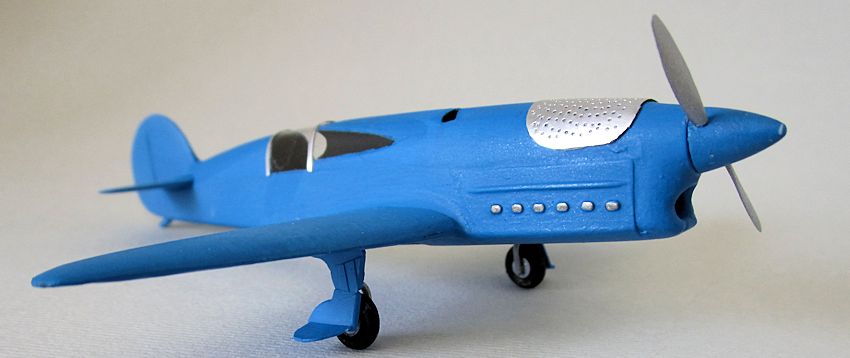
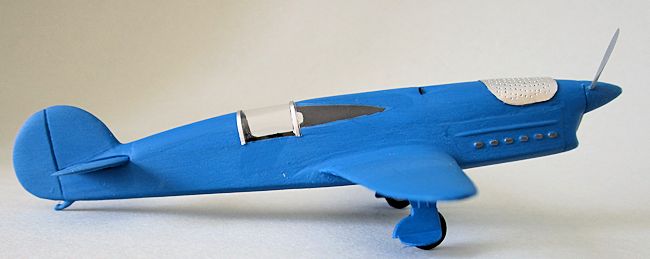
Blast the whole thing
with the blue of your choice. French racing blue seems to have varied
considerably in its shades. From the few black and white photos I could find of
the machine, it looks as if M. Caudron favoured a dark one, which looks much
darker than, say, Bugatti racing cars of that period. I used Lifecolor Matt
Light Blue, ref L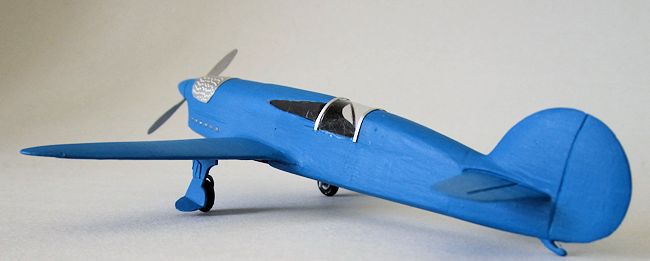 C09, which corresponds to FS 35180. Though there is a 1/32
scale model on the internet which uses a much darker shade. Look at the photos
and decide for yourself.
C09, which corresponds to FS 35180. Though there is a 1/32
scale model on the internet which uses a much darker shade. Look at the photos
and decide for yourself.
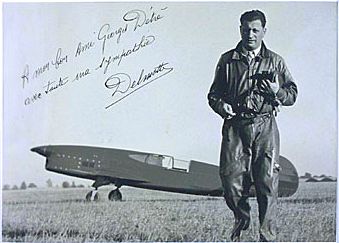
Incidentally, there is one lovely period picture of the test pilot and racer Raymond Delmotte walking away from the machine, holding his leather helmet in one hand and a Gauloise in the other. He looks even more rakish than the Caudron. The ghost of a smile on his face suggests that he is very happy at having landed an aircraft by stretching his neck sideways and squinting with one eye down a narrow gouge. The view of the landing threshold would have been about the size of a postage stamp. And would have disappeared long before landing.
| FINAL BITS |
The cockpit was filled with a cut down seat, a rudimentary instrument panel,and a short control column. On the seat rests a tiny spiral-bound Pilot's Notes, which is open at the entry marked “Landing”. And in Gill Sans 1/4 point script it says “Landing this aircraft is not for the faint hearted”. Alas, this tiny detail is not visible in my photographs.
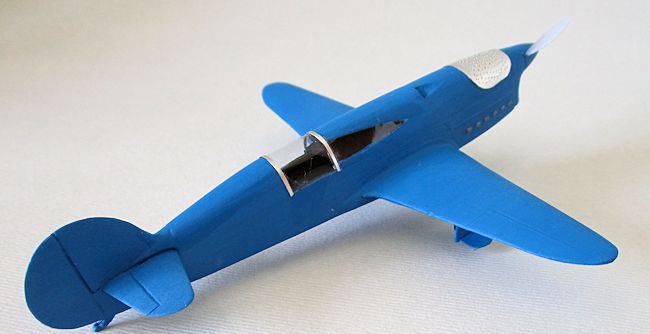
 You now face the beast's two unique features.
The first is the canopy. I tried sanding down the kit's offering, but that
proved horrible. I cut up some plastic packaging found in the fruit section of
the local supermarket, and that looked horrible. I even contemplated carving a
wooden block and plunge moulding the canopy from warm clear plastic sheet, but
remembered that my previous efforts in that line were horrible. Casting my
panic-stricken eyes around the ridiculous clutter that is my work bench, my gaze
stopped on a roll of Sellotape. (Scotch tape to you in the US). One piece for
the two gouges and one piece for the canopy, both very carefully cut around with
a new scalpel blade and the results are as you see. They even come with their
own adhesive. The two silver canopy frames were cut from the edge of a piece of
foil from a wine bottle.
You now face the beast's two unique features.
The first is the canopy. I tried sanding down the kit's offering, but that
proved horrible. I cut up some plastic packaging found in the fruit section of
the local supermarket, and that looked horrible. I even contemplated carving a
wooden block and plunge moulding the canopy from warm clear plastic sheet, but
remembered that my previous efforts in that line were horrible. Casting my
panic-stricken eyes around the ridiculous clutter that is my work bench, my gaze
stopped on a roll of Sellotape. (Scotch tape to you in the US). One piece for
the two gouges and one piece for the canopy, both very carefully cut around with
a new scalpel blade and the results are as you see. They even come with their
own adhesive. The two silver canopy frames were cut from the edge of a piece of
foil from a wine bottle.
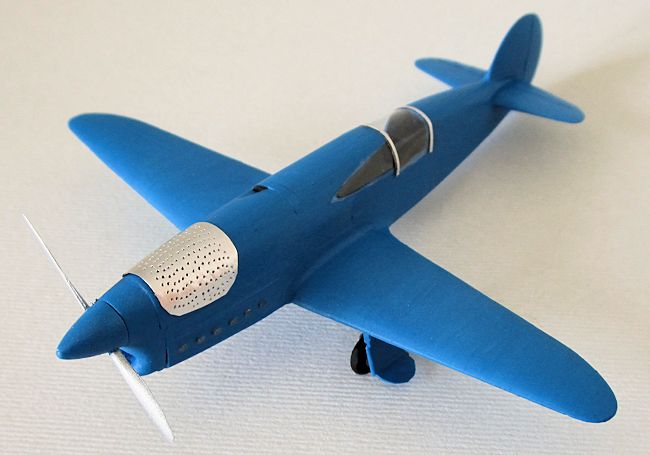
Since I had this piece of foil to hand, I cut out a section for the nose radiator, and punctured it with a dental pick, using a metal ruler to keep all the little holes in line. Note how once the foil is fastened down on the compound curve of the nose, all the holes re-align themselves into a random scatter. Remember what I said about God laughing? No matter, since most of the photos show uneven rows too.
Finally the propeller. Remove the kit's three blades, fill the spinner with more card, more filler, and more sanding, then re-attach two of the blades and set it at ten to four.
| CONCLUSIONS |
I can't find any other example of this sleek beast in 1/72 on the internet, and so for the time being, until some other deluded madman builds one, this is unique. It looks very nice indeed on the shelf, next to my Farman Monowheel racer, awaiting the day when I forget how I made the canopy, pick it up amidships and am forcibly reminded how very self-adhesive Sellotape is.
| REFERENCES |
http://forum.kerbalspaceprogram.com/threads/101889-awesome-aircraft-thread/page5
http://www7b.biglobe.ne.jp/~solidmodel/items/drawing/caudoron-C.561.jpg
http://www.manosparnai.lt/e107_plugins/forum/forum_viewtopic.php?33377.70
http://www.renaultoloog.nl/luchtvaart-english.htm
http://www.legang.fr/maquettes/caudron%20C561%20ad/petites%20images/081216_Delmotte_Detre_.jpg
September 2015
If you would like your product reviewed fairly and fairly quickly, please contact the editor or see other details in the Note to Contributors.