| KIT #: | 01028 |
| PRICE: | NZ$11.95 |
| DECALS: | 3 options |
| REVIEWER: | Zac Yates |
| NOTES: | Custom decals and scratchbuilt parts |
| HISTORY |
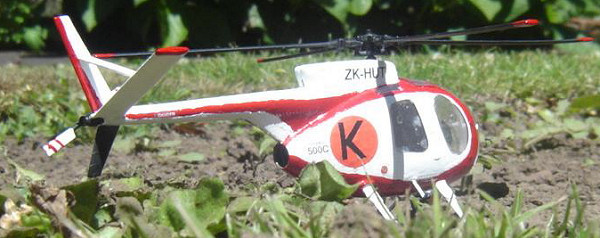
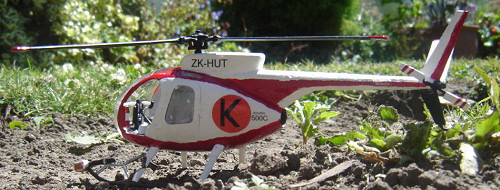
The Hughes 369 design was done for a US Army-initiated competition for a Light Observation Helicopter (LOH), for which Bell, Hiller and Hughes submitted designs. The Hughes aircraft won, but technical difficulties saw it replaced by the Bell OH-58. Since its service in Vietnam the Hughes 369/500 series has been successfully marketed to both military and civilian customers worldwide. One of the main customers in the 1970s must have been the deer hunters of New Zealand, as about 30 500C helos were operated on dangerous deer hunting and live recovery flights during a time known as "The Deer Wars". The government's Forest Service sanctioned hunters to rid the country of feral deer using any means necessary, and the helicopter was found to be an economic tool for the job. The crews switched to live deer recovery when the deer farming industry began, and when deer numbers began to drop in the wild hill country of New Zealand. To prevent poaching each aircraft had to have its own identification letter on a coloured background (a circle 762mm in diameter).
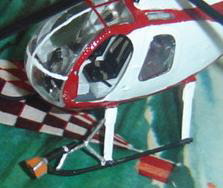
One such aircraft was Masterton-based 500C
registered ZK-HUT (ID Red K), which performed a deer recovery demonstration at a
local air show in 1986. The crew (pilot Richard Paku
and shooter Duncan Sutherland) flew up and down the airfield after a decoy,
stopping it with nets from both the skid-mounted gun and Duncan's handheld
weapon. As Duncan got out to secure the "deer",
 Richard pulled the aircraft into
a backing manoeuvre - regularly done on a hillside, but dangerous on a flat
surface. The chopper's tail rotor smashed itself into the soil, ripped the
entire tail assembly off, rendering the aircraft uncontrollable. It spun once or
twice before impacting on the ground, coming to rest on its left side. Both
pilot and shooter escaped unharmed, but the aircraft was totalled - its main
rotor blades disintegrated into the soil, the tail
boom sheared off and the left skid was crushed. Both crew escaped completely
unscathed.
Richard pulled the aircraft into
a backing manoeuvre - regularly done on a hillside, but dangerous on a flat
surface. The chopper's tail rotor smashed itself into the soil, ripped the
entire tail assembly off, rendering the aircraft uncontrollable. It spun once or
twice before impacting on the ground, coming to rest on its left side. Both
pilot and shooter escaped unharmed, but the aircraft was totalled - its main
rotor blades disintegrated into the soil, the tail
boom sheared off and the left skid was crushed. Both crew escaped completely
unscathed.
The entire spectacle of the crash, lasting about five seconds from start to finish, was captured on home video by local Forest Service hunter Mario Geremia, and a copy was made soon after for my father who at the time was a pilot. At least once a month as a child I would get this video out and watch it, enthralled. It became an objective to, when my modelling skills were up to it, model ZK-HUT as she appeared before the crash. And now, 20 years later, this has come to pass.
| THE KIT |
Italeri's kit of the OH-6A has been out for some time as far as I know, and has also been reboxed by Italeri. It has many parts in common with the Italeri/Tamiya AH-6 Night Fox, with different sprues added for each boxing. Others, such as the "coolie hat" fairing seen on the 500D and Defender series are included in both kits, but where necessary the instructions mention they are not to be used (despite the pictures of the assembled OH-6A on the box show the "coolie hat" installed).
The plastic is typical Italeri in olive drab. There was one sprue of transparencies (a rather large part of the fuselage is clear when you look at it) and two of the airframe components. The doors on the port side are moulded separately, in order to have them off completely (as with the "Miss Clawd" US Army option) or merely open. I found the doors are a very tricky fit, and should really be trimmed before installation, but I feared I would trim excessively so left them as they were. Some releases of this kit have apparently included both low and high skids - this issue came only with low skids as seen on OH-6As, so I got a pair of high skids (as seen on later military examples and all civilian 500s) from my Tamiya AH-6.
| CONSTRUCTION |
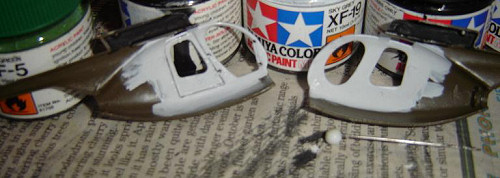
For me construction begins with painting the cockpit parts. Using the video of 'HUT and the Internet for reference, I painted the floor of the cabin Tamiya XF-24 Dark Grey, and the vertical bulkheads XF-19 Sky Grey. The pilot's cyclic and collective controls had the shafts painted in a rough mix of XF-2 Flat White with about six dashes of Sky Grey (the interior of the fuselage was also painted in this colour), and the handles XF-1 Flat Black. The seats were painted Flat Black as well. As with most (if not all) hunting machines ZK-HUT had the passenger's side controls removed, so I did the same with my build and left them on the sprue.
From diagrams and photos in the excellent book "The Chopper Boys" by Rex Forrester (which includes the only photos of ZK-HUT I have ever seen - five blow-by-blow images of the crash) I gathered that civilian 500s have a different instrument panel to military OH-6s, so I trimmed the sides from the kit's panel and used one of the scrap parts as an instrument for the top of the panel. A small side panel was made by cutting part of a number from the sprue. This was then painted Flat Black and then drybrushed with X-11 Chrome Silver. When the paint was dry, the parts were assembled into the cockpit subassembly. The rudder pedals were then cemented on, painted Chrome silver.
 While the cockpit subassembly was drying,
I separated the fuselage halves from their sprues, glues the passenger's door to
the left side and painted the exterior Flat White. In hindsight my job would
have been much easier if I used a primer or undercoat, as White paint and I have
never really got on that well, but what's done is done. About three coats of
white were used. I left the underside unpainted (another mistake, as we'll see
later) and left the lot to dry.
While the cockpit subassembly was drying,
I separated the fuselage halves from their sprues, glues the passenger's door to
the left side and painted the exterior Flat White. In hindsight my job would
have been much easier if I used a primer or undercoat, as White paint and I have
never really got on that well, but what's done is done. About three coats of
white were used. I left the underside unpainted (another mistake, as we'll see
later) and left the lot to dry.
Rather than watching the paint dry, I raided my bits box for a rather essential component missing from the kit - the cockpit fire extinguisher, attached to the door frame on the left side. For this very small part I cut off the warhead from a rocket (courtesy Airfix's 1:72 Hawker Hurricane Mk.II) and painted it X-7 Red. Two coats were done, then a band of Flat White around the middle (another two coats) and, to finish, a dab of Chrome Silver to represent the handle and nozzle at the top. Next, as the cockpit was dry, I cut some household Cellotape into lengths, folded them and used my plastic cement to fix them to each of the two front seats. These were then painted XF-10 Flat Brown with Chrome Silver "buckles". Two 2D belts were painted on the cushion part of each seat as well.
Before I installed the rather fiddly cockpit setup into the fuselage I added a finishing touch I read about in "The Chopper Boys" (though this is a generic thing, rather than being specific to 'HUT) - deer blood on the rear cabin floor. Stories abound where a dozen deer were crammed into the comparatively tiny space behind the pilot, and that despite attempts to hose it down the blood would stay. I watered down some Red and brushed it across the floor and the lower parts of each bulkhead (these vertical parts were then repainted lightly with my light grey mix). All this seems to be for nothing though, as on the completed model you would need to shine a light into the cabin to actually see the "blood", but at least I know it's there.
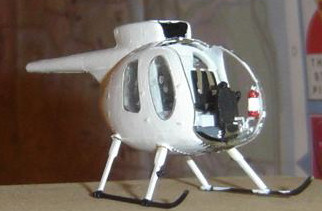
All the cabin windows were cemented from the inside after much trimming of their locating holes, then the cabin assembly was glued to the left fuselage half, and finally both halves joined together. Look hard enough at the completed model and you'll see a gap where the forward bulkhead should meet the ceiling, but I left this alone. The cabin also slants off to one side, but it is not that noticeable.
Once the fuselage was dry, my new high skids were cemented. Mistake number one - not cleaning the join. Where the skids meet the fuselage there is only a butt join. This is weak enough on its own, but when the glue is stuck only to paint, this is a problem. The left skid (already warped slightly, one leg angled oddly) was wobbly, and I ended up having to take it off and re-glue it before it stayed.
I painted the four main rotor blades and
rotorhead components Flat Black. When dry they were given a second coat, then
separated from the sprue and cemented together. The instructions allow for the
rotor to spin, but the hole for the shaft is rather
 tight, so I just glued it in
place. The rotor setup was put aside for installation after painting and
decaling.
tight, so I just glued it in
place. The rotor setup was put aside for installation after painting and
decaling.
When the skids were both on (the first time) I attached the tail setup - another butt-join or two, the characteristic Y-tail of the 500C formed by two vertical fins and one at a 45° angle supported by a small strut. To call this "fiddly" would be an understatement. I constructed a jig to support the setup (ie, a book and a model box) and left it to dry. I then separated the two parts making up the tail rotor and painted them - the hub Flat Black and the rotor blades Flat White with Red stripes. I think these may have been included on the decal sheet that came with the kit but I decided to do it myself. I then attached the fire extinguisher to the cockpit side, and then closed it up with the expansive canopy. Whenever I handled this sizeable part I was careful to clean it with a tissue to get rid of fingerprints - this worked very well.
| COLORS & MARKINGS |
My hands are not by any means steady, so painting the fine red trim on the tail of the 500 would not be easy. I did one coat of the entire red area with my main brush, then followed up with fine brush on the tail and the main brush again on the fuselage. The initial coats were very shaky, so I touched up problem areas with Flat White. I attempted to use masking tape on the tail for the touchups, but I doubt I'll do it again thanks to a small trickle of white which seeped through (easily remedied). The underbelly required a couple more coats of Red due to the dark Olive Drab colour underneath. The tail fins were also had Red areas painted on them.
The tail rotor was attached to the tail and left to dry.
By this time I felt she was ready for decals, but they hadn't arrived, so I set to painting the canopy. Not fun - more white! This took two coats of Flat White. I then used the fine brush again to paint the spotlight in the canopy Flat Black, followed by a Chrome Silver centre.
 The next part was something most
definitely not included in any model kit that I know of - the net
gun. This was situated on the left skid and was controlled by
the pilot, in addition to the shooter on the right side. To build the strut
arrangement I used miscellaneous parts from kits including a Super Etendard and
Bf.109G-10, with the body of the gun coming from an unknown aircraft and the net
canister from cementing together two 1:144 F-14 Tomcat undercarriage doors and
trimming them. The struts were painted Chrome Silver, the body of the gun Flat
Black and the canister a mix of Flat White, Red and X-8 Lemon Yellow. Some
Chrome Silver was used to create small piping on the gun and canister. Now, it
was time to play the waiting game once more as I awaited my custom-printed
decals from the US.
The next part was something most
definitely not included in any model kit that I know of - the net
gun. This was situated on the left skid and was controlled by
the pilot, in addition to the shooter on the right side. To build the strut
arrangement I used miscellaneous parts from kits including a Super Etendard and
Bf.109G-10, with the body of the gun coming from an unknown aircraft and the net
canister from cementing together two 1:144 F-14 Tomcat undercarriage doors and
trimming them. The struts were painted Chrome Silver, the body of the gun Flat
Black and the canister a mix of Flat White, Red and X-8 Lemon Yellow. Some
Chrome Silver was used to create small piping on the gun and canister. Now, it
was time to play the waiting game once more as I awaited my custom-printed
decals from the US.
The decals for this build were designed and printed by Ashley Messenger, who volunteered his and his ALPS printer's services after a plea was put out over the Internet modelling forums. After trial and error with black-and-white mock-ups printed at home, we decided on a final design close to the full-size (as far as I can determine) and these were then posted from the US to me in New Zealand. They arrived after about a week or two, and I was pleased to see enough decals to do two aircraft (or rather, to remedy mistakes). I cut the decals from the sheet very closely and soaked them in water for about 30 seconds, using a brush to put the smaller decals on the airframe. I used my finger to put on the Forest Service identification circle. I then used a tissue to dampen down the decal. I had to replace the registration on the right side as it had not "stuck" properly.
| CONCLUSIONS |
I am extremely proud of myself for the effort I have put into this build. It has been a labour of love for me, and modelling a subject close to one's heart is a great thing. At the moment I am awaiting a cargo hook from the United States to put on the underside.
In terms of the kit, I wouldn't recommend it to the inexperienced or younger modeler - I left it alone for a week after the incident with the wobbly skid - but a modeller with enough experience should be able to tackle the fit problems and butt joins.
It's the only kit of the OH-6A on the market in 1:72, and fair enough considering its small size, but at the same time I think Italeri would do well to retool it slightly with alignment tabs for the skids and tailfins.
Review kit courtesy of my ATM card, decals courtesy Ashley Messenger's generosity.
February 2006
| REFERENCES |
GEREMIA, Mario - Home video, 1986
Googling "Hughes 500"
FORRESTER, Rex - The Chopper Boys & The Helicopter Hunters, Penguin 2002
Copyright ModelingMadness.com. All rights reserved. No reproduction in part or in whole without express permission.
If you would like your product reviewed fairly and fairly quickly, please contact the editor or see other details in the Note to Contributors.