|
KIT # |
1206 |
|
PRICE: |
£5.99 |
|
DECALS: |
2 USAF Rescue Aircraft |
|
REVIEW & |
|
|
NOTES: |
|
|
HISTORY |
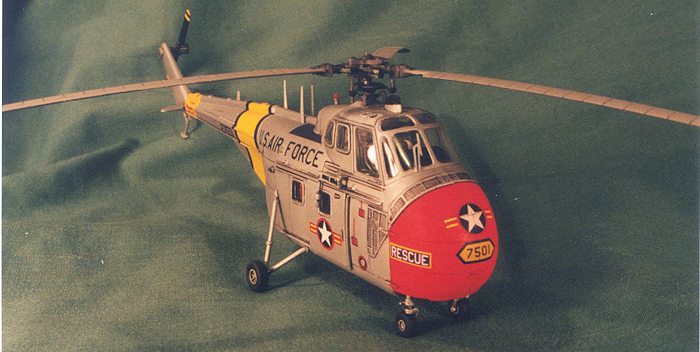
Sikorski's H-19 (S-55) was one of the first Western helicopters with a truly useful load-carrying capability. Introduced into service towards the end of the Korean war, the H-19 went on to pioneer vertical envelopment tactics with the Marines- the strategy that would go on to form the basis of the airmobile tactics used heavily in Vietnam. The S-55 also went on to a successful civilian life, not to mention starring in 'Riptide'!
Though replaced relatively quickly in US service by its more powerful and capable offspring, the H-34 (S-58), Sikorski's H-19 and it derivatives soldiered on for many years in the inventories of other air forces. The H-19 was the first troop-carrying helicopter to see service in Vietnam, as examples appeared towards the end of French involvement in the conflict. Surviving French aircraft were passed on to the fledgling Vietnamese Air Force (VNAF). For several years these were only helicopter assets of the VNAF. In the early 60s the VNAF inventory was bolstered with the addition of ex-USAF rescue UH-19Bs, as depicted by this model.
|
THE KIT |
Until the release of this kit earlier this year, the only 1:72 H-19/S-55 kit available was the ancient Airfix example, reissued many times over the years since its original, no clear parts issue. Italeri's kit is a quantum leap over Airfix, as befits 40-odd years of molding technology.
The kit is molded in a soft, flash-free, light grey plastic, with recessed panel detail throughout. The scribing is a bit soft, and is excessively deep and wide around certain access panels. Molded detail around the engine grillwork is very well done, though some detail is lost where the screening bridges the fuselage halves. Unlike their recent H-21 kit, Italeri have molded all the screening as solid, and do not provide flexible mesh. Given the extensive screening on the H-19's nose, with its compound curvature, this is probably the best approach in this scale.
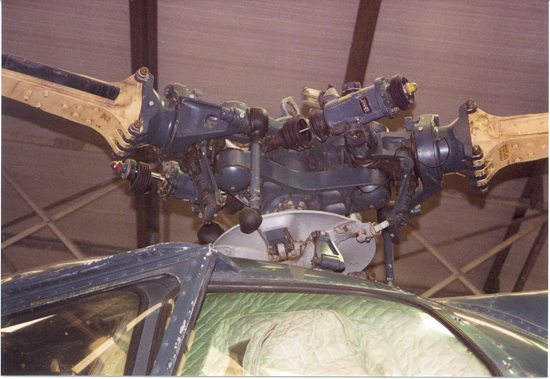
The main rotor features a well-detailed multi-part head, and suitably drooped blades. At first I thought that the bulbous moldings on the ends of the rotor linkages looked ridiculously overscale, but then I compared them to photos of the real thing (see the Whirlwind rotor head, below), and they don't look quite so bad!
The interior includes a full cargo cabin, with excellent seats. The cockpit is simplified, with minimal controls (cyclics only, no collectives or tail-rotor pedals), and a featureless instrument panel/coaming, to which is applied a simple decal. Compared to their earlier H-34, Italeri has done a better job of representing the actual layout of the cabin and flightdeck (access to the flightdeck is via ladders, leading through hatches under the pilots' seats). The cargo section includes front and rear bulkheads and a roof, which also includes a simplified transmission for the main rotor. Panels with simulated acoustic insulation hide the transmission from view, however these were sometimes removed in service. Non of the seats include belts. Ejector pin marks mar the cabin walls and the backs of the seats (which are visible through the windows). The underside of the transmission is hollow, leaving a large hole in the roof of the cabin. These problems will need to be addressed if the cargo door is left open.
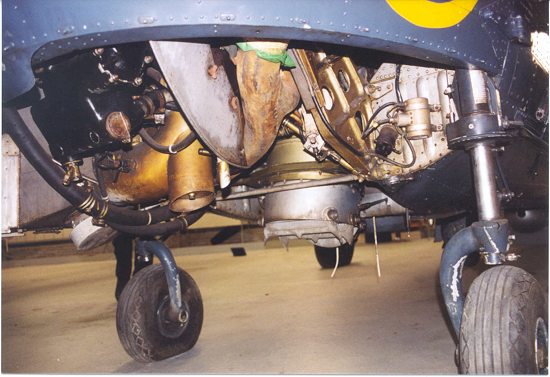
External details are generally well done. A very simple hoist is included, although many aircraft featured a more complex, tubular structure, similar to that included in the H-34 kit. This kit includes the H-19B style 'kinked' tailboom and horizontal stabilisers- Revell have released a H-19A, with a straight boom and drooped stabilisers. Otherwise these kits are identical. All the windows feature a heavy raised rim. Study of photos of actual aircraft indicates this is not nearly so prominent. The windscreen includes a moulded-on wiper, which makes painting a bit of a chore. On the real aircraft, the underside of the engine compartment is open. Italeri include a bulkhead with a very simplified representation of the bottom of the radial engine. The real deal is considerably more complex (see the accompanying photo of the bottom of a Whirlwind)- this is an excellent opportunity for some aftermarket bits.
|
CONSTRUCTION |
Construction starts, as usual, with the interior. For the most part I stuck to the box here, only adding tape belts and foil buckles to all the seats. The missing controls are not evident due to the highly curved windows and the small scale. To cover the hole under the transmission, I glued on a section of aluminum foil, textured to resemble quilted insulation. I made this by lightly drawing a pattern of diagonal lines on the foil, using a soft, 0.3 mm mechanical pencil. Any ejector pin marks that would be visible through the windows were filled. Alignment of the various bulkheads and floors is a bit tricky, and I had to use some super glue to hold the cabin roof/transmission in place in one fuselage half.
Before assembling the forward fuselage halves, I added the recommended 10 grams (about 1/3 oz) of weight to the engine compartment. Without the weight, this kit is likely to be a major tailsitter. The interior is slightly too narrow compared to the fuselage. If glued snugly to one side, you will be left with a slight gap on the other. Normally this wouldn't have worried me, but as the nose gears attach to the bottom of the floor molding, and their alignment is more evident, I glued some small shims to the edges of the floor.
With the interior secured, the forward fuselage was assembled. This went well, although the bulge on the underside required some cleanup. I lightly rescribed the mesh where it bridged the seam, and rescribed the seam down the front of the nose, to represent the gap between the engine doors. I removed the moulded-on red beacon from the spine, aft of the rotor shaft, and replaced it later in assembly with a sprue mount and a light carved from clear sprue. The boom was added, and this fit very well, with virtually no clean up needed of the seam. Well done Italeri! Next the canopy was added, and this was where I encountered my only real fit problem. I found the rear edge of the canopy to be a poor match to the top of the fuselage, and only a lot of filing and polishing cured this. Fortunately this area of the canopy is actually solid.
The rotor head requires some care in assembly, if the linkages are to end up pointing in the right directions. This detail will reward some careful painting to highlight all that is there. The blade mountings are reasonably secure (this is probably the first helicopter kit I've built where I didn't break off a rotor blade during construction!
Final touches prior to painting included some new antennae, carved from sheet plastic to better match my photos references. I also added the mysterious, crossed-out crescent shaped part to the bottom of the nose. While Italeri indicate this is not to be used, a recent issue of Heli-Kit News indicated that this part was sometimes present on UH-19Bs. Checking my photos careful, it was evident that this part should be present on this particular aircraft. Finally I added two small handles to the engine covers.
|
PAINT & DECALS |
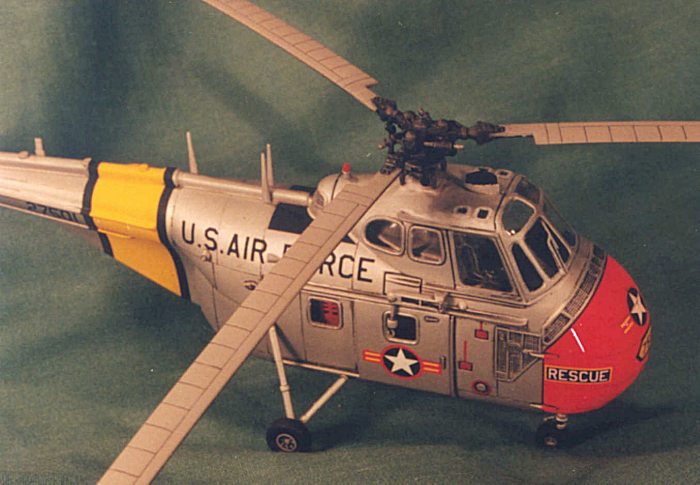
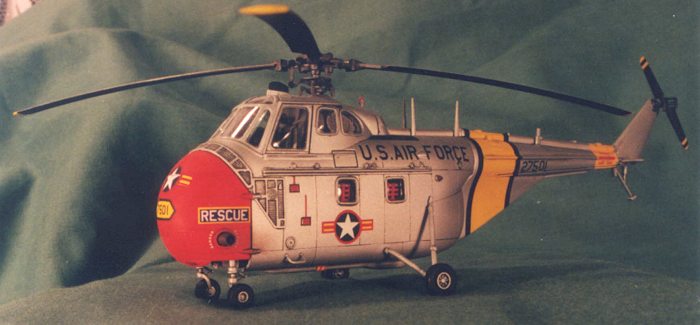
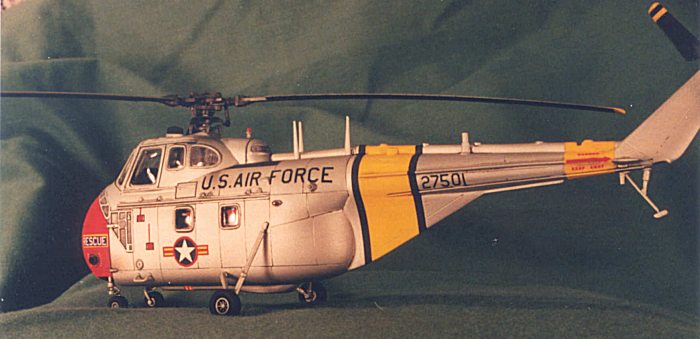
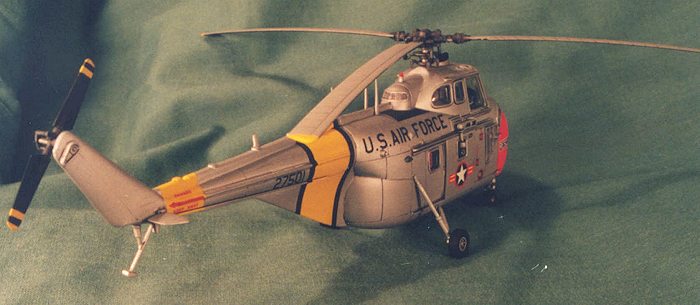
The finish chosen for this kit is based on a photo that appeared in several publications (including Squadron-Signal's VNAF, see references at the end of this review) of a freshly delivered VNAF UH-19B wearing VNAF stars and bars and full USAF titles. From other photos of VNAF H-19s, it appears these markings were soon replaced by a more pedestrian scheme, and the high-visibility yellow and dayglo markings were removed. The basic aircraft colour scheme included bits of both of the kit schemes. The nose appeared to be finished in dayglo, while the fuselage band featured fat black trim. The nose featured a black trimmed yellow oblong hexagon with the serial number, as seen on many MATS aircraft. No decal for this was included in the kit.
After masking all the transparencies, I sprayed the fuselage and all ancillary bits with primer coat of grey. After fixing up the inevitable flaws and repriming, I began the colour scheme my spraying a coat of white one the nose, and under the two tailboom bands. With most of the nose masked, I sprayed the yellow bands, and the serial hexagon on the nose. I then masked the yellow bits (and the rest of the fuselage) and sprayed the nose with Lifecolour Fluorescent Red. Like all fluorescents, this paint does not cover well at all, and requires very even coats over a white base to give a good finish.
I then masked the colourful bits and reprimed the fuselage with gloss light grey (it was what I had at hand). The metal finish is Humbrol Metalcote dull aluminium. This was my first try with this paint, and I found it went on very well, although the metallic finish tended to rub off with handling. I then left the finish to harden for a few weeks while my sister came to visit.
I sealed the finish with an overall coat of Humbrol gloss clear. This allowed me to handle the kit without fear of damaging the finish, or getting metallic pigment onto the coloured areas. I followed this up with a wash of black watercolour. When this was dried I cleared up the excess with a dampened towel. I concentrated the wash on the mesh areas, to pop out the well-moulded detail.
The rotor was painted with light grey upper surfaces and black lowers, with yellow tips. I had no hard references for this, but it seemed to go with what I'd seen suggested for H-34s. The tail rotor was black with two thin yellow bands.
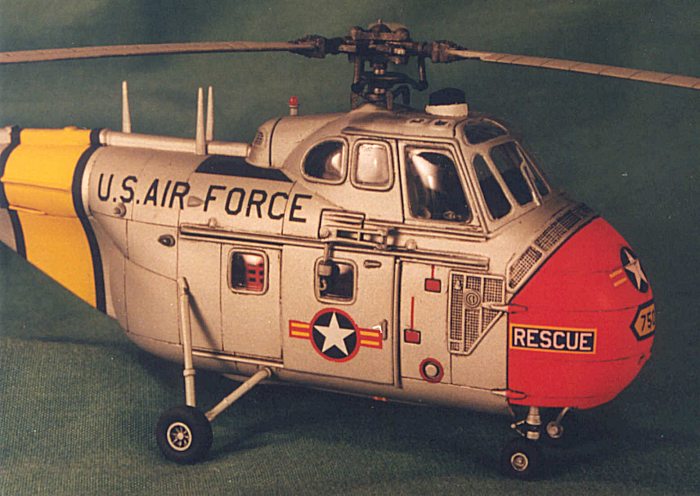
The markings for the kit are a mix of spares and kit decals. The kit decals were used for most of the stenciling (except for the surround on the fuel filler, which folded over on me and couldn't be resuscitated), the black trim on the tail boom, and the RESCUE markings. I found the decals to be of excellent quality and very thin, and the black stripes fit very well over the complex surface of the tail boom. I cut up the tail-rotor warning into three parts to bridge the ribbing on the boom. The serial number and U. S. AIR FORCE markings came from spares, while the black trim on the serial hexagon came from a sheet of stripes.
The VNAF stars and bars came from a Carpena sheet. Like all my experiences with Carpena decals, they were very thin, and required overcoating before removal from the sheet to avoid disintegration. For the nose marking, I cut the decal in two halves. I still had trouble getting it to settle onto the highly curved surface.
Final finish was Humbrol clear flat overall. The masking was removed, and the fiddly bits were attached one by one. Take care with the main gear- the attachment points are not terribly strong, and if the joint is not reinforced you may find the legs splaying outwards. Finally I painted the windscreen wiper and touched-up any remaining goofs, and the kit was done.
|
CONCLUSIONS |
Once again, Italeri have managed to produce another excellent, reasonably priced kit of a much needed rotary wing subject. Roll on that long delayed CH-37 Mojave! The bright colour scheme and unusual markings certainly make this model stand out on the shelf. Apparently this goes for the contest table as well, as this model was honoured with a silver medal in the small scale helicopter class at Scale Modelworld 2000 in Telford, England.
|
REFERENCES |
VNAF- South Vietnamese Airforce 1945-1975 by Jim Mesko. Squadron/Signal Publications
If you would like your product reviewed fairly and quickly, please contact me or see other details in the Note to Contributors.