Skybirds 1/72 Supermarine Scimitar
| KIT #: | ? |
| PRICE: | £19.50 |
| DECALS: | See review |
| REVIEWER: | Carmel J. Attard |
| NOTES: | Short run with photo etch and resin parts |
| HISTORY |
Modellers
who have been in the hobby for a good number of years would notice that among
the most sought after kits has been the old Frog Scimitar Navy jet fighter in
spite of detail in the kit was a far cry from what we are used to these days.
Then appeared on the market the Contrail vac form kit which was a vast
improvement but suitable for those who build the vac form type. Both of these
models needed a fair amount of work as they were rather basic. (Carmel probably
would rather forget that Merlin also did a Scimitar which your editor
 actually built and is darn
proud of it as it was a pig. Ed)
actually built and is darn
proud of it as it was a pig. Ed)
At the same scale Skybirds 86 were able to produce a very reasonable representation of the Scimitar and this goes back in 1991. This scale model was very welcome since at last one could build a highly detailed Scimitar without extra effort as it contained everything needed in the kit to make an aircraft which in real life will be remembered as a fighter with a graceful design yet the noisiest in service with the Royal Navy in the 60s before being replaced by the Buccaneer in 1965. The Scimitar served on RN carriers like HMS Ark Royal, Centaur, Hermes and Victorious and will remain well remembered particularly of the times these carriers entered the Grand Harbour at Valletta with a good number of Scimitars stretched in a line along the deck and sharing the space alongside Sea Vixens and Fairey Gannets.
| THE KIT |
The Skybirds 86 kit is a multi media type injection moulded
in grey plastic parts of the fuselage intake area, 4 in number fuel tanks of 250
gallon capacity, rear fuselage exhaust pipes, tail unit and main wings and tail
planes. The rear fuselage exhaust area, smaller intake ducts, tail skid,
arrestor hook, antennae, refuelling probe, undercarriage doors, undercarriage
legs and wheels, nose cone, ejection seat, cockpit were all cast white metal
with accurate shape and quality of product. There were two identical
 vac form canopies which
are very accurate in shape and very clear. Also there is an option for the main
undercarriage; one type differed from the other in having varied wheel hubs.
These also had flattened tyres. Also in the kit were brass etch air brake doors,
and wind fences already shaped from plastic card.
vac form canopies which
are very accurate in shape and very clear. Also there is an option for the main
undercarriage; one type differed from the other in having varied wheel hubs.
These also had flattened tyres. Also in the kit were brass etch air brake doors,
and wind fences already shaped from plastic card.
My sample came to me only recently although I noticed that an important mid section which was also injection moulded and contains the cockpit canopy was to my surprise missing. This was a somewhat complicated item as it has the cockpit and nose undercarriage well already formed empty spaces and also needed to fit in between the forward air intake areas. I have checked with a set of Aviation News scale plans (Vol 4 No 25) to see the extent of the part which was missing and after careful study of the drawing and sections I decided to build it from balsa wood. The wood offers the advantage of being soft and easy to work with but on the other hand it also may not be strong enough in view of the narrow skin it will result into when the bath tub and nose wheel well spaces are cut. In short a lot of care was needed while producing the important missing item which in the end I managed to produce.
| CONSTRUCTION |
 The white
metal detail parts and sections forming the kit demanded use of super glue to
join together. The parts like the wing tip probe, refuelling probe and arrestor
hook were easily bent but then white metal is very ductile and any piece that
was bent was just as easily straightened, unlike plastic which could have broken
in parts. Building a multi media kit certainly demanded some experience but
moving one pace at a time during the assembly will in the end be quite
rewarding. Another important item that was missing in the kit was the
instruction sheet. I started the assembly by joining the centre section that was
in two plastic pieces divided horizontally. This was followed by adding the wing
centre section. A little filler was needed at the joining line which was then
smoothened down by sanding. The cockpit area which was missing I have made from
a balsa block measuring 42mmx12mmx24mm in overall size. This was carefully
curved, hollowed and sanded until the final shape was achieved and the item was
strengthened with swabbing sanding sealer to the surfaces, again followed by
sanding when it was dry. The kit part for the nose undercarriage metal wheel
well was then fitted inside the balsa section. The opposite side of the wheel
well piece also formed the cockpit floor. The balsa section then fitted in
between the slot void that provided between the side air intakes. This was
checked with scale plans before glue was applied and allowed to set.
The white
metal detail parts and sections forming the kit demanded use of super glue to
join together. The parts like the wing tip probe, refuelling probe and arrestor
hook were easily bent but then white metal is very ductile and any piece that
was bent was just as easily straightened, unlike plastic which could have broken
in parts. Building a multi media kit certainly demanded some experience but
moving one pace at a time during the assembly will in the end be quite
rewarding. Another important item that was missing in the kit was the
instruction sheet. I started the assembly by joining the centre section that was
in two plastic pieces divided horizontally. This was followed by adding the wing
centre section. A little filler was needed at the joining line which was then
smoothened down by sanding. The cockpit area which was missing I have made from
a balsa block measuring 42mmx12mmx24mm in overall size. This was carefully
curved, hollowed and sanded until the final shape was achieved and the item was
strengthened with swabbing sanding sealer to the surfaces, again followed by
sanding when it was dry. The kit part for the nose undercarriage metal wheel
well was then fitted inside the balsa section. The opposite side of the wheel
well piece also formed the cockpit floor. The balsa section then fitted in
between the slot void that provided between the side air intakes. This was
checked with scale plans before glue was applied and allowed to set.
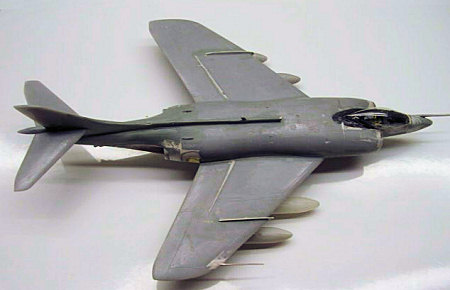
 The wing
fences supplied were of the right thickness and only needed a slight alteration
to bring to correct shape. These were fitted between the inner and outer wing
panels which contained a space for these. The white metal cast parts of the
engine exhaust area, one part for each side were quite impressively produced
having the correct contours of the area. The jet pipe nozzles also contained
blanking round pieces that avoided the see through effect once in place. The
tail unit contained a tail bumper, arrestor hook, fuel damping pipe and the only
missing item was a small air intake that fits offset to port at the rear
underside of the fuselage. This I built from a piece of stretch sprue. Since I
decided to build a later issue version of the Scimitar I chose the main wheels
that conform to those of the Sea Vixen which were then standard and apparently
interchangeable for the two aircraft when these operated alongside on same
carrier. I also added some cross channels in the wing wheel wells as this area
The wing
fences supplied were of the right thickness and only needed a slight alteration
to bring to correct shape. These were fitted between the inner and outer wing
panels which contained a space for these. The white metal cast parts of the
engine exhaust area, one part for each side were quite impressively produced
having the correct contours of the area. The jet pipe nozzles also contained
blanking round pieces that avoided the see through effect once in place. The
tail unit contained a tail bumper, arrestor hook, fuel damping pipe and the only
missing item was a small air intake that fits offset to port at the rear
underside of the fuselage. This I built from a piece of stretch sprue. Since I
decided to build a later issue version of the Scimitar I chose the main wheels
that conform to those of the Sea Vixen which were then standard and apparently
interchangeable for the two aircraft when these operated alongside on same
carrier. I also added some cross channels in the wing wheel wells as this area
 lacked detail.
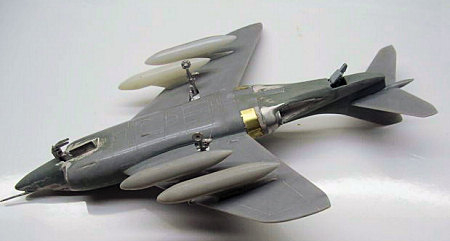
The air intake on the centreline of the fuselage and a section of the spine was also a white metal piece which had an aerial built on it were then fixed in place. These were so delicately produced that these hardly needed filler. Finally the nose cone which is metal was fixed and blended to the wood section adding filler where needed. The refuelling probe was shortened by 3mm to bring to correct size and fixed in the side insert of the metal nose. The boundary layer bleeds were then fixed to the intake fuselage area. The cut cockpit bath tab was wide enough to take the metal detailed ejection seat and the brass etch, pre painted instrument panel fixed in place. The super clear vac form canopy was carefully cut to fit and fixed using white glue. The brass etch air intake doors, four in number were fixed in closed position at a recess to the rear of the wing root trailing edge. The completed model with so much solid metal parts added had a weighty feeling and this was quite appropriate to the Scimitar in real life.
| COLORS & MARKINGS |
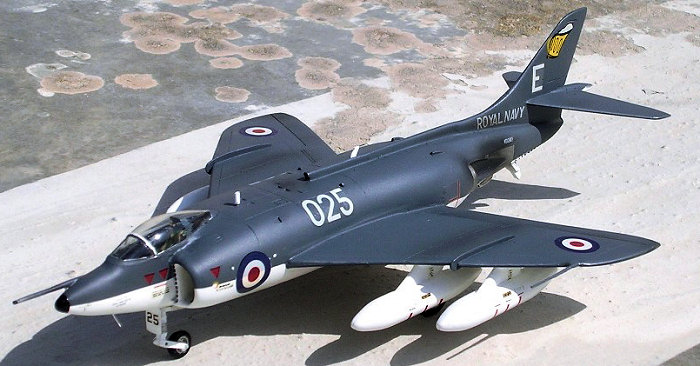
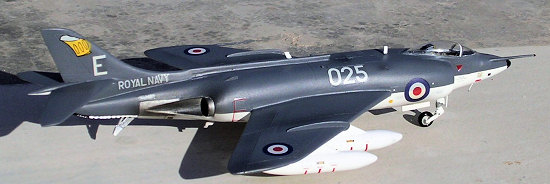
The kit was airbrushed gloss white under-surfaces using
Humbrol paints. The upper surfaces were painted in extra dark sea grey ( Humbrol
123) and the engine exhaust area was silver with burnished spray using mix of
silver and engine grey. The kit comes with decals for Naval Air Squadrons No
804, 736, 803, and 800B. These were of very good quality in spite of age and no
yellowing 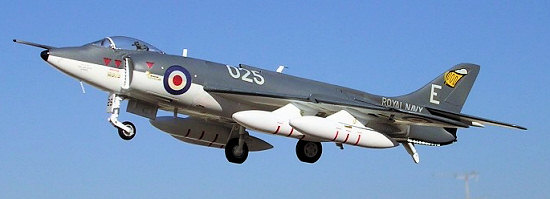 on clear parts.
Fin markings as the Tiger head of 804 Sq, Beer tankard for 800B, and a blue
lightning flash of 736 are all given besides the serials for any of the machines
which are for 7 different aircraft. My fancy fell on a foaming beer tankard of
800B squadron as it reminded me of the Brown Ale that I used to take during my
time at Jesmond Park West in Newcastle in my early days. This squadron was to
act as the unit’s refuelling role and the last of the type that landed at Luqa
Malta in 1963. As my kit lacked the proper instruction sheet to refer to during
decaling the kit, I made reference to Aviation News Vol4 No2 where there is a
photo of the same aircraft that had a black nose cone. Also ref to SAM Vol 13
No2 and Aeroplane Monthly March 79 issue from where detail on fuselage was
extracted.
on clear parts.
Fin markings as the Tiger head of 804 Sq, Beer tankard for 800B, and a blue
lightning flash of 736 are all given besides the serials for any of the machines
which are for 7 different aircraft. My fancy fell on a foaming beer tankard of
800B squadron as it reminded me of the Brown Ale that I used to take during my
time at Jesmond Park West in Newcastle in my early days. This squadron was to
act as the unit’s refuelling role and the last of the type that landed at Luqa
Malta in 1963. As my kit lacked the proper instruction sheet to refer to during
decaling the kit, I made reference to Aviation News Vol4 No2 where there is a
photo of the same aircraft that had a black nose cone. Also ref to SAM Vol 13
No2 and Aeroplane Monthly March 79 issue from where detail on fuselage was
extracted.
In common on all Scimitars, the DS Grey returns under edge
of both wings and tail planes. This required careful masking along the length of
these edges. In order to produce a sharp dividing line between the white and
grey colour. Red stripe decal are only supplied for two of the four fuel tanks.
I have preferred to f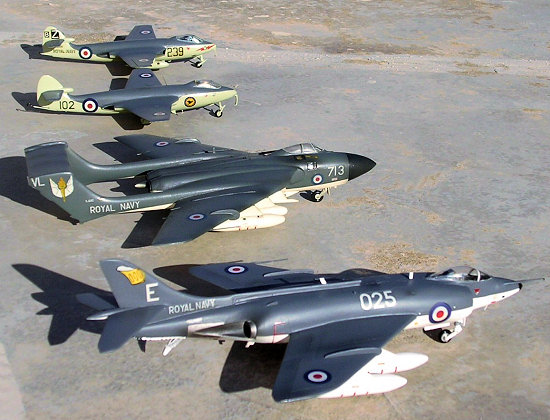 it the
tanks before painting the wings since the protruding pylons did not have the
perfect fit at the rear and needed filling. This also meant that the under wing
serial decals had to be carefully sliced and positioned around the pylons. With
regards to the 4 in No 30mm Aden cannons, apparently 4 were fitted in the early
life of the Scimitar and the kit only had two. As I elected to do the kit from
its later service life this seemed to be correct with two cannons installed.
it the
tanks before painting the wings since the protruding pylons did not have the
perfect fit at the rear and needed filling. This also meant that the under wing
serial decals had to be carefully sliced and positioned around the pylons. With
regards to the 4 in No 30mm Aden cannons, apparently 4 were fitted in the early
life of the Scimitar and the kit only had two. As I elected to do the kit from
its later service life this seemed to be correct with two cannons installed.
| CONCLUSIONS |
It was only by coincidence that this kit came to my direction via a friend who refrained from scratch building the kit part that went missing.. I doubt if the kit is still in circulation at some shop in the UK and maybe Skybirds 86 of Dorset UK may one day produce batches if the demand warrants. I enjoyed building the kit. Probably it is one of the earliest true multi-media models to go in shops as it contained no less than 6 qualities of media; injection plastic parts, plastic card parts, metal parts, vac form canopy, brass etch parts and the decal sheets.
September 2007
Copyright ModelingMadness.com
If you would like your product reviewed fairly and fairly quickly, please contact the editor or see other details in the Note to Contributors.