| KIT #: | 4102 |
| PRICE: | $55.00 MSRP |
| DECALS: | Three options |
| REVIEWER: | Tom Cleaver |
| NOTES: | Short run with resin parts |
| HISTORY |
The Supermarine Attacker - the first jet fighter in squadron service with the Fleet Air Arm - is a study in the official procrastination that seemed to dominate the British aviation industry in the years immediately following the end of the Second World War. In regards to performance, the Attacker was closely similar to the Grumman F9F Panther, both being powered by the Rolls‑Royce Nene jet engine. Yet the Attacker, which first flew in prototype form two years before the Panther, was destined to enter service three years later than the American fighter.
In 1944, after Rolls‑Royce began work on what would become the Nene ‑ a centrifugal‑flow jet of considerably more power than was shown by the Power Jets Welland or the Rolls‑Royce Derwent developed from the Welland ‑ Supermarine responded to specification E.1/44 with an airplane that used the laminar wings of the company's piston‑engined Spiteful, a development of the Spitfire that would fly in prototype form on June 30, 1944.
 After inspection of
the wooden mockup, an order for three prototypes to specification E10/44
was issued August 5, 1944; on September 9, and amendment to the contract
specified the semi‑ navalization of the second and third prototypes.
After inspection of
the wooden mockup, an order for three prototypes to specification E10/44
was issued August 5, 1944; on September 9, and amendment to the contract
specified the semi‑ navalization of the second and third prototypes.
Unfortunately, the first Spiteful was lost in the same month, after having demonstrated that the characteristics of the new laminar wing at low speed were undesirable; this poor handling in landing configuration was confirmed by the second Spiteful, which flew in January 1945. In spite of this, a contract for 24 Type 392 jet fighters was confirmed on July 7, 1945. By that November, Supermarine's continuing inability to resolve the low speed handling problems of the Spiteful finally came to the attention of their Lordships of the Admiralty, and it was decided the order for the 24 airplanes was premature; the contract was canceled with the Admiralty requesting that further development of the shipboard fighter be suspended.
Work on the three prototypes continued, with the first one flying on July 27, 1946. The major complaint was in regard to the outdated tailwheel landing gear Supermarine had retained, which led to severe airfield erosion during taxying. A Martin‑Baker Mk.1 ejection seat was fitted to the second aircraft, which finally flew June 17, 1947; it was the first to be named "Attacker." During carrier trials with this airplane in October 1947, famed British test pilot Eric Brown developed the constant-power/constant-angle approach that is used to this day in landing jet aircraft aboard ship. On February 26, 1948, pilot Mike Lithgow captured the 100‑km International Closed Course Speed Record with the first prototype, averaging 560.634 mph.
In November 1948, in the face of a changing international situation as the Cold War began to develop, the Royal Navy ordered 60 Attacker F.1s. Following this British order, the Pakistani Air Force ordered 36 de‑navalized Attackers able to carry two 1,000‑lb bombs and 8 rocket projectiles. The Royal Navy F.Mk.1, which first appeared May 4, 1950, had no provision for underwing ordnance; No. 800 Squadron FAA was formed with eight Attackers on August 17, 1951, with 803 Squadron following that November. After 43 F.Mk.1s were completed, 16 following were completed as interim fighter‑bombers under the designation F.B.Mk.1.
 The definitive
Attacker, the F.B.Mk.2, was powered by a Nene 102, and introduced a
metal‑framed canopy after two failures of the earlier bubble canopy. This
airplane had the same under wing ordnance capability as the Pakistani
Attackers. 84 were delivered, with the last one produced a few weeks
before the Attacker was removed from front line service.
The definitive
Attacker, the F.B.Mk.2, was powered by a Nene 102, and introduced a
metal‑framed canopy after two failures of the earlier bubble canopy. This
airplane had the same under wing ordnance capability as the Pakistani
Attackers. 84 were delivered, with the last one produced a few weeks
before the Attacker was removed from front line service.
800 Squadron, with 12 F.B.2s, went aboard the newly‑commissioned HMS "Eagle" on March 4, 1952. 803 Squadron joined 800 shortly thereafter. After work‑up, the ship departed for the Mediterranean, with the Attackers finally going to sea operationally. The airplane was already obsolete, and upon return from the cruise, 800 Squadron was disembarked for disbandment on May 26, 1954. 803 Squadron returned from Hal Far, Malta, aboard Eagle on June 6, and disbanded at the end of the month. The Attacker remained in service with RNVR squadrons until the end of 1956.
While the Attacker did introduce the Fleet Air Arm to jet aircraft operation aboard ship, it had never been brought up to a satisfactory standard. Its altitude performance was poor, it lacked maneuverability, and it was too unstable to be an effective gun platform. As Eric Brown said of it, "the Attacker marked the beginning of the end of the charisma surrounding the Supermarine name."
| THE KIT |
The only other 1/48 kit of the Attacker released is a very good vacuform from Falcon Models, that appeared in the late 1980s and is still available. (I do believe there is a 1/48 resin kit somewhere, but I have no personal knowledge of it.)
 This kit from
Classic Airframes continues their line of first-generation British jet
airplanes. The injection-molded parts are very smooth and shiny, though
the engraved panel detail looks a bit heavy “on the sprue.” There is an
interesting construction methodology, with the nose being separate from the
main fuselage in order to create the intakes to the Nene engine. The
cannons are done in resin and are separate from the wing, which also
includes separate flaps. The cockpit is in resin and looks accurate - most
of its detail will not be seen due to the fact the cockpit is black.
This kit from
Classic Airframes continues their line of first-generation British jet
airplanes. The injection-molded parts are very smooth and shiny, though
the engraved panel detail looks a bit heavy “on the sprue.” There is an
interesting construction methodology, with the nose being separate from the
main fuselage in order to create the intakes to the Nene engine. The
cannons are done in resin and are separate from the wing, which also
includes separate flaps. The cockpit is in resin and looks accurate - most
of its detail will not be seen due to the fact the cockpit is black.
Decals are provided for three airplanes - an F.Mk.1 of 800 Squadron, an F.B.Mk.2 of 1831 Squadron RNVR, and a Pakistani Attacker. While the serial number of the F.1 is in the range for F.1s, no F.1s were aboard HMS “Eagle” in 1953, since the F.B.Mk.2 had replaced them. A modeler would be on stronger ground using the serials for the 1831 Squadron airplane with the markings for 800 Squadron to get an F.B.Mk.2 used operationally.
| CONSTRUCTION |
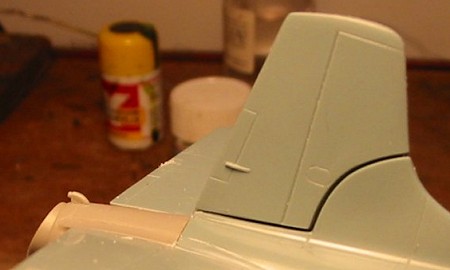 Overall, this kit has many of the same fit problems of any Classic
Airframes limited-run kit I have built in recent years. The main area of
fit problems is the large gap in the vertical fin where the dorsal fin
attaches to the vertical fin. This is due to a fault in kit design, in
which the dorsal fin is molded in halves to the separate rear fuselage
parts, while the vertical fin is molded in one piece to the left half.
Construction would have been entirely straightforward had the production
design had the vertical surfaces divided in half to each fuselage part - I
think the reason for this design was to get a thin trailing edge on the
rudder, which is something that can be done by sanding the inner surfaces
before assembly.
Overall, this kit has many of the same fit problems of any Classic
Airframes limited-run kit I have built in recent years. The main area of
fit problems is the large gap in the vertical fin where the dorsal fin
attaches to the vertical fin. This is due to a fault in kit design, in
which the dorsal fin is molded in halves to the separate rear fuselage
parts, while the vertical fin is molded in one piece to the left half.
Construction would have been entirely straightforward had the production
design had the vertical surfaces divided in half to each fuselage part - I
think the reason for this design was to get a thin trailing edge on the
rudder, which is something that can be done by sanding the inner surfaces
before assembly.
I first attached each forward fuselage part to the correct rear part, and attached the intake splitter plates. I did not use the rear intake bulkhead, since it cannot be seen once the fuselage is assembled. Strangely enough, this part had spars for the wings, yet there was no place in the fuselage for these to slide through.
 After I had the fuselage assembled into complete left and right halves, I
assembled the wings - without the lowered flaps - and attached them to the
fuselage halves so I could work on the wing-fuselage joint from inside and
outside to get it right, and obtain the correct dihedral. This was not
difficult, and the spars that couldn't be used on the engine bulkhead
weren't really necessary. I did have to fill in the prominent seam on the
lower surface joint with cyanoacrylate glue, which I sanded smooth after
hitting it with accelerator.
After I had the fuselage assembled into complete left and right halves, I
assembled the wings - without the lowered flaps - and attached them to the
fuselage halves so I could work on the wing-fuselage joint from inside and
outside to get it right, and obtain the correct dihedral. This was not
difficult, and the spars that couldn't be used on the engine bulkhead
weren't really necessary. I did have to fill in the prominent seam on the
lower surface joint with cyanoacrylate glue, which I sanded smooth after
hitting it with accelerator.
I then assembled and painted the cockpit tub and instrument panel, and attached them to the left fuselage half. When this had set up, I glued the fuselage halves together.
I attached the resin rear fuselage cone - which doesn't exactly fit, since it's just a tad bit narrower in diameter than the assembled forward fuselage. I hit the cyanoacrylate glue I used for filler with accelerator, and then sanded the area of the joint smooth with a sanding stick. I then attached the horizontal stabilizers, which fit with only a little bit of cyanoacrylate glue needed in the joint to fill it in.
 At this point, I dealt with the huge gap between the one-piece vertical fin
and the divided dorsal fin. I filled the gap with cyanoacrylate glue, hit
it with accelerator, and then sanded the vertical fin smooth and the joint
of the horizontal stabilizers. A good coat of Mr. Surfacer 500 sanded
smooth finished the job and I then rescribed the panel lines.
At this point, I dealt with the huge gap between the one-piece vertical fin
and the divided dorsal fin. I filled the gap with cyanoacrylate glue, hit
it with accelerator, and then sanded the vertical fin smooth and the joint
of the horizontal stabilizers. A good coat of Mr. Surfacer 500 sanded
smooth finished the job and I then rescribed the panel lines.
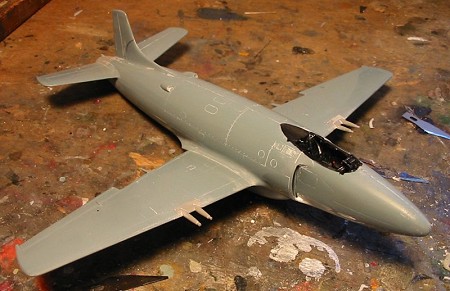
Once the main airframe was assembled, I applied Mr. Surfacer 500 to all the joints and seams. When that had set up, I sanded everything smooth, then polished the model with Tamiya plastic polish. I then rescribed panel lines where necessary, and attached the flaps in the down position.
 I finally
assembled the seat and installed it, after deciding I was going to build
the model with the canopy closed. Fortunately, I had discovered the extra
vacuformed canopy from the Falcon kit, which I substituted for the useless
blob of clear plastic masquerading as a canopy that was provided in the
kit. This kit canopy had flow lines inside the plastic, and had the
clarity of the bottom of an old Coke bottle due to its thickness. I
corresponded with some other modelers who have this kit, all of whom
reported their canopy was the same, so this appears to be a fairly
widespread problem. In addition to being badly molded, the canopy did not
have a correct shape, inasmuch as it had a flat windscreen. The problem of
canopies that are not more than approximations of what they should be has
been happening with Classic Airframes kits ever since they stopped using
vacuformed canopies. I really wish they would go back to the original
vacuforms, which were always quite accurate and easy to use.
I finally
assembled the seat and installed it, after deciding I was going to build
the model with the canopy closed. Fortunately, I had discovered the extra
vacuformed canopy from the Falcon kit, which I substituted for the useless
blob of clear plastic masquerading as a canopy that was provided in the
kit. This kit canopy had flow lines inside the plastic, and had the
clarity of the bottom of an old Coke bottle due to its thickness. I
corresponded with some other modelers who have this kit, all of whom
reported their canopy was the same, so this appears to be a fairly
widespread problem. In addition to being badly molded, the canopy did not
have a correct shape, inasmuch as it had a flat windscreen. The problem of
canopies that are not more than approximations of what they should be has
been happening with Classic Airframes kits ever since they stopped using
vacuformed canopies. I really wish they would go back to the original
vacuforms, which were always quite accurate and easy to use.
Once the canopy was in place and had been masked off, it was time to go to the paint shop.
| COLORS & MARKINGS |
Painting:
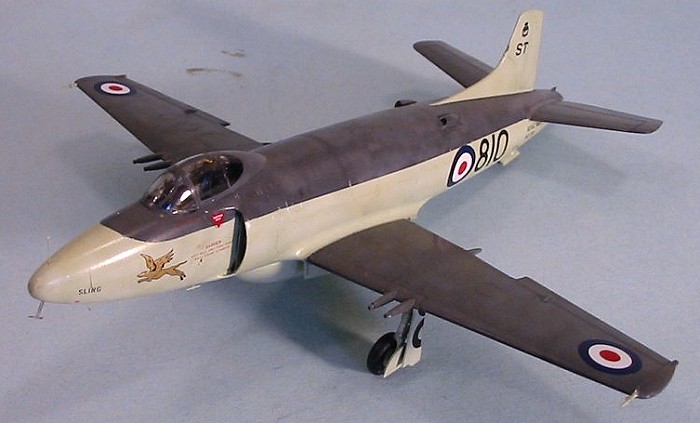
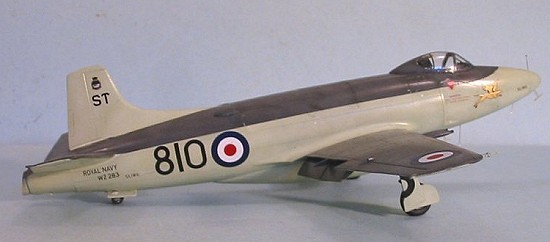
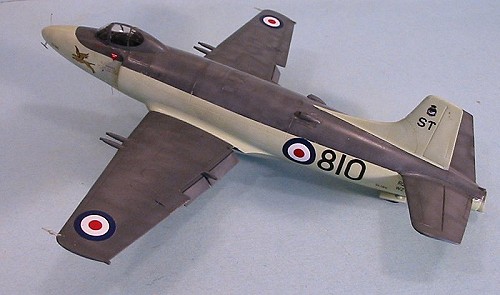
I used Xtracrylix “Extra Dark Sea Grey” and “Sky” for the FAA scheme. After pre-shading the model, I applied the upper surface color first, masked it off, and then applied the lower color. When these were dry, I gave the model a coat of Xtracrylix Gloss Varnish.
Decals:
 The only
difficulty with the decals is cutting the serial numbers for the lower wing
so they go over the outer gear door, and then applying them over the cannon
fairings, which involves slicing them once they're in position, and then
applying some extra applications of decal solvent to get them down. Past
that, there were no problems. I opted for the markings of the RNVR F.B.Mk.2
of 1831 Squadron. The F.Mk.1 markings are incorrect since that version of
the Attacker never served in a squadron aboard ship, in addition to the
fact it cannot be done since there is no correct canopy for the F.Mk.1
included in the kit. It would likely have also been possible to use the
F.Mk.2 serials with the carrier markings of the Mk.1 and do a Mk. 1 during
its one and only deployment aboard HMS Eagle in 1955. When the decals were
set, I washed off the model and gave it an overall coat of Xtracrylix Satin
Varnish, which gives a “scale” gloss finish.
The only
difficulty with the decals is cutting the serial numbers for the lower wing
so they go over the outer gear door, and then applying them over the cannon
fairings, which involves slicing them once they're in position, and then
applying some extra applications of decal solvent to get them down. Past
that, there were no problems. I opted for the markings of the RNVR F.B.Mk.2
of 1831 Squadron. The F.Mk.1 markings are incorrect since that version of
the Attacker never served in a squadron aboard ship, in addition to the
fact it cannot be done since there is no correct canopy for the F.Mk.1
included in the kit. It would likely have also been possible to use the
F.Mk.2 serials with the carrier markings of the Mk.1 and do a Mk. 1 during
its one and only deployment aboard HMS Eagle in 1955. When the decals were
set, I washed off the model and gave it an overall coat of Xtracrylix Satin
Varnish, which gives a “scale” gloss finish.
| FINAL BITS |
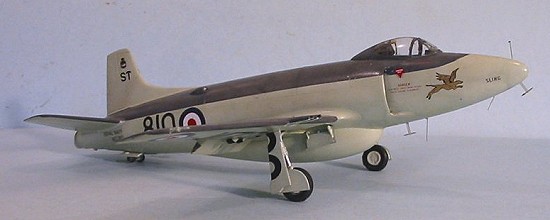
When I went to attach the landing gear, I noticed that the inner gear leg door is not the right shape to fit to the outer door, so I trimmed it to give an approximation of the right look - you may not find this necessary inasmuch as the outer door fits over that door so the mistake isn't so noticeable. With the landing gear assembled, I attached the photo-etch antennas to the nose. I then unmasked the canopy and declared the project complete.
| CONCLUSIONS |
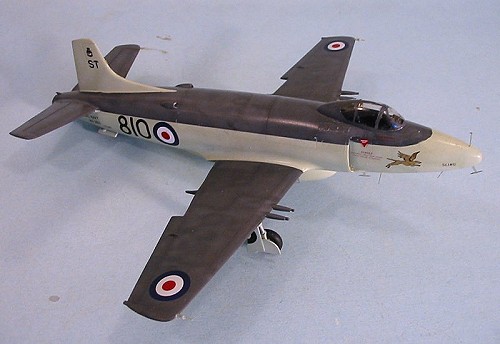
 This kit of
the Attacker is dimensionally accurate and also correctly presents the
bulbous shape of the forward fuselage. The heavy surface detail looks all
right under a few coats of paint. While it is possible to make both the
Pakistani Attacker and the F.B.Mk.2 Attacker with what is in the box, you
cannot do the F.Mk.1.
This kit of
the Attacker is dimensionally accurate and also correctly presents the
bulbous shape of the forward fuselage. The heavy surface detail looks all
right under a few coats of paint. While it is possible to make both the
Pakistani Attacker and the F.B.Mk.2 Attacker with what is in the box, you
cannot do the F.Mk.1.
For those modelers who like first-generation jets, the Attacker - one of only two taildragger jets to see operational service (the other being the Yak-15) - is an interesting airplane that looks attractive in its early-50s Fleet Air Arm camouflage. Try and get hold of a Falcon canopy if you can, because the kit canopy really detracts from what is otherwise a very nice model.
Review kit courtesy of Hannant's - http://www.hannants.co.uk
November 2005
Copyright ModelingMadness.com
If you would like your product reviewed fairly and fairly quickly, please contact the editor or see other details in the Note to Contributors.