Dynavector 1/48 Hornet F.1
| KIT #: | ? |
| PRICE: | $48.00 MSRP |
| DECALS: | Three options |
| REVIEWER: | Tom Cleaver |
| NOTES: | Vacuform kit. Classic Airframes decals used |
| HISTORY |
The initial concept of the D.H.103 design was a scaled-down single seat version of the Mosquito, capable of meeting single engined Japanese fighters in long-range combat among the islands of the South Pacific. Rolls-Royce Ltd. developed special Merlin power plants of minimum frontal area for the aircraft, which permitted an exceptionally sleek installation. Permission to build was not received until June 1943 when the D.H. 103 ceased to be a private venture and Specification F.12/43 was written round it. At this time it was named "Hornet."
 The Hornet was an entirely new design, sharing with the earlier Mosquito
only the method used for manufacturing the slim, oval section fuselage. The
one piece. two spar, cantilever laminar flow wing was designed to high
strength factors and consisted of a composite wood and metal internal
structure with a stressed birch ply double upper skin and an undersurface
of reinforced Alclad. The Hornet was the first aircraft in which wood was
cemented to metal - a unique method of construction only possible by using
the revolutionary new Redux adhesive.
The Hornet was an entirely new design, sharing with the earlier Mosquito
only the method used for manufacturing the slim, oval section fuselage. The
one piece. two spar, cantilever laminar flow wing was designed to high
strength factors and consisted of a composite wood and metal internal
structure with a stressed birch ply double upper skin and an undersurface
of reinforced Alclad. The Hornet was the first aircraft in which wood was
cemented to metal - a unique method of construction only possible by using
the revolutionary new Redux adhesive.
Piloted by Geoffrey de Havilland Jr., the first prototype - RR915 - flew for the first time on July 28, 1944, only 13 months after the commencement of detail design. Estimated performance was met easily; maneuverability and climb were exceptional and the prototype reached 485 mph. With two 200 gallon drop tanks under the wings, the Hornet had a range of over 2,500 miles cruising at 340 m.p.h. at 30,000 ft.
Production of the Hornet F. Mk. 1 began at Hatfield late in 1944; the first aircraft, PX210, was delivered February 28, 1945 but the war with Japan was over before any Hornet-equipped unit reached Initial Operational Capability. The production Hornet was only marginally slower than the prototype, with a top speed of 472 mph at altitude and was capable of an astounding 400 mph at sea level.
64 Squadron - the first equipped with the Hornet - took part in the Victory
Fly Past over London on June 8, 1946. 19 Squadron received Hornets at
Church Fenton that October, with 41 and 65 Squadrons similarly equipped in
following months. On May 20, 1948, 65 Squadron was chosen to fly to Uppsala
to pay an official visit to the Swedish Air Force. On September 15, 1949
one of two Hornets which was to participate in Battle of Britain
celebrations at Gibraltar was flown from Bovingdon to Gibraltar by F/Lt. H.
Peebles at an a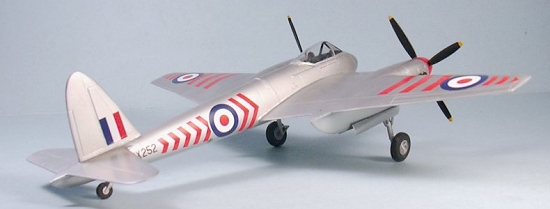 verage speed of 357.565 mph, which set a British
point-to-point record. On the return journey September 19th, Group Captain
A. C. P. Carver flew to Bovingdon under strict cruise control at an
altitude of 25,000 feet in 2 hours, 30 minutes, 21 seconds, and landed with
15 minutes fuel, setting a new record of 435.871 mph.
verage speed of 357.565 mph, which set a British
point-to-point record. On the return journey September 19th, Group Captain
A. C. P. Carver flew to Bovingdon under strict cruise control at an
altitude of 25,000 feet in 2 hours, 30 minutes, 21 seconds, and landed with
15 minutes fuel, setting a new record of 435.871 mph.
De Havilland test pilot G.H. Pike came third in the High Speed Handicap Race at 343.5 mph in F.Mk.1 PX224 at Lympne on August 31, 1946. Reading this, one can only think what a sensation the Hornet would have been in the post-war Thompson Trophy Races.
The Hornet F.Mk.1 was declared obsolete in 1950.
| THE KIT |
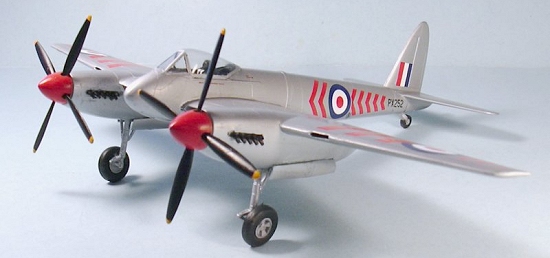
 Dynavector's Hornet was the first 1/48 kit of this airplane to be produced,
back in 1998. The kit's only drawback to many modelers was that it was a vacuform. In 2003, Classic Airframes released a series of injection-molded
Hornets, which are now out of production. Dynavector's Hornet is still the
only kit currently available.
Dynavector's Hornet was the first 1/48 kit of this airplane to be produced,
back in 1998. The kit's only drawback to many modelers was that it was a vacuform. In 2003, Classic Airframes released a series of injection-molded
Hornets, which are now out of production. Dynavector's Hornet is still the
only kit currently available.
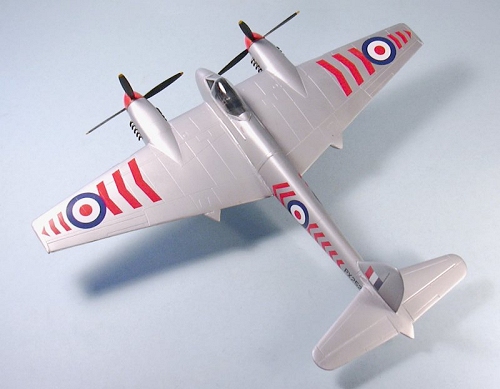
The kit comes on two plastic sheets, and provides the larger vertical fin and horizontal stabilizers for the Hornet F.Mk.3, as well as the smaller tail surfaces for the F.Mk.1. The landing gear, propellers, and cockpit interior are done in white metal, with the major airframe parts as vacuform pieces. Decals include an F.Mk.1 of 65 Squadron in "high altitude" camouflage, a silver F.Mk.3 from the same unit, and a camouflaged F.Mk.3 of 33 Squadron serving in the Malayan Emergency. Two very clear vacuformed canopies round out what's in the box.
| CONSTRUCTION |
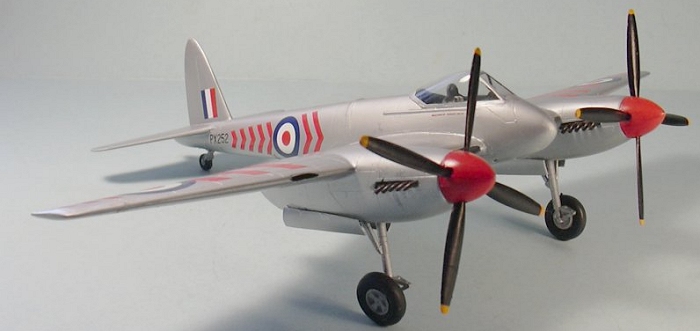
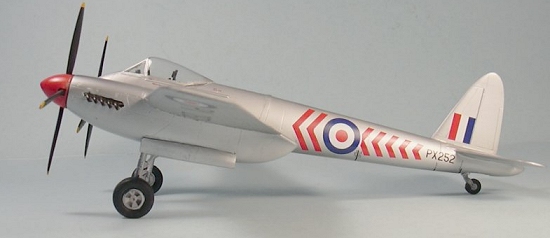
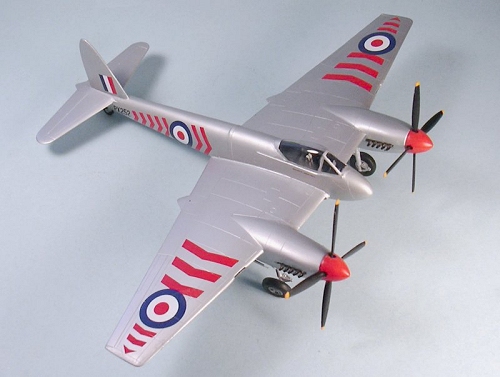
Since I had already done a Hornet F.Mk.3 from Classic Airframes, I decided to make the F.Mk.1 from this kit and thus round out my collection of Hornets. I also decided to do the very colorful F.Mk.1 of 64 Squadron that was supplied on the Classic Airframes decal sheet, that had been hanging around since I had done the F.Mk.3 kit.
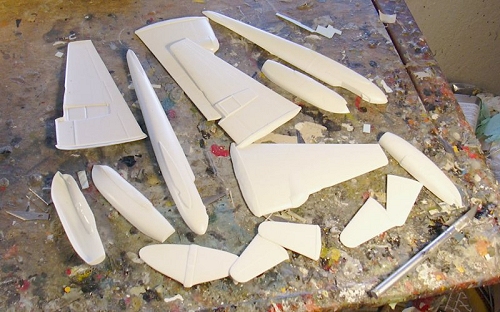 With any vacuform, construction starts with taking the parts off the
sheets. I score around the parts with a X-acto, then pop them off. The
kit comes with the larger F.Mk.3 vertical fin as part of the fuselage
molding, so this had to be cut off.
With any vacuform, construction starts with taking the parts off the
sheets. I score around the parts with a X-acto, then pop them off. The
kit comes with the larger F.Mk.3 vertical fin as part of the fuselage
molding, so this had to be cut off.
Once the parts were loose, I took an afternoon and sanded them down. One good thing about Dynavector kits is the plastic is soft enough that this process can be done quickly; the downside to that is you have to be careful not to sand away too much. I was able to create wing and tail parts with nice thin trailing edges.
I then assembled the wings and tail parts and set them aside. I cleaned up the nacelle halves and made bulkheads for the wheel wells from Evergreen sheet. I also added some Evergreen sheet inside the forward sections of the nacelles to provide a better "grab" surface. I assembled the nacelles and attached them to the wings.
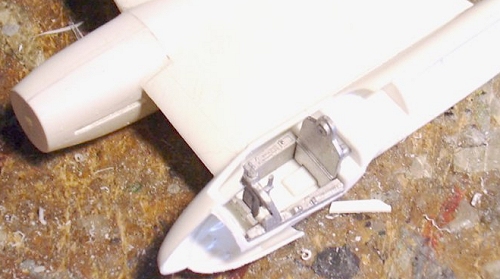 The cockpit area is easy to do with the white metal parts, and it is then
painted black. I used the extra instrument panel decal from the Xtradecals
sheet for the Vampire, since the two aircraft
The cockpit area is easy to do with the white metal parts, and it is then
painted black. I used the extra instrument panel decal from the Xtradecals
sheet for the Vampire, since the two aircraft
 used identical
instrument panels. I made the Sutton harness with lead foil from a
wine bottle, and then closed up the fuselage.
used identical
instrument panels. I made the Sutton harness with lead foil from a
wine bottle, and then closed up the fuselage.
The wings were easy to attach with the mounting mold on the fuselage, and the horizontal stabilizers were easy to attach to the spar provided in the kit. The only hard part to this was filling in the open area on the rear fuselage where the fin had been attached. I filled that with cyanoacrylate glue, zapped it, sanded it smooth, then attached the vertical fin.
Applying Mr. Surfacer 500 to all the joints had everything nice and smooth and I finished off by rescribing lost panel lines and attaching the canopy in the closed position -being very clear, it's easy to see the cockpit, and to me opening the canopy destroys the sleek lines of the Hornet.
I then assembled the white metal landing gear and installed it in the wheel wells. At this point, I realized I should have put some weight in the rear fuselage, since the model was getting nose-heavy with the white metal cockpit and landing gear, and the propellers and spinners to come. It does sit on its tail, but if I tilt it forward it will also sit on the tips of the props, due to the center of gravity being so far forward.
| COLORS & MARKINGS |
Painting:
I painted the model with SNJ Aluminum paint, and then gave it a coat of ModelMaster Metalizer sealer, which gives the SNJ paint the appearance of aluminum dope, which is what the Hornet was painted with.
Decals:
 I
used the Classic Airframes markings, which went down with no problem.
I
used the Classic Airframes markings, which went down with no problem.
| FINAL CONSTRUCTION |
I unmasked the canopy, and attached the main wheels and propellers, and the exhaust stacks. As the Squadron Commander's airplane during peacetime, this Hornet was kept in immaculate condition, so I did not do any further weathering.
| CONCLUSIONS |
If you haven't built a vacuform, stop being afraid of them and get yourself a Dynavector kit. Even the "hard ones" are easy, and this one is far from hard. It is easy enough it could be your first vacuform kit, and you could enter the project knowing you were going to get a good-looking result. I recall the Classic Airframes kits actually being more difficult to assemble and fit together than this kit. Sitting next to the Classic Airframes Hornet models, an observer would not think this model is a vacuform in comparison, it is that good.
March 2005
Copyright ModelingMadness.com. All rights reserved. No reproduction in part or in whole without express permission.
If you would like your product reviewed fairly and fairly quickly, please contact the editor or see other details in the Note to Contributors.