Trumpeter 1/48 Sea Hornet NF.21
| KIT #: | 02895 |
| PRICE: | $39.98 SRP |
| DECALS: | Two Options |
| REVIEWER: | Tom Cleaver |
| NOTES: | John Adams corrected canopies used. |
| HISTORY |
Following quickly on the successful flight of the first deHavilland Hornet F.1 prototype, Specification N.5/44 was issued, covering modification of the aircraft for naval service. The Heston Aircraft Company was contracted to perform the conversion work on three early production F.1s., which involved modifying the wings to incorporate wing folding that allowed each outer wing panel, from the aileron/flap line outboard to be folded upwards and inwards at an angle. Slotted flaps were introduced to improve low speed control. The lower rear fuselage was reinforced with two additional spruce longerons to take the stresses from the external "vee" framed arrestor hook. Since the Hornet used the American "3 point" system of catapult assisted takeoff, two forged steel catapult bridle hooks were fitted, one below each wing, close to the fuselage.
 The de Havilland rubber in compression undercarriage legs could not
absorb the rebound energies imposed by carrier landings, and were replaced by
more conventional hydraulic oleos which embodied torque links. Power was two
Merlin 133/134s derated from 2,070 hp to 2,030 hp. The modifications added some
550 lb to the aircraft weight and maximum speed was decreased by 11 mph. In
single-seat form, this emerged as the Sea Hornet F 20.
The de Havilland rubber in compression undercarriage legs could not
absorb the rebound energies imposed by carrier landings, and were replaced by
more conventional hydraulic oleos which embodied torque links. Power was two
Merlin 133/134s derated from 2,070 hp to 2,030 hp. The modifications added some
550 lb to the aircraft weight and maximum speed was decreased by 11 mph. In
single-seat form, this emerged as the Sea Hornet F 20.
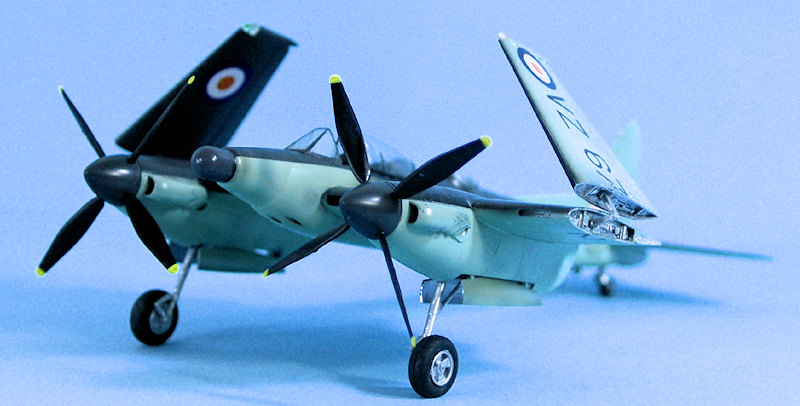
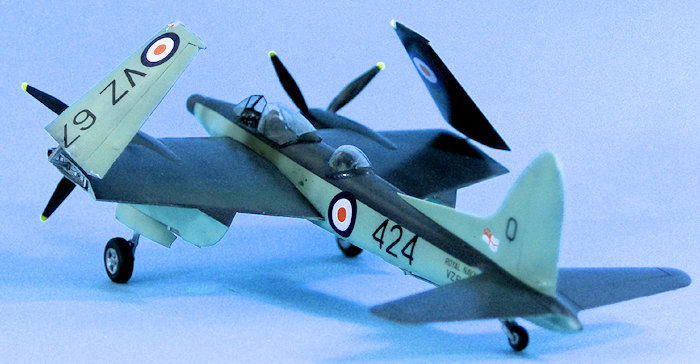
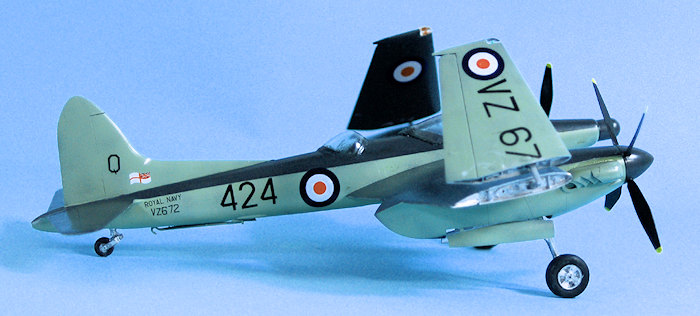
The Sea Hornet NF 21 was designed to fill a need for a dedicated carrier-based night fighter, equipped with US ASH radar in a nose-mount highly reminiscent of an insect’s proboscis. Special flame dampening exhausts were installed, and a second cockpit was added to the rear fuselage for the aft-facing radar operator, with a small trapdoor was provided in the lower fuselage, while a fixed, jettisonable teardrop shaped bubble canopy provided a good field of view. The horizontal tail units were increased in span. The effect of these modifications on performance was minimal, with about a 4 mph loss of speed compared to the F 20.
In January 1949, 809 Squadron, the only unit to operate the NF 21, went aboard HMS Illustrious and then, in May 1951, to HMS Vengeance. The squadron was briefly seconded to the RAF at Coltishall before a posting to Hal Far Malta where it disbanded in 1954. The NF.21 later equipped the Fleet Requirements Units at Hal Far, Malta, and St. Davids, West Wales. During it’s operation service, the Sea Hornet was capable of intercepting any aircraft in trials.
 Eric Brown, who
performed the tests on the Sea Hornet, wrote 27 years later: "...from the outset
the Sea Hornet was a winner!
Eric Brown, who
performed the tests on the Sea Hornet, wrote 27 years later: "...from the outset
the Sea Hornet was a winner!
"The view from the cockpit, positioned right forward in the nose beneath a one piece aft sliding canopy was truly magnificent. The Sea Hornet was easy to taxi, with powerful brakes... the takeoff using 25 lb boost and flaps at one third extension was remarkable! The 2,070 hp Merlin 130/131 engines fitted to the prototypes were to be derated to 18 lb boost and 2,030 hp as Merlin 133/134s in production Sea Hornets, but takeoff performance was to remain fantastic. Climb with 18 lb boost exceeded 4,000 ft/min.
"In level flight the Sea Hornet's stability about all axes was just satisfactory, characteristic, of course, of a good day interceptor fighter. Its stalling characteristics were innocuous, with a fair amount of elevator buffeting and aileron twitching preceding the actual stall.
"For aerobatics the Sea Hornet was absolute bliss. The excess of power was such that maneuvers in the vertical plane can only be described as rocket like. Even with one propeller feathered the Hornet could loop with the best single engine fighter, and its aerodynamic cleanliness was such that I delighted in its demonstration by diving with both engines at full bore and feathering both propellers before pulling up into a loop!"
| THE KIT |
Over the past 50 years, there have been a number of Hornet kits released
in 1/72, 1/48 and 1/32 scale. They all suffer from the fact that there are no
accurate factory drawings of the Hornet in existence, and thus each kit has been
a best-guess by the kit designers, based on information they cobbled together.
While much negative comment has accompanied the Trumpeter kits, in fact these
kits share the same design basis as does the very expens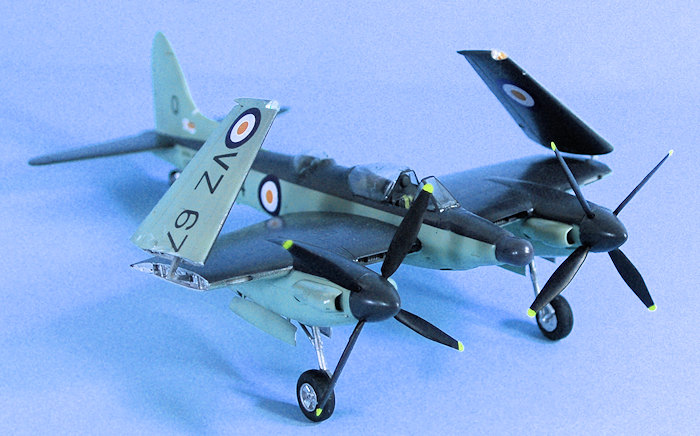 ive 1/32 HPH Hornet kit,
and thus the same faults. Thus, the best one can hope for is a kit that
expresses “Hornetness” to an acceptable degree.
ive 1/32 HPH Hornet kit,
and thus the same faults. Thus, the best one can hope for is a kit that
expresses “Hornetness” to an acceptable degree.
Unfortunately, the Trumpeter kits fail to achieve that. Fortunately, however, the faults are not fatal, though only a few can be corrected. The end result can be a model with as much “Hornetness” as the Classic Airframes kits, which have been considered the best of the releases.
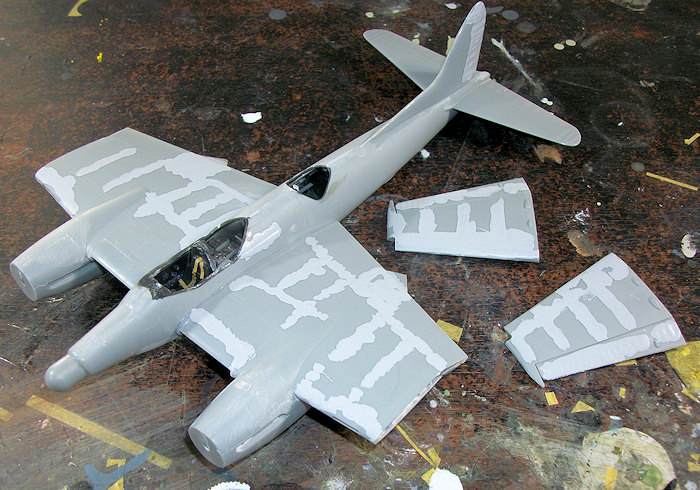
The kit fails primarily in the shape of the fuselage around the pilot’s cockpit, the overall length of the fuselage, the positioning and design of the landing gear, and the over-emphasized fabric effect on the control surfaces, which were all metal-covered, not fabric-covered. Length of the fuselage cannot really be adequately dealt with without major surgery, and the landing gear while wrong are not obviously wrong with the model displayed unless one turns it over and examines the gear in detail. The fabric problem can be dealt with by filling the “valleys,” and then sanding down the “hills and valleys” to a smooth surface; while one is at that, filling in and sanding off the panel lines on the upper wing surfaces is also useful.
So far, the only way to correct the cockpit is to get hold of John Adams’ vacuformed canopy set. One then has to engage in some “radical surgery” to change the shape of the nose, though this is not beyond the ability of anyone who has worked on a more basic limited-run kit.
The decals are for two aircraft of 809 Squadron. Unfortunately, the “Royal Navy” and serial number decals for the fuselage were provided in 1/72 scale rather than 1/48, necessitating a modeler finding suitable substitutes.
| CONSTRUCTION |
 After getting this
kit, and then finding out all the problems associated with it, I was first
attracted to the idea of “termination with extreme prejudice,” as they say.
However, when I found out about John Adams’ canopies and obtained them, I
decided to build it for a review to demonstrate what can be done to save the kit
and produce an acceptable model.
After getting this
kit, and then finding out all the problems associated with it, I was first
attracted to the idea of “termination with extreme prejudice,” as they say.
However, when I found out about John Adams’ canopies and obtained them, I
decided to build it for a review to demonstrate what can be done to save the kit
and produce an acceptable model.
The cockpit is useless so far as accuracy is concerned, but fortunately it is black, so one can get away with just painting it.
The problem with correcting the nose involved cutting and re-aligning the nose to lower the lower line of the windshield. After positioning the cut-down parts, I covered them with a lot of Mr. Surfacer 500, then sanded the nose into a better shape.
 After sanding off the worst of the “hills” of the overdone control
surfaces, I filled the “valleys” with Mr. Surfacer and then sanded them smooth.
I also filled in the non-existent panel lines on the upper wing surfaces.
After sanding off the worst of the “hills” of the overdone control
surfaces, I filled the “valleys” with Mr. Surfacer and then sanded them smooth.
I also filled in the non-existent panel lines on the upper wing surfaces.
After doing all that, assembly was fairly easy. I cut apart the radar observer’s seat, which was even more imaginary than the pilot’s seat, and folded it up as it would be with the airplane unoccupied. This got rid of the shape problem, while painting things black made certain no one saw anything with much detail.
Sadly, Trumpeter included the sprue with the short-span horizontal stabilizers for the F.1, but since I had made the mistake of also buying the F.3 kit - which has the correct larger horizontal stabilizers - I used those on the NF 21; should the F.3 kit ever see the light of day, it will appear as an F.1.
| COLORS & MARKINGS |
 I gave the model an overall coat of black, then painted it with
Xtracrylix Extra Dark Sea Grey and Sky. I used the kit decals, though I
corrected the fuselage markings with decals from the decal dungeon. Be very
careful with these kit decals, as they are very thin and will fold like the
proverbial cheap suit at the first chance.
I gave the model an overall coat of black, then painted it with
Xtracrylix Extra Dark Sea Grey and Sky. I used the kit decals, though I
corrected the fuselage markings with decals from the decal dungeon. Be very
careful with these kit decals, as they are very thin and will fold like the
proverbial cheap suit at the first chance.
I attached the pilot’s canopy in the open position, then attached the outer wing panels. The attachment is very weak and I strongly recommend you not touch the wings after attachment if you choose the folded wing option. The propellers may look on the sprue like they are not handed as they should be, but they are - you have to “mix and match” two prop blades from each sprue with the correct blades from the other sprue. I then attached the landing gear and called it done.
| CONCLUSIONS |
I can’t really recommend this kit, unless you really really really want a Sea Hornet in your collection and can’t afford the collector’s prices for the better Classic Airframes kit. Once you do all the corrections, the model will still be “wrong.” If that doesn’t bother you, “model on.” But remember that there is no “correct” kit of this airplane to be had. “Hornetness” is the best you can do.
28 July 2016
Copyright ModelingMadness.com
Review kit courtesy of my wallet. Thanks to John Adams for the canopies (John can be contacted through his page on Britmodeller if you wish to obtain these).
If you would like your product reviewed fairly and fairly quickly, please contact the editor or see other details in the Note to Contributors.