
| KIT #: | 2832/3 |
| PRICE: | $39.95 MSRP |
| DECALS: | Two Options |
| REVIEWER: | Tom Cleaver |
| NOTES: |
| HISTORY |
What became the Grumman Panther was first designed as a four-jet night fighter that resembled the Curtiss XF-87 Nighthawk. This was due to the fact that early jet engine development under Navy sponsorship made a false start. One of the first engines available to Grumman designers at the end of the Second World War was the 1,500 lb thrust Westinghouse 130; in order to achieve the required performance it would be necessary to install four of these engines in the original Grumman design, which was designated XF9F-1. The development contract was issued on April 22, 1946, but further design work revealed that the airplane would not meet the specifications.
By
1947, the British Nene engine was available, producing nearly four times the
thrust of the Westinghouse engine. Grumman determined that using a single Nene
would allow them to produce a day fighter that had significantly better
performance than either the FH-1 Phantom or the FJ-1 Fury that were then in
limited operational use by the Navy. The Navy agreed and Pratt & Whitney
obtained a license to produce the British engine as the J42. The designation
became XF9F-2, and Corky Meyer flew the first prototype on November 24,1947,
powered by a Nene providing 5,750 pounds of thrust. The prototype was very
close to “right” all the way around as originally flown, other than needing
permanently-mounted wingtip fuel tanks, which improved the roll
 rate. The F9F-2, now known as
the “Panther,” was cleared for carrier operation in September 1949 and entered
service that November with VF-51.
rate. The F9F-2, now known as
the “Panther,” was cleared for carrier operation in September 1949 and entered
service that November with VF-51.
The entry of the Panther into service came just in time. Seven months later the Panther was involved in a shooting war following the North Korean invasion of South Korea on June 25, 1950. On June 27, President Truman authorized American forces to enter combat and the USS “Boxer,” with VF-51 aboard, which had moved into the Sea of Japan immediately following the outbreak of hostilities, launched the first Navy air strike that same day. VF-51's Panthers flew as fighter escort to the Corsair and Skyraider attack squadrons in a strike on the airfield at Pyongyang, the North Korean capitol.
On July 3, LT (jg) Leonard H. Plog scored the first U.S. air victory of the war when he shot down a North Korean Yak-9. Two days later another Yak-9 was shot down over Seoul. On November, 9, 1950 LCDR William Amen, CO of VF-111 "Sundowners" shot down a MiG-15 when his division was attacked while flying escort near the Yalu River. Amen reported that the MiG completely outclassed the F9F-2, and that he and his wingman had only barely been able to stay in range behind the MiG he shot down. Two more MiG-15s were shot down on November 18, 1950, while two more were shot down two years later to the day on November 18, 1952. In all five cases, the victories were due to superior pilot training and experience on the part of the Navy pilots.
Despite its limitations, the Panther was the main naval jet aircraft used throughout the Korean War, flying 78,000 sorties between June 27, 1950 and July 30, 1953.
There are at least four F9F-2 Panthers left in existence, one on display at the Marine Corps Museum in Quantico, Virginia, one at the National Museum of Naval Aviation in Pensacola, Florida, one at NAS Willow Grove in Pennsylvania, and BuNo 123708, owned by the Cavanaugh Flight Museum in Addison Texas, which was restored to flight status in 1995 and is the only flying Panther in the world.
| THE KIT |
 Modelers have been waiting for four years to see this F9F-2, since the kit was
first announced by Hobbycraft. Due to corporate difficulties, Hobbycraft was
only able to get this out the door by partnering with Trumpeter. These two
releases by Trumpeter will be followed in approximately 6-8 weeks by release of
the kits by Hobbycraft.
Modelers have been waiting for four years to see this F9F-2, since the kit was
first announced by Hobbycraft. Due to corporate difficulties, Hobbycraft was
only able to get this out the door by partnering with Trumpeter. These two
releases by Trumpeter will be followed in approximately 6-8 weeks by release of
the kits by Hobbycraft.
Interestingly, the two kits are the same, other than the decals. They include both the photo nose and fighter nose, and full ordnance. Modelers who choose to do the F9F-2P should be aware that the airplane seldom (if ever) carried underwing ordnance, despite the instructions in the kit.
Overall, Hobbycraft appears to have gotten it right as concerns overall shape, including such little-known items as the lower keel/fin just ahead of the tail bumper. The cockpit accurately represents the side panel and instrument panel detail of an F9F-2, which differs in small but important ways from the F9F-5.
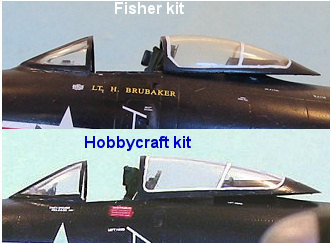 The canopy is better than
other F9F kits in that it finally gets the higher cross section right. The kit
I received had the earlier “test shot” canopy. Apparently there was a glitch in
the initial production of the kit, that resulted in some of the kits having the
earlier canopy. The other mistake in the kit is that the intakes are too
small. This is also easily solved with a rat tail file and about 5 minutes’
work to extend the intake about 1/32 inch further outboard.
The canopy is better than
other F9F kits in that it finally gets the higher cross section right. The kit
I received had the earlier “test shot” canopy. Apparently there was a glitch in
the initial production of the kit, that resulted in some of the kits having the
earlier canopy. The other mistake in the kit is that the intakes are too
small. This is also easily solved with a rat tail file and about 5 minutes’
work to extend the intake about 1/32 inch further outboard.
I
have included pictures in this review of the Fisher Panther and the Trumpeter
Panther with the canopies assembled. The Fisher model has a canopy with the
right shapes, and these pictures will do more than any words I can write to
demonstrate what the problem is with the Hobbycraft/Trumpeter model.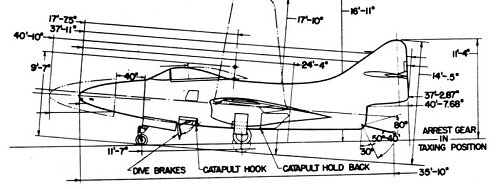
This drawing clearly shows the dimensional problems with the canopy that I have mentioned here. It additionally shows the overall shape problem with the kit associated with the fact that it is overall too long to be a fully-accurate F9F-2.
| CONSTRUCTION |
Construction of the kit is not difficult, with good overall fit. My own construction differed from the kit instructions in that I assembled the wing completely before attaching it to the fuselage. This was done so that I could experiment with the best way to correct the intake. The result was I had to slice off the rear attachment point on the fuselage to pop the wing into position. However, it is not necessary for you to do this, since I discovered that the correction can easily be done once the wing is attached to the fuselage in the assembly sequence the instructions call for.
What is needed to correct the intake is to extend it out about 1/32 inch, to the
attachment pin. Also, the lowe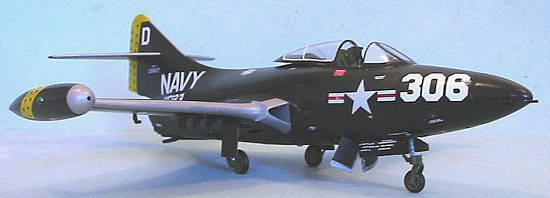 r
line of the intake should be reshaped to make it parallel to the lower line of
the center section when viewed head-on. This is all easily accomplished with a
rat-tail file and your trusty old #11 X-acto blade.
r
line of the intake should be reshaped to make it parallel to the lower line of
the center section when viewed head-on. This is all easily accomplished with a
rat-tail file and your trusty old #11 X-acto blade.
I needed to sand the join lines of the wings to the center section and the nose to the fuselage, and this led me to the discovery that sanding down the model overall once it is assembled will take down the incorrect overdone rivet detail, to the point where it is acceptable. Those who want some rivet detail can leave off sanding down at the point where the detail is just visible, or one can go all the way and sand it all off. Since the panel lines are deeper than the rivets to begin with, there is no chance of losing them and they can be rescribed where necessary. Once the model is sanded smooth and then polished out with rubbing compound, the surface detail looks right for the representing the real thing.
The kit provides complete 20mm cannons, which cannot be seen when assembled. I found on my first attempt that the gun barrels do not slide easily through the holes in the nose from the rear. I decided to leave them until final assembly, when I cut off the barrels and inserted them in position in the holes from the outside. This was done without problem.
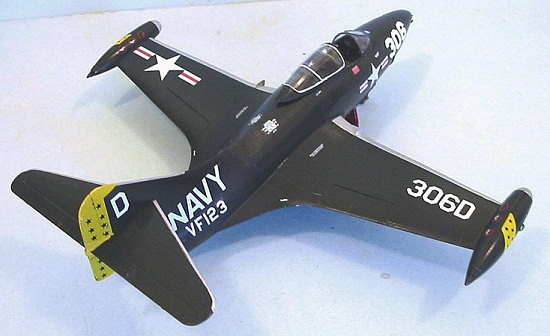
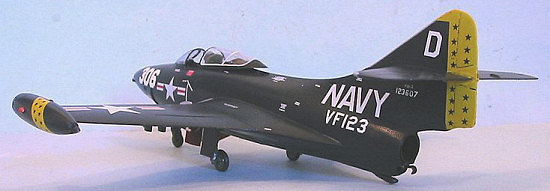
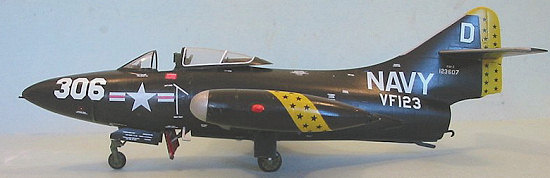
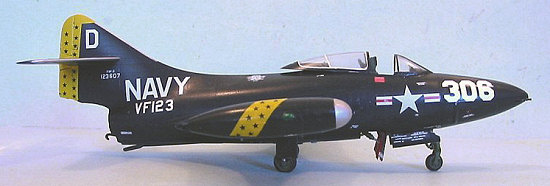
I had decided to do an F9F-2 from VF-123 that had the wing fence modification. I did the wing fence from Evergreen .010 sheet without problem.
| COLORS & MARKINGS |
Painting:
I began painting the model by doing all interior painting before further assembly. For those unclear on what colors to use on the Panther, here is what I did:
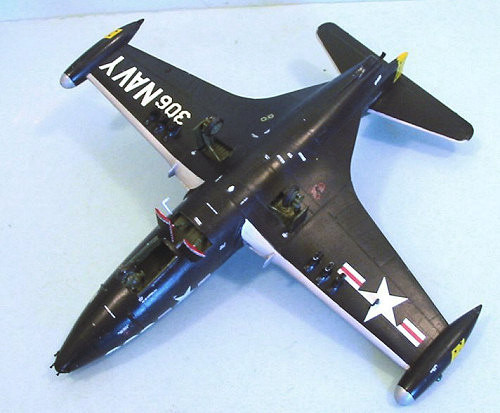
 The wheel wells and dive
brake well, landing gear, wheels, and insides of the gear doors, were painted
Interior Green.
The wheel wells and dive
brake well, landing gear, wheels, and insides of the gear doors, were painted
Interior Green.
The cockpit side consoles from a line aft of the instrument panel are all black including their sides, as is the area of the cockpit interior above the side consoles, the instrument panel and the glare shield. The cockpit floor, the sides of the consoles ahead of the instrument panel, the rudder pedals, the rear bulkhead, and the ejection seat, are in Interior Green.
The interior of the canopy and windshield frames, the deck behind the cockpit and the rear canopy insert are all black.
The hinges of the dive brakes are Interior Green, the interior of the brake itself is Gloss Red.
For the exterior, I used SNJ Aluminum for the leading edges of the wings and tail and tip tanks, then masked them and painted the rest of the model with Xtracrylix “Gloss Sea Blue.”
Because I was doing an F9F-2 with the various updates, this included the white canopy reinforcements seen on the F9F-5. I did this freehand with Xtracrylix “White” and a 0000 brush.
Decals:
 The decals in the
Trumpeter kit are not particularly good, and they do not provide the
stenciling. Undoubtedly, good things will come to those who wait for the
aftermarket decal makers, since there is a plethora of interesting markings for
the F9F-2 Panther. SuperScale already made a sheet of Panther stencils, which
may be out of production but are available at Hannant’s at present. Thanks to
Dan Lee, I was able to use the stencils from a Monogram Panther sheet on this
model.
The decals in the
Trumpeter kit are not particularly good, and they do not provide the
stenciling. Undoubtedly, good things will come to those who wait for the
aftermarket decal makers, since there is a plethora of interesting markings for
the F9F-2 Panther. SuperScale already made a sheet of Panther stencils, which
may be out of production but are available at Hannant’s at present. Thanks to
Dan Lee, I was able to use the stencils from a Monogram Panther sheet on this
model.
I used a combination of decals from the really ancient MicroScale Panther sheet for the yellow markings of VF-123 (which fortunately I had two copies of, since one set dissolved when they hit the water), as well as national insignia from a generic sheet, and Navy markings from other decal sheets, with the numbers from a generic Aeromaster sheet. I used the large “306" number codes from the original Monogram Panther sheet, since photographs show that VF-123 used this size on their nose numbers.
| FINAL CONSTRUCTION |
I attached the Aero racks to the wings, and assembled the landing gear. The canopy and windshield were unmasked and the canopy was attached in the open position. I also attached the entry step in the open position and attached the 20mm gun barrels as described above.
| CONCLUSIONS |
I am pleasantly surprised to report that this is the best Hobbycraft release since their P-26 series. The two minor shape problems are easily solved for those who consider them important, and the work of the Mad Riveter is easily turned into history with 20 minutes spent with sandpaper and rubbing compound, resulting in whatever degree you want your final surface finish to be.
 I noted commentary at
another site over the weekend in which several modelers posted information that
the Trumpeter F9F-2 and the Monogram F9F-5 kits are the same length. I took out
my Monogram Panther, and measured the two models. In fact, the Trumpeter kit is
the same length as the Monogram kit, and this is wrong. The F9F-2 is shorter
overall by 8 inches (1/6 inch in 1/48), all in the area of the fuselage ahead of
the intakes, with the canopy and cockpit thus back further over the wings. In
1/48, this is noticeable. However, the cuts that are necessary to shorten the
kit, which involve taking that 1/6 inch out ahead of the intakes and then in the
middle of the upper fuselage halfway between the end of the canopy and the
vertical fin, are difficult enough (I tried doing it ten years ago to modify a
Monogram kit from F9F-5 to F9F-2) that I don’t recommend it to any but the Truly
Obsessed. The truth is, 99 percent of us - myself included and I consider
myself a Panther Fan - are not going to notice it. It does, however, make me
look forward to Paul Fisher’s coming release of an F9F-2 Panther, which I know
is already the right length.
I noted commentary at
another site over the weekend in which several modelers posted information that
the Trumpeter F9F-2 and the Monogram F9F-5 kits are the same length. I took out
my Monogram Panther, and measured the two models. In fact, the Trumpeter kit is
the same length as the Monogram kit, and this is wrong. The F9F-2 is shorter
overall by 8 inches (1/6 inch in 1/48), all in the area of the fuselage ahead of
the intakes, with the canopy and cockpit thus back further over the wings. In
1/48, this is noticeable. However, the cuts that are necessary to shorten the
kit, which involve taking that 1/6 inch out ahead of the intakes and then in the
middle of the upper fuselage halfway between the end of the canopy and the
vertical fin, are difficult enough (I tried doing it ten years ago to modify a
Monogram kit from F9F-5 to F9F-2) that I don’t recommend it to any but the Truly
Obsessed. The truth is, 99 percent of us - myself included and I consider
myself a Panther Fan - are not going to notice it. It does, however, make me
look forward to Paul Fisher’s coming release of an F9F-2 Panther, which I know
is already the right length.
Past that, the kit makes up into an acceptably-accurate Panther for most of us. Some people have suggested replacing the canopy with the Squadron/Falcon canopy for the Monogram Panther, which may ultimately be the solution to the canopy problem, even if it isn’t quite right in cross section.
My recommendation is that you buy the kit and wait for the release of the undoubted plethora of aftermarket decals that should be available in a matter of months.
This kit bodes well for the rest of the F9F series that was announced by Hobbycraft, since the Cougars are all the length of the F9F-5. My guess at this point is that modelers can safely take a pass on the Fonderie Miniatures Cougar and wait for the Hobbycraft/Trumpeter release.
The Panther is my favorite early jet, and while I wish it had the accuracy of a Fisher Panther, I am happy with what Hobbycraft did here. The kit was worth the wait.
February 2007
Copyright ModelingMadness.com. All rights reserved. No reproduction in part or in whole without express permission.
If you would like your product reviewed fairly and fairly quickly, please contact the editor or see other details in the Note to Contributors.