Trumpeter 1/48 Sea Fury FB.11
|
KIT #: |
2844 |
|
PRICE: |
$54.95 MSRP |
|
DECALS: |
Two Options |
|
REVIEWER: |
Tom Cleaver |
|
NOTES: |
|
Had the Hawker Sea Fury arrived on
the scene one year earlier than it did, its place in history would not be
assured by its technical excellence but rather by the outstanding combat record
it would undoubtedly have achieved with the British Pacific Fleet in the final
struggles of 1945. As it is, the Sea Fury
- designed for air superiority
- is known for shooting down only one opponent, a MiG
-15, shot down on August 2, 1952, by Lt. Peter "Hoagy" Carmichael of 802
Squadron. Given that in the intervening five years between its appearance in
squadron strength and that day in 1952, technological development had rendered
the Sea Fury obsolete, its victory over the MiG-15 is even more remarkable.
Regardless, the Sea Fury is the penultimate result of Sir Sidney Camm's
philosophy of piston-engine fighter design and one of the most beautiful piston-engined
fighters ever flown.
The Sea Fury began life in 1942
with a request by the Air Ministry that Hawker Aircraft design a long -range
fighter for operations in the Far East. While a radial -engine version of the
Tempest was under development at the time, it was thought that t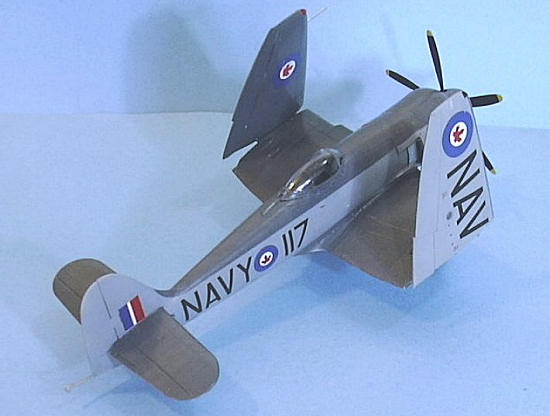 he
relatively high wing -loading of the Tempest would be ill -suited for combat
with the lightly -loaded Japanese fighters, and thus the Sea Fury started out as
the "Tempest Light Fighter (Centaurus)."
he
relatively high wing -loading of the Tempest would be ill -suited for combat
with the lightly -loaded Japanese fighters, and thus the Sea Fury started out as
the "Tempest Light Fighter (Centaurus)."
In early 1943, the designers were
directed to adapt the fighter for shipboard operation as well as the land -based
role.
The first RAF Fury prototype flew
in September 1944, while the first navalized Sea Fury prototype flew in February
1945. Tests revealed a need for an increase in vertical fin and rudder size to
counter the swing on take-off, while the rigid engine mounts created vibration
difficulty until they were replaced with dynafocal-base mounts which completely
eliminated the vibration at lower speeds which had hampered the airplane's
ability to land aboard ship.
While the Royal Navy was testing
both the Meteor and the Vampire aboard carriers, and had ordered the Supermarine
Attacker, there was sufficient doubt about the ability of jets to operate off
carriers that
- while the RAF canceled the land -based Fury in the face of the
arrival of the new jets
- the Royal Navy continued to develop the Sea Fury as a
shipboard interceptor and later as a fighter-bomber. With carrier compatibility
trials completed in 1947, 807 Squadron was the first to convert to the aircraft,
followed by 802, 803 and 805 Squadrons between August 1947 and February 1948.
The initial Sea Fury Mk.X was quickly replaced by the F.B.11, which could carry
underwing drop tanks, bombs and rockets; squadrons began to equip with it in May
1948.
In 1947, the Royal Canadian Navy
was looking for a fighter with fighter-bomber capabilities to replace the
Seafire F.XV that had been acquired in 1946.
The Canadians wanted an airplane that was more robust
and able to fly off the light carrier HMCS Magnificent
in the stormy North Atlantic, an assignment the delicate Seafire was not up to
fulfilling.
Commencing in 1947 with the delivery of one F.B.10, 74 F.B.11 Sea
Furies were delivered for use by 871 Squadron.
The Sea Furies served the RCN between 1948-57, at which
time they were replaced by the F2H-4 Banshee, the last fixed-wing fighter
operated by the Canadian Navy.
Beginning in the early 1960s, surviving Canadian Sea
Furies made their way south of the border, where they made a name for themselves
in the 1960s and 1970s as air racers and proved popular as warbirds.
Today, most surviving Sea Furies in North America have
had their Bristol Centaurus replaced by an R-3350, since parts and maintenance
on the American engine are both easier and cheaper to maintain.
Several highly-modified Sea Fury racers can be seen at
Reno each September, where they are formidable competitors.
Trumpeter’s 1/48 Sea Fury is the
first kit of this airplane in 1/48 since the release 20 years ago of the
Hobbycraft kit.
The only other Sea Fury available in this scale is a vacuform by
Falcon which was originally released in the mid-1980s.
Of the three, the most accurate in
terms of outline and dimensions is the Falcon kit.
One could use parts from the other injection-molded kits
for props and landing gear and get a model that is still very good looking.
The Hobbycraft kit suffers from numerous faults,
including a wing with an upside-down airfoil, among other things.
 Unfortunately, while the Trumpeter
kit is miles in advance of the Hobbycraft kit in terms of outline and
dimensional accuracy, it has its own faults.
Unfortunately, while the Trumpeter
kit is miles in advance of the Hobbycraft kit in terms of outline and
dimensional accuracy, it has its own faults.
The cockpit bears no resemblance to
any Sea Fury cockpit I have ever seen (and I have sat in three), being too
shallow and incorrectly laid-out.
There is the additional problem that the area of the
fuselage under the canopy when closed has been cut down, which is totally
inaccurate.
Also, the gear legs are too short and the gear is positioned much
too far inboard in the wheel wells.
The drop tanks that are provided bear no resemblance
whatsoever to any used by the Sea Fury, being at least twice the size of the
actual tanks.
Finally, the propeller blades are strangely shaped and the
spinner is too long and too pointed.
Fortunately, almost of these faults
can be fixed with scratch-modifications, which will be sufficient to create an
accurate-enough model out of the box.
Decals are provided for two
aircraft.
As with most Trumpeter kits, the sheet is best tossed.
Among other things it uses a non-existant font for the
serial numbers.
Fortunately, better decals are
available. There is an old Aeromaster Sea Fury sheet, which provides markings
for Cuban, Iraqi, Dutch and Burmese Sea Furies.
There is additionally an Aeromaster sheet that provides
markings for Commonwealth Sea Furies including one flown by the RCN and one by
the RAN.
More contemporary releases include a sheet of Canadian Sea Furies from
Mike Grant Decals and a sheet of Commonwealth Sea Furies from Xtradecals.
One can also rob decal sheets from contemporary
Hobbycraft releases of their Sea Fury kit and get excellent decals that alone
are worth the cost of this kit.
The kit is in severe need of
aftermarket detail sets.
Unfortunately, there are none currently in production,
though if you have the Cooper Details set that was re-released several years ago
by Meteor Productions, or the Airwaves cockpit set, these should fit this kit
with only a slight bit of sanding to get them to fit.
The Falcon/Squadron vac canopy for the Hobbycraft kit
fits this kit perfectly.
 Overall, the kit goes together
easily and I only needed a very little bit of filler along the fuselage
centerline upper and lower.
Overall, the kit goes together
easily and I only needed a very little bit of filler along the fuselage
centerline upper and lower.
Fortunately, I was able to refer to
the most accurate Sea Fury model - the Fisher Models Sea Fury - throughout this
project as a guide for what to do in correcting this kit.
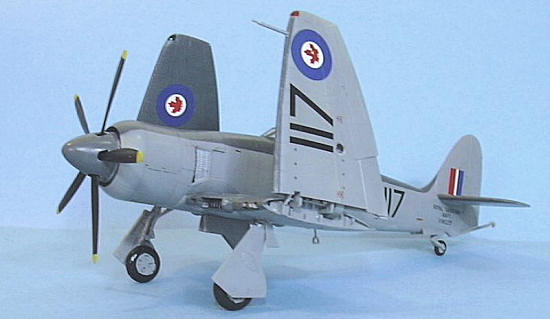
The first thing that stuck out to
me was the spinner, which was obviously too long and too pointed.
The first thing I did was fill the spinner with
cyanoacrylate and let it dry normally overnight.
When that was done, I cut 1/16 inch off the tip of the
spinner, then reshaped the spinner to make it blunter.
The prop blades were just “off” enough to be noticeable,
but I decided they would be acceptable for an out-of-the-box project.
The next thing I noticed was that
the area just behind and below the exhaust area on the forward fuselage side was
done with angles, rather than a smooth curve.
I trimmed the angles and then reshaped this area with a
file to give it the proper curve.
It was glaringly obvious that the
cockpit was completely incorrect.
I decided that since it was to be painted black, if I
simply closed the canopy a viewer would be unable to see all that bad detail.
I did use a set of photo-etch Eduard seatbelts, which
improved the seat and gave the cockpit enough of a “look” for what would be seen
through the clear plastic.
 The area immediately behind the
cockpit was also completely incorrect, being cut down.
I too some .010 Evergreen sheet, cut it to fit and then
curved it correctly.
I filled in with cyanoacrylate glue and then sanded it
smooth.
I reshaped the headrest to fit properly.
The area immediately behind the
cockpit was also completely incorrect, being cut down.
I too some .010 Evergreen sheet, cut it to fit and then
curved it correctly.
I filled in with cyanoacrylate glue and then sanded it
smooth.
I reshaped the headrest to fit properly.
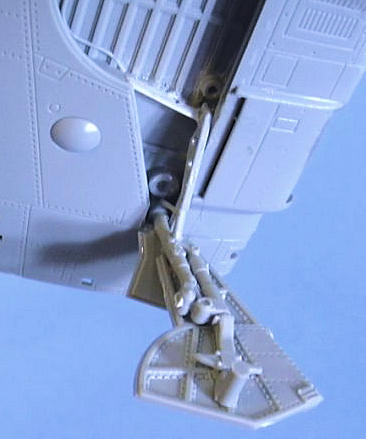
The next problem was the wheel
wells.
I made a bulkhead section with Evergreen sheet, then used some Evergreen
tubing to lengthen the landing gear a bit more than 3/32 inch. The landing gear
was glued into the extreme end of the wheel well where it is supposed to be.
I also lengthened the tailwheel leg by the same amount.
The engine cowling was a bit
fiddly, so I cut off the guides, glued it in position and then held it overnight
with rubber bands to insure a solid attachment.
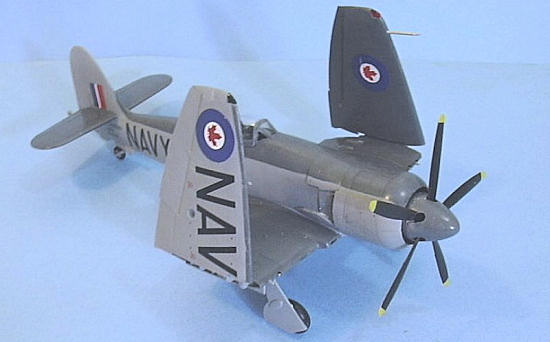
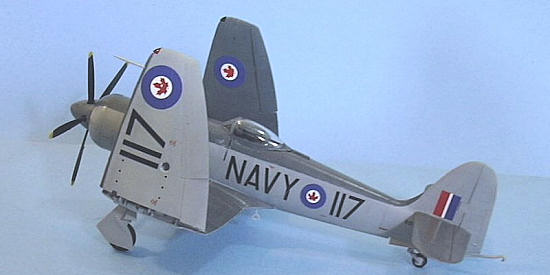
I had contemplated having the wings
spread, but since I didn’t want to give an observer more view of that cockpit
than necessary, I decided to fold the wings.
When folded, the ailerons both go “down” about 5
degrees.
Since the ailerons on the kit are separate, this was easy to do.
At the end, I discovered the
Trumpeter canopy has a seam down the middle.
This can be scraped off with a knife blade, then the
area can be smoothed an polished with Micro-Mesh.
Once it is Futured, the seam will be unnoticeable.
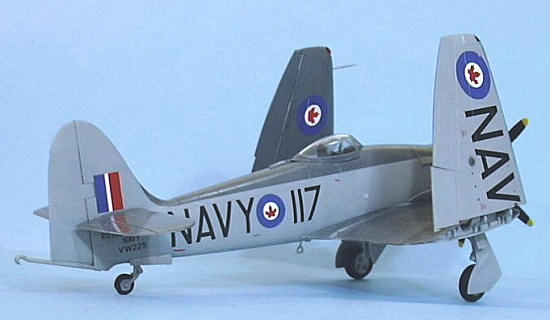
Painting:
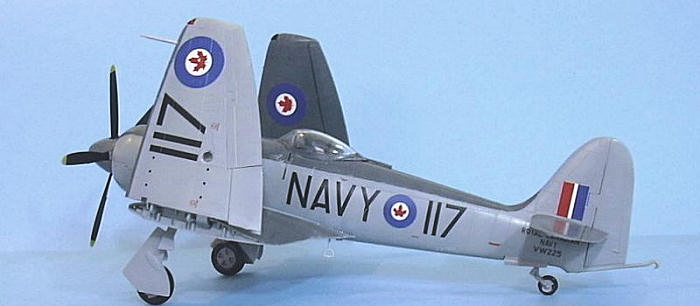
I decided to do the Canadian Sea
Fury on the Aeromaster sheet.
This airplane is also found on the Mike Grant and
Xtradecals sheet.
This is one of four airplanes of 871 Squadron which flew
as an air demonstration flight in 1957-58, with the spinners painted red with a
white star on the tip, with red lightning flashes on the drop tanks.
 I originally painted the spinner
white, then discovered during the decal application process that the red decal
provided in the Aeromaster sheet was too small to fit (since the Hobbycraft
spinner is also small).
Two attempts at masking and painting didn’t work, so I
decided I would depict the airplane as it would have looked prior to its air
demonstration flight assignment, with the spinner painted Extra Dark Sea Grey.
I originally painted the spinner
white, then discovered during the decal application process that the red decal
provided in the Aeromaster sheet was too small to fit (since the Hobbycraft
spinner is also small).
Two attempts at masking and painting didn’t work, so I
decided I would depict the airplane as it would have looked prior to its air
demonstration flight assignment, with the spinner painted Extra Dark Sea Grey.
The model was painted Xtracrylix
Sea Grey Medium on the lower surfaces, and Extra Dark Sea Grey on the upper
surfaces. I post-shaded each by applying a bit of white to the colors and going
over panels. The Canadian airplanes may not have been painted these exact
shades, but whatever they were was “close enough” that these colors work.
Decals:
The Aeromaster decals are thick,
and required two applications of Micro-Sol, a bit of slicing with an X-acto
blade, and several applications of Solvaset to make them finally go down.
Since both the Mike Grant sheet and the Xtradecals sheet
provide markings for this airplane, I recommend you use those decals since I
know they are thinner and will not give you this kind of problem.
I gave the model an overall coat of
Xtracrylix Satin Varnish to give a “scale effect” gloss finish.
I then unmasked the canopy and attached the wings.
For a kit that retails at around
$50 (and perhaps more by the time you read this since all manufacturers are
announcing price increases to deal with $130+ per barrel petroleum products and
vastly increased transportation costs), the Trumpeter Sea Fury is a
disappointment.
It is a scale-up of the inaccurate 1/72 kit, with all of its
problems made larger.
The rivet detail isn’t really right for this scale but
under the proverbial “coat of paint,” the surface detail doesn’t look all that
bad.
 As I was finishing the model, I was
contacted by my friend Dave Carter, the chief designer at White Ensign Models.
WEM is planning a correction set for this kit.
I referred Dave to “Mister Sea Fury” (Paul Fisher) who
is providing him with accurate information.
White Ensign should make a good set that will correct
the prop, the wheel well, the landing gear, and the cockpit.
If you are a
“serious Sea Fury Fan,” then I suggest if you have this kit in the stash you put
all the parts in the box, tape it closed and put it back in storage to await the
release of the WEM set.
As I was finishing the model, I was
contacted by my friend Dave Carter, the chief designer at White Ensign Models.
WEM is planning a correction set for this kit.
I referred Dave to “Mister Sea Fury” (Paul Fisher) who
is providing him with accurate information.
White Ensign should make a good set that will correct
the prop, the wheel well, the landing gear, and the cockpit.
If you are a
“serious Sea Fury Fan,” then I suggest if you have this kit in the stash you put
all the parts in the box, tape it closed and put it back in storage to await the
release of the WEM set.
Overall, with “some modeling
ability required,” this can be turned into a mostly-acceptable model with what’s
in the box, so long as you are a modeler who is content with a “mostly
acceptable model.”
The kit definitely requires aftermarket decals no matter
what you decide to do with it.
As far as a final final
recommendation is concerned, if you are a really serious Sea Fury fan and only
want one in the collection, which will be totally “right,” then bite the bullet
and get the Fisher kit, which is still in production and worth every penny.
Thanks
to Stevens International for the kit.
Tom Cleaver
July 2008
Copyright ModelingMadness.com
If you would like your product reviewed fairly and quickly, please
contact
the editor or see other details in the
Note to
Contributors.
Back to the Main Page
Back to the Reviews Index Page 2017