| KIT #: | 48141 |
| PRICE: | 4320 yen at HLJ |
| DECALS: | Three options |
| REVIEWER: | Tom Cleaver |
| NOTES: | Lone Star Model resin UC-45J conversion and Caracal Decals 48076 used |
| HISTORY |
 In 1936, Walter Beech
speculated that developing a light twin-engine passenger-carrying aircraft could
have good commercial prospects as an executive transport for business, a “feeder
airliner” providing service to smaller airports and passenger markets, and as a
utility aircraft for the military. The result was the Model 18, the first
all-metal cantilever monocoque design by Beechcraft. The design could carry 6-9
passengers and two pilots, and was powered by two radial engines. The initial
engines used ere either the 330 Hp. Jacobs L6 or the 350 hp Wright R-760E. The
450 hp Pratt & Whitney R-985 became the definitive engine used for the rest of
production from the Model C18S onwards.
In 1936, Walter Beech
speculated that developing a light twin-engine passenger-carrying aircraft could
have good commercial prospects as an executive transport for business, a “feeder
airliner” providing service to smaller airports and passenger markets, and as a
utility aircraft for the military. The result was the Model 18, the first
all-metal cantilever monocoque design by Beechcraft. The design could carry 6-9
passengers and two pilots, and was powered by two radial engines. The initial
engines used ere either the 330 Hp. Jacobs L6 or the 350 hp Wright R-760E. The
450 hp Pratt & Whitney R-985 became the definitive engine used for the rest of
production from the Model C18S onwards.
The first prototype flew on January 15, 1937. The airplane was frequently mistaken for the Lockheed Model 12 Electra, which was larger than the Beech design. By the time of Pearl Harbor, the Lockheed design had outsold the Model 18 two-to-one, with only 39 Model 18s sold. However, Lockheed was forced to cease production of the Model 12 in favor of military aircraft, leaving the field open to the Model 18. Over 4,000 Model 18s were built in various sub-types during the war, including the AT-7 twin-engine pilot trainer and the AT-11 bombardier, navigation and gunnery trainer. Between 1937 when production began and 1970, when the Model 18 was phased out, over 9,000 Model 18s were built. Both the USAAF and US Navy made wide use of the aircraft, known as the C-45 to the Air Force and the JRB (personnel transport) SNB (trainer) to the Navy prior to 1962.
After
the Second World War, between 1951-55, many of the earlier Model 18s were
remanufactured by Beech, with an enlarged engine nacelle providing better
aerodynamic smoothness, while an extended leading edge between the engine and
fuselage provided better low-speed stability, which brought the military
aircraft up to the production standard of post-war civilian Model 18s. The
remanufacutred aircraft were known as the UC-45J in the Air Force and the SNB-5
and SNB-5P in the Navy. After 1962, the unified designation system was adopted
with all services designating it UC-45J. The Airforce phased out its UC-45s in
1963, while the Navy used the aircraft until 1972 and the US Army flew it until
1976. In its later years, the C-4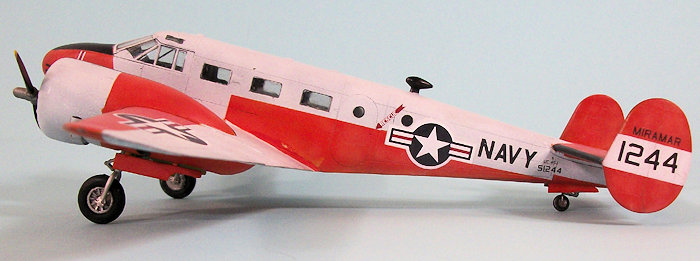 5 was universally known as the “bug smasher,”
through its extensive use by deskbound military pilots to get their minimum
flight hours to qualify for flight pay. Through 33 years of production (a record
at the time),32 variations of the basic design were flown and over 200
improvement modification kits were developed. The Model 18 was the premier
executive transport until the introduction of the Learjet in the early 1960s.
5 was universally known as the “bug smasher,”
through its extensive use by deskbound military pilots to get their minimum
flight hours to qualify for flight pay. Through 33 years of production (a record
at the time),32 variations of the basic design were flown and over 200
improvement modification kits were developed. The Model 18 was the premier
executive transport until the introduction of the Learjet in the early 1960s.
Yours truly has had a love/hate relationship with the Model 18 for the past 52 years, having first laid hands on an airplane’s controls in 1964 when I put in a few hours as “passenger” for the Staff ASW Officer of Commander Patrol Forces 7th Fleet, buzzing rice paddies in Okinawa, and then losing my 1947 Model 35 Bonanza when a Union Flights Turbo-18 lost an engine on takeoff at Sacramento Executive airport in 1978 and crashed into parked aircraft, including my Bonanza.
| THE KIT |
 The Model 18 has had a few
kits made over the years. The first plastic kit was by Comet in the mid-1950s,
to “box scale” that approximated 1/48. Pioneer released a 1/72 kit in the late
1980s. Battle Axe made a limited-run 1/48 kit in the 1990s that was so difficult
I ended up tossing mine; I do know of at least two people who managed to
persevere through to completion. This kit by ICM is the first kit of the Model
18 to modern standards.
The Model 18 has had a few
kits made over the years. The first plastic kit was by Comet in the mid-1950s,
to “box scale” that approximated 1/48. Pioneer released a 1/72 kit in the late
1980s. Battle Axe made a limited-run 1/48 kit in the 1990s that was so difficult
I ended up tossing mine; I do know of at least two people who managed to
persevere through to completion. This kit by ICM is the first kit of the Model
18 to modern standards.
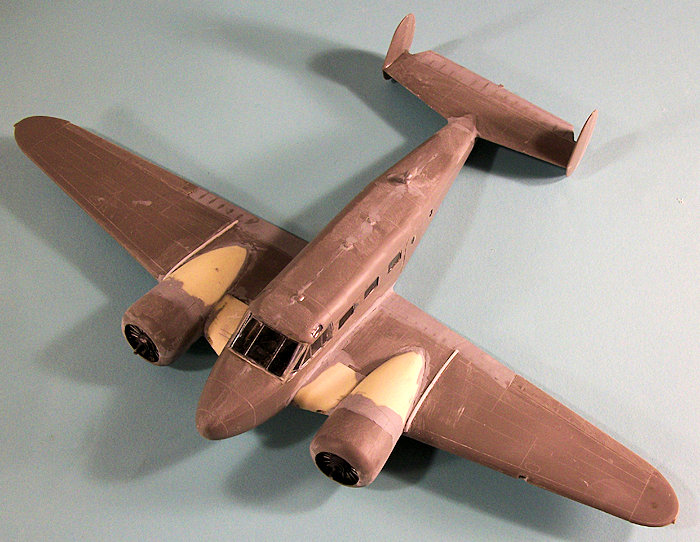
The kit has some shortcomings, most obviously the grossly-overdone fabric effect on the control surfaces. Whether a modeler is going to do a C-45F or a modernized UC-45J, the overdone rib detail has to be sanded off. The interior seats are very fiddly in construction and getting the cockpit interior that is glued to the lower wing into the assembled fuselage can be tricky. Decals are for World War II era American aircraft, and for a French and Italian Air Force operated C-45F. Revell-Germany has recently released this kit under their banner, with different decals.
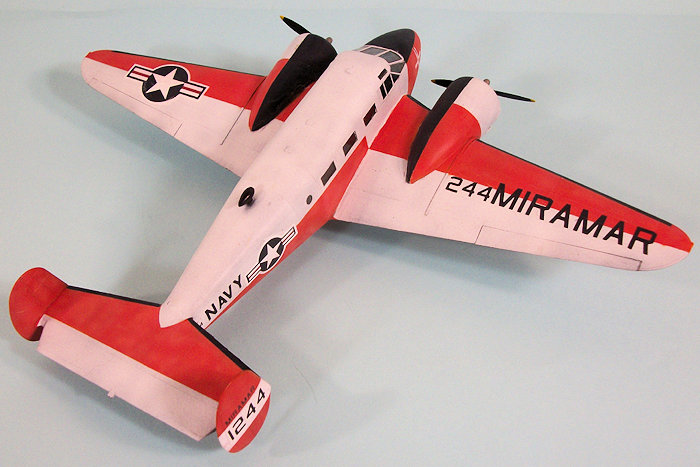
Mike West of Lone Star Models has released a conversion set to do the later remanufactured UC-45J, which includes the extended upper engine nacelle and extended inner wing in resin, and the different main gear legs in white metal. Lone Star also produces a more extensive conversion to turn the model into an AT-11 trainer. Caracal Decals has released sheet 48076 which includes several post-war Navy and Air Force UC-46J aircraft.
| CONSTRUCTION |
 Since
I wanted to do the UC-45J, I bought the Lone Star Models conversion. I began by
making these modifications. The upper engine nacelle and the inner leading edge
of the wing have to be removed. The resin nacelle replacement is attached, and
then the wing sub-assembly is built according to instructions. Once the upper
and lower wing parts are assembled, the inner leading edge extension is attached.
Since
I wanted to do the UC-45J, I bought the Lone Star Models conversion. I began by
making these modifications. The upper engine nacelle and the inner leading edge
of the wing have to be removed. The resin nacelle replacement is attached, and
then the wing sub-assembly is built according to instructions. Once the upper
and lower wing parts are assembled, the inner leading edge extension is attached.
I then assembled the fuselage according to instructions, and then built the seats and installed them in the lower wing per the instructions, then attached the fuselage and wing sub-assemblies. At this point, I applied Mr. Surfacer 500 to the resin parts and smoothed out the joints. I then sanded all the fabric detail off the control surfaces, assembled the tail and attached that to the fuselage.
| COLORS & MARKINGS |
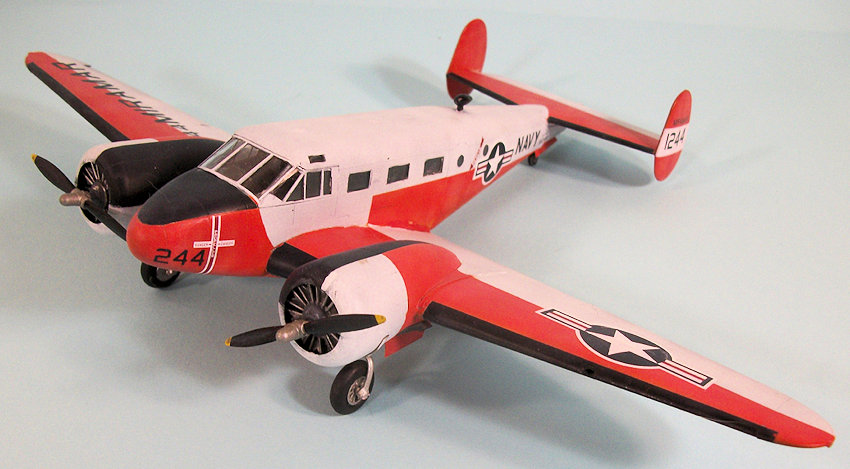
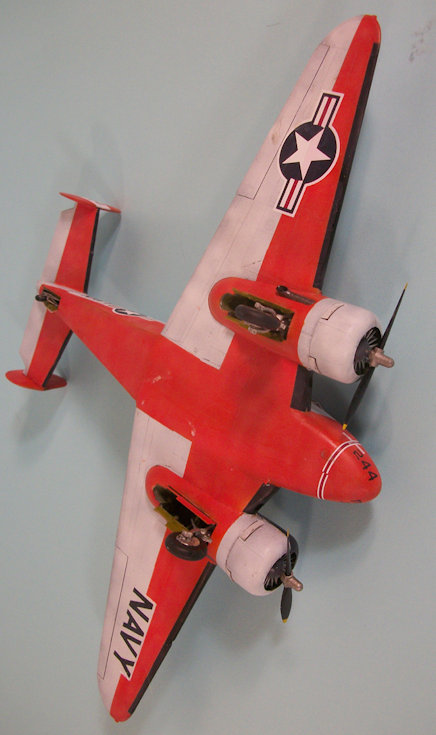
I wanted to do my model as a well-used Navy UC-45J. These airplanes were originally painted gloss white and gloss red-orange, but the finish rapidly deteriorated to an overall flat finish since the airplanes were almost always parked outside. This was particularly the case for airplanes stationed on fields near the ocean, where salt air contributed to the flattening process.
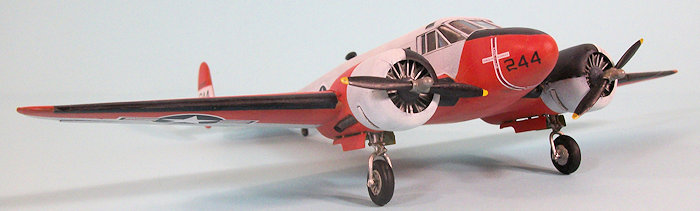 I
painted the model overall gloss black, masked off the de-icer boots on wings and
horizontal stabilizer and the enti-flare areas of the nose and inner engine
cowlings and nacelles, then applied Tamiya Gloss White. The result was an
“uneven” finish that implied wear and tear. I then mixed Tamiya Orange and Gloss
Red, and after masking off the white areas, applied this color with an “uneven”
finish. I then lightened the red-orange color and went over the painted area,
since the red-orange paint oxidized as it flattened.
I
painted the model overall gloss black, masked off the de-icer boots on wings and
horizontal stabilizer and the enti-flare areas of the nose and inner engine
cowlings and nacelles, then applied Tamiya Gloss White. The result was an
“uneven” finish that implied wear and tear. I then mixed Tamiya Orange and Gloss
Red, and after masking off the white areas, applied this color with an “uneven”
finish. I then lightened the red-orange color and went over the painted area,
since the red-orange paint oxidized as it flattened.
I unmasked the model and applied a coat of clear gloss before applying the decals. The Caracal Decals went down without problem. I finished by applying a coat of Clear Flat overall to the model. The windows were unmasked and the props and landing gear attached.
| CONCLUSIONS |
The ICM kit provides a good basis for making whatever variety of Beech Model 18 you might wish to do. The Lone Star Models conversion is not difficult, and the Caracal decals provide several very colorful markings options.
February 2016
Copyright ModelingMadness.com
Review kit courtesy HobbyLink Japan. Order yours at: http://hlj.com/product/ICM48181
Decals courtesy Caracal Decals. Order yours at caracalmodels.com
Lone Star Models conversion set available at: www.lonestarmodels.com
If you would like your product reviewed fairly and fairly quickly, please contact the editor or see other details in the Note to Contributors.