Falcon 1/48 Attacker FB.2
|
KIT # |
|
|
PRICE: |
$24.98 |
|
DECALS: |
Two aircraft |
|
REVIEWER: |
|
|
NOTES: |
Vacuformed kit |
|
HISTORY |
The Supermarine Attacker, the first jet fighter in squadron service with the Fleet Air Arm, is a study in the official procrastination that seemed to dominate the British aviation industry in the years immediately following the end of the Second World War. In regards to performance, the Attacker was closely similar to the Grumman F9F Panther, both being powered by the Rolls-Royce Nene jet engine. Yet the Attacker, which first flew in prototype form two years before the Panther, was destined to enter service three years later than the American fighter.
 In 1944, after
Rolls-Royce began work on what would become the Nene - a centrifugal-flow jet of
considerably more power than was shown by the Power Jets Welland or the
Rolls-Royce Derwent developed from the Welland - Supermarine responded to
specification E.1/44 with an airplane that used the laminar wings of the
company's piston-engined Spiteful, a development of the Spitfire that would fly
in prototype form on June 30, 1944. After inspection of the wooden mockup, an
order for three prototypes to specification E10/44 was issued August 5, 1944; on
September 9, and amendment to the contract specified the semi-navalization of
the second and third prototypes.
In 1944, after
Rolls-Royce began work on what would become the Nene - a centrifugal-flow jet of
considerably more power than was shown by the Power Jets Welland or the
Rolls-Royce Derwent developed from the Welland - Supermarine responded to
specification E.1/44 with an airplane that used the laminar wings of the
company's piston-engined Spiteful, a development of the Spitfire that would fly
in prototype form on June 30, 1944. After inspection of the wooden mockup, an
order for three prototypes to specification E10/44 was issued August 5, 1944; on
September 9, and amendment to the contract specified the semi-navalization of
the second and third prototypes.
Unfortunately, the first Spiteful was lost in the same month, after having demonstrated that the characteristics of the new laminar wing at low speed were undesirable; this poor handling in landing configuration was confirmed by the second Spiteful, which flew in January 1945. In spite of this, a contract for 24 Type 392 jet fighters was confirmed on July 7, 1945. By that November, Supermarine's continuing inability to resolve the low speed handling problems of the Spiteful finally came to the attention of their Lordships of the Admiralty, and it was decided the order for the 24 airplanes was premature; the contract was cancelled with the Admiralty requesting further development of the shipboard fighter be suspended.
Work on the three prototypes continued, with the first one flying on July 27, 1946. The major complaint was in regard to the outdated tailwheel landing gear Supermarine had retained, which led to severe airfield erosion during taxying. A Martin-Baker Mk.1 ejection seat was fitted to the second aircraft, which finally flew June 17, 1947; it was the first to be named "Attacker." During carrier trials with this airplane in October 1947, famed British test pilot Eric Brown developed the constant power/constant angle approach that is used to this day in landing jet aircraft aboard ship. On February 26, 1948, pilot Mike Lithgow captured the 100-km International Closed Course Speed Record with the first prototype, averaging 560.634 mph.
 In November 1948, in the
face of a changing international situation as the Cold War began to develop, the
Royal Navy ordered 60 Attacker F.1s. Following this British order, the
Pakistani Air Force ordered 36 Attackers, de-navalized and able to carry two
1,000-lb bombs and 8 rocket projectiles. The Royal Navy F.Mk.1, which first
appeared May 4, 1950, had no provision for underwing ordnance; No. 800 Squadron
FAA was formed with eight Attackers on August 17, 1951, with 803 Squadron
following that November. After 43 F.Mk.1s were completed, 16 following were
completed as interim fighter-bombers under the designation F.B.Mk.1.
In November 1948, in the
face of a changing international situation as the Cold War began to develop, the
Royal Navy ordered 60 Attacker F.1s. Following this British order, the
Pakistani Air Force ordered 36 Attackers, de-navalized and able to carry two
1,000-lb bombs and 8 rocket projectiles. The Royal Navy F.Mk.1, which first
appeared May 4, 1950, had no provision for underwing ordnance; No. 800 Squadron
FAA was formed with eight Attackers on August 17, 1951, with 803 Squadron
following that November. After 43 F.Mk.1s were completed, 16 following were
completed as interim fighter-bombers under the designation F.B.Mk.1.
The definitive Attacker, the F.B.Mk.2, was powered by a Nene 102, and introduced a metal-framed canopy after two failures of the earlier bubble canopy. This airplane had the same underwing ordnance capability as the Pakistani Attackers. 84 were delivered, with the last one produced a few weeks before the Attacker was removed from front line service.
 800 Squadron, with 12
F.B.2s, went aboard the newly-commissioned HMS "Eagle" on March 4, 1952. 803
Squadron joined 800 shortly thereafter. After work-up, the ship departed for the
Mediterranean, with the Attackers finally going to sea operationally. The
airplane was already obsolete, and upon return from the Med, 800 Squadron was
disembarked for disbandment on May 26, 1954. 803 Squadron was returned from Hal
Far, Malta, aboard Eagle on June 6, and disbanded at the end of the month. The
Attacker remained in service with RNVR squadrons until the end of 1956.
800 Squadron, with 12
F.B.2s, went aboard the newly-commissioned HMS "Eagle" on March 4, 1952. 803
Squadron joined 800 shortly thereafter. After work-up, the ship departed for the
Mediterranean, with the Attackers finally going to sea operationally. The
airplane was already obsolete, and upon return from the Med, 800 Squadron was
disembarked for disbandment on May 26, 1954. 803 Squadron was returned from Hal
Far, Malta, aboard Eagle on June 6, and disbanded at the end of the month. The
Attacker remained in service with RNVR squadrons until the end of 1956.
While the Attacker did introduce the Fleet Air Arm to jet aircraft operation aboard ship, it had never been brought up to a satisfactory standard. Its altitude performance was poor, it lacked maneuverability, and it was too unstable to be an effective gun platform. As Eric Brown said of it, "the Attacker marked the beginning of the end of the charisma surrounding the Supermarine name."
|
THE KIT |
 Frog released an Attacker
in 1/72 scale in the mid-1950s, which was slightly updated with landing gear and
a pilot who was more than a head atop the fuselage in the early 1960s. The kit
has occasionally been available since Frog was sold to Novo, and with a lot of
work can be turned into an effective model. More recently, MPM released an
Attacker in 1/72 scale, which suffers all of the problems associated with the
term "limited run injection-molded kit." The Falcon vacuform Attacker first
appeared in around 1991 as I recall. About two years ago, Magna Models in
England released a 1/48 Attacker as an all-resin kit; I have yet to see one of
these built-up. At about US$50 in price, the Magna kit is twice as expensive as
the Falcon version; it has more complete decals offering three aircraft, and is
also an F.B. Mk.2.
Frog released an Attacker
in 1/72 scale in the mid-1950s, which was slightly updated with landing gear and
a pilot who was more than a head atop the fuselage in the early 1960s. The kit
has occasionally been available since Frog was sold to Novo, and with a lot of
work can be turned into an effective model. More recently, MPM released an
Attacker in 1/72 scale, which suffers all of the problems associated with the
term "limited run injection-molded kit." The Falcon vacuform Attacker first
appeared in around 1991 as I recall. About two years ago, Magna Models in
England released a 1/48 Attacker as an all-resin kit; I have yet to see one of
these built-up. At about US$50 in price, the Magna kit is twice as expensive as
the Falcon version; it has more complete decals offering three aircraft, and is
also an F.B. Mk.2.
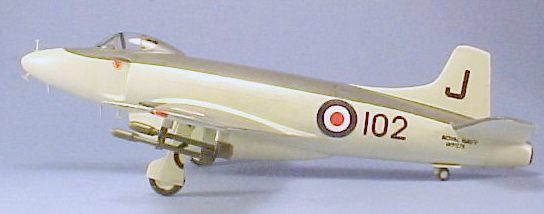
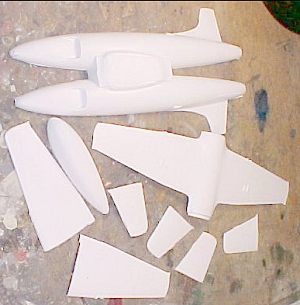
The Falcon kit offers 16 vacuformed parts on a single sheet of plastic, with Aeroclub white metal ejection seat, main gear legs and tailwheel. Panel detail is of the petite raised-line variety. Two very clear vacuformed canopies are also included. The decal sheet allows the modeler to create one airplane, WP275, as operated by 800 Squadron aboard HMS "Eagle" in 1952-54, and as flown by the RNVR in 1954-56; there are no data stencil decals provided.
|
CONSTRUCTION |
As with any vacuform,
construction begins with the removal of the parts from the backing sheet. This
is really far easier than people imagine it is. The one big problem is the
likelihood of over-sanding the parts after they have been removed from the
backing sheet, with consequent difficulty in accurate assembly. Of the many
methods vacuform modelers have come up with over the years to deal with this
problem, the one I have used with consistent success consists of drawing around
the 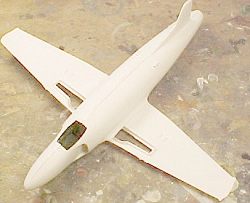 part with a pencil, then cutting the part off the sheet without leaving a
"border" of backing sheet. I then sand down the part until the pencil line
disappears, at which point the part is ready. I do find that sanding down the
trailing edges of wings, horizontal stabilizers and vertical fins and rudders
results in a better looking model when assembled. Overall, I really don't think
this process is more difficult or time-consuming than removing flash and sprue
gates from limited-run injection kits.
part with a pencil, then cutting the part off the sheet without leaving a
"border" of backing sheet. I then sand down the part until the pencil line
disappears, at which point the part is ready. I do find that sanding down the
trailing edges of wings, horizontal stabilizers and vertical fins and rudders
results in a better looking model when assembled. Overall, I really don't think
this process is more difficult or time-consuming than removing flash and sprue
gates from limited-run injection kits.
I then cut out the wheel
wells out on the lower wing, being careful to trim the cutaway closely, since
these would become the models for the gear doors I planned to make from
Evergreen sheet. I boxed in the wheel wells with Evergreen sheet, adding in
some small rib detail as seen in the photo of the gear wells included in the kit
instructions. Since I was unsure of the fit of the wing to the fuselage, I
decided I would glue the lower wing to the assembled fuselage before attaching
the upper wings, so I set aside the wing at this point
 and assembled the
horizontal stabilizers.
and assembled the
horizontal stabilizers.
The problem in assembling the fuselage of a vacuform is that often the plastic is thin, with the result being that there is not a lot of surface to glue together in the centerline joint. I solve this by using some Evergreen strip and gluing it along the centerline of one fuselage half, so that when it fits inside the other, there is a considerable surface for the glue to attach to, making a strong sub-assembly.
I made interior ducting for the intakes using .010 Evergreen sheet; the boundary layer splitter plate was made with .020 Evergreen sheet, and I closed off the end of the ducts to avoid having a "see through" model.
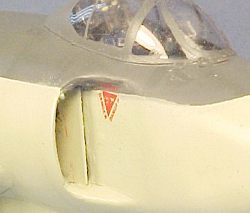
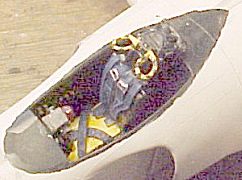 The cockpit was made with
Evergreen sheet, using the very good drawing included in the kit instructions.
Since it would be painted black, and I was planning to keep the canopy closed, I
concentrated on detailing the Aeroclub white metal seat, since it was the one
thing that would be easily seen in the completed model; as Verlinden says, a
good seat will improve any cockpit regardless of whatever else is done.
The cockpit was made with
Evergreen sheet, using the very good drawing included in the kit instructions.
Since it would be painted black, and I was planning to keep the canopy closed, I
concentrated on detailing the Aeroclub white metal seat, since it was the one
thing that would be easily seen in the completed model; as Verlinden says, a
good seat will improve any cockpit regardless of whatever else is done.
Once the cockpit was
completed and painted, I glued the fuselage together. I ran cyanoacrylate down
the centerline seam to close it up, then attached the lower wing. I then
test-fitted the upper wings, and sanded down the butt joint of the wing root
till they fit perfectly, then glued them in place. There was a small gap in the
wheel wells between the wheel well walls and the inside of the upper wing, which
I filled using white glue. I then attached the horizontal stabilizers and the
belly tank, and set the model aside to set up after
 running cyanoacrylate glue
along all the seams.
running cyanoacrylate glue
along all the seams.
When all was solidly attached, I sanded down the CA glue in the seams, then covered them again with Mr. Surfacer 500, which I sanded down smooth. With a final coat of Mr. Surfacer 1000, the assembly was complete. I rescribed the panel lines with an X-acto #11 blade.
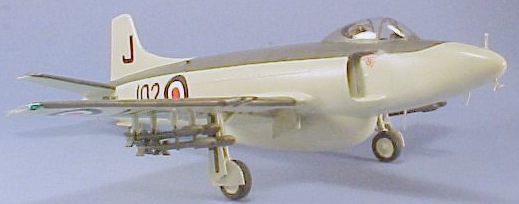
I inserted the seat, control stick and gunsight, then attached the canopy, which I had previously Futured. I also attached the landing gear and the gear doors I had made from Evergreen sheet. I also drilled out holes on the lower wing for the attachment of the rockets. When all was complete, the model was ready for painting.
|
PAINT & DECALS |
Painting:
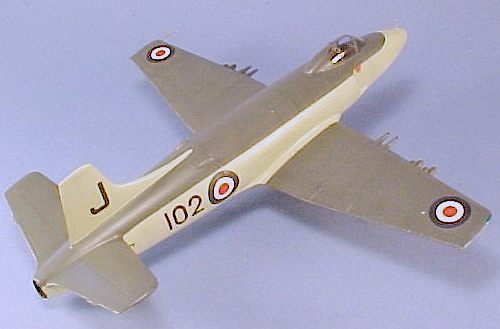
After pre-shading the model with flat black, I applied the upper camouflage color, using Tamiya Dark Grey. which was "faded" with some Flat White as I went back over the areas. When dry, I masked off the upper camouflage and painted the rest of the model with Gunze-Sanyo "Sky." This is a more yellow color than the Tamiya Sky, and is closer to the color of Sky used post-war by the FAA from color photos I have studied. After all was dry, I removed the masking from the upper surfaces and shot the model with Future.
 Decals:
The decals are simple, and went down easily with an application of Micro-Sol. The only difficulty encountered was putting the lower wing serials over the gun bulges on the underwing; once the decal began to set, I poked it full of holes around these bulges, then applied more Micro-Sol, and they settled down perfectly. When all was finished, I washed off the model and applied another coat of Future.
Final Assembly and Finish:
I painted the model with a final coat of Dullcote mixed with Glosscote, to get a "glossy" finish that was not shiny, since this would not look right for the operational aircraft. When that was dry, I unmasked the canopy. I attached the main wheels, then attached the underwing rockets - these came from the spares box, and were originally included in an Airfix Spitfire 24 kit.
|
CONCLUSIONS |
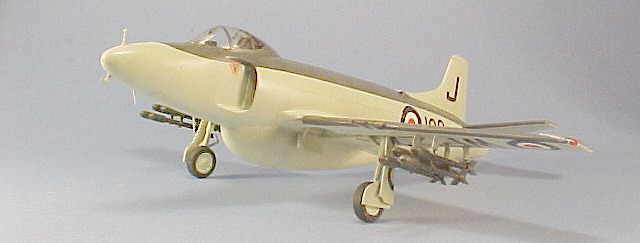
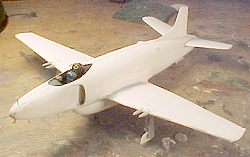
Hey! It's a taildragger jet! The only one in this configuration to ever see operational service. It might not have been the best of its kind, but the Attacker is historically important, and is an interesting-looking model sitting on the shelves with my other FAA models.
Review kit compliments of Falcon Models. Order yours at: http://www.falconmodels.co.nz
If you would like your product reviewed fairly and fairly quickly, please contact the editor or see other details in the Note to Contributors.