Czech Models 1/48 FJ-1 Fury
|
KIT # |
4805 |
|
PRICE: |
$29.95 |
|
DECALS: |
Two VF-51 aircraft |
|
REVIEW: |
|
|
NOTES: |
"WEEKEND WARRIOR" - NORTH AMERICAN'S FIRST FURY
|
HISTORY |
Blowtorches at Sea:
By 1944, the U.S. Navy was aware of what the USAAF and RAF were doing with the P-80 and Meteor projects, respectively, and knew as much as anyone did what was expected soon from the Germans. Having come up on the short end for underestimating the Japanese at the outset of the war, they were convinced the Japanese were much further along with jet development than in fact they were. With the Pacific War likely to involve an invasion of Japan and fighting into 1946, it seemed prudent to order some jets of their own. Being more conservative than the Air Force due to the difference in operating conditions, the first airplane ordered was the "halfway house" Ryan FR-1 "Fireball". This was followed shortly after with orders to McDonnell for the FH-1 "Phantom," to Chance Vought for the F6U "Pirate", and to North American for the FJ-1 "Fury."
None of these were completely successful. Adaptation of jet aircraft for service aboard aircraft carriers presented many difficulties: the airplanes were gas hogs, and all had tricycle landing gear, which had never been used aboard carries before. Additionally, the acceleration of the early jet engines left much to be desired, and it was not even certain a jet airplane could get off a carrier, assuming it could get aboard in the first place by any means other than a crane. There was going to be more to bringing jets to sea than merely commanding they be built.
North American's "Fury":
Three Fury prototypes were ordered January 1, 1945, followed by a production order for 100 on May 18 that was cut back to 30 following the end of the war in August. The first XFJ-1 flew November 27, 1946, and the first of the 30 production aircraft was delivered in October 1947.
The fat little fighter paid homage to its P-51 forbears in the wing shape and the nicely-tapered bubble canopy. Armed with six .50 caliber machine guns, the Fury used the Allison J-35A-2, which gave it a top speed of 547 mph at 9,000 ft - a healthy 80 mph better than the FH-1; landing speed of 121 mph was "hot" for an aircraft carrier. The low overall performance of the Fury prototypes was why North American was as happy as they were to discover the German swept wing research. This gave them reason to obtain an extra year for the development of the parallel USAAF project, the XP-86, which as a result would become the world-beating "Sabre."
The production FJ-1s served with VF-5A (later VF-51) at NAS North Island in San Diego, and were tested aboard the U.S.S. "Boxer" in March 1948. They proved just barely able to get off the deck unassisted, with the ship steaming full speed into a 20 knot wind. The airplane took nearly the entire flight deck to become airborne; jet fighters were going to need some extra oomph in the form of a catapult for takeoff, and this would change flight deck operations.
Two of the Furies set speed records, one from San Diego to San Francisco and one from San Diego to Seattle. Also, VF-5A's CO, CDR Bill Aurand, came in second in the 1948 Bendix Trophy Race with an average speed between Los Angeles and Cleveland of 436 mph.
By 1949, VF-51 had gone on to the F9F-2 Panther, and the surviving FJ-1s were turned over to the Naval Reserve at NRAB Oakland and NRAB Los Alamitos, California; NRAB Olathe, Kansas; and NRAB Dallas, Texas. They served until 1953, when the surviving airplanes were turned into instructional airframes. Two now survive in museums.
|
THE KIT |
Previous to this Czechmaster kit, modelers were limited to a 1/72 vacuform from Rareplanes - a very good example of that company's work, with good surface detail and crisp molding - and a very indifferent 1/48 vacuform from a company whose name I can no longer recall that was the embodiment of a modeler's nightmares about vacuforms.
This FJ-1 is the second early jet done by Czechmaster, the first being the Soviet Yak-15, a model I liked a lot. This FJ-1 model is a limited-run injection molded kit consisting of 29 plastic parts and a bag full of very nice, well-cast Czechmaster/Aires resin parts to take care of the cockpit and nosewheel well. Two very clear vacuformed canopies are provided.
|
CONSTRUCTION |
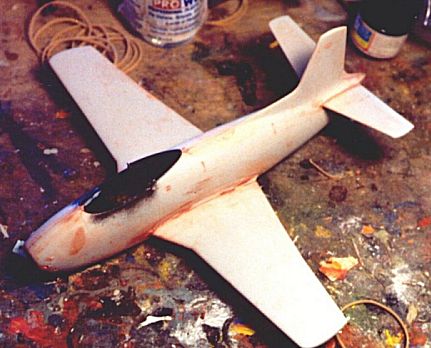
While the kit appears simple, it isn't. Both wings and horizontal stabilizers fit to the fuselage with butt joints that have no positive alignment. Additionally, the wings are not thick enough to fit directly to their butt joint. What I did was to test fit, and then install small plastic blocks inside the wing as "spreaders" to get the proper shape. I had trouble on the first of the two Furies I did as I discovered this, and ended up with a great bit of putty on it, which took off a lot of the very fine engraved surface detail when finished. With the benefit of hindsight, the wings of the second kit went on so well I only needed a bit of Gunze "Mr. Surfacer" to make an entirely smooth joint with virtually no sanding. I attached both wings and horizontal stabilizers to each fuselage half before proceeding with fuselage assembly, as I find it gives me more area to hold while positioning these parts, as I can work from inside and outside the fuselage. You must provide walls for the main gear wells, which are not boxed; I fixed this with 10-mil sheet styrene pieces. Personally, I thought problems like this went out with models made after the mid-1970s.
Assembling the fuselage begins with the engine intake and exhaust pieces. The exhaust is easy, the intake isn't. My suggestion is to cut off the intake without its base, and then block it off with a piece of sheet styrene, so one does not have the problem of making that baseplate fit to the nosewheel well.
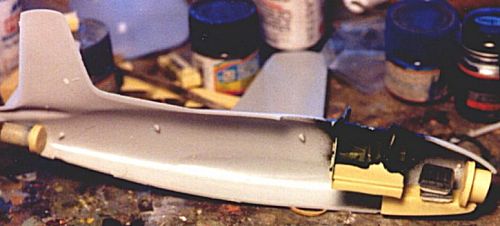
The nosewheel well is the worst of the resin parts - it's thin and breaks easily, and it's not easily fitted into the fuselage; all I can say is, cut carefully and test fit. Additionally, the instructions don't say so but you need at least 1/4 oz. of weight in the nose; without the base on the intake, the "shelf" of the nosewheel well is perfect for this, once you have fitted the cockpit into position.
The cockpit is nice cast resin. I had no trouble finding and using the throttle and control stick. On the first kit, I painted the molded-on seatbelts, which was acceptable but not great; on the second I sanded them off and used some old True Details P-E seat belts, which to me looked much better. The modeler must test-fit everything here to get a slight back-angle on the rear bulkhead/seat back. Insure that when the cockpit is in position it will fit so that the small "vanes" on the back of the headrest fit against the plastic bar of the fuselage; this backplate is also too wide, and will have to be trimmed to fit. You must also be very careful when assembling the cockpit into the fuselage to insure that it is properly aligned vertically and horizontally - it wants to tilt to the right.
Looking at the canopies, I decided to construct my Furies with the canopy closed. They look better that way, at least to me, and the canopy is large enough and clear enough to allow anyone to see the cockpit interior with no problem. Other modelers may not take this option, since you have to glue them down and putty the joint, which means sanding it down and possibly scratching the glass. I solved that worry with some scotch tape 1/32" above the join line, which let me sand lightly without fear. Additionally, if you do get a scratch on a vacuform canopy, a brushful of "Future" will solve all your problems.
I also assembled the landing gear once I had the basic airframe completed. You need to remove 5/32" from the main gear leg to get the airplane to sit properly. When assembling the main gear doors, follow the general arrangement drawing in the instructions, not the close-up drawing. I also assembled the wheels to the gear at this point, since painting the rubber black over a midnight blue surface would not cause problems.
For my VF-5A airplane, I did not use the kit-provided drop tanks. The tanks the Fury used were the standard 150-gallon variety, and I used a set I had not used with a Tamiya F4U-1D. I trimmed off the "rim" where it would meet the wing, then cut the wing to fit the shape of the tip tank; everything fit well, and a bit of putty insured smoothness. I made the tip glass by building up a new area with Micro Krystal Klear, once I had painted and finished the model. I suggest from experience that you not attach the fins to the tank until you have completed all your handling of the model during construction and decaling, as they are very fragile.
|
PAINT & DECALS |
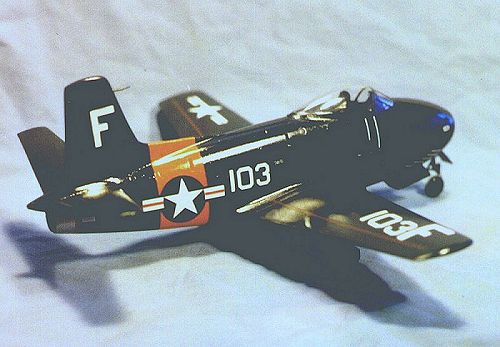
The Fury is the essence of simplicity: overall midnight blue, including landing gear, wheel wells, etc. For the Naval Reserve airplane, I shot Gunze-Sanyo H-14 Orange, then masked over to get the "reserve stripe." Both models were painted overall with Gunze-Sanyo H-55 Midnight Blue.
The kit-supplied decals are for the two record-setting Furies from VF-5A, 101-S and 115-S respectively. These decals are the only disappointment I find with the model, because they are not properly sized. All letters and numbers are the same size, which means the wing numbers are too large and the fuselage and rudder numbers and letters too small; also the wing insignia is too small. Additionally, the maintenance stencilling is heavy. I did the 101-S airplane flown by CDR Aurand for the San Diego/San Francisco run and the Bendix race, since the model was headed to the Planes of Fame Air Museum where it would go in the Record Breakers section.
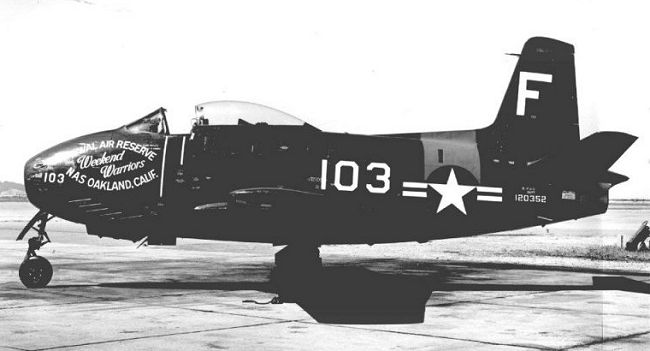
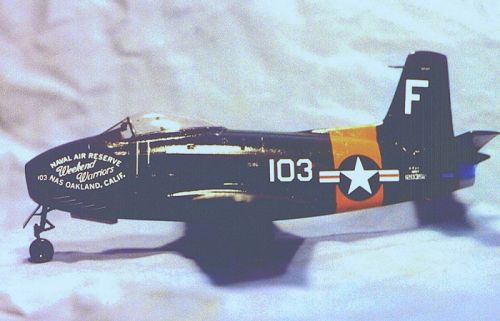
Fortunately, two months after the release of the kit, Flightline Decals came to the rescue of modelers who wanted something more interesting in the way of Fury markings. Ever since I was a kid and first saw my now-friend Bill Larkins' shots of the Furies assigned to the Oakland, California, Naval Reserve Air Base in 1950, with their big "Weekend Warriors" logo on the left side of the nose, I have wanted a Fury in these markings. Flightline does this scheme on their new set, as well as a Fury assigned to NRAB Olathe in 1952, and an XFJ-1 flying at Patuxent River in 1947.
These are excellent decals, and from the set of photo prints Bill sent me, they are the right size. There is one thing to note: all Bill's pictures were taken of the left side of the airplanes, with the logo clearly visible. Flightline has a note in their instruction that they are not sure if the logo was on both sides, and provide a second logo for the right side; however, I have been assured by the man who took the pictures that the logo was only on the left side.
Once the decals were dry and the models washed to get rid of any film, I re-shot them with Testor's Glosscote, then painted the rubber of the tires flat black. I finished by unmasking the canopy.
|
CONCLUSIONS |
I find first-generation jets interesting. The technology was new and they didn't know what worked, yet, so they tried all kinds of configurations. Unlike the generic Sukhoi F-18s and Lockheed Su-27s and Mikoyan F-16s and McDonnell MiG-29s, the first and second generation jets have personalities. They're as interesting and strange as my other passion, airplanes of the First World War. If you're interested in the early jets, the Czechmaster FJ-1 is a "must have."
Get your Czechmaster FJ-1 from Squadron Mail Order <www.squadron.com>
You can obtain these decals from Flightline at P.O. Box 883, Riverside CA 92502. e-mail <Apollodecl@aol.com>