|
KIT: |
Classic Airframes 1/48 Meteor T.7 |
|
KIT # |
? |
|
PRICE: |
$59.95 MSRP |
|
DECALS: |
Two options |
|
REVIEWER: |
Tom Cleaver |
|
NOTES: |
|
HISTORY |
After three years of operating the Meteor, it was becoming obvious that there was a need for a trainer, so that new jet pilots could have the opportunity of learning more about their mounts before being turned loose on their own. This had been made very clear to Gloster after the crash of the F. Mk.4 demonstrator, G-AIDC, with a Belgian first-timer at the controls, the company decided that never again would they allow a Meteor to be flown without the supervision of their own test pilots.
The sale of 100 Mk. 4s to Argentina in 1947 brought 12 Argentine pilots to England for flight training. To instruct the students in the art of taxying, the canopy was removed from an F. Mk.4, so that the Gloster instructor could sit astride the fuselage behind the cockpit yelling instructions and signaling by hand until the students were proficient enough for a solo.
 As a result of
this, Gloster decided to privately develop a trainer based on the Mk.4
airframe, whose main change was a 30-inch extension to the forward
fuselage to allow a second fully-equipped cockpit, and a heavily-framed
canopy over both cockpits which opened to the right on the ground.
Neither the prototype nor any operational Meteor trainers would be
equipped with ejection seats.
As a result of
this, Gloster decided to privately develop a trainer based on the Mk.4
airframe, whose main change was a 30-inch extension to the forward
fuselage to allow a second fully-equipped cockpit, and a heavily-framed
canopy over both cockpits which opened to the right on the ground.
Neither the prototype nor any operational Meteor trainers would be
equipped with ejection seats.
The Gloster G.43 T.7 Trainer made its first flight on March 19, 1948. The performance was only slightly less than that of the single-seater. Official interest in the private-venture trainer was immediate, with the Air Ministry issuing Specification T.1/47 to cover an RAF version. The prototype, registered G-AKPK, was painted bright scarlet with cream letters, and toured several countries before eventually being sold to the Royal Netherlands Air Force in November 1948.
The two cockpits of the T.7 eliminated the need for nose ballast, replacing that with an extra 200-gallon fuel tank, while there was also provision for a 180-gallon ventral tank and two 200-gallon underwing tanks. The first production T.7, VW410, flew on October 26, 1948, while the last, XF279, was delivered July 27, 1954; of the 500 T.7s produced, many of which were rebuilt from F.4 airframes for the RAF. While the prototype had been powered by the Derwent 5, production aircraft were powered by the Derwent 8. While both the F.4 and F.8 had aileron trim tabs that extended beyond the trailing edge, this was replaced by a trim tab which extended along the length of the aileron, without extending beyond the trailing edge.
In service,
the T.7 equipped several training squadrons; additionally, every
operational Meteor squadron included at least one T.7 and generally two,
which were provided for continuation training and such things as IFR
proficiency reviews, target towing and liaison. The type was so popular
with pilots that its use was not limited to squadrons which operated
Meteors, with several Vampire and Venom-equipped units carrying a T.7 on
the books, and Meteor trainers formed the station flight of virtually
every RAF base throughout the 1950s and early 1960s. With the r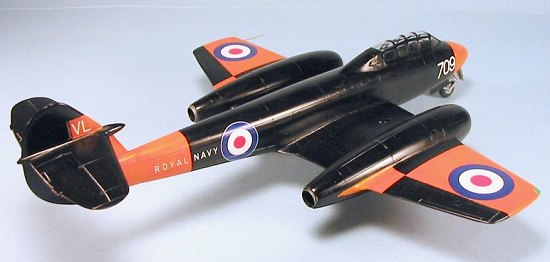 eturn of
colorful squadron markings in 1951, T.7s operated by first-line squadrons
often had their yellow trainer stripes removed, and were repainted in the
same manner as the operational aircraft; T.7s of 74 Squadron RAF and 607
Squadron RAuxAF even received camouflage schemes. The Fleet Air Arm
adopted the Meteor T.7 as its standard jet trainer; the type also was
used for IFR proficiency and target towing, and used the airplane to
equip station flights until the last - WS103 - was retired from service
from Yeovilton in January 1967.
eturn of
colorful squadron markings in 1951, T.7s operated by first-line squadrons
often had their yellow trainer stripes removed, and were repainted in the
same manner as the operational aircraft; T.7s of 74 Squadron RAF and 607
Squadron RAuxAF even received camouflage schemes. The Fleet Air Arm
adopted the Meteor T.7 as its standard jet trainer; the type also was
used for IFR proficiency and target towing, and used the airplane to
equip station flights until the last - WS103 - was retired from service
from Yeovilton in January 1967.
Following final delivery to the RAF, the T.7 remained in production to fill orders from Australia, Belgium, France, Denmark, the Netherlands, Egypt, Brazil, Israel and Syria. Two Israeli T.7s were re-equipped with the camera nose and became the only T.7s to see combat, flying in the photo-reconnaissance role in Operation Kadesh, Israel’s participation in the 1956 Suez War. The 45 T.7s operated by the Royal Netherlands Air Force made the Dutch the second-largest user of the type. In 1955, Flight Refuelling Ltd. modified the first of three T.7s that would be operated by Svenska Flygjaenst as target tugs for the Swedish air Force. The last flight of a Brazilian T.7 came on October 7, 1971, with the last Israeli T.7 retiring from service at about the same time, two having served with the Vautour-equipped squadrons of the IDF/AF for proficiency training since the introduction of that type into Israeli service.
 T.7 WA634 was
utilized by Martin-Baker in the development of the Martin-Baker Mk.4
ejection seat, which was the first seat to have zero-zero capabilities.
The first demonstration of this seat was performed by Squadron Leader
John Fifield at Chalgrove Aerodrome on September 3, 1955. At a speed of
120 mph, Fifield fired the seat and was ejected to an altitude of 70
feet, his parachute deploying at 30 feet for a successful landing.
T.7 WA634 was
utilized by Martin-Baker in the development of the Martin-Baker Mk.4
ejection seat, which was the first seat to have zero-zero capabilities.
The first demonstration of this seat was performed by Squadron Leader
John Fifield at Chalgrove Aerodrome on September 3, 1955. At a speed of
120 mph, Fifield fired the seat and was ejected to an altitude of 70
feet, his parachute deploying at 30 feet for a successful landing.
Because the T.7 could carry an observer, the aircraft was used in numerous engineering development programs until the mid-1970s, including development of the remote-control system for drones and the firing trials of the Firestreak AAM.
|
THE KIT |
 The only new
items in the kit as compared to the recent F. Mk.4 kit is the different
fuselage, with two very complete resin cockpits, and the distinctive
heavy-framed canopy. This canopy is injection molded, and while it is
very clear there is enough optical distortion in the plastic that the
modeler who wishes to display the detailed cockpit can only do so with
the canopy in the open position, which hinges it over to the right.
The only new
items in the kit as compared to the recent F. Mk.4 kit is the different
fuselage, with two very complete resin cockpits, and the distinctive
heavy-framed canopy. This canopy is injection molded, and while it is
very clear there is enough optical distortion in the plastic that the
modeler who wishes to display the detailed cockpit can only do so with
the canopy in the open position, which hinges it over to the right.
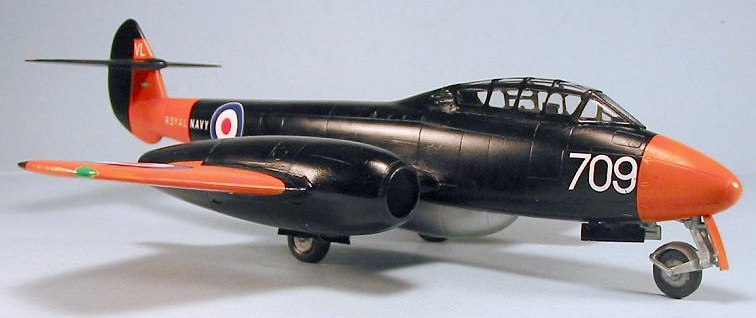
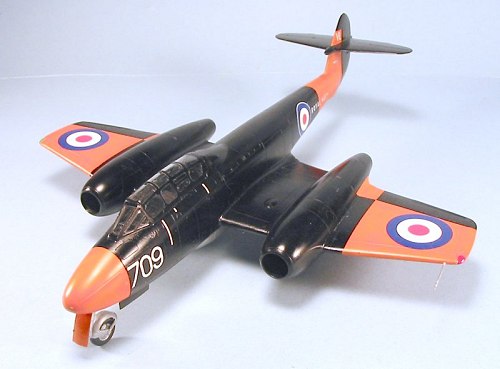
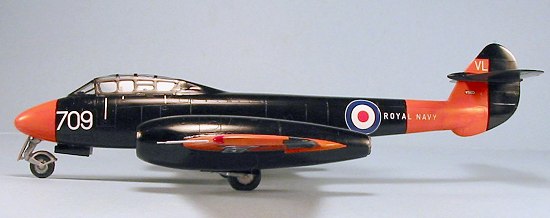
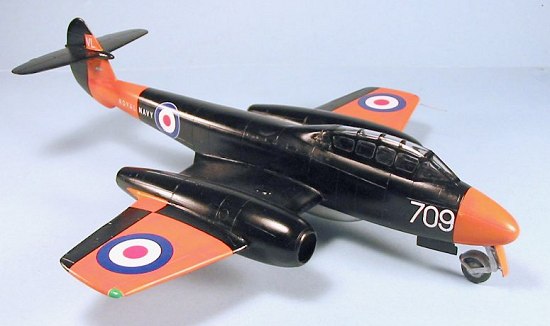
Decals include a squadron hack for 74 Squadron in camouflage from the mid-1950s, and a very colorful Fleet Air Arm station hack based at Yeovilton in the late 1960s, in overall satin black with large dayglo orange panels on the wings, nose and rear fuselage, this being WS103, the last T.7 operated by the FAA. It should be noted that the XtraDecals sheet that is made for the Meteor F. Mk.4 also includes several T.7s, including some very colorful target tugs.
|
CONSTRUCTION |
Overall, the production quality of this kit is the best yet from Classic Airframes. That said, it is still a limited‑run kit, and it is essential to test fit every part before committing to gluing the part in position.
Having built
four previous Meteors, construction began by cutting all the parts off
the trees and cleaning up flash, smoothing the areas around the sprue
gates, etc. It is particularly important to be certain you have trimmed
off all the flash from the lower wing center section part, otherwise it
will not fit to the fuselage; I mention this because the flash is easy to
miss along the trailing edge, where it is present just sufficient to
completely bugger‑up the fit along the trailing edge when it comes time
to mate the fuselage sub-assembly with that of the wing. It is also
essential to cut out all the mold‑release pins inside the parts in order
for things to fit right.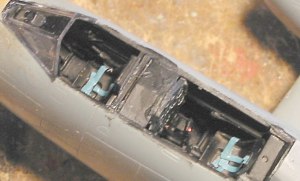
The first thing I did was assemble the fuselage halves, and attached the horizontal stabilizers, then set that aside to dry.
I then proceeded with the cockpits. They come as separate cockpits and were fitted as such. Each cockpit was painted flat black, and was dry-brushed with dark grey and aluminum paint to bring up sufficient highlights to be able to see the detail once installed in the fuselage, and assembled completely. Fitting the instrument panel is difficult, and requires some sanding‑down of the lower section of the panel where it attaches to the wheel well in order for it to fit to the rest of the cockpit.
I then slid
the front cockpit into position, having test-fitted it several times and
sanding down various areas to be sure it would slide as far forward in
the fuselage as it needed to. After gluing it in position with CA glue,
I flattened as many lead fish weights as I could stuff in beneath the
cockpit floor and glued them in position. I then slid the second cockpit
into position and glued it, following that with more fishweights
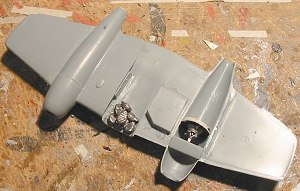 beneath
the cockpit floor and as many as I could glue against the rear bulkhead.
Given that about 60 percent of the length of this model comes behind the
centerline of the main wheels, it is essential to get in as much weight
as far forward as possible to insure nose-sitting.
beneath
the cockpit floor and as many as I could glue against the rear bulkhead.
Given that about 60 percent of the length of this model comes behind the
centerline of the main wheels, it is essential to get in as much weight
as far forward as possible to insure nose-sitting.
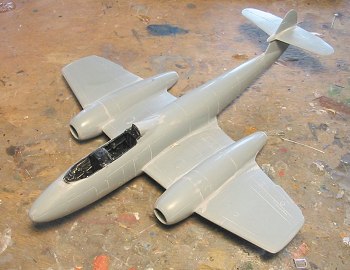
When I turned to assembly of the wings, I decided to try a suggestion made at the HyperScale discussion board, and glued the engine intakes to their respective wing parts, assuring they fit properly to the rest of the nacelles, instead of assembling them together and attaching them separately after assembling the inner wings. The result was that I only had to use a very little bit of Mr. Surfacer 500 on the intake/nacelle joint, and only had to deal with poor fit along the upper/lower joint, where there are no panel lines to sand off getting rid of the seam.
I also assembled the upper and lower outer wing parts to their respective upper and lower inner wing parts, thus getting the joint where the outer wing joins the inner as smooth as possible, and thus reducing the amount of Mr. Surfacer used, as well as time spent sanding down and re-scribing detail.
 Overall, I now
recommend this method of assembly for any of the Classic Airframes Meteor
kits, and wish I could remember the name of the guy who posted the idea,
so I could thank him publicly for having such a good solution to a
difficult modeling problem.
Overall, I now
recommend this method of assembly for any of the Classic Airframes Meteor
kits, and wish I could remember the name of the guy who posted the idea,
so I could thank him publicly for having such a good solution to a
difficult modeling problem.
Once upper and lower wing sub-assemblies were complete, I test-fitted the lower wing to the fuselage so that I could do a balance test at the landing gear position. I ended up adding in some more fishweights to the fuselage, being sure to get them in ahead of the line where the main wheels would touch the ground, and determined the model would nose sit.
That accomplished, I glued the lower wing sub-assembly to the fuselage, then attached the upper wing sub-assemblies. I only had to worry about filling gaps along the sides of the forward engine nacelles, and narrow gaps along the upper wing to fuselage joint.
With the model rescribed where necessary and polished out, it was time to move to the paint shop.
|
COLORS AND MARKINGS |
Painting:
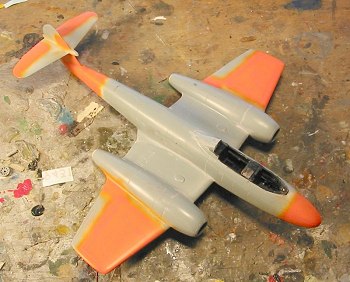 I knew that painting the model with fluorescent orange was going to be
difficult. It turned out to be very difficult indeed and I came very
close to deciding on an alternative scheme several times.
I knew that painting the model with fluorescent orange was going to be
difficult. It turned out to be very difficult indeed and I came very
close to deciding on an alternative scheme several times.
I first pre-shaded the model along all panel lines, then painted the areas where the orange would go with flat white. The box art shows the airplane with orange elevators, but a profile by Richard Caruana in a recent issue of SAMI has the airplane with black elevators; as to which scheme is absolutely accurate I don’t know, but I decided that the Caruana profile looked better and went with that.
I first used
Gunze-Sangyo Fluorescent Orange. This went on like crap, which is common
with any of these fluorescent paints - and was difficult in 1:1 I am
told! This resulted in my stripping off the first paint job, re-doing
the pre-shading, and re-applying the flat white. I decided that inasmuch
as fluorescent orange in real life weathers out quickly and is not so
fluorescent after a few months of operation, that this was the kind of
finish I would have. I mixed in some of the Fluorescent Orange with some
regular Gunze-Sangyo Orange, which stabilized things. I applied that,
then added in some white and went over the areas to lighten them and
simulate wear. When all that was dry, I masked off the orange areas and
painted th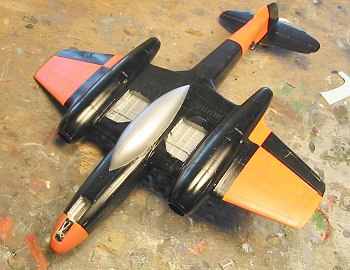 e belly tank, wheel wells and inside of the gear doors with SNJ
Aluminum, which was also used on the landing gear. When that was dry, I
masked the tank and then proceeded to paint the rest of the model with
Tamiya XF-18 Semi-Gloss Black. When that was done, I added in some
Tamiya “NATO Black” and went over various panels to get rid of the
monochromatic look - this final bit may not be so visible in photos, but
can be seen under good light in person.
e belly tank, wheel wells and inside of the gear doors with SNJ
Aluminum, which was also used on the landing gear. When that was dry, I
masked the tank and then proceeded to paint the rest of the model with
Tamiya XF-18 Semi-Gloss Black. When that was done, I added in some
Tamiya “NATO Black” and went over various panels to get rid of the
monochromatic look - this final bit may not be so visible in photos, but
can be seen under good light in person.
When all was dry, I unmasked the aluminum areas, and gave the model a coat of Future.
Decals:
The kit decals are printed by MicroScale and went down without difficulty. When they were dry, I washed the model to get rid of any dried setting solution residue, and gave the model another coat of Future.
|
FINAL CONSTRUCTION |
I gave the model an overall coat of a mixture of Dullcote and Glosscote, 50-50, to give a satin sheen. I unmasked the cockpit, and then attached the landing gear and gear doors.
|
CONCLUSIONS |
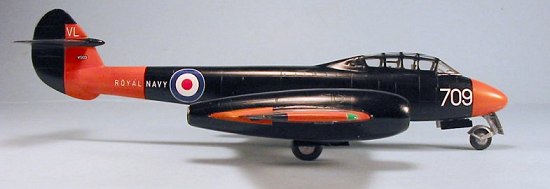 I call this
“The Halloween Special,” and it is the most colorful model in my
collection outside of my US Navy 1930s airplanes. As with all the other
Classic Airframes Meteors, it is not an easy kit to build, but the result
looks really good. With all the colorful schemes in the RAF and
interesting camouflage schemes for such services as the Israeli Air
Force, I could see myself doing another of these if I run across it. If
you like early jets and have some limited-run kits under your belt, this
can be a very nice addition to your collection.
I call this
“The Halloween Special,” and it is the most colorful model in my
collection outside of my US Navy 1930s airplanes. As with all the other
Classic Airframes Meteors, it is not an easy kit to build, but the result
looks really good. With all the colorful schemes in the RAF and
interesting camouflage schemes for such services as the Israeli Air
Force, I could see myself doing another of these if I run across it. If
you like early jets and have some limited-run kits under your belt, this
can be a very nice addition to your collection.
Highly recommended!
March 2004
Review Kit courtesy of Classic Airframes
If you would like your product reviewed fairly and quickly by a site that has nearly 250,000 visitors a month, please contact me or see other details in the Note to Contributors.