Aeroclub 1/48 Meteor NF.14
|
KIT # |
|
|
PRICE: |
$55.00 |
|
DECALS: |
One aircraft |
|
REVIEW : |
|
|
NOTES: |
Vacuform multimedia kit |
|
HISTORY |
The Meteor was Britain's first operational jet fighter. In fact, the series was underpowered at the outset, and the version that should have seen combat in World War II, the F.4, did not arrive in the squadrons until 1948. The most widely-produced single-seater, the F.8, was obsolescent the day the first one rolled out of the factory, and was outperformed on almost all counts by the MiG-15; only the skill of its pilots kept 77 Squadron RAAF from being wiped out in the air-to-air combats they engaged in during the Korean War.
Be that as it may, Britain had been bled white by the war, and the Meteor was all there was, with the limited funds available for aeronautical development during the post-war period; the RAF was fortunate that the design literally had "stretch" in it, so that jet-powered all weather fighters could be brought into service to face the threat of possible Russian bomber attacks. The Meteors N.F.11, 12, 13 and 14 provided Great Britain with a credible air defence against Russian Tu-4 B-29 copies and Il-28 light jet bombers through the mid to late 1950s.
|
THE KIT |
 Say the word "vacuform," and the majority of modelers turn and run
screaming from the room, an attitude I have never been able to understand even
back in the 1970s when the complaints that the kits were nothing more than lumps
on a sheet of plastic actually bore some validity. Even then, anyone with good
hand-eye coordination and a bit of patience could create something that looked
as much like its 1:1 forbear as anything being produced by most of the
injection-molded manufacturers. I suppose my blasé attitude toward vacuforms may
come from the fact that I started my modeling career building Strombecker solid
wood kits, Monogram balsa-and-plastic Speedee-Bilts, and carving what I couldn't
find in a kit from a block of balsa. I'm not saying I truly enjoyed the days of
trudging five miles uphill each way in a driving blizzard; I like Tamigawas as
much as anyone. But there is fun in the build and a feeling of accomplishment
once a vacuform model is sitting on the shelf that one does not get from a
"shake 'n' bake," or even a limited-run injection kit.
Say the word "vacuform," and the majority of modelers turn and run
screaming from the room, an attitude I have never been able to understand even
back in the 1970s when the complaints that the kits were nothing more than lumps
on a sheet of plastic actually bore some validity. Even then, anyone with good
hand-eye coordination and a bit of patience could create something that looked
as much like its 1:1 forbear as anything being produced by most of the
injection-molded manufacturers. I suppose my blasé attitude toward vacuforms may
come from the fact that I started my modeling career building Strombecker solid
wood kits, Monogram balsa-and-plastic Speedee-Bilts, and carving what I couldn't
find in a kit from a block of balsa. I'm not saying I truly enjoyed the days of
trudging five miles uphill each way in a driving blizzard; I like Tamigawas as
much as anyone. But there is fun in the build and a feeling of accomplishment
once a vacuform model is sitting on the shelf that one does not get from a
"shake 'n' bake," or even a limited-run injection kit.
Nowadays, the complaints about vacuforms are even more mindlessly inaccurate than they were before. Since the mid-1980s, Aeroclub in England has released a string of vacuform kits that - built right - are as good as anything that came from an injection-molded kit. The series of RAF fighters from the 1920s and 1930s has yet to find any competition from anyone. The only reason the Hunter and Lightning kits have been "superseded" is due to the reluctance of modelers to attempt vacuforms kits, even though the injection-molded Hunter has severe accuracy problems and does not provide the two-seater, and the injection-molded Lightning series does not even come close to representing all the sub-types as the Aeroclub series did, let alone that both series from Aeroclub are more accurate. Aeroclub's Meteor series includes all the operational types, and presents aircraft like the F.4, F.8, the trainer and the night fighters that are unlikely ever to see release from Tamigawa.
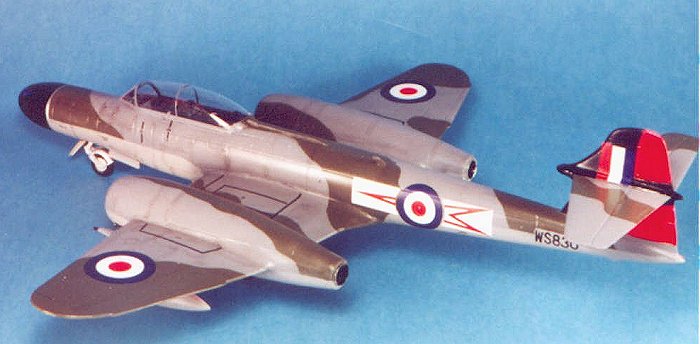
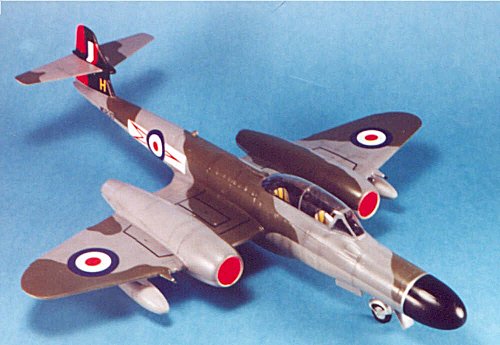
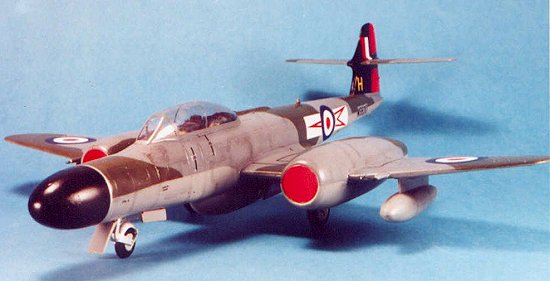
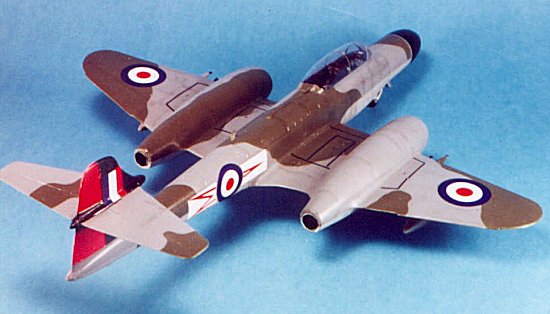
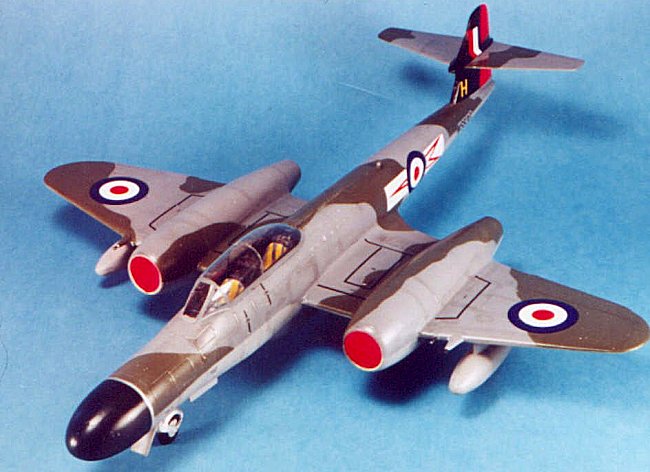
The Meteor N.F.14 is a "multi-media" kit, with vacuformed fuselage and wings, limited-run injection molded horizontal stablilizer, resin cockpit tub and jet intakes, and white metal detail parts for landing gear and cockpit, with two very clear vacuformed canopies. The kit provides decals for two aircraft: one from 85 Squadron based in England in 1955, and one from 60 Squadron - the last equipped with the type - in Singapore in 1960. John Adams of Aeroclub went and measured a surviving N.F.14 and put to rest the myth that the airplane is longer than the other nightfighters; thus, this kit is the only completely accurate one of this airplane (unlike the Matchbox 1/72 kit).
|
CONSTRUCTION |
 Construction begins with taking the fuselage, wings, belly tank and wing
tanks off the backing sheet. I draw around the part with a Number 2 pencil, then
score around it with an X-acto knife. After the parts have been popped free of
the backing, the only real "hard part" of building a vacuform begins:
sanding the parts down. I use a sanding block with a medium-grit sheet of wet
'r' dry, and sand the part down until the pencil marking disappears. The result
is wings with a thin trailing edge and smooth join lines elsewhere. After
cutting out the area of the cockpit and nose gear on the fuselage, I apply a
thin sheet of plastic from Evergreen along the edge of one side of the fuselage,
to aid alignment of the parts and to provide more mating surface for a stronger
bond.
Construction begins with taking the fuselage, wings, belly tank and wing
tanks off the backing sheet. I draw around the part with a Number 2 pencil, then
score around it with an X-acto knife. After the parts have been popped free of
the backing, the only real "hard part" of building a vacuform begins:
sanding the parts down. I use a sanding block with a medium-grit sheet of wet
'r' dry, and sand the part down until the pencil marking disappears. The result
is wings with a thin trailing edge and smooth join lines elsewhere. After
cutting out the area of the cockpit and nose gear on the fuselage, I apply a
thin sheet of plastic from Evergreen along the edge of one side of the fuselage,
to aid alignment of the parts and to provide more mating surface for a stronger
bond.
After the wing and fuselage are glued together, it's time to turn to the cockpit. I painted the tub black, as well as all the detail parts other than the seats, and dry brushed Aluminum metalizer over it to pop out detail. I used instrument decals from a ProModeler sheet for the pilot's and observer's panels. The seats were painted with yellow pads and blue seat belts. Once the cockpit was assembled with the upper part of the nose gear attached, I dropped one quarter ounce of lead weight (later found to be un-needed) in the nose then inserted the cockpit through the wing cutout and glued it in position with cyanoacrylate.
I then glued the wing to the fuselage, and attached the resin intakes on the wing. The belly tank and wing tanks were blued in position as were the horizontal stabilizers, and then all joints were puttied. When this had set up overnight, the joints were sanded smooth with a sanding stick, then covered with Mr. Surfacer 500, and hand-sanded smooth when that was dry. I then airbrushed the whole model with some light grey paint, puttied and filled the seams that showed up, sanded them smooth and then shot a final primer coat. All was well.
|
PAINT & DECALS |
 Painting:
After pre-shading the model along the panel lines with black paint, I painted the model the post-war British camouflage of sea grey medium (a different shade from the wartime paint), with a disruptive pattern of dark sea grey and dark green (more an olive drab shade than the WW2 paint), using thread under drafting tape to get hard edges to the camouflage without paint buildup. Once this had dried and the masking was removed, I shot the model with two coats of Future and set it aside overnight.
Decals:
The Fantasy Factory decals went down with no problems under a light brushing of Micro-Sol. When they set up, I washed the model, dried it, shot another coat of Future to seal it. When that was dry, I gave it a light coat of Flat Future to get a satin finish which looked more realistic than the very shiny finish that had existed.
Final Assembly:
The white metal landing gear was glued in position with cyanoacrylate, and the canopy was unmasked. The N.F.14 had a clear blown canopy, which I had attached in the closed position. There is no problem seeing all the cockpit detail through this large clear plastic bubble.
|
CONCLUSIONS |
The night fighting Meteor, last of the line, looks very good sitting next to my Tamiya Mk.I and Aeroclub F.8. I like the first two generations of jets because they didn't yet know the rules of the game, so there were a multitude of configurations, and the airplanes weren't indistinguishable - unlike today's Sukhoi Rafales and Lockheed MiG-29s.
Copyright ModelingMadness.com. All rights reserved. No reproduction in part or in whole without express permission from the editor.
If you would like your product reviewed fairly and quickly by a site that has over 1,500 visits a day, pleasecontact the editor or see other details in the Note to Contributors.
Back to Reviews Page 2024