Hasegawa 1/72 F-102A Delta Dagger
|
KIT # |
00129 |
|
PRICE: |
Currently (2004) OOP |
|
DECALS: |
Two options: 4 and 40 FIS |
|
REVIEWER: |
Les Dorr Jr |
|
NOTES: |
Superscale 72-107 used |
|
HISTORY |
The main mission of the F-102A "Delta Dagger" was to seek out and destroy enemy aircraft. According to the U.S. Air Force Museum website, it was the world's first supersonic all-weather jet interceptor and the USAF's first operational delta-wing aircraft. At the peak of the type's deployment in the late 1950's, F-102s equipped more than 25 Air Defense Command (ADC) squadrons.
Dr. Alexander Lippisch pioneered the idea of delta-winged aircraft in Nazi Germany during the 1930s. He was perhaps best known for helping develop the tailless Me-163 Komet rocket interceptor, but also had designed a pure delta aircraft, the DM-1, which might well evolved into a Luftwaffe fighter had the war continued.
Building on Lippisch's work, the United States approved construction of a delta-wing airplane, designated the Convair Model 7002, in 1946. First flown on September 18, 1948 at Edwards AFB, California, it was supposed to serve as a flying prototype for the XF-92 fighter then under development...but the U.S. Air Force ultimately axed the XF-92 program. The prototype flew on as the XF-92A, first for the Air Force and later for the National Advisory Committee for Aeronautics (NACA).
 The XF-92A flight
tests showed that the stability and control characteristics of the
delta-wing concept were practical. The Air
Force still wanted a supersonic delta-winged fighter, and Convair won the
competition for what was now called the "F-102." But subsequent wind
tunnel tests suggested that Convair engineers had significantly
underestimated the amount of drag the airframe would produce, and
unfortunately, flights of the prototype YF-102 beginning in October 1953
verified the test results. The plane experienced severe buffeting at Mach
0.9. More seriously, the aircraft couldn't exceed the speed of sound in
level flight.
The XF-92A flight
tests showed that the stability and control characteristics of the
delta-wing concept were practical. The Air
Force still wanted a supersonic delta-winged fighter, and Convair won the
competition for what was now called the "F-102." But subsequent wind
tunnel tests suggested that Convair engineers had significantly
underestimated the amount of drag the airframe would produce, and
unfortunately, flights of the prototype YF-102 beginning in October 1953
verified the test results. The plane experienced severe buffeting at Mach
0.9. More seriously, the aircraft couldn't exceed the speed of sound in
level flight.
Convair embarked on a major redesign program and, using the area rule principle developed by noted NACA aerodynamicist Dick Whitcomb, produced a revamped prototype in only 117 days. With its pinched or "Coke bottle" waist, the revised design corrected the problems and allowed the Dagger to have a long, successful service life as a front-line USAF interceptor.
The F-102 carried sophisticated radar to hunt for enemy aircraft and close in for attack. The Dagger carried no guns; when the plane was within range, its electronic fire control system automatically let loose AIM-9D Falcon air-to-air guided missiles or a salvo of 2.75-inch folding fin unguided rockets.
No F-102 pilot ever fired a shot in anger during the plane's ADC service. F-102s were stationed in South Vietnam and Thailand during the Vietnam War, but even there, the only actual combat the Dagger saw was flying close-air-support missions -- a role for which the plane was never intended!
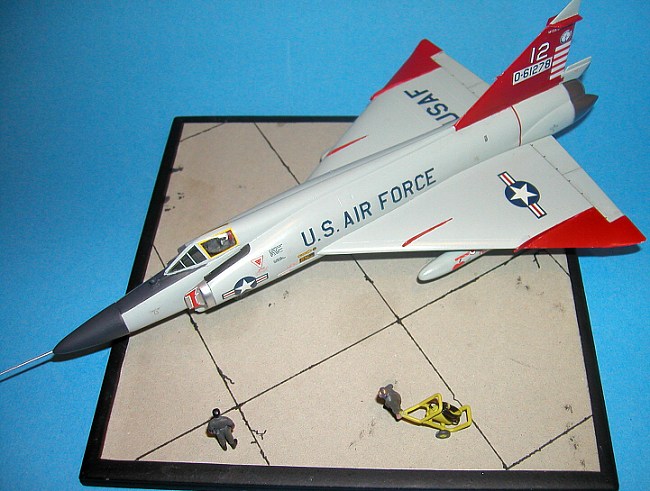
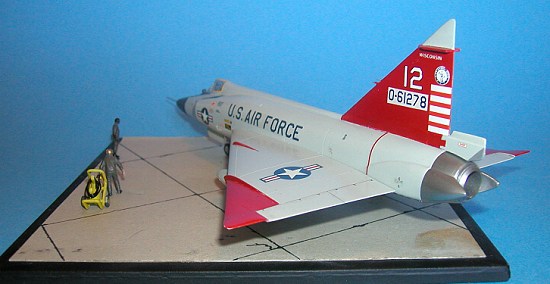
When active Air Force units acquired more advanced aircraft, the F-102A eventually found its way into many Air National Guard (ANG) squadrons across the United States. The subject of this review flew with the 176th FIS, based at Truax Field near Madison, Wisconsin. The squadron operated F-102As from 1966 to 1974, winning the Air Force's annual "William Tell" air-to-air weapons competition in 1972.
|
THE KIT |
Hasegawa's F-102A is typical of 1/72 kits released shortly before fine detail and recessed panel lines came into vogue. Control surfaces are recessed, but all panels and panel lines are raised. Tiny rivets flank most of the panel lines. Sanding obliterates many of these rivets, and in my opinion, they would be extremely difficult to reproduce after working the fuselage and wing seams.
The kit has a couple of engineering quirks that make assembly somewhat challenging. The fuselage is split into left and right halves. Most of the vertical tail is molded with the right fuselage, but an insert is molded to the left. Fit of the tail pieces is not very good, producing a substantial seam on the left side of the fin much wider than the raised detail on the other side.
The left and
right top wing pieces attach to a single bottom part. To capture the
wings' downward camber, Hasegawa molded the entire leading edge and outer
wing panels integral with the upper wing pieces. Much like the vertical
tail, this produces a large seam on the bottom that is difficult to fil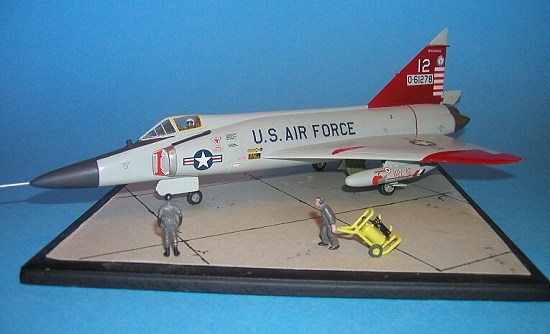 l
without destroying the raised detail on the lower wings. The wings are
the "Case XX" version with drooped wingtips, so you may want to consult
references for the specific aircraft you're building. (Editor's Note:
Case XX wings start with 56-1317)
l
without destroying the raised detail on the lower wings. The wings are
the "Case XX" version with drooped wingtips, so you may want to consult
references for the specific aircraft you're building. (Editor's Note:
Case XX wings start with 56-1317)
The main and nose gears are simplified, and the gear wells are devoid of detail. Conversely, the interiors of the gear doors have recessed detail, and a separate landing light mounts to the nose gear door. The missile bay is designed to be displayed with the doors open and missiles deployed on realistically complex rails. The missiles themselves, however, are pretty crude and only vaguely resemble the Falcons that the F-102 carried. It is possible to build the kit with the doors closed, but I can tell you from (sad) past experience that it's very labor-intensive. If you want to go this route, I recommend using the Aeroclub closed missile bay insert, as I did for this review. I got mine from Roll Models for $6.50 USD.
The cockpit is sparse. The kit ejection seat barely resembles the F-102's Weber seat. The cockpit tub consoles have lumps that I guess are supposed to be throttle quadrants…except they're on both sides, and way too far back. There is no other raised detail. The featureless instrument panel is separate. Decals are provided for both the panel and consoles. The one-piece canopy is acceptably clear, but Hasegawa molded the piece only from the glass forward; to display it open, you'll have to cut out part of the fuselage spine and glue it to the canopy. The radar nose cone is separate, as are the front parts of the intakes.
This issue of the F-102A has decals for a couple of colorful aircraft based at Yokota AB (40th FIS) and Misawa AB (4th FIS) in Japan during the 1960s. I've always liked the "Weekend Warrior" concept, however, so I chose to build a Wisconsin ANG bird. SuperScale sheet 72-107 provides markings for an aircraft in the William Tell competition, as well as for planes from the California ANG and the regular USAF 317th FIS. I couldn't find any references on this specific bird to determine if it had the "Case XX" wings.
|
CONSTRUCTION |
I tackled the
cockpit first. I'm satisfied with decals for instrument panels and
consoles in 1/72, and since I planned to install a closed canopy, there
wasn't much detailing to do. I did cut away those "throttle" bumps,
replacing the left-hand one with a small piece of half-round plastic rod
in a more accurate location. I also added a control stick made from .025
plastic rod. I then painted the cockpit tub and instrument
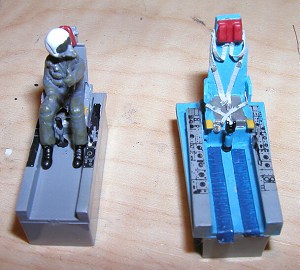 panel dark gull gray and
applied the decals. I assembled, painted and installed a white metal
Aeroclub ejection seat in place of the ugly kit part. (All this looks
very nice and proper, but the cockpit details are virtually invisible
once the canopy is closed.) I planned to depict my Dagger ready to roll
out on a mission, so I painted and installed a pilot from Hasegawa's
pilot and ground crew set giving a thumbs-up. I wrapped up the interior
by supergluing the competed tub into the left fuselage half.
panel dark gull gray and
applied the decals. I assembled, painted and installed a white metal
Aeroclub ejection seat in place of the ugly kit part. (All this looks
very nice and proper, but the cockpit details are virtually invisible
once the canopy is closed.) I planned to depict my Dagger ready to roll
out on a mission, so I painted and installed a pilot from Hasegawa's
pilot and ground crew set giving a thumbs-up. I wrapped up the interior
by supergluing the competed tub into the left fuselage half.
Next, I mated the fuselage halves, trying to get the best possible fit at the vertical tail insert to minimize filling and sanding. Even with that effort, the joints were still very noticeable and required a couple shots of gap-filling CA glue to fix. I then attached the left and right intakes, which lined up pretty well. I also installed the missile bay floor, but used the Aeroclub closed bay insert in place of the open bay doors, rails and missiles. The fit of the aftermarket piece with the fuselage was OK, but there was a significant gap at the rear when I test-fitted the bottom wing part. I shimmed the gap with plastic sheet and cut and sanded it to shape.
I thought about trying to preserve the rest of the raised detail on the fuselage, wings and tail fin, but ultimately decided I couldn't effectively recreate the myriad tiny rivets that ran along the panel lines. I sanded the whole airframe smooth with progressively finer grades of wet-n-dry sandpaper for later rescribing. The next step was gluing the wing pieces together, then filling and sanding the substantial seams along part of the bottom leading edge and outer wing.
With the major
airframe parts assembled, it was time for one of my least-favorite
chores: rescribing. My philosophy is not to recreate every single panel
and panel line, but to make sure that those I do scribe in are
accurate. I found it interesting that many of the real F-102s I examined
(well, photos, anyway) exhibit few noticeable panel lines, so you could
even get away with none at all!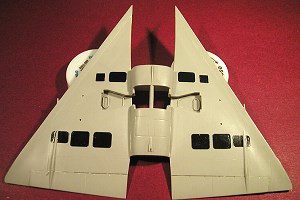
To reproduce the panel lines I used my trusty ol' metal scriber guided by thin strips of label tape or, for tight curves, doubled-up strips of black electrical tape. Rather than trying to rescribe the individual panels that dot the vertical fin and wing underside, I tried a technique new to me. Using an old template designed for home plan drawings, I carefully cut out pieces of Bare-Metal Foil and burnished them down on the appropriate locations. My theory, at least, was that subsequent coats of primer and color would cover them and leave just a slightly raised surface. (It didn't work exactly as planned, as explained in the Camouflage and Markings section.)
Next, I glued the wing assembly to the fuselage with liquid cement. Oddly, the port wing fit snugly, but there was a slight gap at the starboard joint that I filled with multiple applications of white glue. After dipping the canopy in Future, I attached it with a small application of CA glue, then filled and delicately sanded the seam at the canopy/fuselage joint.
I decided to leave off the landing gear parts and doors, the nose cone and the exhaust fairing until later to facilitate painting.
|
COLORS & MARKINGS |
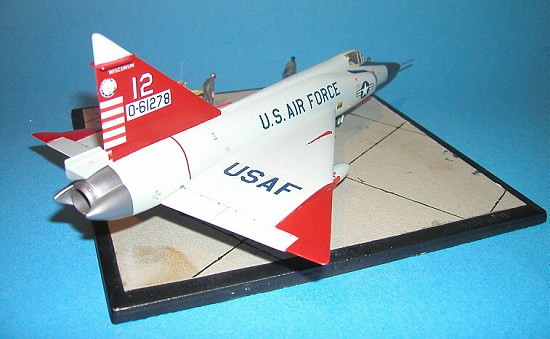
Most ANG F-102s served in ADC (Air Defense Command) Gray (FS16273), and the 176th FIS plane was no exception. The Wisconsin bird added a bit more color with a red tail and wingtips.
First, I sprayed the entire model with a primer coat of flat white from a discount chain spray can. There were only a couple places where I had to fix imperfections or deepen panel lines.
I masked the vertical tail and wingtips using a combination of electrical and masking tape prior to airbrushing with Testors Model Master (MM) Insignia Red. But before painting, I realized my technique using the foil panels had a glaring flaw: The adhesive on the tape was a lot stronger than that on the foil...so my carefully crafted foil panels would lift up with the tape! I shifted to an impromptu Plan B, removing the foil panels and letting the medium gray of the kit plastic beneath the paint create the impression of a proper access panel.
This approach had
mixed success. It took many more airbrushed coats of red than I
anticipated to cover the bare plastic, and the "panels" look more like
slight depressions than a good representation of the real thing. A couple
of coats of Future applied with a Q-Tip improved things, but I'll try
something different for my next project.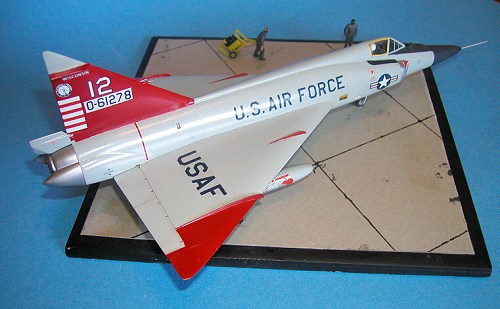
When the red areas were dry, I masked them and airbrushed the rest of the airframe and gear doors MM Aircraft Gray lightened with about 10 percent MM Insignia White. The glossy paint went on smoothly, and the panels beneath the wings looked much better than did those on the tail. Go figure! After touching up a few spots, I brush-painted the insides of the wheel wells and gear doors zinc chromate green, the gear and wheel hubs Testor's Metallic Silver (from the spray can), and the tires Floquil Grimy Black.
The worst part of the whole job was painting the wing fences Insignia Red. Despite my best efforts to mask them with Scotch tape, it seemed I always got either too much or too little paint on them. I ended up finishing them freehand with a tiny brush and scraping away any excess with a toothpick.
Two areas required painting with Testors Metalizer shades. I airbrushed the intake front pieces Aluminum and the exhaust cone Magnesium, and when dry, polished both to a shine with an old t-shirt. Although the finish doesn't tolerate much handling, I prefer not to overcoat with Metalizer Sealer because (in my opinion, anyway) it dulls the metallic look that I try to achieve in the first place.
Decaling was the next task. I used a combination of kit markings (national insignia and "U.S. Air Force" lettering) and items from the SuperScale sheet. The only hang-up was an all-too-common-for-me disaster with one of the tiny "WISCONSIN" legends on the tail. Although I successfully tested the integrity of the old Super Scale markings with an unused item on the sheet, the letters promptly disintegrated when I tried to apply the decal. A coat of Superfilm on the remaining markings avoided any more problems. I took duplicate lettering from a spare sheet. (Mucho thanx, David Sepos!). I didn't use the nearly invisible "No Step" decals, figuring that they might well have been painted over by the time the 176 FIS got their hands on the bird.
Most pix of ANG aircraft show them in nearly pristine condition, so I kept weathering to a minimum. I applied a dark gray acrylic "sludge wash" to the flaperons on the wing trailing edge and to several small openings (vents?) in the fuselage, but that was it.
|
FINAL CONSTRUCTION |
I slathered liquid masking over the clear parts of the canopy to prepare the Dagger for airbrushing with clear semi-gloss. Although ADC Gray is a gloss color, I prefer to cut down the shine to a more in-scale appearance. The semi-gloss coat also sealed the decals and gray wash I had applied.
Next I
brush-painted the anti-glare panel and nose cone Floquil Grimy Black;
when the paint was dry, I attached the nose
 cone with CA glue. I
replicated the seal around the canopy windows with thin strips of yellow
decal, and used ultra-thin strips of tape painted ADC Gray for the two
frames on each side of the windshield. Lastly, I painted the nose pitot
tube Testors Metallic Silver and attached it to the nose cone with CA
glue.
cone with CA glue. I
replicated the seal around the canopy windows with thin strips of yellow
decal, and used ultra-thin strips of tape painted ADC Gray for the two
frames on each side of the windshield. Lastly, I painted the nose pitot
tube Testors Metallic Silver and attached it to the nose cone with CA
glue.
Turning my attention to the underside of the fuselage, I glued on the main and nose gear assemblies, followed by all the gear doors. I used cut-down parts of the missile rails to replicate actuator arms on the center main doors. I finished the model by painting and installing the nose gear door landing light and the tail hook.
I mounted my F-102 on a base made from a painted ceramic tile and a piece of box top. I drew tar lines on the latter with a narrow black laundry marker, and weathered it with drybrushed "oil stains" and several drops of gunk from the bottom of my brush-cleaning jar. I painted a couple figures and a fire extinguisher from Hasegawa's 1/72 pilot and ground crew set, and attached them to the "concrete" with white glue.
|
CONCLUSIONS |
Hasegawa's F-102 is a pretty good kit for its vintage. Moreover, it's the only Dagger in the Sacred Scale. I don't count rivets or wield a micrometer, so I don't know how accurate the dimensions are. But the finished product -- say it with me, Class -- "certainly looks like an F-102 Delta Dagger." Airwaves makes a photo-etched detail set for those so inclined, but adding detail to the cockpit seems a waste unless you perform the surgery required to open the canopy. I'd also suggest scrounging better Falcon missiles from another source.
|
REFERENCES |
John Eaton's Century Series Extravaganza: http://yolo.net/~jeaton/century/102/102.htm
U.S. Air Force Museum website: http://www.wpafb.af.mil/museum/research/fighter/f102.htm
May 2004
If you would like your product reviewed fairly and fairly quickly, please contact the editor or see other details in the Note to Contributors.