
Magna 1/48 Firebrand TF.V
|
KIT: |
Magna 1/48 Firebrand TF.V |
|
KIT # |
248 |
|
PRICE: |
£36.00 (about $55.00 US) |
|
DECALS: |
One aircraft |
|
REVIEW & |
Richard Eglen |
|
NOTES: |
` |
|
HISTORY |
'A barely successful and short-lived torpedo-armed strike fighter'.
This is a description often used for the Blackburn Firebrand, originally conceived in 1940 to replace the Skua and Fulmar. It proved to be a long gestation for this aircraft, as it only entered service in 1945. In response to Admiralty specification N.11/40, two designs were considered. One was a naval version of the Hawker Typhoon (termed 'Sea-Phoon') and the other from Blackburn, coded B-37, was later named the Firebrand. The maiden flight of the Firebrand prototype was in February 1942. It was fitted with a Napier Sabre III powerplant, a huge engine for a fighter at that time, with a radiator housed behind intakes mounted near the wing roots.
To facilitate carrier take off and landing, the Firebrand was fitted with massive Fowler flaps with the wings built around a two-spar center section. The outer wing sections were folded up and backwards using a Skua-like crank. In later marks, the rudder was greatly enlarged and positioned well forward of the tail planes and elevators. This, plus the wide undercarriage, gave the whole aircraft a very clumsy air. The prototype indeed was slow, having an initial speed of only 330 mph. It was also very heavy, being by comparison, almost twice the weight of the Grumman Martlet.
 The prototype had
several problems, including directional instability, a tendency to swing on take
off and hard to service by carrier personnel. These issues, and the fact that by
1942, the Supermarine Seafire was then in FAA service, made the Firebrand
irrelevant as a carrier fighter. It was then suggested to Blackburn that it be
developed as a torpedo fighter, thus replacing the aging Swordfish. At that
time, a modern fighter torpedo bomber was much in demand by the Royal Navy
following the successful but costly attacks by these biplanes on the Scharnhorst
and Prinz Eugen.
The prototype had
several problems, including directional instability, a tendency to swing on take
off and hard to service by carrier personnel. These issues, and the fact that by
1942, the Supermarine Seafire was then in FAA service, made the Firebrand
irrelevant as a carrier fighter. It was then suggested to Blackburn that it be
developed as a torpedo fighter, thus replacing the aging Swordfish. At that
time, a modern fighter torpedo bomber was much in demand by the Royal Navy
following the successful but costly attacks by these biplanes on the Scharnhorst
and Prinz Eugen.
To complicate matters, the Air Ministry ordered a diversion of the Sabre engine for the Typhoon. In consequence, the Firebrand needed a new powerplant and the Bristol Centaurus radial engine was chosen, with the Firebrand III prototype first flying in December 1943. Further delays occurred in the development program so that in 1945, No 708 Squadron received an aircraft for operational usage. This was designated as the TF Mk IV - and it proved to be a 'handful'. Pilots thought it generally a reliable aircraft, with good characteristics as a dive-bomber and torpedo bomber. However, they also considered it a poor fighter, with a limited all round view, bad roll maneuverability and was large, thus presenting a huge target to enemy fighters. The Firebrand TF. Mk V entered production in 1946 and operational service with No 803 Squadron in May 1947, possessing several improvements designed to cure earlier shortcomings.
Even with these it was, in many respects inferior to the Hawker Sea Fury or Sea Hawk, notably in the difficulties pilots had of landing on pitching carrier decks - and accidents were commonplace. Consequently, the Firebrand was never used operationally, and all were quickly scrapped with no example surviving today. It was, nonetheless, the first single-seat torpedo bomber accepted by the Royal Navy since the Blackburn Dart in 1933. It also flew in London’s Victory Flypast in 1946, thereby being assured a place in British aviation history. Ultimately, a larger, turboprop single seat fighter, the Westland Wyvern, replaced the Firebrand in 1953, although was not a successful aircraft either. The next Blackburn aircraft to enter Royal Naval service was, in very marked contrast, the superb Buccaneer.
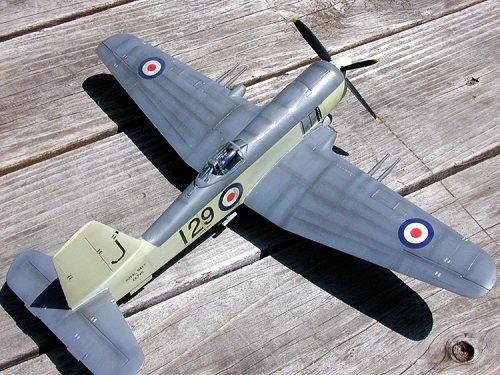
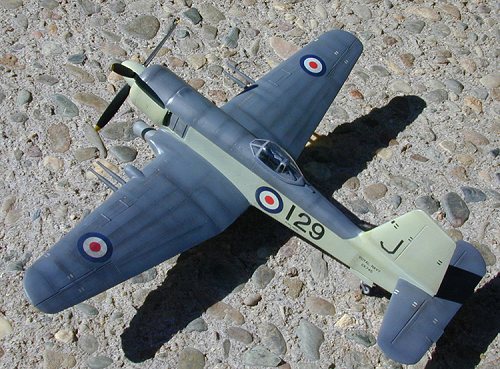
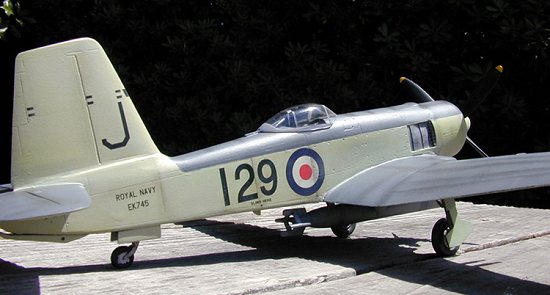
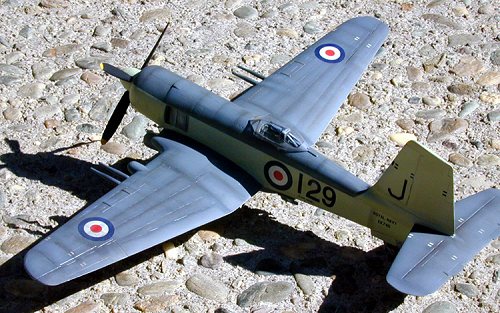
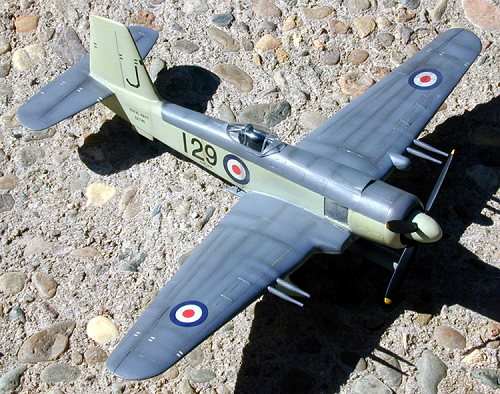
The model described below is meant to represent a weathered aircraft, EK745/129, in service sometime in the last year of operational service, 1952, with No 827 Squadron, HMS Eagle.
General comments:
 I have wanted to
make a model of this important Fleet Air Arm aircraft for a while now, having
tried, and failed, to make a model by converting the Hobbycraft Sea Fury. I read
Robin Powell’s scratchbuilt article on the aircraft in Plastic Kit Constructor
Vol 16, No 4, Autumn 1999, but attempts to duplicate this in my hands were
unsuccessful. However, the article is highly recommended as it provides very
useful plan drawings and good background on modeling the type. David Askett has
also published a very good article on another scratchbuilt Firebrand model - click here for details.
Overall, I was delighted to see, at last year’s Telford IPMS UK show, a 1:48
scale resin Firebrand model by Magna. Since there was also a discount from the
show, I bought one on the spot! Having made a several vacforms before, I
anticipated some extra work, including clean up, detailing etc. Reassuringly,
this was required to a much lesser degree than I expected, attesting to the
quality of the Magna product.
I have wanted to
make a model of this important Fleet Air Arm aircraft for a while now, having
tried, and failed, to make a model by converting the Hobbycraft Sea Fury. I read
Robin Powell’s scratchbuilt article on the aircraft in Plastic Kit Constructor
Vol 16, No 4, Autumn 1999, but attempts to duplicate this in my hands were
unsuccessful. However, the article is highly recommended as it provides very
useful plan drawings and good background on modeling the type. David Askett has
also published a very good article on another scratchbuilt Firebrand model - click here for details.
Overall, I was delighted to see, at last year’s Telford IPMS UK show, a 1:48
scale resin Firebrand model by Magna. Since there was also a discount from the
show, I bought one on the spot! Having made a several vacforms before, I
anticipated some extra work, including clean up, detailing etc. Reassuringly,
this was required to a much lesser degree than I expected, attesting to the
quality of the Magna product.
I had two personal goals to achieve with the model – one of which was to make my first resin kit! The second was to develop a pastel weathering system. During the course of this model, I thus evolved, by trial and error, some processes that seem to work. Some general construction points are also worth highlighting. Cyanoacrylate glue (Superglue) was used throughout construction, both as an adhesive and filler. This works well, notably when using accelerator to rapidly cure the glue after application. However, care is needed when sanding it down, as the cured glue is a harder surface than the surrounding resin making it easy to ruin the model surface. Related to this, care is also needed when rescribing panel lines, since the resin is soft and deep grooves can easily be made erroneously. The weathering process I used is discussed in detail below. However, one point to emphasize is to proceed slowly, allowing plenty of time for successive coats to dry. I mostly use Aeromaster paints, although occasionally employ Polly S acrylics and Testor’s aluminum as needed.
|
THE KIT |
 The kit follows
the usual Magna format, being presented in a sturdy box, with a line drawing of
the aircraft on the front. The kit comprises several cast pieces in cream
polyurethane resin, a small bag containing white metal pieces and two vacform
canopies, thus providing a spare. The instructions are clear and informative,
and a useful history of the aircraft is included. White metal is used for small
items such as the propeller blades, wheel well covers, undercarriage legs and
items of the cockpit and torpedo blades and propeller. In my model, some were
crudely cast and were replaced with items from the spares box. The decal sheet
is extensive allowing several aircraft to be made - a useful series of diagrams
are also provided to illustrating the finish of each aircraft.
The kit follows
the usual Magna format, being presented in a sturdy box, with a line drawing of
the aircraft on the front. The kit comprises several cast pieces in cream
polyurethane resin, a small bag containing white metal pieces and two vacform
canopies, thus providing a spare. The instructions are clear and informative,
and a useful history of the aircraft is included. White metal is used for small
items such as the propeller blades, wheel well covers, undercarriage legs and
items of the cockpit and torpedo blades and propeller. In my model, some were
crudely cast and were replaced with items from the spares box. The decal sheet
is extensive allowing several aircraft to be made - a useful series of diagrams
are also provided to illustrating the finish of each aircraft.
Being used to the traditional injection molded kit, I was surprised at how few pieces were present in the box. The fuselage comprised two halves; the wings, tailplane and empennage were solid cast in one piece. Unfortunately, some items were warped, including the fuselage and torpedo. This was easily rectified by placing them in boiling water, straightening and then quickly placing under a cold running tap. Importantly, all pieces were washed in soapy water before construction in order to remove any mold release agent, which can impair the painting surface. Several metal pieces had casting holes, but these were fixed using filler, removing the flash and sanding smooth.
|
CONSTRUCTION |
Like most aircraft models, construction begins with the cockpit tub. In my opinion, this is poorly cast. As I did not intend to model the aircraft with the canopy open, I did not add a large amount of detail. Nonetheless, it was improved somewhat with items from the spares box, carefully checking against archival photos. Once it all was glued, the tub and control panel were painted matt black, surface details picked out by dry brushing and glued to a fuselage side. At this stage I painted the entire interior side of the fuselage halves with matt black and two sides glued together. A good fit was ensured by rubbing down each semi fuselage edge with glass paper, thereby providing smooth surfaces for joining. As result, no filler was required and the whole assembly was set aside to dry.
 Attention now
turned to the wings, which were a single cast piece. These were cleaned of
adhering flash, obvious pockmarks filled with green putty and the joint surface
slightly roughened before abutting to the fuselage. This was not
straightforward, and several dry runs were needed to obtain the correct join
angle to the fuselage. Frequent checking with the 1:48 scale plans was critical.
Finally, the wings were glued to the fuselage, accelerator applied to secure the
joint, and the assembly was set aside to fully cure.
Attention now
turned to the wings, which were a single cast piece. These were cleaned of
adhering flash, obvious pockmarks filled with green putty and the joint surface
slightly roughened before abutting to the fuselage. This was not
straightforward, and several dry runs were needed to obtain the correct join
angle to the fuselage. Frequent checking with the 1:48 scale plans was critical.
Finally, the wings were glued to the fuselage, accelerator applied to secure the
joint, and the assembly was set aside to fully cure.
The tail plane and empennage was now constructed. Again, cleaning of flash was needed, and careful cutting and some sanding needed to obtain a good joining surface with which to attach to the fuselage. Again, it’s important to check references here since the real fin and rudder were offset from the centerline by 3 degrees. I find that painting a line of Testors aluminum along a joint provides an easy way to assess the size of the gap and quality of the sanding. Where needed, I filled the gap with superglue, cured with accelerator, and sanded smooth. At this stage, all the major assemblies were complete - it was clear that this was going to be a large single seat aircraft model!
The next stage was to improve the wheel wells, which had an unsightly gap where the wing joined the fuselage. This was filled with white glue, smoothed with a wet paintbrush and allowed to fully dry. The white metal torpedo rack was attached at this stage, after clean up, and any gaps filled by running a thin bead of superglue around the edges. The Centuras engine is a solid-cast piece that looks good when painted. However careful sanding is needed, both on the rear of the cowl and on the fuselage front to obtain a good fit. Once this was securely attached, the engine exhausts were drilled out with a pin drill.
At this stage, the entire model surface was sanded to remove any unsightly bumps. It was then polished with Mr. Surfacer and sprayed with aluminum metallizer to check for any small surface imperfections. These were then fixed by sanding with fine grit paper. Panel lines, where need were reapplied with a Squadron scriber. Painting was then done, of which more later. Construction of the subassemblies were also finished and cleaned up, including the torpedo, propeller blades, propeller hub and wheel well covers. Undercarriage legs were cleaned up and a brake line added from stretch sprue. These subassemblies were sprayed aluminum to check for any surface problems and prepared for painting.
|
PAINT & MARKINGS |
As stated above, I wanted to achieve a number of things with this model, one of which was to try pastels weathering. Here’s the process I used; the major panel lines were first under shadowed with matt black. Once dry, these were gently rubbed down with a Scotchbrite pad and the model wiped clean. The model undersurfaces were then painted with RAF Sky, using two thin coats - which allows for the panel lines to show through yet provide good coverage. FAA Extra Sea Gray upper surfaces markings were then applied - the demarcation line being made sharp by masking with ‘Post It’ notes. The model was allowed twenty-four hours to dry, during which time I painted the propeller blades black, with yellow tips, the prop hub Sky and the undercarriage a mixture of aluminum and black. Wheels were painted dark gray, dusted with light gray pastels and the hubs dry-brushed with aluminum.
 Once all was dry,
the entire model and subassemblies was sprayed with Future acrylic polish and
allowed to dry for four hours. When dry, the decals were applied, using the
Microcal system with no problems. All decals supplied with the model were of a
high quality and settled down very well. These were allowed to dry for about two
hours, after which time any excessive dried fluid was washed away using Polly S
plastic preparation solution.
Once all was dry,
the entire model and subassemblies was sprayed with Future acrylic polish and
allowed to dry for four hours. When dry, the decals were applied, using the
Microcal system with no problems. All decals supplied with the model were of a
high quality and settled down very well. These were allowed to dry for about two
hours, after which time any excessive dried fluid was washed away using Polly S
plastic preparation solution.
The models, and subassemblies, were then sprayed with a thin coat of Gloss varnish. This was allowed to dry for a day and panel lines were carefully accentuated with Burnt Umber oil paint, thinned with white spirit. Any excess was wiped away in the direction of the airflow, using a tissue moistened with white spirit. A third thin gloss varnish coat was then applied and again the model put aside to dry for a day or so. Panel lines on the Gray uppersurfaces were then weathered using pastels, taking care not to get any dust on my fingers. Chalk was applied with a thin brush in the direction of the panel line and any excess blown off. The pastel shading was brushed away in the direction of the airflow. A similar procedure on the Sky surfaces was applied using a light gray pastel. The model was then spayed with a matt varnish and allowed to dry.
At this stage, the model gently was rubbed with a Scotchpad and a final coat of matt varnish applied - which in fact dries to scale realistic semi matt appearance. One final step was to use a toothbrush and toothpaste to rub down selected panels, thus giving the impression of faded finish some areas. I was quite pleased with result after all this - the weathering effect to strive for is subtle, as FAA aircraft during this post war period were generally well looked after.
All sub assemblies were then glued to the model, cured and allowed to dry. A final touch included added exhaust stains and cordite stains (both with pastels). The canopy I used was from a Falcon vacform set. This was coated in Future to enhance its transparency, and also to provide resistance to fogging by fumes from cyanoacryalte glue, painted and attached with superglue.
|
CONCLUSIONS |
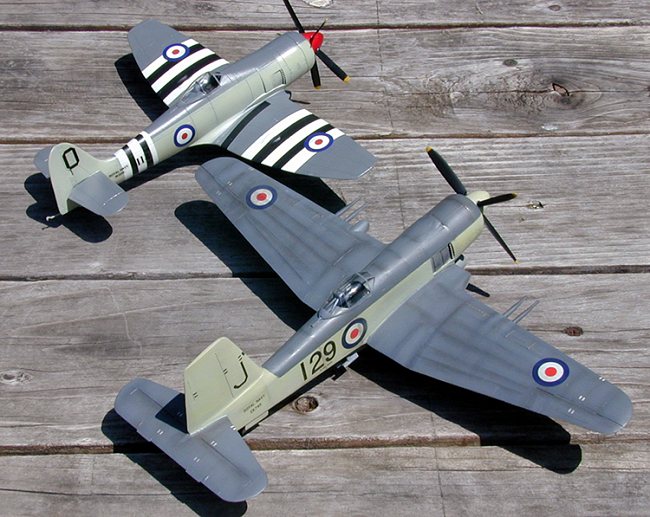
I was pleased with the resulting model, although it’s not perfect, as I’ll describe below. Nonetheless, it makes into an accurate representation of an important FAA aircraft and fills a gap in my collection, between the Hawker Sea Fury and the Westland Wyvern, both of which can be made in 1:48 scale. The end result is a large model, as can be gauged from the photograph were both the Sea Fury and Firebrand are pictured together. In general, I thought the standard of the Magna model very good, although care needs to be taken in the assembly - including attention to basic clean up and surface preparation. I was disappointed with the cockpit interior, but using the Cooper Details Sea Fury cockpit may help here. Obvious errors in the model are thus the cockpit interior, the torpedo fins and propeller and the release mechanism of the torpedo attachment. In retrospect, the cordite staining from the guns I applied looks overdone.
Resin multimedia models are not for everyone, since they evidently are not ‘shake and bake’. Nonetheless, they are fun and challenging to construct. Moreover, several small manufacturers, including Magna, are using this medium to make some very attractive and unusual models. I thus recommended the model to enthusiasts with intermediate to advanced skills. It’s a shame that an injection molded, or high quality Vacform, version is unavailable of this aircraft, since a truly outstanding model could be made. In-service pictures of the aircraft show that any super detailing, notably making those large Fowler flaps in the ‘down’ position, and with control surfaces actuated, would make for a spectacular model!
Additional details of this model and other British aircraft of this period can be found on my website - www.aircraftscalemodeling.com.
Acknowledgements
Special thanks to Jerry Shore, Assistant Curator of the Fleet Air Museum at Yeovilton, UK, for providing photocopies of aircraft.
If you would like your product reviewed fairly and quickly, please contact me or see other details in the Note to Contributors.