Flying Kiwis C-47 (DC-3) Dakota*
|
KIT # |
KC 03 |
|
PRICE: |
NZ $46.95 |
|
DECALS: |
RNZAF C 47A NZ3503 N ZK-BBJ Fieldair Topdresser RNZAF VIP – No 42 Squadron WARBIRDS "ZK-DAK" C-47B/DC-3 (As seen on TV! Star of many NZ commercials.) |
|
REVIEW : |
|
|
NOTES: |
Flying Kiwis’ Dakota uses repackaged Italeri C47 mouldings with locally produced decals and information pack, Colour chart and other goodies. |
|
HISTORY |
So much has been written on the DC 3 that I need not repeat it here so instead I will concentrate on the History of the C-47/DC-3’s depicted in the Decals.
NZ3503.
This C –47 was obtained during WWII by New Zealand under the Lend-Lease scheme to support the RNZAF in the Pacific area. The first of these NZ3501, arrived at Whenuapui in April 1943 and formed the nucleus of No 40 Transport Squadron. A further five including NZ3503 arrived during the following months.
No 40 Squadron then commenced regular services to various parts of the pacific Gaudacanel, Papa New Guinea and Australia to name a few.
ZK-BBJ
On the 21st of October 1952, FIELDAIR LTD was granted Aerial Topdressing & Spraying licence No 39 and they commenced operations using war surplus Tiger Moths, Piper Super Cubs and then on to Fletchers.
On 7th December 1954 FIELDAIR was granted a licence to operate heavy multi-engine aircraft on topdressing work, They started using Lockheed Lodestars from April 1955, By 1975 FIELDAIR had swapped the Lodestars for the C-47 for topdressing. ZK-BBJ is one of the planes used in this operation.
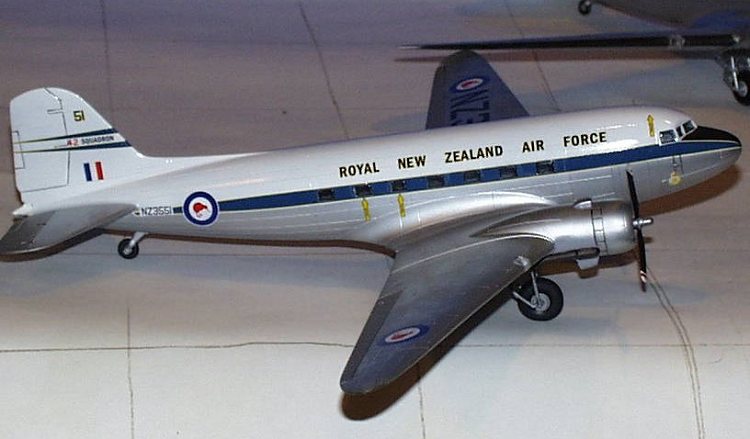
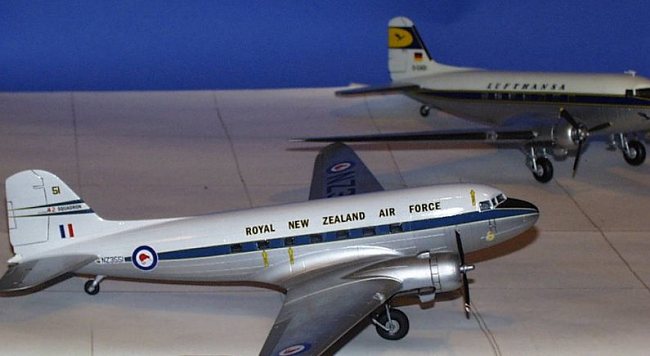
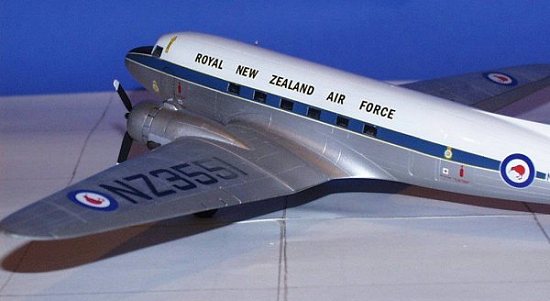 RNZAF VIP No 42 SQN
NZ3551 (Madame Cholet) was delivered in Hamilton on 14th August 1945 as C-47b-45-DK USAAF Serial No 45-960 and apart from NZ3553 was the only other Dakota to see continuous RNZAF service between 1945 and 1977. NZ3551 was built as a VIP aircraft for the 1953 Royal Tour, As the Queens aircraft she was refitted to become a luxurious Rimu wood panelled 8 seater.
ZK-DAK
"DAK" as she’s known. Was built in 1943 for the USAAF, Decommissioned following WWII this aircraft operated with Philippines Airlines, PATAIR in New Guinea and in 1970 was registered as VH-PNM flying out of Australia.
Purchased by New Zealand Warbirds group in 1987, the aircraft was re-registered as ZK-DAK and extensively renovated. In Authentic D-Day colours of No 48 Sqn R.A.F recreates a C-47 flown at that time by a New Zealander, Squadron Leader Rex Daniell. I am lucky enough to see this graceful aircraft flying overhead regularly during the summer months, and on TV every 15 Minutes!
|
THE KIT |
On receiving the kitset, kindly supplied by Trevor Bringans of Flying Kiwis’ for this review. The first thing you notice is the box, Big and strong enough to drive a truck over. This is one kit that’s not going to get crushed in the post or by your spouse when you bring yet another one of them silly things home.
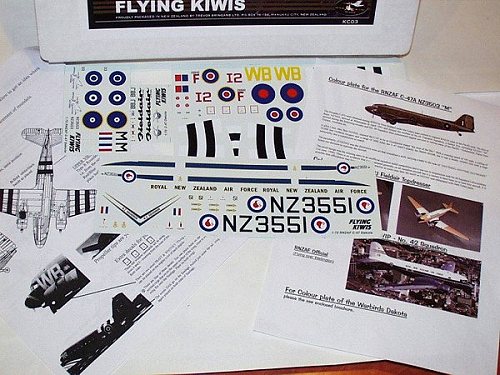 Inside you get the separately packaged Italeri C47, 4 separate sets of
decals, One set, RNZAF C 47A NZ3503 went straight into my
Academy Grumman TBF box for a future RNZAF project.
Inside you get the separately packaged Italeri C47, 4 separate sets of
decals, One set, RNZAF C 47A NZ3503 went straight into my
Academy Grumman TBF box for a future RNZAF project.
A "book" of painting and Decaling instructions from Flying Kiwi’s, a Tamiya paint colour chart (very useful), A tour brochure for NZ-DAK Flight times, and finally a A4 sheet of high quality colour photos depicting 3 of the Aircraft. Whew, now I know why it came in such a large box!
The sprues are typically Italeri, beautifully moulded in a delicate shade of olive green with fine recessed lines and no flash what so-ever.
Transparencies consist of the V shaped canopy and separate flat strips of passenger windows, test fitting show that they are useable.
I completed the Italeri Lufthansa DC-3 a few months ago and had no problems with that kit so lets see what happens with this one.
|
CONSTRUCTION |
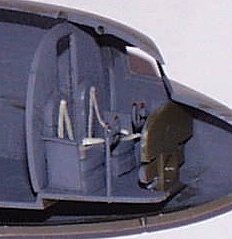 Construction begins with assembling the full-length fuselage floor, bulkheads
and adding the pilot seats and instrument panel. Now when I made the Lufthansa
DC-3, I went the whole hog detailing the interior of the cockpit, adding extra
detail etc, only to discover that NONE of it is visible once the fuselage halves
are joined. So this time I just added some harnesses and slopped some dark grey
paint around and a light dry brush to bring out the sharp edges.
Construction begins with assembling the full-length fuselage floor, bulkheads
and adding the pilot seats and instrument panel. Now when I made the Lufthansa
DC-3, I went the whole hog detailing the interior of the cockpit, adding extra
detail etc, only to discover that NONE of it is visible once the fuselage halves
are joined. So this time I just added some harnesses and slopped some dark grey
paint around and a light dry brush to bring out the sharp edges.
The kit supplied fuselage transparencies fit well enough but I decided to leave them out and Kristal Klear the windows later on. Once the interior was completed it’s time to join up the fuselage halves, a little scraping and sanding was all that was needed to hide the join lines, nice and simple.
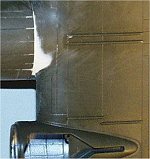
Construction of the wings came next, these came in five pieces, single piece
per side on the upper wings with a centre section and separate outer wings for
the underside. The wings 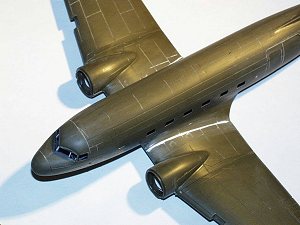 went together without fuss although as you can see
 from
the photos a small amount of filler was required. The only area of concern came
when mating the centre section up to the underside of the fuselage, there is a
slight step that needs to be overcome with careful filling, this step was also
present on the "Civil" DC-3 Lufthansa kitset as well.
from
the photos a small amount of filler was required. The only area of concern came
when mating the centre section up to the underside of the fuselage, there is a
slight step that needs to be overcome with careful filling, this step was also
present on the "Civil" DC-3 Lufthansa kitset as well.
Engines were assembled and painted a homebrewed gunmetal and dry-brushed
 With silver then fitted into the two piece cowlings. You have to be careful
removing the join line on the cowling as not to damage too much of the
detailing. Italeri could have made the modellers’ life a whole lot easier by
moulding the cowling as one piece.
With silver then fitted into the two piece cowlings. You have to be careful
removing the join line on the cowling as not to damage too much of the
detailing. Italeri could have made the modellers’ life a whole lot easier by
moulding the cowling as one piece.
The undercarriage was assembled and painted as per kit instructions, the legs are particularly well moulded, wheels have a very fine tread pattern and detailed hubs so all you need to do is flatten the wheels slightly and careful painting to get the best out of them.
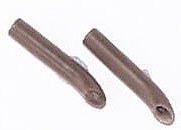 The exhausts were removed from the sprues and the ends carefully drilled out,
doing this really makes a big difference to the look of them. Once that is
completed they were painted grimy exhaust colour and fitted.
The exhausts were removed from the sprues and the ends carefully drilled out,
doing this really makes a big difference to the look of them. Once that is
completed they were painted grimy exhaust colour and fitted.
Once the Props were painted matt black with red/white tips and fitted all that remained was to push the lenses into the wings.
|
PAINT & MARKINGS |
Oh dear, With four separate decal options the biggest problem was, What version am I going to do?, my first thought was to do the WB ZK-DAK and I even got as far as digging out the Olive drab paint. But the RNZAF VIP No 42 Squadron Scheme won in the end and only because it would look good sitting next to my other Dak! And I’m a sucker for White painted Aircraft.
The RNZAF VIP aircraft were painted in gloss white upper fuselage, Lower fuselage wings and cowls were polished metal and the under sides of the wings were painted in a colour known as Dulux Horizon Grey. The instruction sheet recommends Tamiya XF-19 as being the closest match.
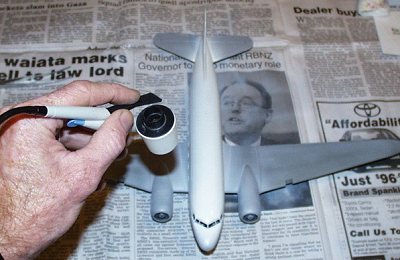 After a quick mist of light grey to undercoat the Dakota and pick out any
areas that needed further work, It’s time to gun light coats of X2 Gloss White
over the upper fuselage down to a level of the windows.
After a quick mist of light grey to undercoat the Dakota and pick out any
areas that needed further work, It’s time to gun light coats of X2 Gloss White
over the upper fuselage down to a level of the windows.
White is a notorious colour to try and spray and the secret to successfully spraying White or Yellow is to spray it over a matt white undercoat and do multiple light coats over a period of a couple of hours and build up the colour that way. Rather than one heavy coat that’s going to run like a greyhound. After the white has dried for a day the top fuselage was masked off and the Tamiya X-11 Chrome Silver was gunned on the wings and sides of the fuselage, The silver was masked off and Tamiya XF-19 Sky Grey airbrushed on the undersides of the wings. The elevators were then masked of and sprayed flat aluminium. The instruction sheet give very good painting guides and tips for all four versions of the aircraft so it pays to study them carefully before spraying, I didn’t and ended up having to respray a botch-up!
After removing the masking tape and respraying the patches of over-spray that always seem to find their way under the masking tape it’s time for the decals, since most of the plane has been sprayed with gloss paint, the decals can go straight on.
 After applying the blue nose stripes I noticed yet another blunder, I hadn’t
sprayed the black anti-glare panel deep enough on the nose and now had a ½ mm
strip of silver between the black and blue stripe …arggg! After carefully
patching that up with a 00 brush it’s on the rest of the decaling. The blue
stripes do not have cut-outs for the cabin windows so they were carefully cut
out after the decals had dried. This system is far better than trying to juggle
window holes and over stretching the decals
After applying the blue nose stripes I noticed yet another blunder, I hadn’t
sprayed the black anti-glare panel deep enough on the nose and now had a ½ mm
strip of silver between the black and blue stripe …arggg! After carefully
patching that up with a 00 brush it’s on the rest of the decaling. The blue
stripes do not have cut-outs for the cabin windows so they were carefully cut
out after the decals had dried. This system is far better than trying to juggle
window holes and over stretching the decals
Flying Kiwi decals are VERY thin and need care placing on the airframe, if you try to slide them they will break so you need to get them lined up as closely as you can before sliding them off the backing sheet. Micro sol was not needed as they moulded around the curves well with no silvering.
Take note that the Kiwi roundels on the wings must have the Kiwi’s feet and beak pointing towards the front of the aircraft.
Once the decals had dried a light coat of gloss varnish was applied and left to dry for a few days before the windows were added using Kristal Klear, On comparing the Lufthansa model with kit supplied transparencies and the Flying Kiwis’ Kirstal Kleared windows. I would recommend using Kirstal Klear for the transparencies as the finish is a lot more realistic.
I used the recommended Tamiya enamel paints throughout.
|
CONCLUSIONS |
Easy to build, Good fitting parts, excellent Decals, plenty of historical information included, in fact the Flying Kiwis’ Dakota has only one major fault.It has cost me the price of two more Italeri C –47 models so that I can model the other versions, for me that was the hardest part of this kitset, deciding what aircraft to do!
This model was Kindly supplied by Trevor Bringans of Flying Kiwis’.
|
REFERENCES |
Airplane Part 61 DC-3/C-47 Dakota
Brochures and colour photos supplied in the Flying Kiwis’ kitset.
Copyright ModelingMadness.com.
If you would like your product reviewed fairly and fairly quickly, pleasecontact the editor or see other details in the Note to Contributors.