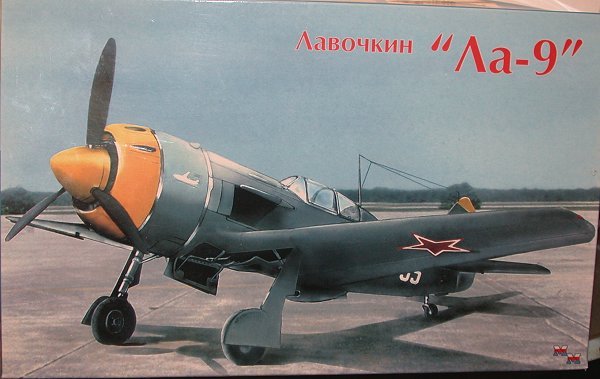
Siga 1/72 Lavochkin LA-9
|
KIT # |
72-M01 |
|
PRICE: |
$10.00 AUD |
|
DECALS: |
Three aircraft |
|
REVIEW : |
Mark Fordham |
|
NOTES: |
Run very far away |
|
HISTORY |

(Based on MPM (Modely Plastikvym Modelarum) manual to La-9/11 model kit)
The last piston aeroplanes made in S.A.Lavochkin's design department (bureau) are represented by La-9 and La-11. In their concept they followed up the previous La-7, including the engine ASh-82FN. Their up-to-date all-metal structure as well as their shapes and laminar flow aero-foils of the wings with straight "cut-off" ends corresponded to a modern design. The development of La-9 started in 1945, the prototype, designated La-130, took off in 1946. It was armed with 4 synchronized 23mm NS-23 cannons.
 A lighter airframe
structure allowed to achieve a longer range than La-7. There were made only 16
pieces of La-9 because the production of improved type La-11 has been started.
It's prototype (La-140) passed the flight tests in May 1947. The La-11 was
determined to be an escort fighter with Tu-2 and Tu-4.
A lighter airframe
structure allowed to achieve a longer range than La-7. There were made only 16
pieces of La-9 because the production of improved type La-11 has been started.
It's prototype (La-140) passed the flight tests in May 1947. The La-11 was
determined to be an escort fighter with Tu-2 and Tu-4.
As a result of a removal of a cannon, its flying range increased; hence, 3 remained cannons NS-23 were situated on the fuselage asymmetrically. The engine cooler was shifted from its world classic place under the fuselage (by La-9 directly to the engine cowling (by La-11), also improving aerodynamics of fighter. The La-11 was provided with ice-removing device from wing leading edges, a stabilizer and propeller cone. Otherwise, both types did not differ significantly from each other their construction was congruent.
The La-11's were used in air forces of the USSR, Northern Korea and China. They were fighting in the initial combats in Korea, used above all as fighter-bombers. There were produced 1500 pieces of La-11. They fulfilled an important role in period of transition before the first jets fighters came into widespread use.
|
THE KIT |
If you see this kit run very far away.
Even taking into account that this is a short run injection molded kit, I have yet come across anything quite as crude as this kit.
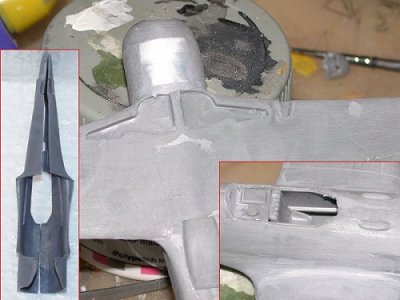
On inspection of the contents the first thing I noticed was the typical Eastern Bloc sprue gates, on this sample up to 7mm in thickness! Oh boy they are going to be fun to remove. Due to poor quality control my sample was missing most of the lower forward fuselage (see photo) and the fuselage parts were very badly warped.
 On mating up the two
fuselage halves the starboard one was at least 1 mm larger in diameter than the
port one. Oh and did I mention that the plastic in the fuselage measured out to
4mm in thickness in places. The only thing going for it was the fact that the
light gray plastic was nice and soft and bent well.
On mating up the two
fuselage halves the starboard one was at least 1 mm larger in diameter than the
port one. Oh and did I mention that the plastic in the fuselage measured out to
4mm in thickness in places. The only thing going for it was the fact that the
light gray plastic was nice and soft and bent well.
The instruction sheet is nicely set out and printed with easy to follow painting instructions in "real" colors with side and plan views, Some of the main stream manufacturers could do well to copy.
The decals look nice but after reading about Eastern Bloc decals, I broke out into a heavy sweat because if they screwed up I’m looking at a delay of at least 2 months for new decals to arrive. So with baited breath and a silent prayer I carefully cut out the instrument panel from the sheet and dropped it into warm water. Thankfully the decals turned out to be the saving grace of this kit.
|
CONSTRUCTION |
Construction begins with trying to wrestle the fuselage parts off the sprues, careful razor cutting was required, once removed and the gates cleaned off it was time to look at the damaged fuselage halves. What I ended up doing was to glue the top of the fuselage together as closely as possible (not very) and leave overnight to harden right up. The next day while trying to down a coffee and bolt out the door to work. I took it upon myself to try and bend the starboard side up to meet up with the other side, using heavy duty pliers and the heat from my coffee, I managed to bend the offending piece almost into the right position. By slopping huge amounts of glue along the join and jamming the whole thing into a vice I managed to get the two halves to sort of mate up.
That evening on returning to the model I noticed that the rudder now was twisted about 3 degrees to one side *sigh * In desperation and with a sod attitude now as I was very close to ditching the entire project, I used the same heavy pliers and twisted the rudder to a upright position. Now I had a vertical rudder and a really nice grill effect from the pliers teeth around the fuselage.
 Moving on to the wings
offered no respite from the troubles and woes. With a one piece lower and two
piece upper wings the fit was well how do you say it? Horrible! (see photo) with
1mm gaps at the leading edges. Oh and I forgot to mention that I had to shave
about 1.5 mm off the upper port wing to be able to get it to fit correctly.
Moving on to the wings
offered no respite from the troubles and woes. With a one piece lower and two
piece upper wings the fit was well how do you say it? Horrible! (see photo) with
1mm gaps at the leading edges. Oh and I forgot to mention that I had to shave
about 1.5 mm off the upper port wing to be able to get it to fit correctly.
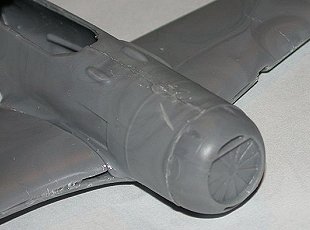
Next came the forward lower fuselage rebuild. I cut back the lower part of the nose and cleaned up the sides as best I could.
By chance the Nose of the Revell F4 Corsair Is about the same diameter as the La-9 so a plug was duly cut out and glued in. After drying the whole lot was flared in with Taimya putty.
 Getting back to the
rudder for a second look shows one of the main inaccuracies of this kit, The
rudder is way too thick and has a particular bulge just above the tailplanes no
amount of sanding seemed to fix the problem and in retrospect I should have
ditched the rudder completely and replaced it with card.
Getting back to the
rudder for a second look shows one of the main inaccuracies of this kit, The
rudder is way too thick and has a particular bulge just above the tailplanes no
amount of sanding seemed to fix the problem and in retrospect I should have
ditched the rudder completely and replaced it with card.
The kit offers two choices of nose cones. A three gun nose and a Four gun Nose. I chose the three gun nose for the only reason being that the sprue gates were thinner.
Tailplanes were cut out, tidied up and glued on, in the true tradition of short run kits there were no locating slots so I drilled out and added some brass pins to help alignment and to add some strength to the butt join.
With the main components together it was time to break out the filler and sandpaper, be prepared for lots of both! Two days later and recovering from a bad case of R.S.I from all that sanding the airframe was finally ready. I scratched a few panel lines along the wings to replace the fine recessed ones that were obliterated with all that filler. Then it’s off to the paint shop.
|
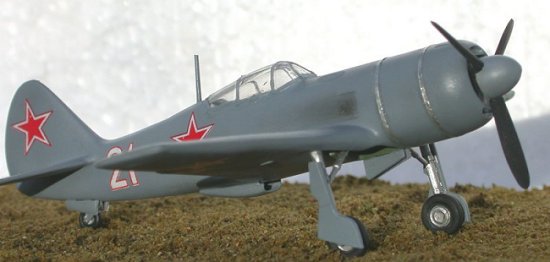
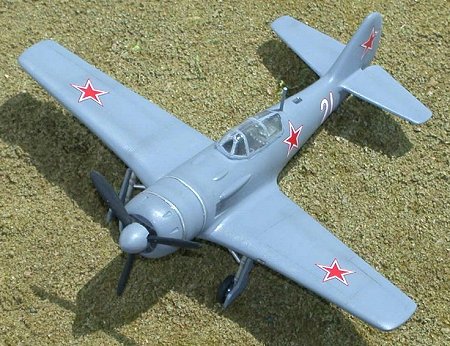
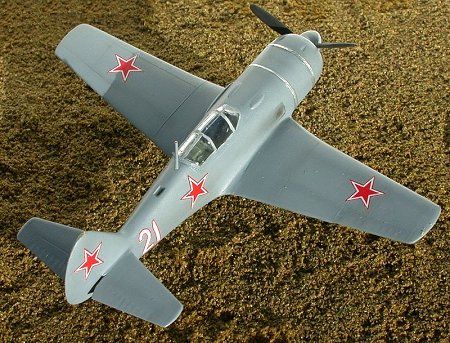
PAINT & MARKINGS |
Painting this beast is one of the easiest jobs of the kit, any color so long as it’s Neutral Grey. All three versions are painted in this delightful shade.
 The La-9 was duly sprayed
Tamiya XF-53 Neutral Grey all over and left to dry for the rest of the night.
Tamiya X-19 Smoke was then gunned on around the exhausts and along the panel
lines to try and get a bit of depth to the model.
The La-9 was duly sprayed
Tamiya XF-53 Neutral Grey all over and left to dry for the rest of the night.
Tamiya X-19 Smoke was then gunned on around the exhausts and along the panel
lines to try and get a bit of depth to the model.
Most Russian Aircraft have two thin steel bands running around the cowling and these were represented by thin strips of kitchen foil glued on with watered down PVA glue. Fiddly bits like the undercarriage were painted as per instruction sheet and added. Curiously the undercarriage doors were 2 mm too short and didn’t fit the wheel wells particularly well being too wide at the bottom. Canopy fitted well enough but was a little cloudy with noticeable air bubbles along the top of it. A coat of Future made a big difference to the clarity.
Siga have released the La-9 with three decal versions, Two Soviet and one north Korean Air force. I have been unable to trace the manufacture of the decal sheet but they are some of the thinnest and nicest I have used in quite a while. There is quite a bit of carrier film around the stars but with careful trimming they conform down well over the paint.
|
CONCLUSIONS |
To sum this kit up in a word that’s publishable is a hard task, quality control should have picked this kit up and binned it before being boxed. Even ignoring the warped fuselage this kit is very crude and in the overall scheme of thing only bears a passing resemblance to a La-9. I have the Siga FJ-1 Fury sitting in the to-do pile and the general moldings and quality of that kit is well above the La-9 Kit and looks like it will make up into a very nice little model.
Maybe I have been a little harsh with Siga over this model as this is the first dealing I have had with this manufacturer but unfortunately it is the worst model I have ever attempted. Saved only by it’s decals.
I can’t really recommend this kit at all and from the photos I have seen of the MPM La-9/11 you would be far better off investing in that one.
|
REFERENCES |
There is very little in the way of references out there for the La-9 but these web sites may be of some use.
http://www.ofmc.co.uk/gallery/la9.asp
http://www.aviation.ru/La/la9-11.html
Review kit foisted upon an unsuspecting Kiwi by your editor.
If you would like your product reviewed fairly and fairly quickly, please contact the editor or see other details in the Note to Contributors.