| KIT #: | 72030 |
| PRICE: |
35.99
|
| DECALS: | Two options |
| REVIEWER: | Carmel J. Attard |
| NOTES: | Short run with resin and photo etch parts |
| HISTORY |
 The
history in detail of the Brigand in RAF service has already appeared in part of
the Preview of this kit by Scott Van Aken and also earlier in the history part
of the kit build that I have compiled when I built the Brigand in vac form.
However it may be of benefit to recall part of its history. The
The
history in detail of the Brigand in RAF service has already appeared in part of
the Preview of this kit by Scott Van Aken and also earlier in the history part
of the kit build that I have compiled when I built the Brigand in vac form.
However it may be of benefit to recall part of its history. The | THE KIT |
This is the first time that the Brigand appeared in injection-molded form in 1/72 scale as the previous form that it existed was as a vac-form kit. Valom has now produced yet another interesting subject with an impressive, nice looking twin-engine combat aircraft. The open-ended box contains 3 full size sprues in gray plastic with parts having nicely molded surface detail. There is
 one clear
sprue for the canopies and wing tip lights. A photo brass etch fret contains
tiny detail parts as instruments for the console, aerials and seat belts for the
three crew seats besides other items and a separate bag has resin detail parts
as intake scoops and radial engine rows of pistons. Of the two clear canopies
that come with the kit only one is the correct type for use on the B Mk1. This
is easily recognizable from the other which apparently caters for a different
version that caries a rear gunner and comes in a different packing.
one clear
sprue for the canopies and wing tip lights. A photo brass etch fret contains
tiny detail parts as instruments for the console, aerials and seat belts for the
three crew seats besides other items and a separate bag has resin detail parts
as intake scoops and radial engine rows of pistons. Of the two clear canopies
that come with the kit only one is the correct type for use on the B Mk1. This
is easily recognizable from the other which apparently caters for a different
version that caries a rear gunner and comes in a different packing.
| CONSTRUCTION |
 Construction begins with the interior of cockpit, which consists of side
instrument panel plastic parts, photo etch for main instrument panel, seat belts
and control column, rudder foot pedals, crew seats. These are all inserted in
their respective place. There is a cockpit floor, bulkhead and position for the
three-crew seat arrangement making a complete interior layout under a one-piece
canopy. The interior is painted
cockpit green and instruments in black, seats in dark gray and seat belts light
khaki. The tail wheel well detail part was glued in place and the fuselage is
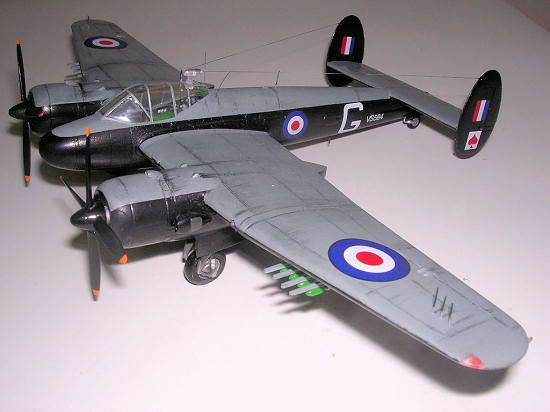
closed. The next stage is assembling the wings. These are split into lower and
upper halves with precise fitting of the separate bulky engine nacelles. There
are no locating pins and some care is required when fitting the nacelle parts
together, otherwise these align very well and no filler is needed at the joint.
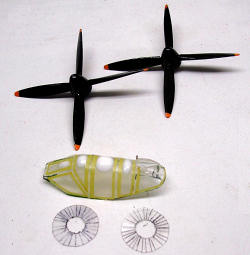
The beautifully molded resin engines that are fixed on a firewall and they slid
nicely when inserted inside the cowlings making them look so realistic. The
resin engine had a hole drilled to take the shaft of the propeller. For a more
authentic look a frontal cooling fan is added. I cut two clear round Perspex
pieces the size of a Eurocent with a hole in center. This had radial lines
scribed on it, which are filled with black ink.
Construction begins with the interior of cockpit, which consists of side
instrument panel plastic parts, photo etch for main instrument panel, seat belts
and control column, rudder foot pedals, crew seats. These are all inserted in
their respective place. There is a cockpit floor, bulkhead and position for the
three-crew seat arrangement making a complete interior layout under a one-piece
canopy. The interior is painted
cockpit green and instruments in black, seats in dark gray and seat belts light
khaki. The tail wheel well detail part was glued in place and the fuselage is
closed. The next stage is assembling the wings. These are split into lower and
upper halves with precise fitting of the separate bulky engine nacelles. There
are no locating pins and some care is required when fitting the nacelle parts
together, otherwise these align very well and no filler is needed at the joint.
The beautifully molded resin engines that are fixed on a firewall and they slid
nicely when inserted inside the cowlings making them look so realistic. The
resin engine had a hole drilled to take the shaft of the propeller. For a more
authentic look a frontal cooling fan is added. I cut two clear round Perspex
pieces the size of a Eurocent with a hole in center. This had radial lines
scribed on it, which are filled with black ink.
 One was fitted inside each of
the cowlings. Being a clear piece this did not hide the wealth of detail on the
engines. The spinner could then be put in place.
One was fitted inside each of
the cowlings. Being a clear piece this did not hide the wealth of detail on the
engines. The spinner could then be put in place.
| COLORS & MARKINGS |
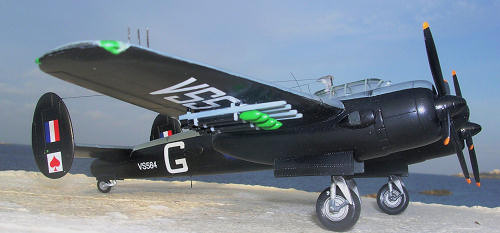
 There are
two markings options. Both have
black undersurfaces. The main difference is that one has white upper surfaces
and the other medium gray upper. The kit states it is extra dark sea gray which
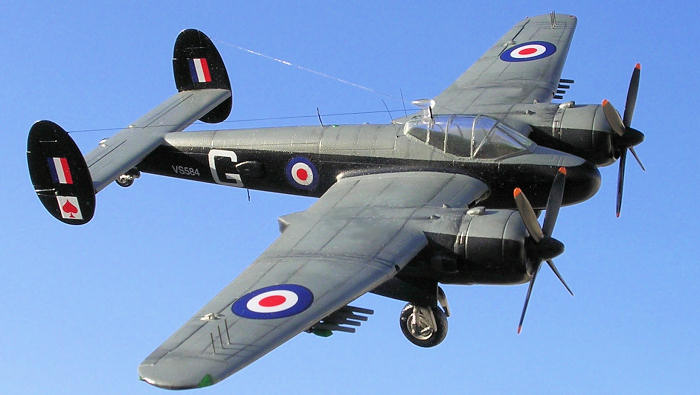
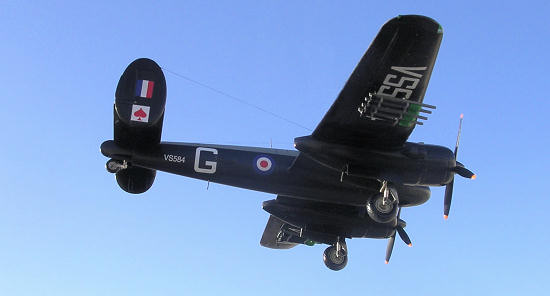
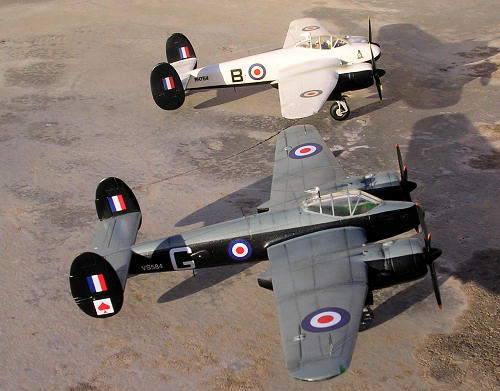
in my opinion will be too dark for this type. The aircraft VS584 ‘G’ is also
depicted on the box cover and belongs to 84 Squadron in Malaya. The former
option is RH764 ‘B’ from 8 Squadron in Aden. It has the low demarcation line of
the white/black color scheme differs from the other and makes it attractive too.
I did not choose to do this one as it has the same markings as the vac-form kit
I made some time ago. I first applied the gloss black using Humbrol brand. When
this was dry another smooth coat was applied, the under surfaces and the canopy
were then masked and all upper surfaces airbrushed in medium gray Tamiya XF-21.
Printing and quality of decals is nicely done. I applied decals using the
conventional method, i.e. slide the wet decal into place, blot away excess water
and apply setting solution as needed. When the decal is dry Klear liquid was
applied to seal it in place. As I have already fixed the under wing rocket rails
I had to carefully slice the white serial number to fit in between the rails.
One can place the decals first and then fit the rails afterwards. The kit was
finally given an overall coat of semi matt Mode Master varnish. The 8 rockets
were carefully glued in place as a last resort.
There are
two markings options. Both have
black undersurfaces. The main difference is that one has white upper surfaces
and the other medium gray upper. The kit states it is extra dark sea gray which
in my opinion will be too dark for this type. The aircraft VS584 ‘G’ is also
depicted on the box cover and belongs to 84 Squadron in Malaya. The former
option is RH764 ‘B’ from 8 Squadron in Aden. It has the low demarcation line of
the white/black color scheme differs from the other and makes it attractive too.
I did not choose to do this one as it has the same markings as the vac-form kit
I made some time ago. I first applied the gloss black using Humbrol brand. When
this was dry another smooth coat was applied, the under surfaces and the canopy
were then masked and all upper surfaces airbrushed in medium gray Tamiya XF-21.
Printing and quality of decals is nicely done. I applied decals using the
conventional method, i.e. slide the wet decal into place, blot away excess water
and apply setting solution as needed. When the decal is dry Klear liquid was
applied to seal it in place. As I have already fixed the under wing rocket rails
I had to carefully slice the white serial number to fit in between the rails.
One can place the decals first and then fit the rails afterwards. The kit was
finally given an overall coat of semi matt Mode Master varnish. The 8 rockets
were carefully glued in place as a last resort.| CONCLUSIONS |
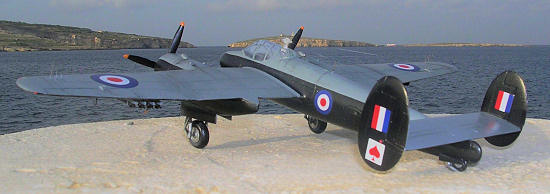
 I enjoyed
the building process and the look of the finished Brigand. It made a great pair
when placed on the shelf next to the other Brigand I made, alternatively one can
place it next to a Beaufighter from which it has evolved. Well-done Valom, a
nice fitting kit with highly detailed parts.
I enjoyed
the building process and the look of the finished Brigand. It made a great pair
when placed on the shelf next to the other Brigand I made, alternatively one can
place it next to a Beaufighter from which it has evolved. Well-done Valom, a
nice fitting kit with highly detailed parts.If you would like your product reviewed fairly and quickly, please contact me or see other details in the Note to Contributors.