Classic Airframes 1/48 Vampire T.11/22
| KIT #: | 493 |
| PRICE: | Long out of production |
| DECALS: | Three Options |
| REVIEWER: | Pat Earing |
| NOTES: | Short run kit with resin detail parts. Flightpath etched set and Max Decals used. |
| HISTORY |
For the Irish Air Corps, the requirement
for a modern turbo-jet aircraft was not forthcoming until 1954 as a direct
result of attrition to their fleet of aging Seafire Mk
Starting in the spring of 1950 the De
Havilland Aircraft Company began design of a new advanced trainer aircraft based
to the Vampire NF 10 airframe.
This
private venture resulted in a prototype (DH 115A) being created that was a
conglomerate of existing airframe components: the wide fuselage of the NF 10
joined with the strengthened wings, tail booms and tailplane of the Vampire FB
5.
 With the successful conclusion of
testing, the new trainer was designated the T 11 series and production commenced
in the late summer of 1951.
The
first production T 11 version flew in January of 1952, with a total of 731
airframes being produced by DH and Fairey Aviation for the RAF.
An additional 73 aircraft were completed as Vampire T 22’s for the Fleet
Air Arm.
A further 216 aircraft
designated T 55 were produced for export and were delivered to 20 different
countries worldwide as well as being license built in Austria, India and
Switzerland.
With the successful conclusion of
testing, the new trainer was designated the T 11 series and production commenced
in the late summer of 1951.
The
first production T 11 version flew in January of 1952, with a total of 731
airframes being produced by DH and Fairey Aviation for the RAF.
An additional 73 aircraft were completed as Vampire T 22’s for the Fleet
Air Arm.
A further 216 aircraft
designated T 55 were produced for export and were delivered to 20 different
countries worldwide as well as being license built in Austria, India and
Switzerland.
The Irish T.55’s were delivered in the
summer of 1956 and represented a huge step forward for the IAC.
Not only were the Vampires the first jet powered aircraft to enter
service with the IAC they were also the first to be equipped with ejection
seats.
The first formal showing of
the Irish Vampires occurred on Easter Sunday, 1957 with a fly-past over the
annual Defense Forces parade in
By 1960, the IAC was in need of a
replacement for their worn-out Spitfire Tr. 9’s.
Additionally, the existing Vampires could not meet all of the advanced
training requirements as well as fulfilling the operational requirements of No 1
fighter squadron.
As such the
Department of Defense ordered a further three aircraft.
The six IAC Vampires provided air support, ceremonial escorts, and
training until 1975 when due to parts scarcity they were retired in favor of the
Aerospatiale Super Magister.
| THE KIT |
It always fascinates me how models
‘choose’ me to be built.
Prior to
my decision to build only Irish aircraft for 2012, I would never have even
considered building a model of a DH Vampire of any sort.
Not that there is anything wrong with the plane or models of it; the
Vampire family just didn’t inspire me.
However, this particular aircraft represents a pivotal transition for the
IAC into the realm of ‘modern’ airpower; and, I had decals for an IAC T 55, so a
search ensued to find a kit.
 The T 11/T 22 boxing from Classic
Airframes (CA) appeared sometime around the mid 1990’s.
Additionally, CA has since gone out of business.
As such many of their kits are not only hard to obtain, but command
significantly higher prices than the kits retailed for originally.
For this build, I was able to find a kit from another modeler on one of
the numerous on line trade forums at a very reasonable price.
Additionally, after some discussion with modelers on the IPMS Ireland web
site I decided to purchase the somewhat pricey Flightpath etched set to correct
and supplement the kit offerings in regards to the aircraft flown by the IAC.
The T 11/T 22 boxing from Classic
Airframes (CA) appeared sometime around the mid 1990’s.
Additionally, CA has since gone out of business.
As such many of their kits are not only hard to obtain, but command
significantly higher prices than the kits retailed for originally.
For this build, I was able to find a kit from another modeler on one of
the numerous on line trade forums at a very reasonable price.
Additionally, after some discussion with modelers on the IPMS Ireland web
site I decided to purchase the somewhat pricey Flightpath etched set to correct
and supplement the kit offerings in regards to the aircraft flown by the IAC.
There are numerous reviews of the various
CA Vampire marks out there; however, since it has been a while since most were
published I will walk you through my impressions of what you get in the box.
First up-the actual box that the kit comes in.
Classic Airframes was nothing if not consistent with the use of their
boxes.
I have never found CA boxes
to be particularly sturdy, and they seldom seem to stay together for an entire
build-which in some cases can be quite lengthy due to the frustration factor of
their limited run nature.
However,
the box art is always fantastic and representative.
 Once open, the box contains two light
grey injection molded sprues that make up the bulk of the airframe, one very
clear and distortion free injection molded canopy and a plastic bag containing
20 beautifully cast resin parts.
Once open, the box contains two light
grey injection molded sprues that make up the bulk of the airframe, one very
clear and distortion free injection molded canopy and a plastic bag containing
20 beautifully cast resin parts.
First impressions are important, and for
this kit everything was thumbs up.
There was very little flash present, and although a limited run kit the progress
of the CA mold makers can be seem in the relatively modest attachment points on
the plastic sprues.
Overall
the panel lines were consistent and amazingly petite.
The resin parts were all intact, and although there are significant pour
blocks to be removed they did not seem poorly placed or awkward to remove.
One disappointment revolved around the canopy.
Although very well cast, it is one piece; not allowing the modeler to
easily pose it in the open position.
The instruction sheet is one folded sheet and printed in a style
consistent with previous CA kits-clear parts placement without any hints for
assembly. Decals are printed by Microscale and include three markings as well as
a separate sheet with stencil data.
The Flightpath detail set struck me as
simply overwhelming.
Wow, what a
bunch of brass!
The instructions
are clear and well diagramed, but the sheer number of parts contained here is,
well, boggling.
| CONSTRUCTION |
I want to preface the construction
process with the caveat that I am in no way a Vampire expert.
Also, because this was a whim build for my Irish theme, I did not have
any real, in depth resource materials to consult during construction-just a few
images of IAC Vampires and the ol’ Mk I eyeball quality control (EQC) system.
The
CA vampire is a limited run kit.
This means that there are some expectations put on the modeler for construction
such as no alignment pins for the wings and fuselage components and it is
expected that parts and subassemblies must be dry fit a few times before being
committed with glue.
Some limited
run kits are easier than other in regards to construction.
In the case of the CA T 11/T 22 Vampire, I can say that construction was
pretty much a breeze with no real hang ups that were not of my own making.
 Assembly started with a soapy bath for
the resin parts.
While the cockpit
parts dried I began assembling the tail booms and wing assemblies.
Clearly CA has learned from their previous kits as the wheel well inserts
fit with little trouble. The wings could benefit from having the trailing edges
thinned some, but look okay without the extra effort.
Fit of the wings was great and there was no apparent warpage with either
the wing or boom parts.
The resin
intake assemblies fit with no fuss, although careful trimming is required to get
a good fit and placement at the fuselage edge of the wing.
Assembly started with a soapy bath for
the resin parts.
While the cockpit
parts dried I began assembling the tail booms and wing assemblies.
Clearly CA has learned from their previous kits as the wheel well inserts
fit with little trouble. The wings could benefit from having the trailing edges
thinned some, but look okay without the extra effort.
Fit of the wings was great and there was no apparent warpage with either
the wing or boom parts.
The resin
intake assemblies fit with no fuss, although careful trimming is required to get
a good fit and placement at the fuselage edge of the wing.
I painted all of the cockpit components
and fuselage interior with Floquil Engine Black.
Using dark grey and burnt umber pastels I highlighted details and glued
the resin side panels into the fuselage halves.
The ejection seats uncharacteristically have wonderful seatbelts cast in
and needed only careful painting to produce wonderful representations.
At this time I installed the cockpit tub, instrument panel and the rear
engine backing plate (without tail pipe) into the left fuselage half.
Never before have CA items fit without trimming, but this cockpit fit as
advertised.
I unfortunately did not
have the Flightpath brass set at this time, and rather than lose momentum,
decided to press on with construction.
CA chose to mold the nose section
separate from the fuselage, in two halves.
Because of previous experience, I chose to carefully attach these to
their respective fuselage half prior to mating the halves together to alleviate
fit problems.
I also added a
considerable amount of lead fishing weights at this time (considerable meaning I
have no idea of the actual weight because I don’t own a small scale to check
with).
I glued the fusela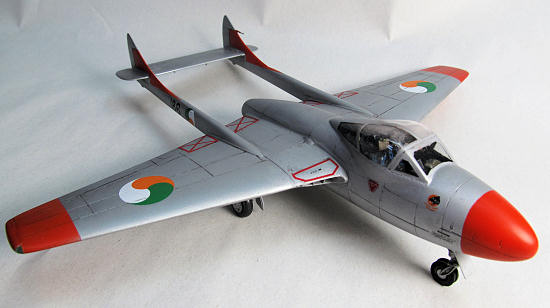 ge
together with both super glue and Tenex, depending on the perceived ‘load’ for
the seam.
Once things securely
joined together there are two lower panels that must be fit to the fuselage.
The first contains the nose wheel bay, and after drilling out the cannon
holes it was secured with very little alteration.
Unfortunately, the rear most belly panel did not fit well at all,
requiring considerable patience to get it nice, and filling to get it smooth.
At this point I promptly dropped the fuselage pod onto my concrete shop
floor.
ge
together with both super glue and Tenex, depending on the perceived ‘load’ for
the seam.
Once things securely
joined together there are two lower panels that must be fit to the fuselage.
The first contains the nose wheel bay, and after drilling out the cannon
holes it was secured with very little alteration.
Unfortunately, the rear most belly panel did not fit well at all,
requiring considerable patience to get it nice, and filling to get it smooth.
At this point I promptly dropped the fuselage pod onto my concrete shop
floor.
Dropping a weighted plastic assembly onto
concrete never does the completion process any good.
However, due to my heavy handed (at times) gluing, the real damage was
contained to the popping off of the nose cone, cracking of the lower panel and
the coming loose of the engine backing plate.
Reassembled, re-sanded, re-primered and re-scribbed I was finally ready
to attach the wings and tail booms-but oh what a pain to get that engine panel
reattached!
I ended up using a
section of ¼ inch diameter plastic tubing, slightly flared, that fit over the
fan section.
Once finagled into
place I carefully applied CA glue and accelerator to get things solidly ‘stuck’
Overall the fit of the wings to the
fuselage pod was not too bad.
However, they didn’t fit great either.
Because of the resin intake assembly right at the wing root, some fussy
trimming and fitting was required to get a snug fit at the wing root.
Although an okay fit was eventually achieved, a sizable amount of
difficult to recreate detail was lost all along the upper and lower seams of
each wing attachment.
Care must
also be taken to ensure that the wings are level and appear square to the
fuselage pod-not an easy task as the pod is very round and the wings tapper.
I used a ruler and small carpenters square to help get things aligned.
Prior to attaching the wings I also cut the wing tip lights and made
clear representations from an old toothbrush handle.
The tail booms attach quite securely; however, it is paramount that they
are also ‘true’ on multiple planes.
For the tail plane, I drilled small holes and used wire for a secure attachment.
At the point where I was ready to begin applying glue I gave each
attachment point a small amount of Tenex to
 soften the plastic and get things
sticking, and also allow time to wiggle everything into place.
I used the small carpenters square to ensure that the vertical and
horizontal tails were in fact at 90 degrees to each other and again I used the
ruler to ensure that the booms were true to the attachment points at the wing
using the center seam as a reference line.
With everything properly lined up I gave all the joints a thorough
application of Tenex and set things aside to dry for a day or two.
Whew!
soften the plastic and get things
sticking, and also allow time to wiggle everything into place.
I used the small carpenters square to ensure that the vertical and
horizontal tails were in fact at 90 degrees to each other and again I used the
ruler to ensure that the booms were true to the attachment points at the wing
using the center seam as a reference line.
With everything properly lined up I gave all the joints a thorough
application of Tenex and set things aside to dry for a day or two.
Whew!
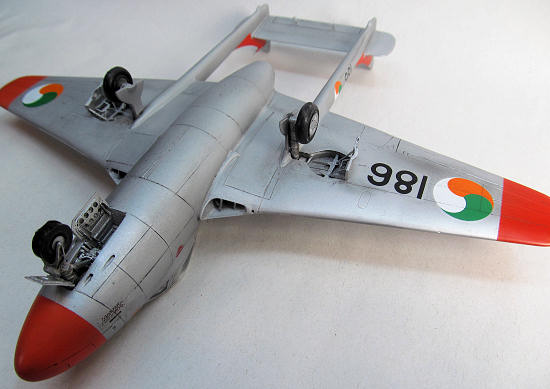
For final assembly before paint I
detailed the wheel wells with some of the Flightpath parts.
Unfortunately, the brass sheet is fairly thick and the attachment ‘stubs’
are also quite thick requiring a solid cutting surface so as not to distort the
sometime small detail parts during removal.
I originally intended to pose the model with the cockpit canopy open.
In order to facilitate opening the canopy I intended to make my own
vacuformed canopy, cut it apart and use the Flightpath canopy framing to really
detail things out.
Unfortunately, I
realized that there was no way I was going to successfully get the framing cut
out without damage, so I opted to dip the kit canopy in Future, mask it up and
install what was provided.
Thankfully it fit very well.
I also
used the brass set to modify the main wheels to something more closely
approximating what the IAC aircraft used as well as other brass bits on the
landing gear legs and doors.
Finally, after installing a few more fiddly bits on the airframe and a final
sanding with 400 grit sandpaper it was time for paint.
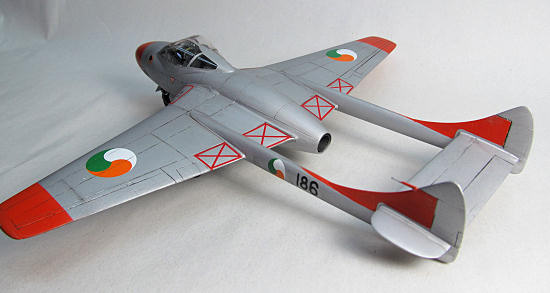
| COLORS & MARKINGS |
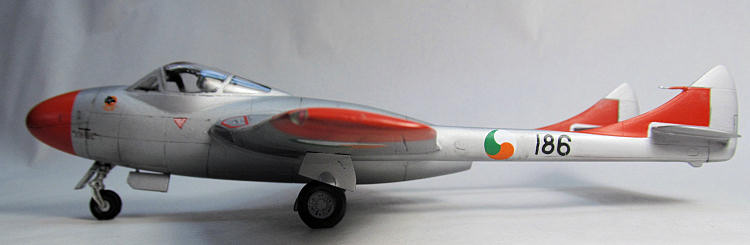
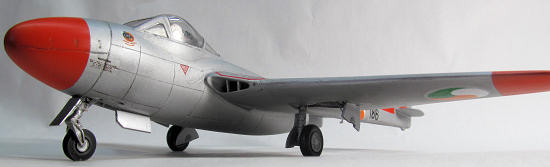
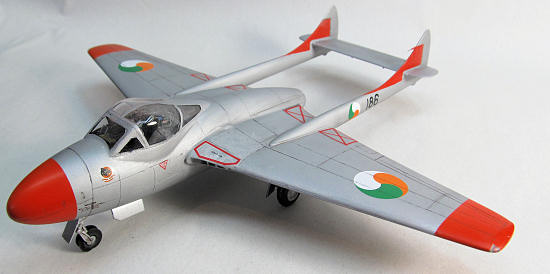
Because De Havilland made considerable
use of wood in their construction of the Vampire, the aircraft were painted
silver rather than being in natural metal.
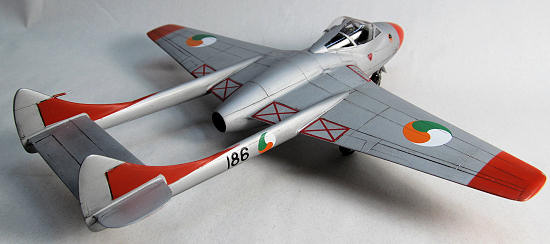
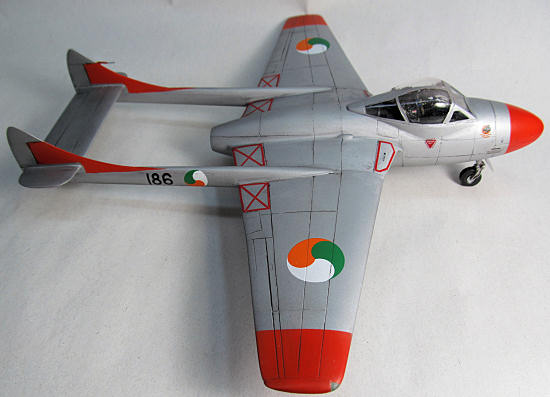
The IAC Vampires also had tricky orange panels painted on the tail,
wingtips and nose. I started
 painting with a coat of Model Master flat white in
all of the areas that were to be painted orange, followed but a few light (to
coverage) coats of MM International Orange FS 12197 (#2022).
After a few days drying time I masked off the orange.
I chose to paint in this color order because of the difficulty in masking
the orange on the tail over the silver.
Once everything was covered I sprayed the entire airframe with Floquil
Old Silver and top coated with MM Glosscoat from a rattle can.
painting with a coat of Model Master flat white in
all of the areas that were to be painted orange, followed but a few light (to
coverage) coats of MM International Orange FS 12197 (#2022).
After a few days drying time I masked off the orange.
I chose to paint in this color order because of the difficulty in masking
the orange on the tail over the silver.
Once everything was covered I sprayed the entire airframe with Floquil
Old Silver and top coated with MM Glosscoat from a rattle can.
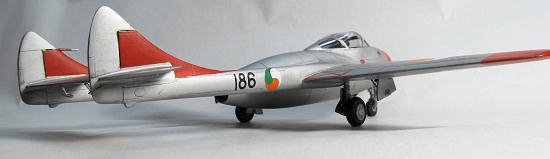
Decals are from the Max Decals sheet 4821
Irish Air Corps, 1922-1956.
They
performed perfectly, although use care and lots of water as you initially
position the decals as they tend to stick hard as they are first placed.
All of the trailing edge/flap area warning markings were individually
placed using narrow red line decals.
Some, but not all of the kit stencils were placed and the model was given
a top coat of MM Dullcoat.
Slight
weathering was done with pastels and artists acrylics to accentuate panel lines
and wear.
| CONCLUSIONS |
I found the CA Vampire to be a fun and
rewarding build.
I have read
that there are faults with the kit, but overall I felt that it was a straight
forward build that gave me very little trouble-a blessing given some of my
experiences with CA kits.
 Upon completion of the model I posted
some images on the IPMS Ireland site to share, and created some interesting
discussion.
Clearly one of the real
faults with the CA kit are the fictitious panel lines.
As I stated at the start I am not a Vampire expert, nor am I a rivet
counter.
That said, the Mk I EQC
system did let me down, as pictures of the real plane clearly show that many of
the panel lines on the fuselage pod are wrong-oh my!
Well, I probably could have fixed those panel lines had I caught the
error; but, done is done and it passes my criteria test-it looks like what it is
supposed to look like (funny panel lines and all).
Maybe not a contest winner; but, it is finished and on the shelf and I
learned a few new things along the way.
If you can find one, this is one of the very best CA kits I have built,
and well within reach of modelers of average skills.
Upon completion of the model I posted
some images on the IPMS Ireland site to share, and created some interesting
discussion.
Clearly one of the real
faults with the CA kit are the fictitious panel lines.
As I stated at the start I am not a Vampire expert, nor am I a rivet
counter.
That said, the Mk I EQC
system did let me down, as pictures of the real plane clearly show that many of
the panel lines on the fuselage pod are wrong-oh my!
Well, I probably could have fixed those panel lines had I caught the
error; but, done is done and it passes my criteria test-it looks like what it is
supposed to look like (funny panel lines and all).
Maybe not a contest winner; but, it is finished and on the shelf and I
learned a few new things along the way.
If you can find one, this is one of the very best CA kits I have built,
and well within reach of modelers of average skills.
| REFERENCES |
Maxwell, Joe and Patrick J. Cummins
The Irish Air Corps: An
Illustrated Guide.
W &G Baird,
Ireland.
2009
Wikipedia
July 2012
If you would like your product reviewed fairly and fairly quickly, please contact the editor or see other details in the Note to Contributors.