| KIT #: | ? |
| PRICE: | $can be found at a very nice, low price |
| DECALS: | One option |
| REVIEWER: | Joel Hamm |
| NOTES: | Currently out of production. |
| HISTORY |
Back when I was a kid, one of my favorite models was Revell’s box
scale (maybe it was 1/48) H-19 on amphibian pontoons. In my incarnation as an
adult modeler I stuck strictly to 1/72. The only H-19 in that scale at that
time was an Airfix, issued, according to an imprint in the plastic, in 1956, and
suffering from all the simplification faults endemic to that era. A decent
 kit was eventually molded by
Italeri (also marketed by Revell), but having no knowledge of such future
developments I armed myself with a copy of the original Revell instruction sheet
(can’t remember how I got hold of it) and set out the accurize the Airfix. I
wrote up the project in an ’86 issue of Scale Modeler; these reminiscences are
gleaned from that decaying document.
kit was eventually molded by
Italeri (also marketed by Revell), but having no knowledge of such future
developments I armed myself with a copy of the original Revell instruction sheet
(can’t remember how I got hold of it) and set out the accurize the Airfix. I
wrote up the project in an ’86 issue of Scale Modeler; these reminiscences are
gleaned from that decaying document.
Sikorsky won the 1949 toss-up for the next generation helicopter to replace the R-5. Igor was dedicated to the single main rotor concept, a design considerably simpler than the competition tandem rotor (Piaseki) and meshing rotor (Kaman), but suffering from center of gravity sensitivities. Placing the radial engine in the nose and routing the drive shaft diagonally beneath the overhead flight deck allowed placement of the fuel and load directly beneath the rotor disk; creating a stable 10-passenger lifter that served in multiple roles for many years in all US services, many allied air forces, and commercially as the Model S-55.
| THE KIT |
State of the 1956 art – flash; prominent parting seams; thick, dimpled, ill-fitting transparencies. The most egregious fault is toy-like simplification of the rotor disk, landing gear, and nose area. Enough exterior work had to be done to discourage thoughts of opening and detailing the engine and cargo compartments.
| CONSTRUCTION |
The first task was
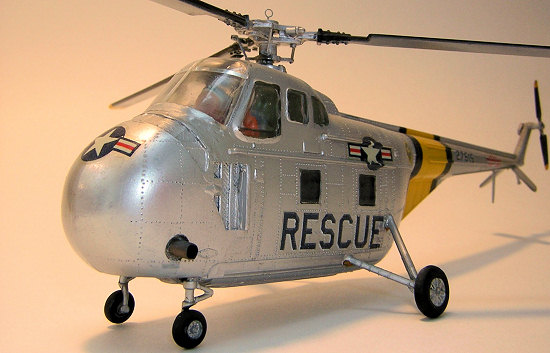
correcting the improper placement of the forward landing gear. These
lollypop-like struts with integral wheels are meant to mount in holes drilled
in the fuselage sides. In real life the legs dangle vertically from the engine
 compartment. The holes had to be
filled, the underside of the engine compartment cut open (as in real life), and
a firewall with mounting brackets installed. A few lead shot in the nose insured
that the long tail boom would not tip the model on its tail.
compartment. The holes had to be
filled, the underside of the engine compartment cut open (as in real life), and
a firewall with mounting brackets installed. A few lead shot in the nose insured
that the long tail boom would not tip the model on its tail.
Before clamshell closure the side transparencies need tackling. Not much can be done with the uppers, except fill the surrounding gaps with clear epoxy. The lower cabin windows needed sanding to remove thickness, dimples, and irregularities; followed by polishing and coating. The mounting flanges then had to be reworked to bring the surfaces back flush with the fuselage.
The flight deck was sufficiently complete for a kit this size, but I added 2 non-matching crew figures to fill the space. The windshield needed sanding and polishing to remove the overdone framing; which was replaced with strips of metal foil tape (available at Radio Shack in those ancient days when reel-to-reel and 8-track cassette was the latest audio medium). A brush coat of epoxy sealed all. Some later H-19’s had blue-tinted upper panes, but the photo from which this one was built showed clear glass throughout. A molded-in deflector plate around the engine cooling grilles had to be sanded away, as US A/C apparently lacked this appendage.
| COLORS & MARKINGS |
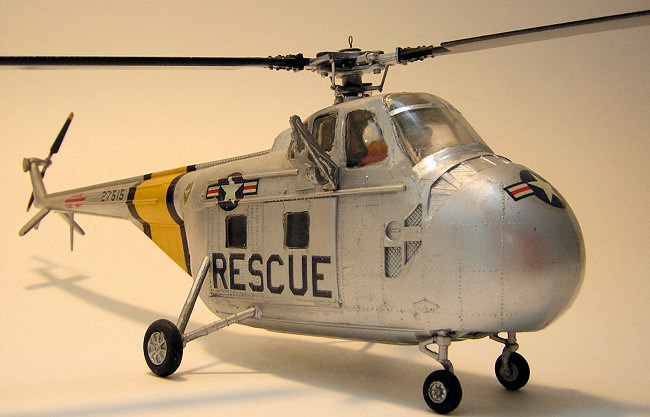
The tail band was sprayed yellow then masked. Windows were taped over, then Testors silver from the little square bottle (I think it was still 25 cents at that time) covered everything. Decals came from the spares box with the words “RESCUE” cut from individual letters from a Microscale (which Superscale then was) sheet. Pro Tec acrylic varnish was the overcoat.
| FINAL ASSEMBLY |
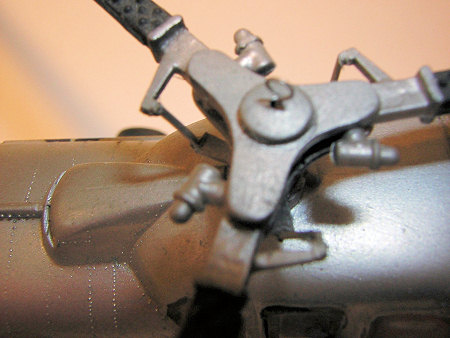 The major task remained of building the main rotor assembly. The hub plates and
blade attach points had to be thinned. Using the Revell 1/48 instruction sheet
as a guide, I fashioned from scratch pitch links, swash plate followers, and all
those bits and pieces that whirl around at a zillion RPM without somehow flying
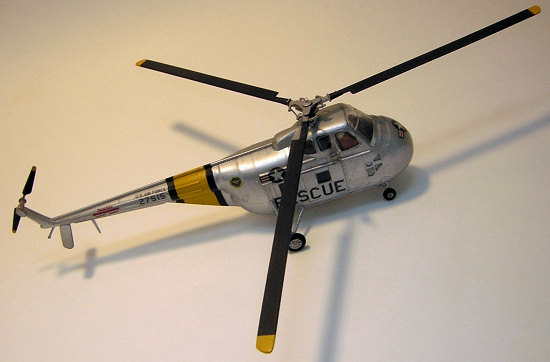
apart. I gave the blades a bit of sag by gently bending them; but the plastic
sprang back
The major task remained of building the main rotor assembly. The hub plates and
blade attach points had to be thinned. Using the Revell 1/48 instruction sheet
as a guide, I fashioned from scratch pitch links, swash plate followers, and all
those bits and pieces that whirl around at a zillion RPM without somehow flying
apart. I gave the blades a bit of sag by gently bending them; but the plastic
sprang back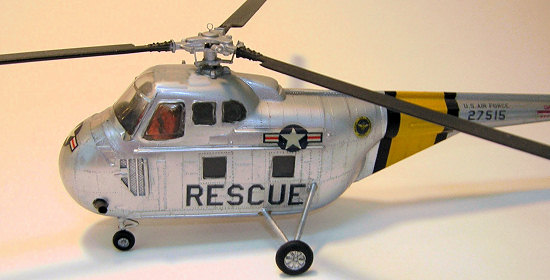 to shape. Back in
them days I wasn’t into par-boiling plastic pieces, which would have made the
bend permanent.
to shape. Back in
them days I wasn’t into par-boiling plastic pieces, which would have made the
bend permanent.
New wheels and struts had to be found in the spares bin. Addition of fins, hoist, exhaust stack, antenna, and finally anti-torque rotor completed the job.
| CONCLUSIONS |
No a bad representation; but I’ve got the Italeri/Revell kit in the stash and will tackle it as soon as I get back into whirlymaflopter mode.
April 2007
Copyright ModelingMadness.com. All rights reserved. No reproduction in part or in whole without express permission from the editor.
If you would like your product reviewed fairly and fairly quickly by a site that has over 350,000 visitors a month, please contact the editor or see other details in the Note to Contributors.