Airfix 1/48 Gnat T.1
|
KIT #: |
A05123 |
|
PRICE: |
£16-99 |
|
DECALS: |
Two options |
|
REVIEWER: |
Frank
Reynolds |
|
NOTES: |
New tool kit |
The Folland Gnat was initially designed as a low cost lightweight single
seat interceptor fighter, armed with twin 30mm cannon and it first flew in
1955. It was designed by W.E.W Petter, the engineer whose talent included
the design of two highly influential military jet aircraft , the English
Electric Lightning and the Canberra. The single seater was not required by
its intended customer, the RAF, but was exported to Finland, Yugoslavia and
India, the latter building it under licence and developing it as the HAL
Ajeet. However the Royal Air Force issued a requirement for a high speed jet
trainer in 1957 and an extensively redesigned unarmed two seat Gnat first
flew in August 1959. The RAF issued orders for a series of production
batches, totalling 105 aircraft, the last being delivered in 1965.
 Powered
by a Bristol Siddeley Orpheus engine of 4,700lb thrust, the little Gnat had
a wingspan of just 22ft 1in. and a length of 28ft 8ins. It was capable of
Mach 0.95. It was unconventional in size and appearance with its highly
loaded shoulder mounted wing and the fuselage mounted main undercarriage
served as the airbrakes. The tandem cockpit was a tight fit with the rear
seat occupant seemingly crammed into a notch in the leading edge of the wing
and hemmed in by the engine air intakes. It was also a mechanic’s nightmare
with equipment crammed into small spaces and it had needed the design of
special light weight ejector seats and miniaturised motors for the powered
flight controls.
Powered
by a Bristol Siddeley Orpheus engine of 4,700lb thrust, the little Gnat had
a wingspan of just 22ft 1in. and a length of 28ft 8ins. It was capable of
Mach 0.95. It was unconventional in size and appearance with its highly
loaded shoulder mounted wing and the fuselage mounted main undercarriage
served as the airbrakes. The tandem cockpit was a tight fit with the rear
seat occupant seemingly crammed into a notch in the leading edge of the wing
and hemmed in by the engine air intakes. It was also a mechanic’s nightmare
with equipment crammed into small spaces and it had needed the design of
special light weight ejector seats and miniaturised motors for the powered
flight controls.
The Gant was a hot ship but a useful link between a basic trainer such as
the Vampire and the front line Lightning. However it was not perfect, being
so small that pilots of above average stature could not comfortably fit in
and forcing the RAF to maintain some Hawker Hunter two seat trainers in
order to cope. The Gnat found its fame as the public face of the Royal Air
Force, equipping its official aerobatic team, the Yellow Jacks, in1962, that
evolved into the Red Arrows in 1964. The small, agile Gnat had a high rate
of roll and was ideal for a nine-ship flight demonstration team, remaining
in the public view until 1979 when the Red Arrows re-equipped with the BAE
Hawk.
This
is supplied in Airfix’s now familiar style of tray-type top opening box with
spectacular full colour artwork. There are three parts frames in pale blue
plastic and one of clear. A comprehensive decal sheet has extensive airframe
stencils and walkways and a choice of two colour finishes, both RAF, since this
air arm was the only user of this aircraft. They are:
Central Flying School, Little Rissington,
Gloucestershire
,England 1964 – an incredibly English location.
Silver airframe
with large areas of Dayglo Orange to nose, tail and wingtips.
No 4
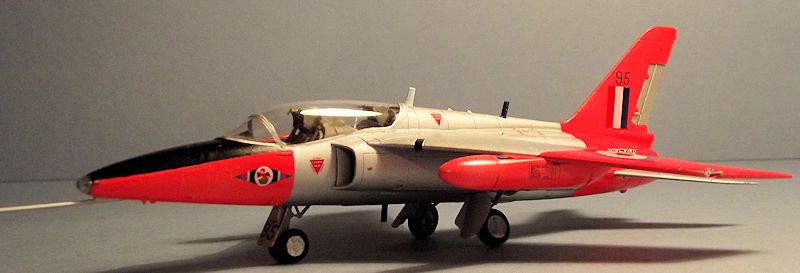
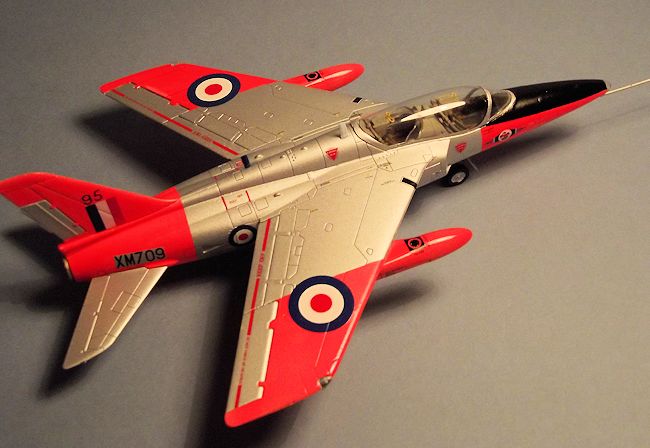
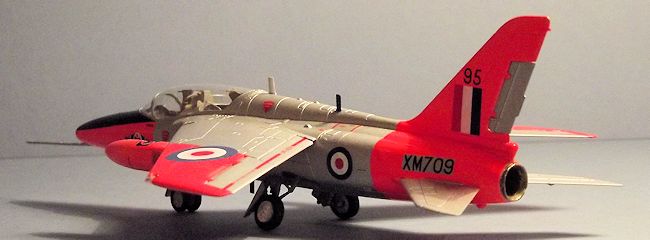
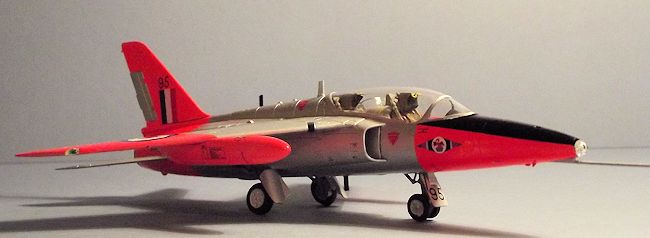
Flying Training School, RAF Valley, Anglesey, Wales, 1973.
Mainly Red with
white fuselage flashes and Light Aircraft Grey under wings.
 The
instructions run to twelve pages in an A4 booklet with full colour four-views
keyed to Airfix paint numbers and exploded views running to 38 stages of
construction,
The
instructions run to twelve pages in an A4 booklet with full colour four-views
keyed to Airfix paint numbers and exploded views running to 38 stages of
construction,
The
parts are sharply moulded with no trace of flash that I could find, although one
tiny part of an ejection seat headrest was short shot and needed a repair with a
small triangle of plastic card and similarly the rear corner of the lower right
wing tip. The etched surface detail seems to be more subtle than some of the
recent offerings from this manufacturer.
The
kit provides options that must be decided before construction :
It can be built
with the undercarriage retracted, using a stand that can be bought separately.
The canopy can be open or closed and separate mouldings are provided. Flaps and
control surfaces can be deflected. One pilot figure is provided but if not used,
there are separate seat cushions that have the straps moulded in. The hatch to
the nose avionics bay can be posed open. Wing mounted pinion tanks are optional.
A
close study of the instructions identified the optional parts that I would not
be using. These were cut from the parts frames and set aside in a ziplock bag,
just in case I had got it wrong or had a change of heart during the build. I
elected to have all of the control surfaces neutral and the nose bay closed up,
realising that if I omitted the nose bay avionics tray there would be room for
some nose weight before the hatch was glued shut.
The
breakdown of parts is a little unconventional, so instead of looking for
sub-assemblies I aimed to follow to the sequence set out in the instructions,
but with some minor variations to make painting easier. The interior parts were
pre-painted in their base colour while still on the parts frame using Tamiya
XF-20 Medium Grey.
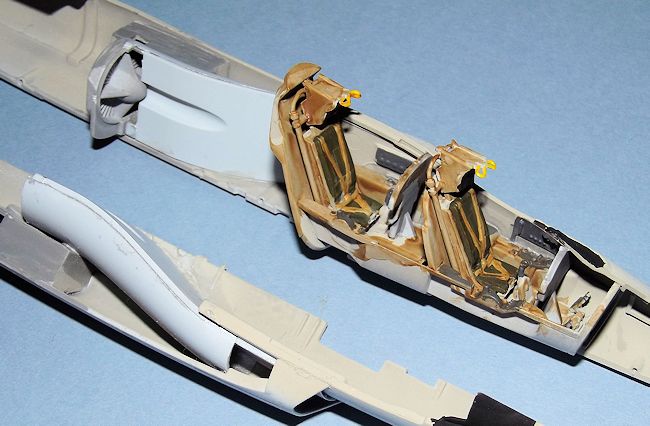 Construction
begins with the cockpit area and a tub forms the floor and side walls, to which
the front and rear bulkheads are glued. The nose wheel bay is a well detailed
box that glues into an opening under the rear seat position. The front and rear
instrument panels/pedestals have raised dials, detailed with instrument decals
that shrank over the raised detail with the application of a little Micro Sol.
Separate rudder bars are provided for each seat position.
Construction
begins with the cockpit area and a tub forms the floor and side walls, to which
the front and rear bulkheads are glued. The nose wheel bay is a well detailed
box that glues into an opening under the rear seat position. The front and rear
instrument panels/pedestals have raised dials, detailed with instrument decals
that shrank over the raised detail with the application of a little Micro Sol.
Separate rudder bars are provided for each seat position.
The
two ejection seats each consist of seven parts and the seat cushions were
painted Olive Green with the seat belts picked out in medium grey. The seats are
reasonably well detailed and include the skeleton mounting frame and tiny pull
handles to the head rests. The front seat is glued onto a dividing bulkhead and
the rear seat onto the rear bulkhead, but I decided to keep the seats separate
for the time being in case they needed any adjustment to clear the canopy. The
two stubby control sticks were glued in place and when dry, the cockpit area was
detailed by picking out some of the boxes and switches to the side panels in
matt Black, then gently dry brushing the cockpit are in Dark Grey to highlight
some of the detail. A quick search of the internet revealed a good range of
cockpit photos for reference purposes.
The
structure of the main airframe is a little unconventional and illustrates to art
of the toolmaker in the 21st
century. The fuselage halves are split conventionally but the intake fairings
from the side of the cockpit, all the way back past the trailing edge of the
wing, are separate sections. Once they are glued in place, they are followed
with a main wheel bay that is detailed with raised internal ribbing and a small
internal box with some pipework detail. Next follows a two-piece intake trunking
that features internal joints at the lower corners, effectively hiding the
joint. The interior of the intakes seems to be silver or white, depending on the
external colour scheme and I elected for matt silver. These sinuous intakes are
fitted from inside each fuselage half and if you trust the confidence and the
skill of the toolmaker they will settle do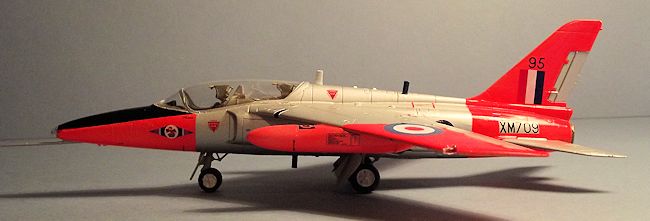 wn
inside the curves of the fuselage. Some time spent dry fitting before committing
to glue and joining the fuselage halves will pay dividends because the combined
parts are a very tight fit and even the thickness of a coat of paint can make a
difference.
wn
inside the curves of the fuselage. Some time spent dry fitting before committing
to glue and joining the fuselage halves will pay dividends because the combined
parts are a very tight fit and even the thickness of a coat of paint can make a
difference.
One
satisfied with the fit, I glued the engine front that joins the two intake
trunks into the right hand fuselage half, together with the jet exhaust, both of
which feature raised fan blade detail, although little of that can be seen,
buried deep within the structure. The cockpit tub was glued into the right hand
fuselage half and the two halves joined.
Attention now turns to the wing and the upper surface is moulded in one piece,
tip to tip, eliminating any problems with setting the angle of the wing’s
anhedral. Marked out holes need to be drilled out on the lower surfaces to
locate the pinion tanks, if required. The lower wing surfaces are in left and
right halves and intended to trap the ailerons when they are glued in place,
allowing them to pivot. Some Gnat colour schemes require the flight control
surfaces to be in a different colour from the surrounding structure, so some
builders might prefer to cut away the tiny hinge pivots so that the control
surfaces can be added after painting.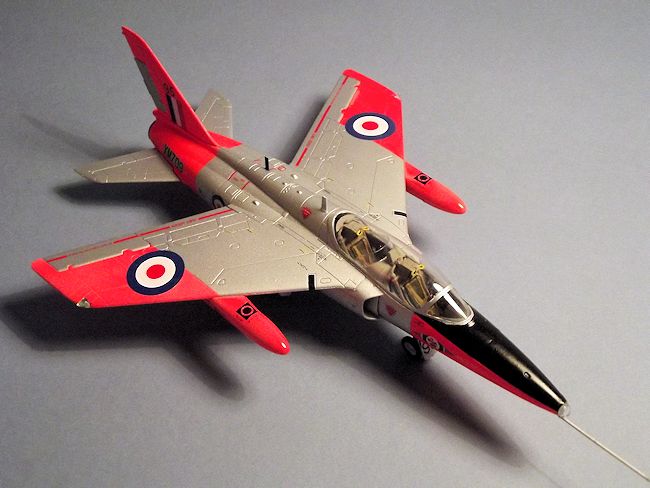 By contrast, the adjoining trailing edge flaps are fixed in position and
alternative mouldings are provided or fixed or extended options.
By contrast, the adjoining trailing edge flaps are fixed in position and
alternative mouldings are provided or fixed or extended options.
The
wing drops in place as a large saddle-like structure that wraps around the rear
cockpit and once again it was a tight, but positive fit, requiring a minimum of
fettling to get to close up. The structure was left overnight to dry after which
the first order of business was to dry fit the ejector seats and test fit the
canopy and I found the need to shave down the base of the rear seat to allow the
canopy to sit down satisfactorily. So the seats were glued in followed by the
coaming between the front and rear cockpits and the clear blast screen for the
rear seat. The canopy was masked with Tamiya tape, trimmed with a fresh scalpel
blade and fixed with Humbrol Clear Fix. The masking was relatively simple,
since, unusually for a British-built aircraft of the period, the framing was
minimal.
I
decided to leave the tail planes off until final assembly, so that they could be
painted separately. The vertical tail consists of one half moulded into the left
fuselage side, to be completed with a separate panel glued onto the right side,
trapping the rudder in place. I trimmed off the tiny pivots on the rudder so
that too could be added after painting.
The
nose area of the fuselage has a car hood type of panel that can be installed
raised to permit access to the nose avionics bay. I had already decided to omit
the well detailed boxes from the nose bay and instead inserted 5 grams of lead
shot, mainly as a precaution against the Gnat being a tail sitter, although the
main gear is so close to the trailing edge it might not need it. So the upper
nose hood was glued shut to conclude the basic build.
I had chosen the option with large areas of
dayglo, so after the transparencies were masked with Tamiya tape the whole
airframe was painted with Tamiya White Fine Surface primer applied from a rattle
can. Thanks to Airfix’s precise engineering, no filler was required and I could
proceed to painting the large areas of dayglo to the wings, nose and tail, using
Humbrol acrylic No 209 Dayglo red-orange. To my surprise this proved to be the
hardest part of the build. This particular paint has the heaviest pigment that I
have found in years and straight from the pot has a glue-like consistency. It
took me the best part of a day of trial and error, mixing and spraying,
variously trying to thin the paint with water and proprietary thinners,
until I found that about 20% Tamiya thinners was close
enough. Even so, the first attempt with this combination had runs all over the
finish, so it was stripped and redone. At last I had a dayglo that I considered
acceptable but there are still one of two areas that are patchy, so I had to
convince myself that this would be an accurate rendition of a paint finish that
soon weathered in service use. The bright areas were masked off and the main
airframe finished in Tamiya XF-16 Flat Aluminium – this is a silver that I
find gives an effe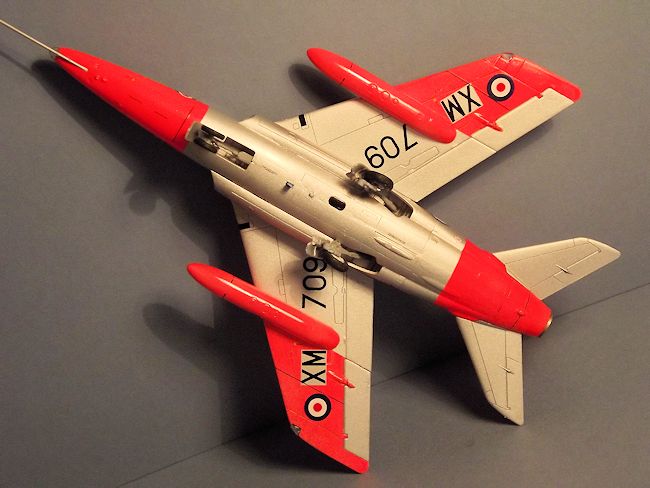 ctive
scale-like representation when later covered with a couple of hand brushed coats
of Future/Klear floor polish. The paintwork was finished with a squirt of XF-1
Flat Black to the masked off nose area and the tail pipe hand painted in Tamiya
X-32 Titanium Silver washed over with some dirty thinners to give a used effect.
The airframe was treated to two brushed coats of Future/Klear floor polish to
provide a base for the decals.
ctive
scale-like representation when later covered with a couple of hand brushed coats
of Future/Klear floor polish. The paintwork was finished with a squirt of XF-1
Flat Black to the masked off nose area and the tail pipe hand painted in Tamiya
X-32 Titanium Silver washed over with some dirty thinners to give a used effect.
The airframe was treated to two brushed coats of Future/Klear floor polish to
provide a base for the decals.
The
decals sheet is fully up to the current good standards to be found in an Airfix
kit, with bright colours and sharp printing and they went on easily, responding
well to Microscale’s Micro Sol and Micro Set decal solutions. There are nearly
100 decals to place, so a methodical plan is needed. I dealt first with the
under surfaces, then the top, then the sides, crossing each decal off the colour
plan in the instructions as I went along. The sheet includes extensive
stencilling and warning signs and a few of the tiniest proved too much for my
eyesight. The dayglo showed through the white of the roundels as a pink tinge,
so those under the wing were doubled up, using two spares from the kit’s sheet
and the upper wing insignia doubled by applying a pair from the decal dungeon.
I then
added the pre-painted wing tanks, horizontal tail and rudder. . The airframe
then received a further coat of Future/Klear to seal the decals in place
It
was now time to add the undercarriage and Airfix have done an excellent job in
moulding the complex gear legs essentially in one piece, providing positive
alignment and detailed notes in the instructions showing the angle of the main
legs. The legs were painted Light Grey and the wheels have White hubs with the
tyres picked out in Tamiya XF-85 Rubber Black.
All
that was left was attachment of the wing tip and nose landing light covers, the
gear doors and a few blade aerials to complete a very satisfying build.
This sort of product puts Airfix in the front rank of
kit producers in my opinion. It can be built straight from the box with a
satisfying result, yet provides scope for more refinement for those who need it.
It builds fairly easily, providing that the complex interior is
carefully assembled, bearing in mind the parts are so finely engineered that
even the thickness of a coat of acrylic paint, especially brush painted, can
interfere with a precise fit.
It was a pleasure to build and adds to what has
now turned out to be a short theme of jet trainers in my showcase. It keeps
company with my attempt at the same subject in 1:72 scale.
Highly recommended for its quality and bargain price.
The kit instructions; the Internet; my own photo
archives.
Frank Reynolds
February 2015
If you would like your product reviewed fairly and fairly quickly, please contact the editor or see other details in the
Note to
Contributors.
Back to the Main Page
Back to the Review
Index Page