Fly 1/48 BAC 167 Strikemaster
| KIT #: | 48015 |
| PRICE: | £30-00 |
| DECALS: | Four options |
| REVIEWER: | Frank Reynolds |
| NOTES: | Short run with resin parts |
| HISTORY |
The BAC Strikemaster is the ultimate development of the Hunting Percival Jet
Provost, a dedicated trainer aircraft that first flew in June 1954, but was
itself a radically re-engineered version of an earlier piston engine trainer,
the Percival Provost, which had its maiden flight in February 1950.
The type was originally conceived as an unarmed military trainer with side by
side seating and was revolutionary in introducing the concept that a rookie
pilot could start training on a jet from day one.
After four years of trials the Royal Air Force introduced the Jet Provost
Mk.3 into service in 1959 with a 1,750lb thrust engine. By 1961, the RAF was
taking delivery of the Mk.4 version with a 2,500lb thrust Viper engine. A
requirement for a faster, higher, training regime, resulted in the Jet Provost
Mk.5, first delivered in 1969, which had a major redesign of the fuselage nose,
incorporating a fully pressurised cockpit and the Viper engine increased to
3,000lb thrust. By this time Hunting Aircraft had become part of the BAC group.
The RAF was to operate over 490 of the Mks. 3, 4 and 5.
 The Mks 3 and 4 had been sold in limited numbers to overseas air forces, with
minimal modification, as armed trainers and the airframe design had been
progressively strengthened, so BAC saw an opportunity to further overhaul the
strong, proven airframe and modify the Mk.5 to provide a dedicated training and
attack aircraft to meet a recognised Counter Insurgency role that was being
increasingly studied by the World’s air
forces.
The Mks 3 and 4 had been sold in limited numbers to overseas air forces, with
minimal modification, as armed trainers and the airframe design had been
progressively strengthened, so BAC saw an opportunity to further overhaul the
strong, proven airframe and modify the Mk.5 to provide a dedicated training and
attack aircraft to meet a recognised Counter Insurgency role that was being
increasingly studied by the World’s air
forces.
What emerged was a useful and versatile aircraft, at relatively low cost, that
appealed to smaller air forces around the World. Again an uprated engine was
installed, this time a Viper 535 of 3,400lb
thrust.
There were four under wing pylons capable of carrying a total 3,000lb of stores
and the Strikemaster was equipped as standard with two 7.62mm machine guns
located under the engine intakes. It first flew in October1967 and 150 were
manufactured, with the last appearing in 1981. As was common with British
warplanes of the era, a double digit Mk. Number was given to export variants and
a unique one for each export customer to reflect variations in specification,
such as different navaid fit. The principal orders came from
Ecuador, for the Mk.89 ( 16 aircraft); Kenya, Mk.87 (6); Kuwait, Mk.83 (12); New
Zealand, Mk.88 (16); Oman, Mk.82 (25); Saudi Arabia, Mk. 80 (25); Singapore,
Mk.84 (16); South Yemen, Mk. 83 (4);
The aircraft is aptly described by Adrian Balch in the Warpaint book as
“virtually unbreakable in tactical use under even the harshest of conditions”.
It was a success in a niche market. Gradually phased out of service towards the
end of the 20th Century, a number of active Strikemasters survive as
popular and reliable privately owned warbirds in the USA, Australasia and the
UK.
| THE KIT |
It arrives in an end opening box with a box top painting of a New Zealand
aircraft. The box side helpfully has a colour illustration of the decal sheet
and the base has full colour two-views of the four options on offer. These cover
the New Zealand Air Force, Royal Saudi Air Force, Ecuador (actually identified
as Columbia by Fly) and the Royal Omani Air Force. The contents are neatly
bagged to minimise transit damage.
The kit is short run, mixed media and in presentation reminiscent of a Special
Hobby or Classic Airframes product. There are three parts frames in light tan
coloured plastic which show slight flash around some of the smaller components.
There are separate wing tips and nose strakes, not for use, which demonstrates
that these mouldings will equally apply to a Jet Provost Mk.5. The parts are
generally neat and clean, with no obvious sinkage although the recessed detail
is so light it fades to almost nothing in places and some parts would benefit
from light rescribing as the build progresses. Some of the sprue gates cross
onto the
joining surfaces of
parts so a careful clean up and test fit is recommended, as for any short run
kit There are a few ejector pins on the inner faces of major components that
need to be trimmed away, but this is not excessive. The smallest parts frame
consists of eight parts to make four under wing tanks and these are the only
stores provided for the wing pylons. Those seeking to model the range of bombs,
rockets or gun packs carried by the Strikemaster will have to look elsewhere.
One frame of clear parts provides the sliding canopy, separate windscreen, nose
light and tip tank navigation lights. The distinctive Miniature Detonation Cords
that feature on the full size are absent from the mouldings and are likely to be
difficult to reproduce. There is a bag of resin that provides parts for
 the
cockpit interior, being the cockpit sides, centre console, ejector seats and
control sticks. Exterior details in cream coloured resin consist of the wheels,
gear leg linkages, cartridge case ejector ports and the jet pipe nozzle. The
resin is cleanly cast.
the
cockpit interior, being the cockpit sides, centre console, ejector seats and
control sticks. Exterior details in cream coloured resin consist of the wheels,
gear leg linkages, cartridge case ejector ports and the jet pipe nozzle. The
resin is cleanly cast.
The instructions are an eight page A5 booklet in greyscale. Colour call outs do
not cross reference to any particular manufacturer. A parts chart is provided
and construction covers eighteen stages of exploded views, while there are
separate diagrams for the differences in airframe stencilling between the
illustrated air forces – a thoughtful touch.
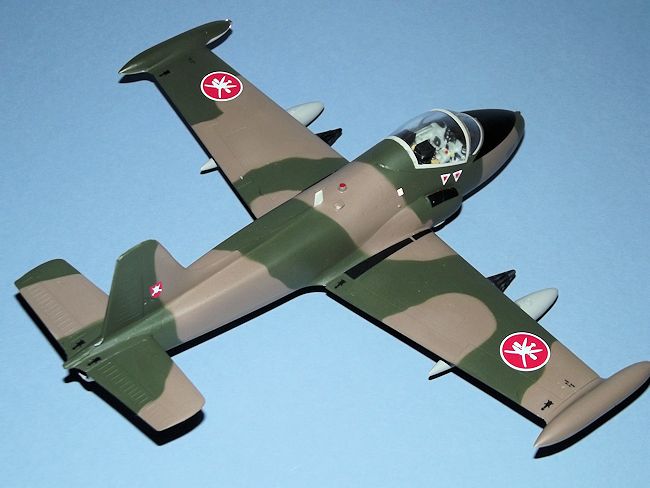
The decal sheet appears well printed, with good colour density and register but there is one flaw. The red Kiwis to the centre of the New Zealand roundels all face to the left, where in reality they are applied as handed pairs, each side facing forward. The red zigzag motif on the tip tanks, carried by the Ecuadorian version, does not appear on the decal sheet but this could be overcome with some careful masking.
| CONSTRUCTION |
This
was part of my Telford Treat for 2014. I made my annual pilgrimage to Scale
Model World, the annual two-day extravaganza of IPMS UK. Part of the experience
for me is the chance to buy kits from Europe direct from European vendors and to
meet them face to face. These guys were not only friendly, they were persuasive.
I came home with six kits and this is one of them.
 ll of the parts were washed in lukewarm water to which a few drops of washing
up liquid were added in order to remove any mould release agent, then patted dry
with a tissue and left overnight to dry off completely. Wearing a mask as a
precaution against inhaling any dust, I cut the resin parts from their casting
blocks with a razor saw and cleaned up the cut areas with sanding sticks.
ll of the parts were washed in lukewarm water to which a few drops of washing
up liquid were added in order to remove any mould release agent, then patted dry
with a tissue and left overnight to dry off completely. Wearing a mask as a
precaution against inhaling any dust, I cut the resin parts from their casting
blocks with a razor saw and cleaned up the cut areas with sanding sticks.
Being a short run kit, extra time should be allowed to check each stage of the
build carefully ensuring that all parts fit and that the joining faces between
components are straight and true.
I try to plan ahead and identify any simple sub-assemblies that can be completed
early on, so as to get a feel for the kit and how the plastic reacts to glues
and sanding. I began by gluing together the halves of the four drop tanks and
the two wing tip tanks. The tanks have a representation of the sway braces
moulded onto the top surface and these were sanded away to allow the tanks to
fit more snugly against the wing pylons. The undercarriage legs were partly
assembled by attaching the resin torque links to the plastic main legs and the
short nose leg glued to the angled wheel fork.
Next, the wings consist of simple upper and lower panels to left and right
halves but before they are joined a resin box is superglued onto each upper wing
to form the undercarriage well and four holes for the under wing pylons are
drilled out on the lower surfaces.
The main build begins with the cockpit interior which is a mixture of plastic
panels and resin parts for the more sculpted components. Most of the plastic
parts have no joining pins so tiny tabs of plastic card were glued around the
inner edges of the fuselage halves to aid alignment.
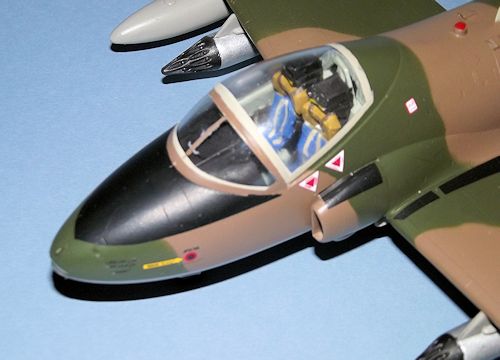
 The cockpit consists of a plastic floor and rear bulkhead, with resin side walls
that are glued into the fuselage halves with cyano. The instrument panel and
coaming are plastic with raised detail. No instrument decal is provided. The
cockpit is furnished with two resin control sticks, a centre throttle box and
two reasonably well cast ejector seats that incorporate seatbelt detail. I found
it best to glue in the floor and rear bulkhead first, aligning them with ribs
formed into the fuselage halves, then add the resin components. However the
ejector seats were kept back in case they needed to be juggled and trimmed to
fit under the clear canopy – as proved to be the case. The seats were painted
black, with cushions picked out in dark blue and the head rests in tan. The seat
belts are in a pale tan colour. The ejector seats were brush painted with a
selection of acrylics from the Citadel range.
The cockpit consists of a plastic floor and rear bulkhead, with resin side walls
that are glued into the fuselage halves with cyano. The instrument panel and
coaming are plastic with raised detail. No instrument decal is provided. The
cockpit is furnished with two resin control sticks, a centre throttle box and
two reasonably well cast ejector seats that incorporate seatbelt detail. I found
it best to glue in the floor and rear bulkhead first, aligning them with ribs
formed into the fuselage halves, then add the resin components. However the
ejector seats were kept back in case they needed to be juggled and trimmed to
fit under the clear canopy – as proved to be the case. The seats were painted
black, with cushions picked out in dark blue and the head rests in tan. The seat
belts are in a pale tan colour. The ejector seats were brush painted with a
selection of acrylics from the Citadel range.
The cockpit was sprayed in pale grey (Tamiya XF-12 JN Grey) with parts of the
instrument panel and side consoles picked out in Black. Next the resin jet pipe
was glued in, painted in Tamiya XF-56 Metallic Grey. The instructions call out
the need for nose weight, but do not specify how much. I guessed at 10 grams of
lead shot, which was anchored inside the nose area in a bed of Milliput epoxy
putty. I reasoned that if I had to, more nose weight could be slipped in through
the aperture for the nose mounted light. The fuselage halves were joined and
left overnight to dry.
As with many short run kits, it appears that slight mould wear has caused the
edges of the main parts to lose their squared corners. A little filler was found
to be necessary along the centre line join between the fuselage halves. The
engine intakes come next and consist of a splitter plate with a separate outer
curved section. The instructions suggest that the interiors are painted in
camouflage colours, but so little can be seen through the small apertures that I
settled for a quick blast of matt Black. The intakes were glued in place,
followed by two small intakes on the fuselage spine and small resin components
for the gun bulges under the intakes and cartridge ejector chutes. Again left to
harden, some filler was then applied to smooth the intakes into the main
fuselage.
The wing tip tanks and underwing tanks were next treated with a smear of filler
along the centre line joints and the tip tanks glued in place. The wings were
detailed with four resin flap guides to the under surfaces.
 With the wings left to settle, attention returned to the cockpit and the
windscreen and hood glazing was dry fitted to check that the ejector seats would
fit under a closed canopy. Some trimming was necessary under the seat bases to
enable them to sit down far enough. The seats are correctly handed with angled
canopy breakers to the top, both of which required just a whisker of trimming to
fit them under the slope of the canopy. The trimmed areas were retouched and the
seats fixed with five minute epoxy that allowed some readjustment while it
hardened.
With the wings left to settle, attention returned to the cockpit and the
windscreen and hood glazing was dry fitted to check that the ejector seats would
fit under a closed canopy. Some trimming was necessary under the seat bases to
enable them to sit down far enough. The seats are correctly handed with angled
canopy breakers to the top, both of which required just a whisker of trimming to
fit them under the slope of the canopy. The trimmed areas were retouched and the
seats fixed with five minute epoxy that allowed some readjustment while it
hardened.
The wings and one piece horizontal tail sections were glued into tongue and slot
locations in the fuselage; some trimming and fettling was necessary to the
tongues and slots to
get a snug fit
but the joints closed up satisfactorily. The basic airframe was left to dry
overnight.
| COLORS & MARKINGS |
The canopy was masked with Tamiya tape and the whole airframe primed in Grey
auto primer from a rattle can. Any small dents and scratches that were revealed
were filled with a smear of Revell Plasto filler.
All paint was applied with an Iwata HP-C airbrush and I
used Tamiya flat acrylics.
The cockpit area was sprayed over with XF-72 Deck Tan to replicate the very
distinctive sealant strips around the glazing and the canopy masking
repositioned.
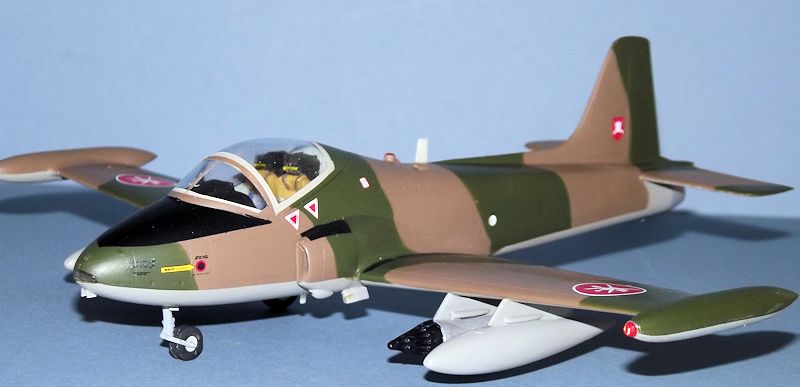
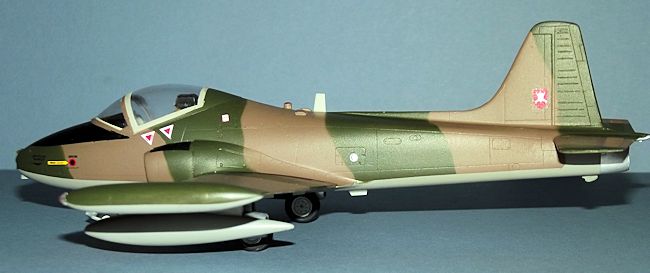
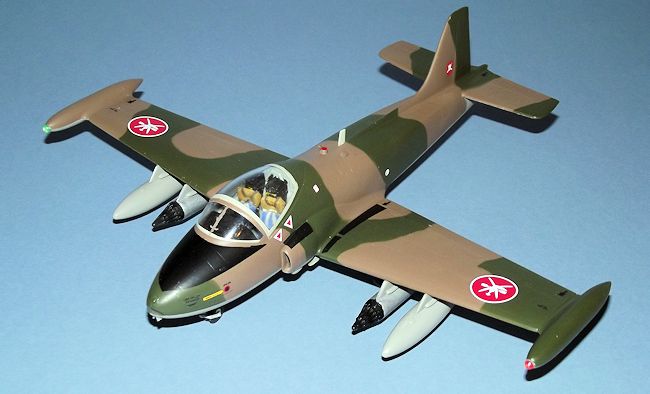
I chose the finish the plane as one of the hard worked Omani fleet which gave
great service from 1969 to 1997. On retirement, some of the airframes had less
than ten hours life left and it is reported that every one of the 25 had some
sort of combat damage. The under surfaces were sprayed in XF-20 Medium Grey with
the drop tanks and pylons in the same colour. The top sides are XF-58 Olive
Green and XF-72
 JGSDF Brown. The Brown was applied first then the Green marked
out with rolled strips of Blu-Tack low
tack putty and masked with Tamiya tape. The jet pipe was finished in Flat
Aluminium. The nose anti-glare panel was masked off and sprayed matt Black.
JGSDF Brown. The Brown was applied first then the Green marked
out with rolled strips of Blu-Tack low
tack putty and masked with Tamiya tape. The jet pipe was finished in Flat
Aluminium. The nose anti-glare panel was masked off and sprayed matt Black.
The paint was sealed with two brushed coats of Future/Klear floor polish to
provide a glossy base for the decals. The decals went on fairly easily, although
they are thin and need careful handling. They reacted well to Micro Set and
Micro Sol decal setting solutions.
Fly
provide a good range of stencils and warning signs to decorate the paintwork. A
final airbrushed coat of Xtracrylix matt varnish sealed the finish and the
canopy masks were removed.
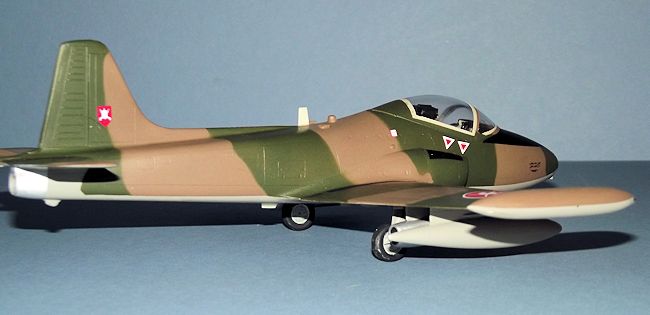
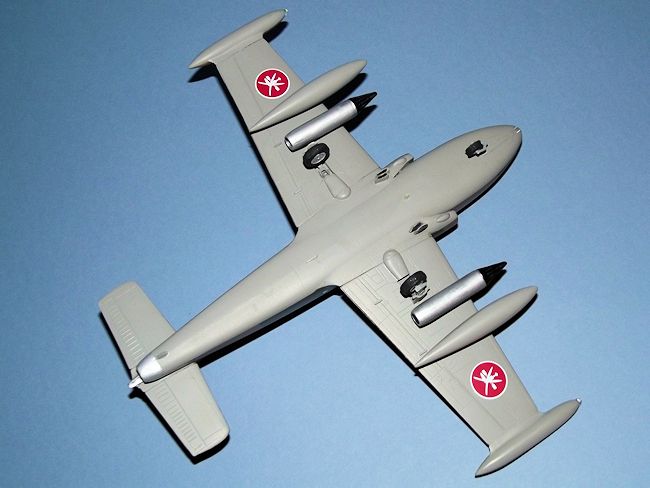
The sturdy and simple undercarriage was added next, painted Light Aircraft Grey with tyres finished in Tamiya Tyre Black. Most of the gear doors are of the flip-flop type and are only open while the gear is cycled. To add a little variety, the inner pylons were loaded with pods for SNEB unguided rockets, left over from a series of Airfix Canberras that I built a couple of years back. Glazing for the nose and tip lights and fixing small external aerials completed the build.
| CONCLUSIONS |
Fly has
provided a reasonable package for an aircraft that occupies a niche market in
both the full size and the model World. It is well engineered and goes together
with little fuss. The box contains most of what is needed to produce a
convincing Strikemaster, although a pre-cut canopy mask would have been
appreciated. It is an uncomplicated product that would serve as a useful
introduction to mixed-media kits.
I thoroughly
enjoyed the build and recommend it.
| REFERENCES |
BAC Jet
Provost and Strikemaster, by Adrian Balch, Warpaint Books Series No 82, 2009
Jet Provost by Bob Clarke, Amberley Publishing plc 2008
December 2014
Thanks to for the review kit. You can find this kit at your favorite hobby shop or on-line retailer.
If you would like your product reviewed fairly and fairly quickly, please contact the editor or see other details in the Note to Contributors.