|
KIT: |
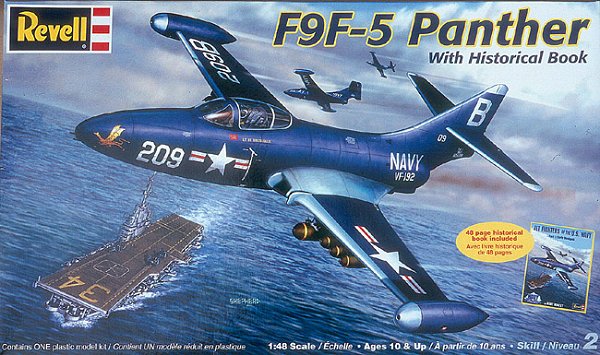
Revell 1/48 F9F-5 Panther |
|
KIT # |
6865 |
|
PRICE: |
$28.45 |
|
DECALS: |
Two aircraft |
|
REVIEWER: |
Norris Graser |
|
NOTES: |
Reissue |
|
THE KIT |
Revell has just re-issued the F9F-5 Panther kit in 1/48th scale. Originally tooled and released in 1990, the kit features raised panel lines. Changes to the model include: modeler friendly neutral gray plastic rather than the dark blue previously seen; a nice decal sheet, featuring a Marine F9F-4 and an F9F-5 featured in the movie, The Bridges at Toko-Ri; and a very nice little surprise not even mentioned in the instructions, the AN /ARA-25 fairing, which was used on Panthers late in their career. Also included is a nifty softbound reference featuring thirteen early Navy jet designs, by Bert Kinzey.
Here are a few modeling notes for use when building this model.
|
CONSTRUCTION |
 The cockpit consists of a
tub, instrument panel, rudder pedals and joystick. There is also a
two-piece pilot figure, if you wish to use one. The correct four-piece
ejection seat assembles in no time, however when you sandwich the completed
cockpit between the two fuselage halves, you will find the instrument panel is a
bit fiddly when butting against the panel cover. I'd suggest that you use
a slow setting glue and add the panel when you mate the fuselage halves,
allowing a little time to align it more precisely.
The cockpit consists of a
tub, instrument panel, rudder pedals and joystick. There is also a
two-piece pilot figure, if you wish to use one. The correct four-piece
ejection seat assembles in no time, however when you sandwich the completed
cockpit between the two fuselage halves, you will find the instrument panel is a
bit fiddly when butting against the panel cover. I'd suggest that you use
a slow setting glue and add the panel when you mate the fuselage halves,
allowing a little time to align it more precisely.
Before enclosing the cockpit within the fuselage halves, you will need to add the tail pipe, tail hook and nose guns to the inside walls. I chose to skip the kit guns and added metal tubing later. Brass tubing looks a bit more authentic and without the plastic guns protruding, you will be able to sand the nose area seam a lot more easily. Don’t forget to add weight to the forward fuselage so that the aircraft will sit properly on its gear. One thing I didn’t care for was that you must attach the nose gear at this time, as the interior parts form the front wall of the nose well. I only mention it because I have built two Panthers and have managed to break the gear on both of them. So be careful!
 You will find the fuselage
goes together easily enough, but some minor filling will be required. I used
cyanoacrylate for filling the seams, notably on the forward fuselage and
the length of the underside. Just a little sanding and it’s onto the next step.
You will find the fuselage
goes together easily enough, but some minor filling will be required. I used
cyanoacrylate for filling the seams, notably on the forward fuselage and
the length of the underside. Just a little sanding and it’s onto the next step.
The horizontal stabilizers will need some sanding and test fitting to adapt to the tail. Before assembling the wings, you need to determine if your Panther will be carrying bombs or rockets and then carve out the appropriate holes in the one-piece lower wing. You can add the appropriate pylons later. The wings are a lot easier and less daunting then they appear, and with care, go together quickly. I suggest test fitting the lower one piece and two topside wings, which lay over the intake trunking before gluing to place. I eliminated the mating pins to insure a good join at the wing root. Minor sanding and you are ready to attach these parts with glue. Again, I suggest liquid glue so you will have a bit of time to position the parts for best fit. Pay attention to the port side aft area at the wing root as it has a tendency to drift open. Don’t worry about tip tank alignment; it is critical to get the wings to match at the wing roots. When the glue has set up, you will have to even out the tip tanks with some sanding and perhaps a little filling. I found medium and fine sanding sticks made quick work of the slightly askew seams on the front end of both tanks, but the seams are more pronounced on the port side.
 On to the weapons pylons,
although the kit has been easy to assemble, (if you paid attention to what you
were doing!) at this point you have to work the pylons over. It almost always
seems to me that manufacturers do not pay quite as much attention to the fit of
weapons as they do the rest of the model, and it appears to be true with the
Panther as well. The bomb racks do not fit the contour of the lower wing
so you will have to do some sanding and test fitting until adapted. The bombs
also have seams that will need filling and sanding. Although the rockets are
well detailed, and ready to paint except for thinning the fins and drilling out
the exhausts, they are not easy to attach to the pylons. This is not so much a
fault of the engineering as it is to the fact that the rockets are held in place
by two small contact areas on the real aircraft. If you use them, you will need
a bit of patience. Cyanoacrylate is the glue of choice here.
On to the weapons pylons,
although the kit has been easy to assemble, (if you paid attention to what you
were doing!) at this point you have to work the pylons over. It almost always
seems to me that manufacturers do not pay quite as much attention to the fit of
weapons as they do the rest of the model, and it appears to be true with the
Panther as well. The bomb racks do not fit the contour of the lower wing
so you will have to do some sanding and test fitting until adapted. The bombs
also have seams that will need filling and sanding. Although the rockets are
well detailed, and ready to paint except for thinning the fins and drilling out
the exhausts, they are not easy to attach to the pylons. This is not so much a
fault of the engineering as it is to the fact that the rockets are held in place
by two small contact areas on the real aircraft. If you use them, you will need
a bit of patience. Cyanoacrylate is the glue of choice here.
|
PAINT & DECALS |
 When painting your Panther,
you will find it easier to spray the metal leading edges first, before applying
the blue finish. Masking the leading edges is not a concern, but you will
definitely find masking the wing tip tanks much easier by starting with the
metalized areas first. I also have found that spraying a metallic finish
anywhere near a dark color just doesn’t work. No matter how much masking you
do, it seems inevitable that the metal will find its way on to the darker
color. The metal on both of my models is Gunze Sangyo Aluminum dusted with
Stainless. For the Blue, the Golden Dragons aircraft was painted with Model
Master Dark Sea Blue FS 15042. For the VMF-334 Marine machine, I used Gunze
Sangyo Midnight Blue. Placed side by side, both colors are very close, so I can
recommend either one. I used Future Floor Acrylic on both models using several
coats and wet sanding with very fine (12000 grade) sanding cloths. I think the
sanding cloths polished the finish more then sanded it and with a little
patience I came up with a very nice, in-scale effect.
When painting your Panther,
you will find it easier to spray the metal leading edges first, before applying
the blue finish. Masking the leading edges is not a concern, but you will
definitely find masking the wing tip tanks much easier by starting with the
metalized areas first. I also have found that spraying a metallic finish
anywhere near a dark color just doesn’t work. No matter how much masking you
do, it seems inevitable that the metal will find its way on to the darker
color. The metal on both of my models is Gunze Sangyo Aluminum dusted with
Stainless. For the Blue, the Golden Dragons aircraft was painted with Model
Master Dark Sea Blue FS 15042. For the VMF-334 Marine machine, I used Gunze
Sangyo Midnight Blue. Placed side by side, both colors are very close, so I can
recommend either one. I used Future Floor Acrylic on both models using several
coats and wet sanding with very fine (12000 grade) sanding cloths. I think the
sanding cloths polished the finish more then sanded it and with a little
patience I came up with a very nice, in-scale effect.
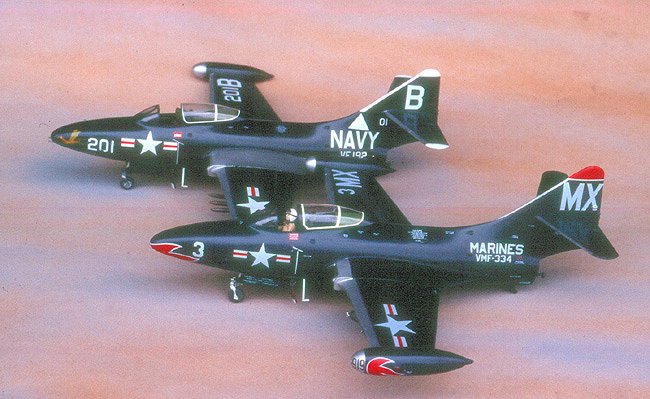
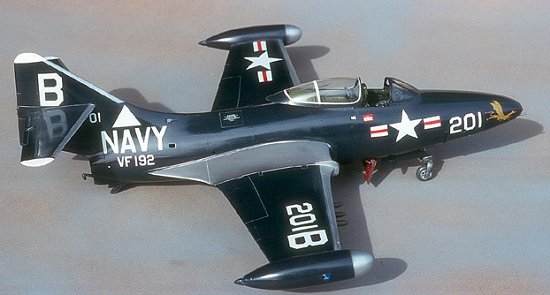
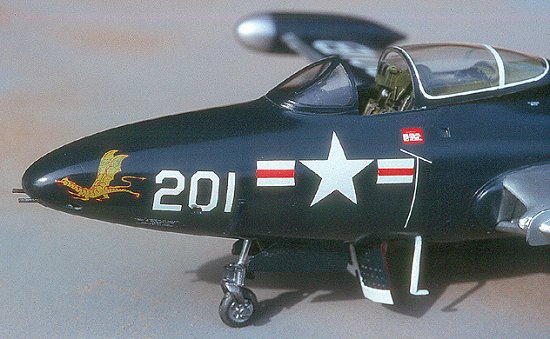
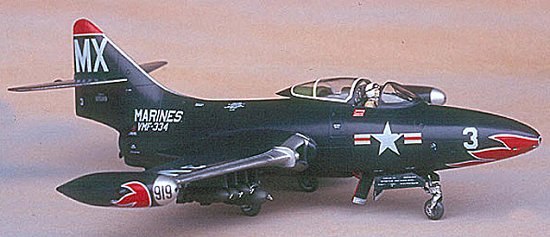
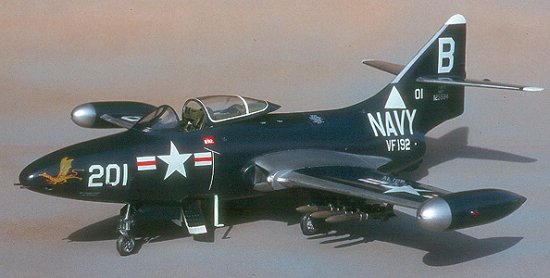
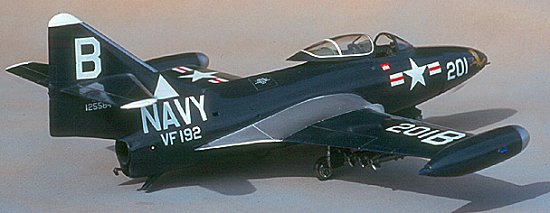
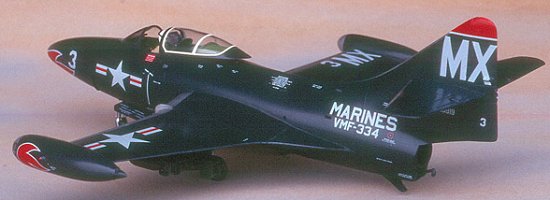
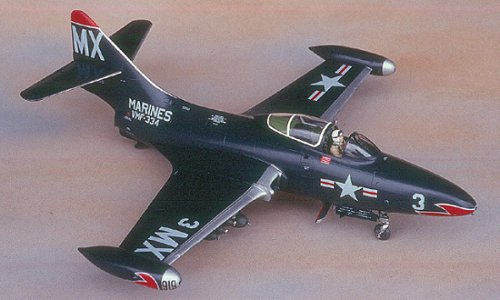
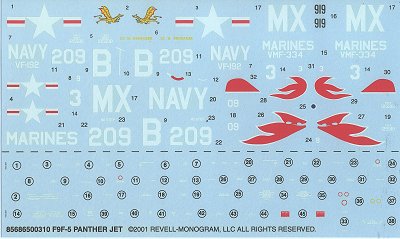 Decals in the kit cover two
aircraft; one is a Marine F9F-4 assigned to VMF-334, which features a colorful
scheme with a red and white flame treatment. The -5 is Lt. Brubaker’s Panther
from the movie, The Bridges at Toko-Ri. I used the Marine markings made
for the kit as this model was used on the box top of the new release. My other
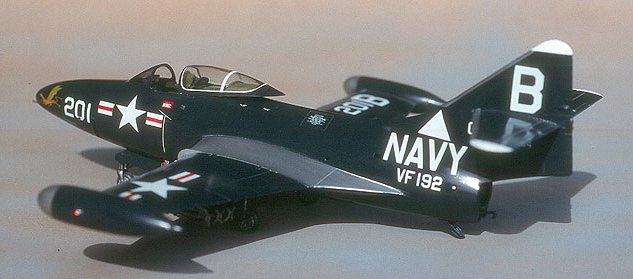
model features markings for a different Golden Dragons F9F-5 Panther. I built
that particular Panther a few years ago and it is from the same squadron used in
the filming of Toko-Ri.
Decals in the kit cover two
aircraft; one is a Marine F9F-4 assigned to VMF-334, which features a colorful
scheme with a red and white flame treatment. The -5 is Lt. Brubaker’s Panther
from the movie, The Bridges at Toko-Ri. I used the Marine markings made
for the kit as this model was used on the box top of the new release. My other
model features markings for a different Golden Dragons F9F-5 Panther. I built
that particular Panther a few years ago and it is from the same squadron used in
the filming of Toko-Ri.
I’d like to comment on both the kit decals from the current release, and also on those used on the earlier build. Decals for my Golden Dragon Panther built for my modeling column in Combat Aircraft magazine in 1999, came from several sources, but the main markings are from SuperScale decal 48-373. The instructions indicate that this particular aircraft also sported white air exercise bands on the wings and top of the tail. I have seen pictures of this Panther and I believe I wisely chose to depict the aircraft prior to, or after the exercise. I understand that it is important to portray the aircraft from your references, but for the life of me, I cannot understand why anyone would add uneven, lap marked, sloppy, somewhat see through white to an aircraft otherwise decked out in uniform markings.
 Getting back to the decal; the
national insignia needed additional attention because of the printing technology
of the time. It was manufactured, (and it was state of the art back then,) with
a wide carrier film that was not feathered. Nowadays we are used to thin,
clear carrier around our decals and the film tapers to almost nothing. It’s not
so noticeable on a military aircraft in flat paint, but if you use older decals
on a high gloss subject, you are going to see a very definite step where the
clear carrier film stops. To correct this, I sprayed undiluted Future into the
stepped area surrounding the insignia. I repeated this 3 or 4 times and when it
was dry, I sanded into the decal, being very careful not to sand away any
color. This worked just fine, but I would suggest that it retrospect, it might
have been easier to trim the carrier film before applying the decal or, better
yet, use a modern decal sheet, which would eliminate the problem altogether.
Getting back to the decal; the
national insignia needed additional attention because of the printing technology
of the time. It was manufactured, (and it was state of the art back then,) with
a wide carrier film that was not feathered. Nowadays we are used to thin,
clear carrier around our decals and the film tapers to almost nothing. It’s not
so noticeable on a military aircraft in flat paint, but if you use older decals
on a high gloss subject, you are going to see a very definite step where the
clear carrier film stops. To correct this, I sprayed undiluted Future into the
stepped area surrounding the insignia. I repeated this 3 or 4 times and when it
was dry, I sanded into the decal, being very careful not to sand away any
color. This worked just fine, but I would suggest that it retrospect, it might
have been easier to trim the carrier film before applying the decal or, better
yet, use a modern decal sheet, which would eliminate the problem altogether.
Kit decals:
There is one small problem you should know about on the kit decals. A two- piece, curved rescue arrow (decal item no. 12 and 13) are not mentioned in the instructions. This arrow is to be used on the Toko-Ri, Golden Dragon aircraft flown by Lt. Brubaker. It is placed on the back painted area of the canopy frame. It is not standard for any other Panther Squadron I have found, but was used on all of the VF-192 Golden Dragons’ aircraft, I have no clue as to why the arrow was omitted from the instructions.
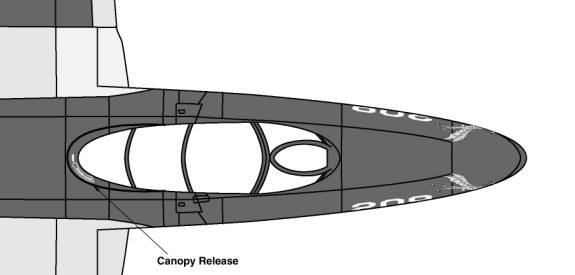
This drawing shows the correct position of the rescue arrow used on
Lt Brubaker’s Toko-Ri Panther but omitted from the kit instructions.
 Revell requested that I
build the model featured on the current release of the Panther using the
markings for VMF-334. As is general practice for a new release, I did not have
access to the kit decals but rather; a proof set was printed on an ALPS printer.
Because of this I cannot comment on the printed quality of the SuperScale
designed kit decals. What I can tell you is that I know particular attention was
paid to test fitting these markings in the art stage to make sure that the
flames would fit the contours of the model. Both wing tank flames went on
without a hitch and the two-part nose decal went over the tapered nose easily. I
can assure you, if the ALPS markings went on without a problem, the kit decals
will work too!
Revell requested that I
build the model featured on the current release of the Panther using the
markings for VMF-334. As is general practice for a new release, I did not have
access to the kit decals but rather; a proof set was printed on an ALPS printer.
Because of this I cannot comment on the printed quality of the SuperScale
designed kit decals. What I can tell you is that I know particular attention was
paid to test fitting these markings in the art stage to make sure that the
flames would fit the contours of the model. Both wing tank flames went on
without a hitch and the two-part nose decal went over the tapered nose easily. I
can assure you, if the ALPS markings went on without a problem, the kit decals
will work too!
As I did the research for the decals in this release, I thought that I might give you a little insight and trivia about the Toko-Ri aircraft. I spent a lot of time looking at a VHS copy of the movie and had major difficulty in finalizing some of the markings. Fortunately, the movie was released on DVD shortly before the project was due and I have to say that DVD media is a lifesaver, especially for the under wing markings. VHS can be stopped anywhere but there is so much blurring of the action that it almost comes down to guess work as to what you are really seeing. DVD just simply freezes a single frame of the image and is very clear.
 Using the DVD media I was able
to note the following: there are two aircraft that show the underside details
plainly, when landing over the bow of the carrier. It’s plain enough to note the
somewhat unusual placement of the aircraft number (209) located only on the port
side flap. I also found by stopping the DVD, to check folded wings of other
Panthers for clues, that there are a lot of swept wing Cougars mixed in with the
Panthers! Something you just can’t see in the film version or VHS format
because of the blur! (If you pay attention, one can also find Gull Gray or
natural metal Banshees in a few scenes, as well.) I also noted that Brubaker's
name is on both sides of the cockpit in yellow, except for an approximately
three second segment, where in the portside name is white. The number 209 is
carried on the starboard wing top, port underside flap, and both sides of the
nose. Just under the stabilizers on both sides are the last two digits, 09.
Except when Brubaker gets out of his crashed F9F for the final part of the movie
and the number magically becomes 04!
Using the DVD media I was able
to note the following: there are two aircraft that show the underside details
plainly, when landing over the bow of the carrier. It’s plain enough to note the
somewhat unusual placement of the aircraft number (209) located only on the port
side flap. I also found by stopping the DVD, to check folded wings of other
Panthers for clues, that there are a lot of swept wing Cougars mixed in with the
Panthers! Something you just can’t see in the film version or VHS format
because of the blur! (If you pay attention, one can also find Gull Gray or
natural metal Banshees in a few scenes, as well.) I also noted that Brubaker's
name is on both sides of the cockpit in yellow, except for an approximately
three second segment, where in the portside name is white. The number 209 is
carried on the starboard wing top, port underside flap, and both sides of the
nose. Just under the stabilizers on both sides are the last two digits, 09.
Except when Brubaker gets out of his crashed F9F for the final part of the movie
and the number magically becomes 04!
|
CONCLUSIONS |
As mentioned, the AN/ARA-25 fairing, which makes it’s first appearance in this re-release, is not used with either squadron featured in the kit. But it does open up the opportunity for several more new schemes never before released on aftermarket decals. (At least two decal outfits are preparing to release new markings for the Panther.) I know first hand that this piece was overlooked and forgotten for over a decade and only by chance was it discovered in time to include in this release. Very classy of Revell to include it even though they didn’t have time to change over to aircraft markings that could take advantage of this item.
Although the kit features raised panel lines, which were the norm back in 1990, it builds into a detailed replica of the dash 4/5 Panther. It’s an easy build if you pay attention to what you are doing and you will probably spend more time working over that gloss blue finish and metal tipped wing tanks then actually putting the model together. Incidentally, it is an ideal kit for your first try at re-scribing raised panel lines, as there are not that many and the majority of them are simple and straightforward.
Please visit IPMS McInstrey at http://www.warpcore.org/~david/
If you would like your product reviewed fairly and quickly by a site that has well over 100,000 visitors a month, please contact me or see other details in the Note to Contributors.