Airfix 1/72 Javelin FAW.9
|
KIT # |
04045 |
|
PRICE: |
£6.00 |
|
DECALS: |
two options |
|
REVIEWER: |
Ant Harrington |
|
NOTES: |
|
HISTORY |
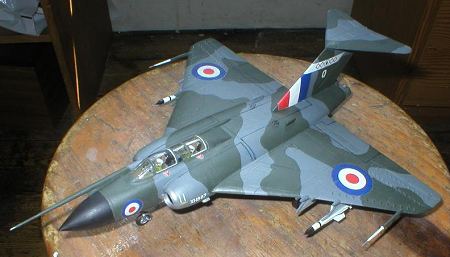
The Javelin was the last Gloster design to enter production, and as such was the end of a long line of Gloster fighters going back to the 1920’s. It was possibly their most distinctive design, with a huge delta wing and T-tail, and was of an imposing size.
It was conceived in the late 1940’s as a night and all weather fighter (FAW= Fighter All Weather) to replace the Meteor, which looked worryingly close to being outperformed by the new Soviet bombers then known to be under development. The Specification called for a high performance aircraft armed with 4 20mm cannon and 4 Air-Air missiles.
Whilst Gloster submitted their proposal as the GA.5, DeHavilland also responded with the DH.110, later to become the SeaVixen.
The history of the Javelin’s development is something of an essay in itself, so it’s probably best just to give a brief summary. The prototype GA.5 first flew on November 26th 1951, one of five prototypes ordered. Various redesigns were required over the next few months, and indeed years. Even in 1956,as the first examples were filtering through to squadrons, there were still numerous problems to be sorted out, and these first examples were operated under strict limitations.
 One phenomenon the Javelin would
always suffer from was a condition known as ‘Deep Stall’. This occurred
at high angles of attack, when the broad delta wings blanked-off the
airflow to the tail, stalling the tailplanes. The aircraft would pitch up
almost vertically, the speed would decay to zero almost instantaneously
and the aircraft would simply drop like a slate! This condition could be
recovered from provided you had the height, and it used to be a favourite
unofficial ‘party trick’ manoeuvre of Javelin crews at altitude. Lower
down, approaching to land for example, the result could be catastrophic.
One phenomenon the Javelin would
always suffer from was a condition known as ‘Deep Stall’. This occurred
at high angles of attack, when the broad delta wings blanked-off the
airflow to the tail, stalling the tailplanes. The aircraft would pitch up
almost vertically, the speed would decay to zero almost instantaneously
and the aircraft would simply drop like a slate! This condition could be
recovered from provided you had the height, and it used to be a favourite
unofficial ‘party trick’ manoeuvre of Javelin crews at altitude. Lower
down, approaching to land for example, the result could be catastrophic.
In all, nine versions of the Javelin were produced, each version varying in engine, avionics and weapons fit. The first operational version to be missile-equipped was the FAW.7, more than ten years after the initial specification for missile armament had been issued! All Javelins were powered by various versions of Armstrong-Siddeley (later Rolls-Royce) Sapphire, with the FAW.8’s and 9’s having reheat. The full story of the Javelin is best told by Damien Burke on his Thunder & Lightnings website, an excellent resource for anyone interested in classic British jets.
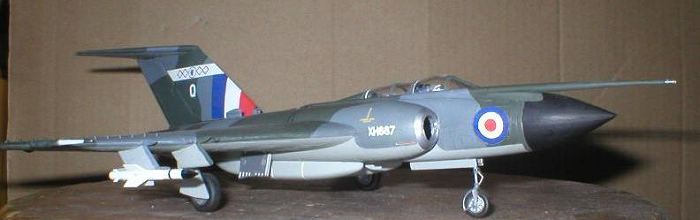
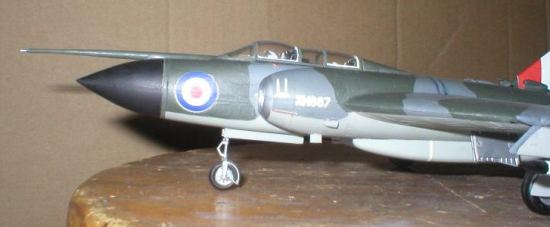
The FAW.9, the subject of this article, was the last version to be produced, and was a mixture of the best bits of the Mk.7 and Mk.8, the majority of FAW.9’s being converted 7’s. This version served in the UK, West Germany and out in the Far East. Many of these were FAW.9R’s, with an in-flight re-fuelling capability, with provision for an enormous detachable IFR probe on the right hand side of the nose. The last Javelins were withdrawn from service in Europe in 1965, but 60Sqn at Tengah, Singapore, kept theirs’ until 1968. These were the last operational Javelins to fly. A single example continued to fly on trials work in the UK until 1976, when it was retired to the museum at Duxford, where it can still be admired today in it’s striking red and white markings.
Only ten Javelins of all versions are thought to survive, some in better condition than others, and with the dicey handling and complexity of the type it seems certain that none will ever fly again.
|
THE KIT |
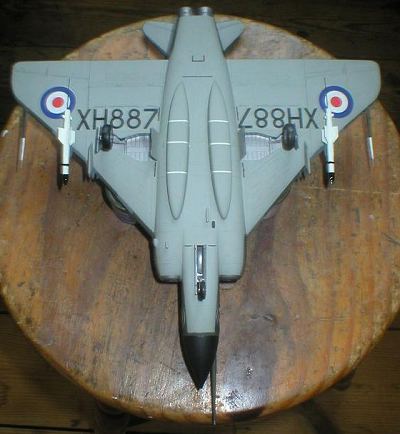
 My kit was moulded with silver
plastic in four frames consisting of about 60 parts, as well as three
clear parts-windscreen, canopy and gunsight. The decal sheet has markings
for two aircraft, XH887 of 64Sqn based at RAF Binbrook in 1963 and XH839
of 60Sqn based at Tengah, Singapore in 1966. The Javelin was covered in
all sorts of safety stencils and guide lines, and these are provided as
well, making this one of the biggest decal sheets you’re likely to see
for a fighter in this scale.
My kit was moulded with silver
plastic in four frames consisting of about 60 parts, as well as three
clear parts-windscreen, canopy and gunsight. The decal sheet has markings
for two aircraft, XH887 of 64Sqn based at RAF Binbrook in 1963 and XH839
of 60Sqn based at Tengah, Singapore in 1966. The Javelin was covered in
all sorts of safety stencils and guide lines, and these are provided as
well, making this one of the biggest decal sheets you’re likely to see
for a fighter in this scale.
As you’d expect from an Airfix of this era, the panel lines are raised and some dry fitting showed that these don’t always match up. It also showed that the fuselage joint wasn’t too neat, but more on that later.
|
CONSTRUCTION |
Cockpit:
The cockpit parts consist of the tub, two instrument panels, pilot’s control stick and two ejector seats. Decals are provided for both the pilot and radar operator’s panels and side consoles, and although they aren’t too detailed they look fine when the kit is finished. The cockpit and seats were painted Matt Black, with Khaki seat backs. Detail on the ejector seats is minimal, so if you’re going to leave them unoccupied it might be a good idea to do a bit of detailing. The kit does not come with crew figures, so I used the pair from the Airfix Sikorsky CH53 helicopter kit, and they look fine.
Fuselage & Wings:
The two fuselage halves are divided horizontally into upper and lower
sections. These also incorporate the engine intakes and about two thirds
of the wing, so they’re pretty substantial. Before they’re assembled, the
cockpit tub is glued in place into the upper half of the fuselage, and a
pair of intake ducts, painted Matt Black on the inside, are assembled and
glued in place in the engine intakes in the lower half. If you’re going
to build it with the undercarriage down, you’ll also need to put some
weight into the nose so that the model sits properly- I put the weight
the instructions specified, but mine still has a
 tendency to tip
backwards, so you might want to add to the amount specified. The fuselage
goes together ok, but the two halves aren’t quite symmetrical, the edges
of one half being slightly proud of the other. This is worse in some
areas than others, the intake lips being particularly awkward to work on,
but it came out ok after some careful sanding and scraping. The same
problem was encountered when attaching the tail-cone, it being just
shallower than the rear fuselage. This left a ‘step’ on the underside of
the rear fuselage of about 1mm, and it takes a bit of careful scraping
and sanding to smooth out the step and achieve the correct profile. The
jet-pipes can be left off and applied at the final detail stage after
painting and decaling.
tendency to tip
backwards, so you might want to add to the amount specified. The fuselage
goes together ok, but the two halves aren’t quite symmetrical, the edges
of one half being slightly proud of the other. This is worse in some
areas than others, the intake lips being particularly awkward to work on,
but it came out ok after some careful sanding and scraping. The same
problem was encountered when attaching the tail-cone, it being just
shallower than the rear fuselage. This left a ‘step’ on the underside of
the rear fuselage of about 1mm, and it takes a bit of careful scraping
and sanding to smooth out the step and achieve the correct profile. The
jet-pipes can be left off and applied at the final detail stage after
painting and decaling.
The wings are more like wingtips, consisting of about the last third of the overall span, with three rows of vortex generators and a socket for a pitot probe in each wingtip, the earlier versions having fewer vortex generators and only one pitot probe. The tips went on fine, being a much better fit than the previous bits, although some care needs to be taken to make sure the wing is straight from root to tip when viewed head-on. The pitot probes themselves can be left until final detailing.
Tail:
Once the fin was glued together, a bit of dry fitting showed that the joint between fin and fuselage was not brilliant, with quite a gap on either side of the root. The fin was carefully glued in place, with the tailplane dry fitted to make sure that it was true-if the fin is even slightly wonky you can pick up on it by referring to the angle of the tailplane. I then inserted glue and filler into the gap and after a bit of work it looked ok. To make life easier, I decided to leave the tailplane off until after painting.
Undercarriage:
This is one of the better parts of this kit. The u/c bays are nicely detailed, as are the legs, wheels and the inside faces of the doors. The nose-leg comes in one piece, complete with wheel and mudguard, and it’s extremely nicely moulded, with the silver plastic enhancing the overall appearance. The only problem is that it’s a bit fiddly to paint the tyre without fouling the surrounding pieces, but with some care I managed it ok. The undercarriage legs, bays, wheel hubs and gear doors were all left in their natural unpainted state in real life and I decided to do the same with the kit parts and they look great. With the legs and their support struts in place, this relatively heavy model sits very solidly, with no tendency to wobble.
Before painting the model, I added other details, including the two large underbelly blister tanks. The Javelin, like many other jets of this era, was lacking in internal fuel capacity, and these tanks were necessary to give a good range and endurance to the thirsty reheat equipped versions. They add to the aircraft’s characteristic appearance, and I think somehow improve it’s looks.
|
CAMOUFLAGE & MARKINGS |
Painting:
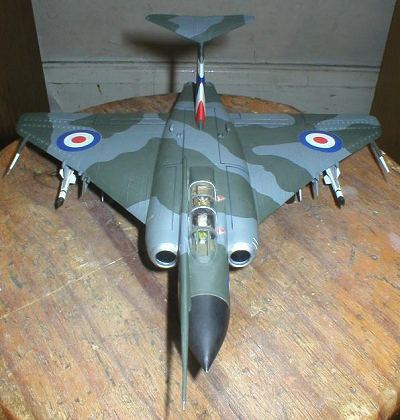
 I used Humbrol enamel throughout,
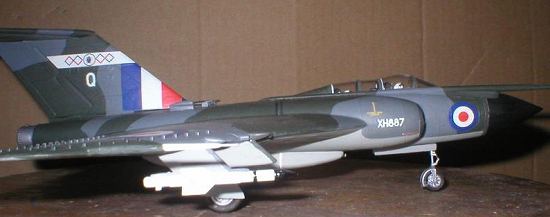
64 Matt Light Grey for the undersides and 27 Matt Sea Grey with 75 Matt
Bronze Green for the uppers. Everything was applied manually with a
brush- I seem to be one of only a handful of people who don’t own an
airbrush. The wing area of this model means that it takes quite a bit of
time to paint! RAF fighters of this period often had top surface
camouflage that extended just below the leading edge of the wings and
tailplanes. I masked these off with the sticky edge of an envelope flap,
and the result was good, with only one or two wayward smears, which were
relatively easy to correct. The nose cone was painted 33 Matt Black.
I used Humbrol enamel throughout,
64 Matt Light Grey for the undersides and 27 Matt Sea Grey with 75 Matt
Bronze Green for the uppers. Everything was applied manually with a
brush- I seem to be one of only a handful of people who don’t own an
airbrush. The wing area of this model means that it takes quite a bit of
time to paint! RAF fighters of this period often had top surface
camouflage that extended just below the leading edge of the wings and
tailplanes. I masked these off with the sticky edge of an envelope flap,
and the result was good, with only one or two wayward smears, which were
relatively easy to correct. The nose cone was painted 33 Matt Black.
The colour of the undersides is open to debate. Having checked with numerous books, websites and even one person who has worked on the restoration of a Javelin, I couldn’t reach a definite conclusion, with some saying it should be light grey and others silver. Most, if not all, of the Javelin’s surviving today have grey bellies, and it’s difficult to tell from original pictures as the massive wing area often casts the aircraft’s under parts into shadow. Since building the model, I’ve found a number of pictures showing Javelins with silver bellies-typical! I’m still not certain that all of them would’ve been, so my paint scheme isn’t wrong for certain. However, if I were to do this kit again, I’d probably go for the High Speed Silver belly-it would look better if nothing else.
Decals:
I chose to finish the aircraft as the 64Sqn FAW.9R, XH887, based at RAF Binbrook in 1963, partly because the unit markings are more attractive and also because being an R version, this aircraft had the big refuelling probe fitted. A number of people have said it looked ridiculous but personally I think it looks pretty mean-it would’ve given Javelin crews something to attack Soviet bombers with if the ammo ran out!
 The decal sheet for this kit is
big for 1/72 scale, and it becomes apparent when you look at all the
little detail stencils etc, that decaling this thing is going to be
something of an epic.
The decal sheet for this kit is
big for 1/72 scale, and it becomes apparent when you look at all the
little detail stencils etc, that decaling this thing is going to be
something of an epic.
After considering my options, I decided to start with the belly. As well as the large under-wing roundels and serial numbers, there are a number of little markings for trestle points etc. Although I bit fiddly, I managed all of them without incident-phew! It just made me wonder how difficult it would be to apply the much more extensive ones to the top surfaces…
Having left those decals to dry, I turned my attention to the top surfaces. It’s here that the first gremlin rears his ugly head. The roundels for the wings and fuselage sides were printed a little off-centre, leaving a thin white border around one edge of the decal. This can be sorted out with careful trimming and paintwork, but it’s annoying all the same-why can’t they just print decals accurately like everyone else?? The same applied for the one-piece wraparound fin-flash. Humbug!
Having applied all the major markings, it was time to turn to those fiddly minor ones. The Javelin had a number of lines painted over the top surfaces to prevent ground crew from walking on bits they shouldn’t. These are all provided on the decal sheet, but I had my reservations even before I’d begun. The decals in general were all a bit on the ‘crisp’ side, and I could tell that this was going to be a problem when applying these long flimsy guide-line decals. Sure enough, the first one ripped and folded, as did the second. I decided instead to draw the lines on with a fine black marker pen. Although the Javelin appears to have lots of flat surface area, there are in fact plenty of curves to follow and other obstructions to avoid, which counted out anything like a conventional ruler. Instead I used pieces of card, tailored to follow the contours, avoid aerials etc. Although tricky, the result was good and in fact the result is probably better than it would’ve been had the decals been useable. Necessity is the mother of invention…
|
FINAL CONSTRUCTION |
The kit comes with four wing pylons, but the only external stores that come with the kit are two Firestreak missiles, so the inboard pylons have to be left empty. I stuck the pylons in place before painting them having painted the missiles whilst still on their sprue. The pylons were a snug fit, and the missiles went on comfortably. The tail plane, tailpipes, canopy, windscreen, pitot probes and undercarriage doors were then added.
The final touch was the big refuelling probe, which in my kit was warped slightly and also had a ridge of flash running along the top. After a bit of gentle twisting back into shape, and some straightforward scraping, the probe was painted and fitted.
|
CONCLUSIONS |
Voila! One Gloster Javelin! This kit has some issues regarding the fitting of certain parts, the most serious ones being the joint of the fuselage halves, tail cone and tailfin, aswell as the usual question marks over the quality of Airfix’s decals.
That said, I enjoyed building this kit, one reason being the subject aircraft itself-despite it’s problems it was a beautiful machine and I got a big kick out of seeing it take shape, and this kit looks right when it’s done. This is also probably the most widely available kit of the Javelin, and in fact Airfix have also done the T.3 trainer version in 1/72 scale. Although they’ve now been out of production for a few years, both of these kits have been offered on e-bay recently, so they’re out there for the taking. If anyone has the T.3 kit lying around spare then I’d be happy to hear from you…
December 2003
|
REFERENCES |
www.thunder-and-lightnings.co.uk
www.btinternet.com/~javelin/ -a website covering the service history and restoration of FAW.5 XA699 at the Midland Air Museum, Coventry, UK, plus more besides.
www.sweptwings.co.uk -online photo gallery
Flypast Magazine, November 2001.
Copyright ModelingMadness.com. All rights reserved. No reproduction in part or in whole without express permission from the editor.
If you would like your product reviewed fairly and fairly quickly, please contact the editor or see other details in the Note to Contributors.