
|
KIT: |
Monogram Box Scale B-26 Invader |
|
KIT # |
6818 |
|
PRICE: |
$2.25 in 1978 |
|
DECALS: |
One aircraft |
|
REVIEW: |
Roger Jackson |
|
NOTES: |
|
|
HISTORY |
Prior to the outbreak of the Second World War in September of 1939, the United States Army Air Corps, under the tutelage of General Henry ‘Hap’ Arnold, issued an urgent request to the American aircraft industry for more modern designs to replace obsolescing types currently in service. Though funds had not yet been allocated or authorized by the United States Congress for production, both he and President Franklin Roosevelt were convinced that only time separated the United States from its officially neutral position amongst the warring European factions to eventual involvement. Rapidly unfolding events would validate the wisdom of this decision with painfully alarming clarity.
The major manufacturers of the period (Martin, Boeing, Douglas, Lockheed, and North American) had all produced modestly successful bombers during the prewar Depression-era years. Many of these aircraft had pioneered the technological development of military aviation (all-metal stressed Duralumin skin, turbo-superchargers, power-operated gun turrets, retractable landing gear), but as early combat reports began to filter in from Europe, American designers, with an eye on maintaining technological supremacy, and with the earnest encouragement of the Army Air Corps, developed new designs which drew heavily upon the rapidly evolving doctrine of modern aerial combat.
Douglas developed the DB-7, a light bomber adopted by the Air Corps as the A-20 Havoc. They would serve with distinction in all combat zones from Alaska to New Zealand. Many were Lend-Leased to Great Britain (and the Commonwealth), the Soviet Union, and the Free French.
Lockheed scaled up its twin-engined commercial Electra into the A-29 Hudson which performed yeoman service as an ASW patrol aircraft during the early days of the Atlantic U-boat offensive. Many of these were also Lend-Leased to the Allied forces.
Boeing simply fine-tuned its Flying Fortress with a new tail assembly, multiple-gunned power-driven turrets and up-rated engines. Older C and D versions would see limited combat, but by the 7th of December 1941, B-17Es were rolling of the assembly line at Renton, Washington.
 Martin’s contribution was the B-26 Marauder, whose high wing loading and
commensurate approach/landing speed earned it the dubious sobriquet of
"Baltimore Whore" (no visible means of support). Nevertheless, when
flown by properly-trained aircrews, it was an excellent combat aircraft.
Martin’s contribution was the B-26 Marauder, whose high wing loading and
commensurate approach/landing speed earned it the dubious sobriquet of
"Baltimore Whore" (no visible means of support). Nevertheless, when
flown by properly-trained aircrews, it was an excellent combat aircraft.
North American Aviation immortalized the medium bomber concept with its B-25, an adaptably efficient design whose length of active U.S. military service would nearly eclipse that of all its contemporaries combined. A few romantically produced motion pictures didn’t hurt its image either.
By 1941, after much objective analysis of current combat data, the engineers at Douglas began planning a new purpose-designed attack aircraft to be designated the A-26 Invader. Led by Ed Heinemann, they resolved to produce the fastest, lightest, most maneuverable and heavily-armed aircraft possible, using the state-of-the-art technology then extant.
By limiting the crew size to three men they reasoned they could hold airframe weight to a minimum. Less personnel meant less seats, less armor, less oxygen tanks, less everything supportive of the human element. Remotely-controlled gun turrets developed for Boeing’s B-29 were adapted to the new Douglas airframe, with a single gunner defending the aircraft’s dorsal, ventral, and tail approaches.
The airframe itself would be scaled-up from the A-20, offering excellent handling, with a new laminar-flow airfoil designed for maximum cruise efficiency. Double-slotted flaps provided low approach speeds and short landing roll-outs.
Pratt & Whitney R-2800 series radial powerplants were selected, with later variants featuring water injection which boosted output to 2370 HP in ‘War Emergency’. Variable-speed three-bladed Hamilton Standard props with full-feathering capability were fitted.
The large internal bomb bay had a 4000 lb capacity while external racks fitted on the wings outboard of the engine nacelles could mount an additional 1000 lbs each. Stub launchers for 5" High Velocity Aerial Rockets were later added, with earlier machines retro-fitted.
Initially, field-installable modular noses were envisioned with various machinegun, cannon, and howitzer combinations available, along with a glazed bombardier version. The Army Air Force, with an eye toward logistical commonality, standardized on the six- and eight-machinegun noses (the A-26B) and the glazed nose (the A-26C). Three .50 caliber guns were mounted in each wing of the B model, while both versions could carry additional .50 caliber weapons under the wings in twin-gun pods (four pods max).
Unforeseen teething problems delayed the Invader’s deployment to combat until late 1944. Perhaps the worst of these was the less-than-stellar cockpit canopy design. Flat, with minimal glazing, this unit provided poor visibility under most conditions while the small emergency escape hatch in the roof made it nearly impossible to egress the aircraft in all but the most optimal of circumstances. A later bulged, clam-shell design of blown Perspex cured both problems.
 Though arriving late to the hostilities, Invaders performed admirably. Units
assigned to the 9th AF supported Patton’s assault into Europe,
while in the CBI, many squadrons traded their A-20s and B-25s in for the new
Douglas machine during General Stilwell’s offensive to drive the Imperialist
Japanese forces from the Asian mainland.
Though arriving late to the hostilities, Invaders performed admirably. Units
assigned to the 9th AF supported Patton’s assault into Europe,
while in the CBI, many squadrons traded their A-20s and B-25s in for the new
Douglas machine during General Stilwell’s offensive to drive the Imperialist
Japanese forces from the Asian mainland.
When war broke out on the Korean peninsula in June of 1950, A-26s (now redesignated ‘B-26’ as the Marauder had passed into ethereal oblivion) assigned to various 5th AF units once again answered the call to arms, providing the lion’s share of light strike and night interdiction capabilities to UN forces throughout the war.
Invaders continued to serve in various light bomber and tactical reconnaissance squadrons throughout the 1950s until replaced by newer types, principally Martin’s B-57 Canberra and Douglas’ own RB-66 Destroyer. Even though its front-line service was drawing to a close, many aircraft found new homes as drone carriers, target tugs, and squadron hacks,
During this phase-out many B-26s were refurbished and up-graded for export to friendly foreign governments under the Military Assistance Program (MAP). Invaders found their way to Central America, Cuba, the Belgian Congo, France and Southeast Asia, where they equipped the fledgling South Vietnamese Air Force (VNAF). During the conflict in Vietnam, the aging Invaders began to shed wings and empennage during high-G low-altitude operations against insurgent forces. On-Mark Engineering in Van Nuys, California totally rebuilt forty B-26 airframes, resulting in a new designation, the B-26K.
Initially, these aircraft were flown by the USAF’s 603rd and 609th Special Operations Squadrons based at NKP in Thailand. A diplomatic dispute with the Royal Thai government culminated with the provisional redesignation of the aircraft as the ‘A-26A’. In 1969 these planes were transferred to South Vietnam and subsequently handed over to the VNAF. Many other customers had their Invaders upgraded to B-26K standards, most notable the Central American superpowers, where they were employed with minimally paltry effect during the various "Soccer Wars".
In a wry twist of fate, during the Cuban ‘Bay of Pigs’ fiasco, Invaders owned by free Cuban insurgents based in Miami and flown by American pilots from the Alabama Air National Guard found themselves pitted against armed Lockheed T-33s of Castro’s communist forces. Due to President John Kennedy’s failure to provide previously promised jet fighter support via U.S. Navy carrier assets in the region, they were mercilessly and cruelly cut to pieces.
The Invader’s military career is now over but many examples have found their way into the civil aviation community. Some were converted into borate bombers for use by the U.S. Forest Service while several were reconfigured as executive transports. Sadly, at least one example was seized by DEA agents in Miami during a raid on a major cocaine-smuggling operation. A few can be found at air shows, restored as "Warbirds", as aficionados prefer to call them, resplendent in the reflective twilight of painted ladies and faded, but not forgotten, glory.
|
THE KIT |
Monogram’s Invader was one of the company’s first all-plastic entries in the growing field of model airplane kits with an original issue date of 1957. The box contains 37 silver-gray parts, two clear canopies, and decals for one scheme. Typical of kits from this era, the surface detail consists of a gazillion over-scale rivets, raised Great Wall of China-sized panel lines, and embossed decal position indicators…a true classic. Control surfaces are delineated with recessed depressions and hinge lines.
The simplified moldings include a nose wheel/strut assembly integrally attached to one fuselage half, the wing guns similarly molded to the wing halves, and all eight nose guns preformed to the nose cap. The gun turrets are neither movable nor positionable, with the paired guns represented by U-shaped inserts.
 Main landing gear struts, while generally correct in configuration, are
devoid of most major details. The main wheels are much too narrow in width and
the hub detail would do Rod Serling proud—totally fictitious. Three figures
(pilot, peter pilot, and gunner) are furnished, with detail commensurate with
the landing gear.
Main landing gear struts, while generally correct in configuration, are
devoid of most major details. The main wheels are much too narrow in width and
the hub detail would do Rod Serling proud—totally fictitious. Three figures
(pilot, peter pilot, and gunner) are furnished, with detail commensurate with
the landing gear.
External ordnance is provided in the form of two napalm canisters (actually, F-80 tip tanks) and six 5" HVAR projectiles with launch pylons molded integral to the rockets. The two canopies are very clear with the framing correctly depicted.
The wings feature the aforementioned molded-in machine guns and oil cooler intakes on both the right and left side while a fictitious ladder is furnished to shore up the rear of this extremely tail-heavy model.
The engine nacelles sport pre-attached main gear doors on each of the four halves while the cowlings have the engine fronts molded to them in recessed relief. Two extremely well-detailed Hamilton Standard props are provided. Other than the rotating propellers, there are no operating features or assembly options.
The decals are matte-finished, on register, and feature a non-specific natural metal finished machine bearing the name ‘LIL-NELL’. Due to the apparent thickness of the carrier film, I am dubious of their ability to negotiate the overly heavy rivet and panel line detail.
|
CONSTRUCTION |
I began this model by removing the major airframe components from the sprues and taping them together. Standard operating procedure for me, this exercise serves a three-fold purpose: (A) it allows me to check the model’s scale, proportions, and overall shape, (B) it gives me an opportunity to check the fit and structural integrity of the various subassemblies, and (C) I can get an idea of how much ballast to add to keep the model solidly perched on its landing gear when completed (more on this later).
 With the mock-up solidly taped together, I flew the model around in my studio
while noting the various areas in need of attention. Several sorties later I
came to the conclusion that the only thing this model really needed was everything!!!
With the mock-up solidly taped together, I flew the model around in my studio
while noting the various areas in need of attention. Several sorties later I
came to the conclusion that the only thing this model really needed was everything!!!
Interior details were non-existent, the landing gear was lamer than Robert Downey Jr’s alibi, the surface detail was time-warped straight from the Stone Age, and conspicuously missing details teemed in abundance.
On the plus side the proportions and lines looked good, with the scale approximating 1/67 (so-called ‘box scale’). Wing and empennage attachment points were straightforward and fit reasonably well, while the two-piece nacelles with their integral main gear doors would speed the assembly.
To check for needed ballast, I cut off the molded-on nose gear and placed the model on a quarter-inch wood dowel taped flat on my bench, with the contact area being the fulcrum point of the main landing gear. As I suspected, it was a tail-dragger of Guinness Book proportions. With a Burger King ketchup cup taped to the nose, I filled the container with lead sinkers. No dice, the tail did not budge. I attached a second cup behind the cockpit (but forward of the dowel) and filled it too. Still no joy. I taped a cup to each cowling and filled them as well. The model teetered .… Clearly, at this point I knew I’d have to go thermonuclear. I laid a quarter-ounce wheel weight, clandestinely purloined from Discount Tire and Wheel, on top of each engine nacelle and, voila, victory!
With my C/G calculations complete, I un-taped the airframe and began construction. Since the odd scale precluded using any off-the-shelf aftermarket resin goodies, I installed a scratch-built cockpit and gunner’s compartment. As the scale is small, only basic seats, control yokes, and instrument panels were required. In the gunner’s area I used thin (.010") sheetstock for bulkheads and floorboards to hold additional weight to a minimum. No nose gear well was provided so I added one via Evergreen sheet.
 With the assigned lead ballast attached in the appropriate areas, I mated
both fuselage halves and glued them together with CA. After sanding and dressing
the seams I proceeded to remove the myriad of igloo-shaped rivets. With a razor
saw, I removed the tip of the tailcone, filed and sanded the area flat, and
bonded a chunk of clear polystyrene there. Properly shaped and polished, it
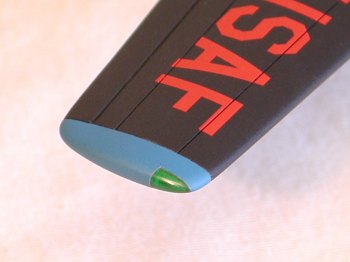
would serve as the rear navigation light.
With the assigned lead ballast attached in the appropriate areas, I mated
both fuselage halves and glued them together with CA. After sanding and dressing
the seams I proceeded to remove the myriad of igloo-shaped rivets. With a razor
saw, I removed the tip of the tailcone, filed and sanded the area flat, and
bonded a chunk of clear polystyrene there. Properly shaped and polished, it
would serve as the rear navigation light.
Under the nose, I drilled four rectangular slots to serve as shell ejection chutes for the noseguns. The guns themselves are #27 hypo needles, replacing the nose cap’s molded-on units. With the cap suitably stuffed with lead, it too was attached with CA and sanded to shape. The fit here was poor with repeated applications of glue required to act as filler.
With the basic fuselage completed, I fitted and attached the stabilizers via gap-filling CA. Prior to installation, I drilled a pair of holes in each of the locator tabs at the ends and used pre-bent brass wire as spars to cantilever the stabilizers to each other. In addition to maintaining the proper dihedral, they served to strengthen the stabilizer-to-fuselage joints as the tabs were undersized relative to their respective slots.
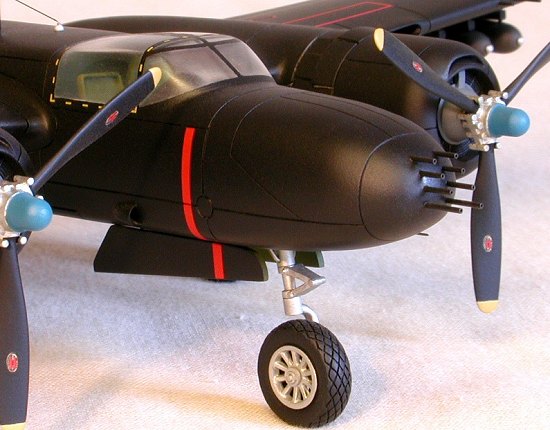
The cowlings were next. After opening up the carburetor scoops to give them more depth, I drilled a 3/32" hole through each ‘engine’ and installed a 1" length of 3/32" aluminum tubing there to serve as bearings for the propeller shafts. I crammed the remaining space inside the cowlings with lead shot and assembled both nacelles with the quarter-ounce wheel weights glued to the firewalls. After mating the cowlings to the nacelles, I re-carved the cowl flaps with an X-Acto knife to add some definition. With the powerplants completed I turned my attention to the wings.
 The molded-on machineguns were removed and the holes in the lower wing halves
for the external ordnance filled as I had other plans. Once the wings were
assembled and sanded smooth, I notched the wingtips and installed navigation
lights fabricated from red and blue/green Lexan. The actual aircraft had a
retractable landing light mounted under each wing so I drilled a couple of
3/16" depressions to which I would later mount a pair of suitably-sized MV
lenses.
The molded-on machineguns were removed and the holes in the lower wing halves
for the external ordnance filled as I had other plans. Once the wings were
assembled and sanded smooth, I notched the wingtips and installed navigation
lights fabricated from red and blue/green Lexan. The actual aircraft had a
retractable landing light mounted under each wing so I drilled a couple of
3/16" depressions to which I would later mount a pair of suitably-sized MV
lenses.
At this stage I began rescribing the surface detail on the various subassemblies using the 3-view drawings in Squadron-Signal’s A-26 Invader In Action as reference. Verlinden’s photo-etched template set, a draftsman’s eraser shield, and a stainless steel engineer’s rule were used as guides, with a few difficult panels cut freehand. Drawn pencil lines were used to assist in these instances.
With the panel lines and other surface features restored, I mated the nacelles to their respective wings with CA. The fit here was atrocious with multiple filling and sanding necessary for an acceptable fit. Concurrently, I realized at this point that I had a very heavy model on my hands. I decided to beef up the wing/fuselage joints so, prior to actual installation, I fabricated two wing spars from 6" lengths of 3/32" square brass channel inserted into the wing roots and passed through the fuselage. While this added still more weight, the trade-off in additional structural integrity was well worth it.
With the wing fillets sanded smooth, I test-flew the completed airframe in vigorous fashion throughout the entire projected flight envelope with no deleterious effects noted. After RTB-ing to the workbench, I started on the remaining armament.
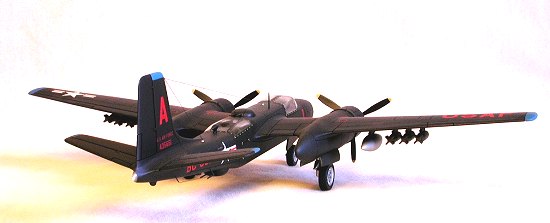
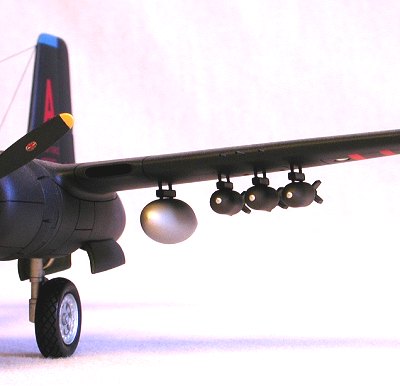
The slots for the kit-supplied guns were filled in each gun turret and new barrels made from #27 needles were installed. Wing guns were added in similar fashion. For the external ordnance I decided to use the kit’s napalm tanks and replace the HVARs with 260 lb fragmentation bombs. New racks were made from steel rod and 1/16" K & S square brass channel while bombs from the Airfix B-29 were used as stand-ins for the frag 260s.
 I had decided early on to build the landing gear struts from metal as the
weight of this model would definitely pose problems beyond the ability of
polystyrene to support. Axles, knuckles, forks, and oleo struts were all made
from various hand-massaged bits of brass, aluminum, steel, and piano wire.
Torque links and oleo scissors assemblies were taken from spares-box struts
carefully removed with a razor saw. I anchored the struts securely in each gear
well with CA then searched for suitably-sized wheels and tires.
I had decided early on to build the landing gear struts from metal as the
weight of this model would definitely pose problems beyond the ability of
polystyrene to support. Axles, knuckles, forks, and oleo struts were all made
from various hand-massaged bits of brass, aluminum, steel, and piano wire.
Torque links and oleo scissors assemblies were taken from spares-box struts
carefully removed with a razor saw. I anchored the struts securely in each gear
well with CA then searched for suitably-sized wheels and tires.
I had hoped to find something in the True Details line which I could adapt to this project, but due to the odd scale, nothing seemed appropriate. In the end, I used a Monogram P-51 main tire for the nose wheel, with the Mustang’s outer hubs installed on both sides for the proper effect. For the main gear I used a pair of Monogram P-47 tires with new hubs made from a pair of Revell F-14 main wheels—not quite correct but close enough for me. Hand-cut tread was added to all three tires via X-Acto knife.
Prior to installing the glass I sprayed the interiors with Modelmaster Interior Green (34151) then diddled about with a little drybrushing. Fit of the gunner’s canopy was excellent while the pilots’ greenhouse required some careful pre-fitting. I used Testor’s liquid cement initially and when fully dry, filled the gaps with CA. After sanding the seams smooth, I polished the canopies with jeweler’s rouge and a buffing wheel chucked into my Dremel tool.
A pitot tube fashioned from nickel-silver guitar string was added to the nose while a sheet brass VHF antenna mast was installed on the fuselage top. Monofilament line was used for the HF and marker beacon antennas. The ADF football (which I had removed prior to assembly of the fuselage) was re-attached along with a round fairing (strike camera?) behind the ventral turret. Two small, molded-on ventilation intakes on the right side of the fuselage (one for the pilots, one for the gunner) were removed and replaced with scratch-built units made from cone-shaped pieces of sprue, drilled out at the flat end, sliced in half, and attached with Testor’ liquid cement.
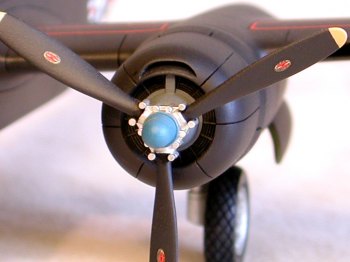 I fitted the propellers to the cowlings by means of 1/16" aluminum
tubing shafts after removing the props’ plastic spindles and drilling out the
back sides of the hubs. The shafts are a little long to ensure they would stay
in the cowlings without retainers and to provide ample clamping space to hold
them while painting.
I fitted the propellers to the cowlings by means of 1/16" aluminum
tubing shafts after removing the props’ plastic spindles and drilling out the
back sides of the hubs. The shafts are a little long to ensure they would stay
in the cowlings without retainers and to provide ample clamping space to hold
them while painting.
The last pieces added were the nosewheel doors. I thinned them out and installed mounting pins made from the nylon bristles of an old hairbrush, two per door. With the pins solidly attached with CA, I drilled a pair of appropriately located holes in each of the nose well’s sidewalls as close to the edge as I dared and slid the doors into position. A little divergent angle provided enough of a friction fit to hold them firmly and at the proper angle without the need for adhesive. The assembly completed, it was off to the paint shop.
|
PAINT & DECALS |
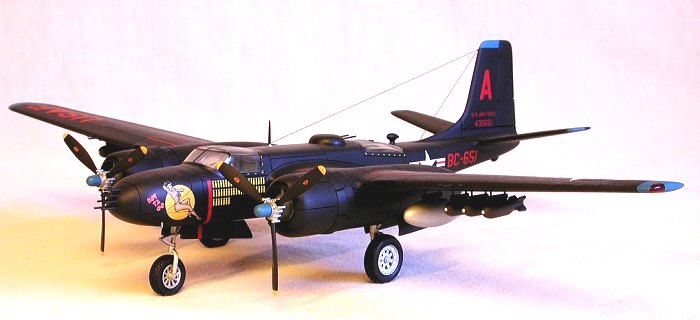
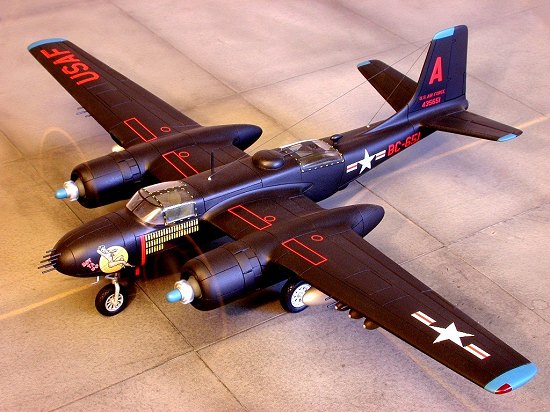
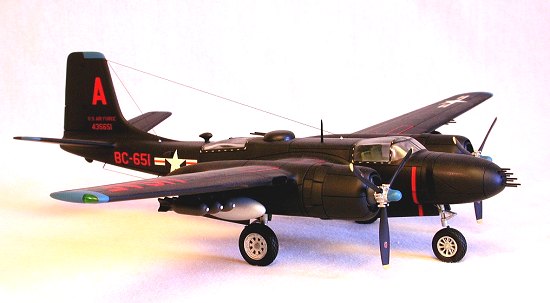
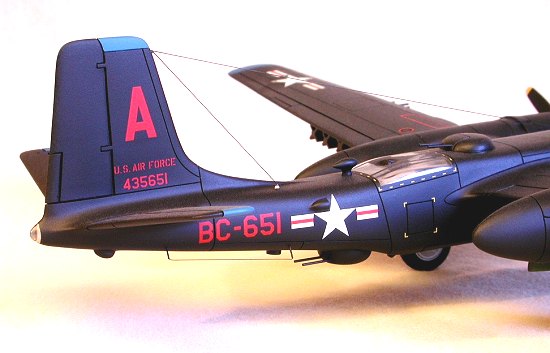
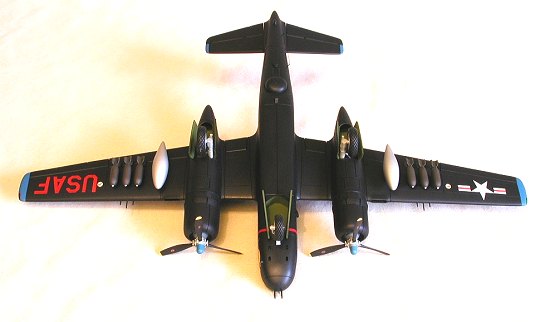
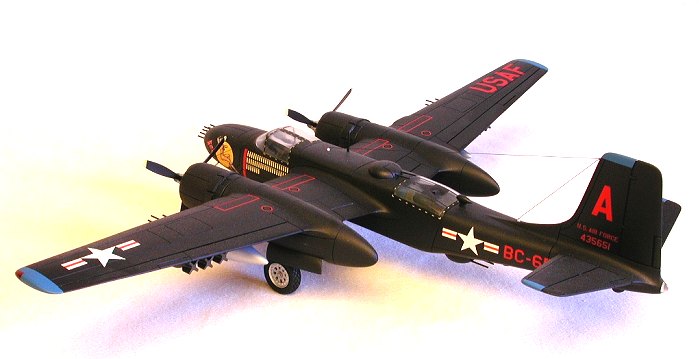
I had already decided that this model would be my tribute to the veterans of the Korean War who had put it all on the line fifty years ago, but I was less that thrilled with the prospect of just another silver airplane. True, a number of olive drab/neutral gray examples have been documented, but as much of the Invader’s ROK service was as a snoop-and-poop nightowl, I leaned toward an all-black scheme with enough individual unit color to provide for some interesting contrast.
The back cover illustration of Squadron-Signal’s In Action volume provided the inspiration for what would become a prototypical Invader of the period; an all-black airplane with medium blue wing, fin, and stabilizer tips and propeller spinners plus gaudy girlie artwork…just what the doctor ordered.
I started by spraying the gearwells and door innards in Interior Green (again, Modelmaster 34151). Since I’d built the struts out of metal, I merely cleaned the overspray off those items with lacquer thinner and a #1 sable brush, revealing the metallic color underneath.
Next, I shot the medium blue areas with paint I’d mixed for a previous Mustang project after first masking the navigation lights. To keep the blue as bright as possible I first undercoated with flat white primer. When fully cured, I masked all the blue areas along with the canopies, rear navigation light and gear wells then shot several coats of Testor’s Gloss Black (the generic kind in the small square bottles) over the entire airframe. I set the model aside for a couple of weeks, both to allow for a fully-cured finish and to give me time to look for decals.
The odd scale definitely kept me behind the eightball regarding decals. In the end it boiled down to an excellent (but 1/72 scale) sheet from Aeromaster (72-043), containing both borderless national insignia and red lettering of the proper font. After comparing the size of these items to the equivalent kit decals (presumably correct for the scale), I found the size discrepancy to be negligible.
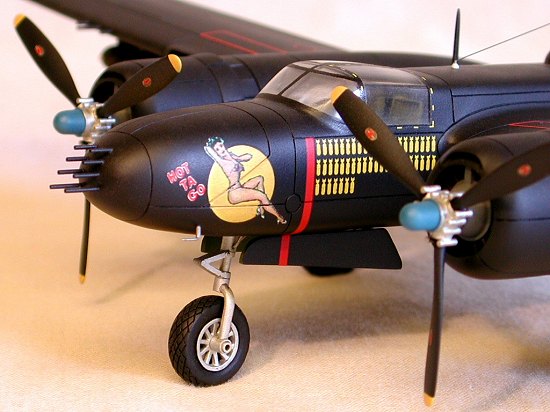 I had inherited some White Wolf B-24 decals featuring some gorgeous pin-ups
and decided to use some ‘artistic license’ in bringing my Invader to life.
Mission symbols were taken from one of Microscale’s older B-17 sheets while
stripes and tidbits came from who-knows-where.
I had inherited some White Wolf B-24 decals featuring some gorgeous pin-ups
and decided to use some ‘artistic license’ in bringing my Invader to life.
Mission symbols were taken from one of Microscale’s older B-17 sheets while
stripes and tidbits came from who-knows-where.
As the paints were gloss enamel, I dispensed with any gloss overcoat and decaled directly onto the paint, using Microset and Solvaset when necessary. The hardest part of this exercise was applying all the yellow perforated emergency fire exit indicators—over one hundred individual pieces.
After the decals had dried I examined the finish. I was not thrilled with the gloss effect. In addition to orange peel in several key areas, the shine seemed to impart a toy-like appearance to the entire airplane. I decided to Dullcote it with Modelmaster lacquer both to seal the decals and provide a uniform matte finish. Thus applied, the Invader took on a more sinister, purpose-designed look.
The props were painted in the appropriate colors and set aside to dry. Concurrently, I installed the MV lenses underneath each wing with Elmer's white glue then attached the napalm tanks and fragmentation bombs to their racks with small drops of CA. With the model inverted, I painted the wheels and tires then mounted them to the struts with thin 1/16" aluminum tubing wafers serving as retainers.
The monofilament antenna wires were highlighted with a thin black wash then sealed with Dullcote. Lastly, I painted the engine gearbox covers aircraft gray and drybrushed the cylinder areas with gull gray to put some depth and detail into the cowlings. When dry, I removed all the masking, touched up a few problem areas, then installed the props.
|
CONCLUSIONS |
By now, many are scratching their heads and thinking "This is wacky. There’s a couple of truly excellent 1/48 Invaders out there, and the old Airfix thing (for those inclined to Smurf-sized models). Why bother with this off-scale orphan?" Here’s why.
The last time I built this kit was on a Saturday morning in 1960. I’d bought it the day before, plunking down 98 cents of my hard-earned paper route money at Woolworths. I opened the box when ‘Johnny Quest’ came on and by the time the credits for ‘Fireball XL-5’ were fading to black I’d completed the thing. Maybe an hour and a half from start to inevitably mediocre finish (including paint, what little there was).
That afternoon the model was gleefully demolished. By surreptitiously acquired M-80s…or Daisy airgun…or lighter fluid and moth balls…I really don’t remember. I always felt guilty about it, especially in later years as my skills improved and I learned to appreciate the therapeutic value of scale modeling.
 A few years ago, while cruising the swap tables at a contest, I came across
this model again, buried under a stack of Tamigawa wonderkits and Star Wars
reissues. It was boxed as one of those "Junior Modelbuilder Club of
America" things, in plain cardboard with a boxtop photo of the build-up
pasted to the end flap. Looking at the picture my mind recalled a time of Cub
Scouts, Little League, Stingray Bikes, and the security of innocence and
childhood that the period afforded. I thought to myself, what if…
A few years ago, while cruising the swap tables at a contest, I came across
this model again, buried under a stack of Tamigawa wonderkits and Star Wars
reissues. It was boxed as one of those "Junior Modelbuilder Club of
America" things, in plain cardboard with a boxtop photo of the build-up
pasted to the end flap. Looking at the picture my mind recalled a time of Cub
Scouts, Little League, Stingray Bikes, and the security of innocence and
childhood that the period afforded. I thought to myself, what if…
The vendor wanted two bucks for it but cautiously confided that he’d take six bits (seventy-five cents for those not hip to the lingo). I bought the kit… Brought it home and stuck it in the hangar where it languished for a few more years. Other projects commanded precedence: Tying up the loose ends of a military career approaching retirement, honey-do’s around the old homestead, The ProMod F-84…
But I never forgot that Invader. Last year, disappointed that Monogram’s Sabredog was delayed (again), I got the kit out, opened the box, and deployed the parts on the workbench. Yes, they’re rude and crude. Yes, it’s a weird scale. Yes, the fit sucks. But temper those observations with this: The beauty and precision of the kits we have now would not have been possible without the first primitive efforts back then of those companies who ventured into uncharted waters.
I resolved to do this kit right, with as much justice as I could muster, to atone for my past sin. I had a lot of fun, my conscience is cleared, and the model…well, it sorta speaks for itself. Like the man said, "It ain’t the song, it’s the singer". Now where’s that Aurora Mig-19?
|
REFERENCES |
A-26 Invader In Action (#37); Jim Mesko; Squadron-Signal Publications
A-26 Invader In Action (#134); Jim Mesko; Squadron-Signal Publications
Air War Over Korea; Larry Davis; Squadron-Signal Publications
Mig Alley; Larry Davis; Squadron-Signal Publications
Air War Over Southeast Asia (Vol. 1 & 2); Lou Drendel; Squadron-Signal Publications
Fighting Colors-USAF Europe; Robert Robinson; Squadron-Signal Publications
Vietnam: The War In The Air; Rene J. Francillon; Arch Cape Press
The History Of The U.S. Air Force; Bill Yenne; Exeter Books
Air Force; Martin Caidin; Branhall House
Personal observations made at Pima Air Museum; Tucson, Arizona
Various Internet Websites
Ó January 2001 Roger M. Jackson
If you would like your product reviewed fairly and quickly by a site that has over 1,700 visits a day, please contact me or see other details in the Note to Contributors.