Monogram 1/72 B-36 Peacemaker
|
KIT # |
5703 |
|
PRICE: |
$36.50 |
|
DECALS: |
One aircraft |
|
REVIEW : |
Lee Kolosna |
|
NOTES: |
Model is B-36B conversion from kit RB-36H |
|
HISTORY |
he Consolidated B-36 Peacemaker, known affectionately to its crews as the "big stick," ushered in the cold, hard realities of the nuclear area. The United States needed a weapons platform to deliver atomic and hydrogen bombs, and the giant bomber fit the bill. In the rapid draw-down of forces and military expenditures after the end of World War II, the B-36 program was largely spared and development continued at a steady pace. General of the Air Force Hap Arnold believed that a super long-range bomber was sill needed to facilitate delivery of the very large nuclear devices that were then being developed at Los Alamos. Not being able to rely on overseas airbases, the tremendous range of the aircraft (in the days prior to the perfection of aerial refueling) allowed it to strike targets half-way across the world in the evil Communist empire and return to bases in the United States.
 Based on a 1941 requirement for an intercontinental bomber, the
engineers at Consolidated Aircraft Corporation used a radical design based on a
slightly swept wing that contained six powerful Pratt and Whitney R-4360 radial
engines, each driving three-bladed propellers in a pusher configuration. An
enormous bomb load capacity of 77,000 pounds in four separate bays was provided.
Crew capacity was 15, with later models providing the capacity of as many as 24
crewmembers on really long reconnaissance flights. The luxurious accommodations
of the tubular fuselage provided the crew with bunks for sleeping, a galley, a
lavatory, and pressurized comfort. For defense, six gun turrets were carried
internally, each armed with twin 20mm cannons. These turrets were deployed from
dedicated weapons bays when needed, otherwise they were retracted internally to
streamline the airflow and reduce drag. An additional nose and tail turret, also
armed with 20 mm cannon, rounded out the armament.
Based on a 1941 requirement for an intercontinental bomber, the
engineers at Consolidated Aircraft Corporation used a radical design based on a
slightly swept wing that contained six powerful Pratt and Whitney R-4360 radial
engines, each driving three-bladed propellers in a pusher configuration. An
enormous bomb load capacity of 77,000 pounds in four separate bays was provided.
Crew capacity was 15, with later models providing the capacity of as many as 24
crewmembers on really long reconnaissance flights. The luxurious accommodations
of the tubular fuselage provided the crew with bunks for sleeping, a galley, a
lavatory, and pressurized comfort. For defense, six gun turrets were carried
internally, each armed with twin 20mm cannons. These turrets were deployed from
dedicated weapons bays when needed, otherwise they were retracted internally to
streamline the airflow and reduce drag. An additional nose and tail turret, also
armed with 20 mm cannon, rounded out the armament.
The B-36 prototype took to the air on August 8, 1946. Several changes were made when the B-36A became operational, mainly the introduction of a new multi-wheeled landing gear system and a redesigned forward crew compartment with an improved canopy greenhouse that provided better visibility to the pilots. The A models were delivered without defensive armament (General Electric had not completed development on the complicated turret and sighting systems) and used for training. The B-36B was the first model to be pressed into front-line service with SAC, being based initially at Carswell Air Force Base in Texas. It was at this time that political controversy arose. The unit price of each B-36 was climbing at an alarming rate, and the fight for control of nuclear weaponry amongst the various branches of the armed forces was fierce. Very simplistically, the Navy charged that the B-36 was an obsolete weapon, was too vulnerable to enemy air defenses, and cost too much. These allegations were mostly true. What the navy wanted, of course, was more funding for its new fleet of super aircraft carriers. The Navy accused the Air Force of financial impropriety with executives of Consolidated-Vultee (later changed to Convair in 1954), and a congressional investigation was held to review the entire project. In the end, Congress decided that there was not enough evidence of wrong-doing to warrant cancellation of the program, and the B-36 continued on as a stopgap weapon system until the new jet-powered B-47 and B-52 programs reached maturity.
 In the meantime, Peacemaker performance was boosted (starting with
the B-36D model) by the addition of four J47 jet engines for use in takeoffs and
sprints to the bomb target. These engines were shut down for cruising, owing to
their prodigious consumption of fuel. The slogan of the day was, "Six
turnin’ and four burnin’." Pilots liked flying the B-36, as it handled
quite well and was relatively fast compared to the lumbering bombers they had
flown during the war. The new commander of the Strategic Air Command, Curtis
LeMay, fought for more B-36 groups in the early 1950s and instilled a sense of
elitism among the members of his command. The film Strategic Air Command,
starring actor and Air Force General Jimmy Stewart, illustrates this point quite
well. It also contains gorgeous aerial photography of the B-36 in flight and is
worth watching.
In the meantime, Peacemaker performance was boosted (starting with
the B-36D model) by the addition of four J47 jet engines for use in takeoffs and
sprints to the bomb target. These engines were shut down for cruising, owing to
their prodigious consumption of fuel. The slogan of the day was, "Six
turnin’ and four burnin’." Pilots liked flying the B-36, as it handled
quite well and was relatively fast compared to the lumbering bombers they had
flown during the war. The new commander of the Strategic Air Command, Curtis
LeMay, fought for more B-36 groups in the early 1950s and instilled a sense of
elitism among the members of his command. The film Strategic Air Command,
starring actor and Air Force General Jimmy Stewart, illustrates this point quite
well. It also contains gorgeous aerial photography of the B-36 in flight and is
worth watching.
Reconnaissance versions of the B-36 were made, loaded with surveillance cameras, a darkroom to develop photos in flight, photoflash bombs for night photography, and electronic countermeasures gear . Bizarre experiments with both specially-modified F-84 and the tiny XF-85 aircraft were conducted in an attempt to provide fighter escort for the big bombers. Also, an operating nuclear reactor was flown aboard a specially shielded B-36 to investigate the possibility of using fission as a power source for aircraft in the future. Thank goodness someone came to their senses and cancelled the test after a few flights before the aircraft crashed and spread radioactivity over half the country. The "Featherweight" program removed most of the defensive armament of the later B-36 models to allow them to fly higher and faster. Phase-out of the line began in 1956, with the last aircraft removed from service in 1959. A total of 383 were built, and three are left in museums today.
|
THE KIT |
Monogram boldly announced the creation of the "world’s largest plastic aircraft kit", when they released this model in 1980. At the time, the claim was true. Since then, I believe Revell’s 1/48 scale B-1B Lancer kit holds the title. The kit depicts a late-model RB-36H (mostly – there are a few minor accuracy problems), and has been reissued a couple of times in the past twenty years. I picked up an original release kit from a modeling buddy of mine and entered the project knowing that it would be quite a challenge to do well, especially with a natural metal finish.
 Molded in sliver styrene with raised panel lines, the kit is a
prime example of the technology of the day. The guns in the nose and tail
turrets work, the bomb bay can be left open, and the interior detail in forward
crew and pilot compartments is adequate. The clear parts are commendably
transparent. A large spar is provided to reinforce the substantial
wing-to-fuselage joints.
Molded in sliver styrene with raised panel lines, the kit is a
prime example of the technology of the day. The guns in the nose and tail
turrets work, the bomb bay can be left open, and the interior detail in forward
crew and pilot compartments is adequate. The clear parts are commendably
transparent. A large spar is provided to reinforce the substantial
wing-to-fuselage joints.
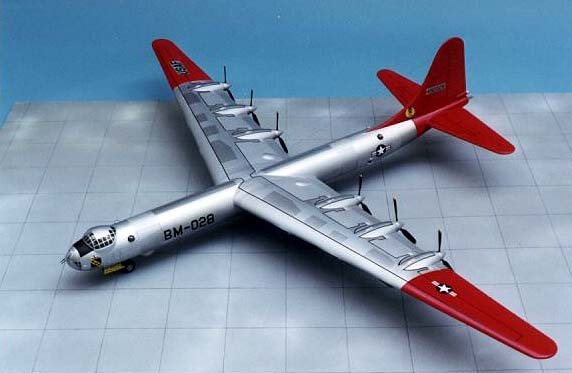
B-36s were quite bland in coloration, being delivered in a natural metal finish that gave way in later years to an aluminum lacquer topside with a anti-radiation gloss white underside. The exception to this was the Artic Red wingtip and tail color of B-36Bs. Since I was also able to obtain an old Super Scale decal sheet for just such an aircraft in the Artic scheme, I decided to complicate my life by converting the RB-36H as provided in the kit and backdate it to a B-36B. This involved a few key steps:
After getting up my nerve, I felt that I was up to the challenge, and commenced construction.
|
CONSTRUCTION |
The interior sections were done first by gluing the necessary consoles and seats in. Everything was painted Polly Scale Medium Green FS34092, which I believe is the correct color. Decals are provided for the instrument panels, and in this girly scale, look fine enough. I didn’t spend a lot of time in the interior doing detailing, as the extensive greenhouse framing makes it tough to see much in there.
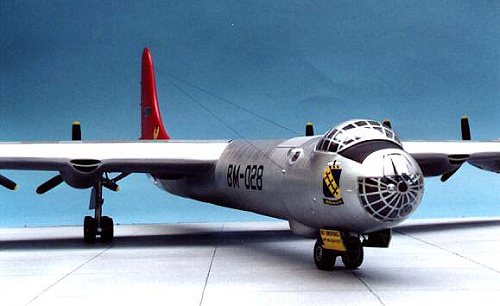
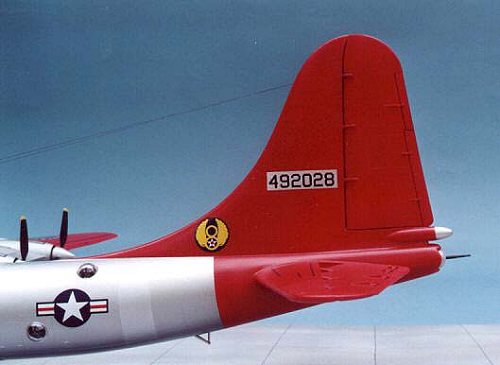 I used a razor saw to chop off the twin radomes of the tail gun
radar, which is correct only for H and J model B-36s. I used sheet plastic to
patch up the hole, then applied multiple coats of Testors red putty (the first
time I’ve used putty in years) and thick CA glue to even things out. I dug up
an old F-4C gun pod from my spares box and used it to fabricate the new single
radome. A lot of careful sanding was needed to smooth the contours out. I glued
in a large hunk of lead into one fuselage half to keep the model perched on its
nose gear, then glued the halves together. Be sure to add enough weight, as this
model is as big as they come. The bomb bay doors were glued closed, owing to the
fact that they represent the segmented "snap open" doors only seen on
B-36D and later models. Typical of Monogram kits of the time period, these didn’t
fit very well and I had to correct some large seams, which I did with my usual
method of applying gap-filling CA glue.
I used a razor saw to chop off the twin radomes of the tail gun
radar, which is correct only for H and J model B-36s. I used sheet plastic to
patch up the hole, then applied multiple coats of Testors red putty (the first
time I’ve used putty in years) and thick CA glue to even things out. I dug up
an old F-4C gun pod from my spares box and used it to fabricate the new single
radome. A lot of careful sanding was needed to smooth the contours out. I glued
in a large hunk of lead into one fuselage half to keep the model perched on its
nose gear, then glued the halves together. Be sure to add enough weight, as this
model is as big as they come. The bomb bay doors were glued closed, owing to the
fact that they represent the segmented "snap open" doors only seen on
B-36D and later models. Typical of Monogram kits of the time period, these didn’t
fit very well and I had to correct some large seams, which I did with my usual
method of applying gap-filling CA glue.
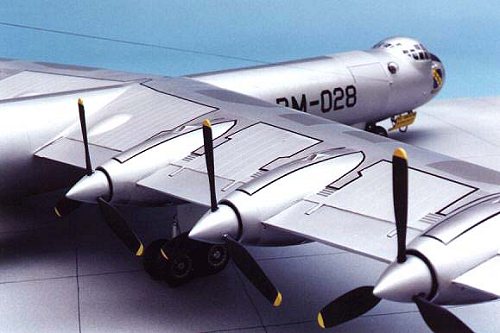
For the wings, I plugged the holes used to attach the jet engine pods struts with sheet styrene. The engine air intakes on the front of the wings consist of two pieces each, and they didn’t fit with any sort of precision. I had to sand these areas quite a bit to get the profiles in line with photographs of the real aircraft. The propellers consist of two pieces each, leaving a very visible gap between the front and the rear of the spinner cones. These seams were filled as well, although the close proximity of the propeller blades made for an interesting exercise in sanding and polishing. I rounded off the blade tips to match those on the B-36B. The instructions have you installing the propellers at the time when the wings are glued together, but I would recommend against doing that, as there is too much risk for damage to all those pointy blades while you work on the rest of the airplane.
The major components were glued together and the all-important alignment of the wings was attended to. Things were pretty straight, but I did have to dunk the entire tail section in a large pot of almost-boiling water to gently persuade the vertical stabilizer to return to its proper upright position. A step was present in the joint between the wings and fuselage, which had to be dealt with. This was mostly tedious, owing to the sheer number of linear inches (heck – make that feet! [centimeters for our non-US friends]) that had to be smoothed. With a natural metal finish, I first fill the seam with CA glue, hit it with accelerator, sand with 320 and 600 grit wet-or-dry sandpaper, then spray the seam with silver paint to see if any areas need touching up. After repeating as necessary (sometimes as many as five or six times), I then polish out each seam with a tri-grit file, eventually leaving the plastic with a mirror shine. It takes a while, but it is the only way to insure that the seams are perfect. I rescribed all the panel lines lost in the process using Dymo label tape as a guide and a sharp scribing tool to etch the plastic.
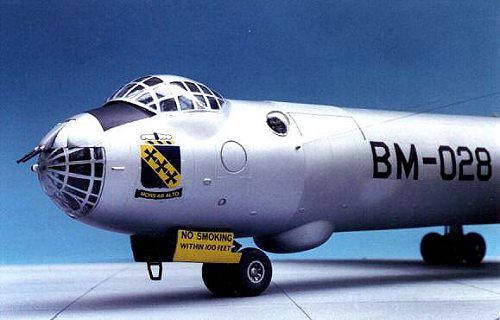
The canopy and the nose greenhouse were attached with crystal watch cement and the gaps filled with white glue. I sanded off the observation blister on top of the canopy to reflect the lines on the B-model B-36. Be careful not to sand all the way through the canopy, like I did. After a thorough cleaning of the model to remove sanding dust and fingerprints, it was off to the paint shop.
|
PAINT & DECALS |
First, I masked off the tail and wingtip sections and primed them with Polly Scale Reefer White. This was followed by several coats of Testors Model Master Acryl Insignia Red. I was slightly disappointed to learn that Artic Red is in fact just plain old Insignia Red and not the more exciting Florescent Red-Orange. This was confirmed by re-reading Dana Bell’s article in the March 1996 issue of Fine Scale Modeler. In a note to me, Dana explained that transparencies from the time have started to lose their tonality, and you often see color pictures of B-36Bs incorrectly printed with orangey high-visibility markings.
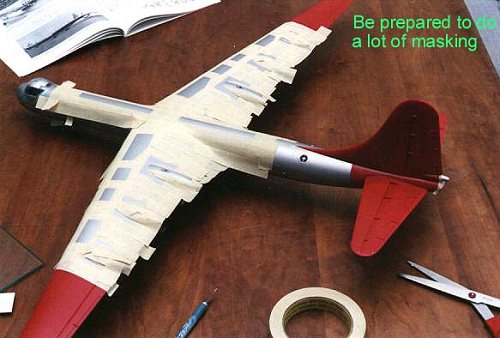 SnJ Spray Metal was used as the base coat of the natural metal
finish. Major portions of the B-36 were made from magnesium, so I replicated
these areas by spraying Testors Dullcote Lacquer over the unpolished SnJ. This
involved a lot of masking with drafting tape (a tip from Tom Cleaver – thank
you!). I first made sure that the tape had a sharp line by cutting it on a piece
of glass with a sharp X-Acto knife blade guided by a metal ruler. Then the tape
applied to the model, following the panel or walkway line precisely. Be aware
that all of this masking takes a long time. Often I would spend three hours
masking off certain metallic sections, only to follow it up with five minutes of
airbrushing. Testors Metallizer Steel was used to simulate the textured walkways
on the top of the wing and fuselage and engine nacelles, and Metallizer Aluminum
was used to pick out the odd panel on the non-magnesium areas for some variety.
SnJ Spray Metal was used as the base coat of the natural metal
finish. Major portions of the B-36 were made from magnesium, so I replicated
these areas by spraying Testors Dullcote Lacquer over the unpolished SnJ. This
involved a lot of masking with drafting tape (a tip from Tom Cleaver – thank
you!). I first made sure that the tape had a sharp line by cutting it on a piece
of glass with a sharp X-Acto knife blade guided by a metal ruler. Then the tape
applied to the model, following the panel or walkway line precisely. Be aware
that all of this masking takes a long time. Often I would spend three hours
masking off certain metallic sections, only to follow it up with five minutes of
airbrushing. Testors Metallizer Steel was used to simulate the textured walkways
on the top of the wing and fuselage and engine nacelles, and Metallizer Aluminum
was used to pick out the odd panel on the non-magnesium areas for some variety.
The complicated canopy frames were masked off with the drafting tape in two marathon sessions. First I masked off all the horizontal lines and sprayed them, then I remasked the canopy for the vertical lines and sprayed again. The nose greenhouse took several passes to complete. I’m usually not in favor of after-market canopy masks, but I notice that Meteor Productions has a set in their Black Magic line for $9.00. After going through the ordeal with old-fashioned tools, I think that this might be a worthwhile investment for those considering building this kit.
The wing-walk decals were obtained from an old Super Scale sheet of 1/16 inch black stripes I picked up on sale at Squadron. I’m not sure what I would have done without them. Applying the striping the model in the right places took about five hours of work. I sprayed Metallizer Aluminum on clear decal sheet, sealed it with Future floor polish, and applied appropriately sized pieces to the model in the areas under the serial number on the tail and the USAF and buzz number insignia on the wings. National insignia came from an AeroMaster sheet. The rest of the decals came from Super Scale sheet 72-271 mentioned above. While I’m pleased that I had colorful markings for the model, I wonder what possessed the guys at Super Scale to issue a sheet for variants (a B-36A and a B-36B) that do not exist in kit form. Why didn’t they issue a sheet for RB-36H aircraft? Perhaps they thought that you could make an A or a B model by just leaving off the jet pods. If so, they were wrong.
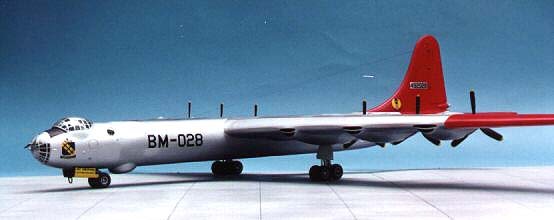
The markings depict a 7th Bombardment Group B-36B, serial 44-92028, based at Carswell Air Force Base in 1948. I used AeroMaster Acrylic Semi-gloss Clear to seal the Artic Red areas only. I applied a wash of Polly Scale RLM 66 Black to delineate the control surfaces. Unpainted B-36s were kept pretty clean, so I limited my weathering to exhaust stains on the underside of the engine nacelles, which I simulated with black pastel chalk. For final assembly, I attached the gun sighting blisters with white glue. I used invisible nylon thread for the two long wire aerials. The wheels and landing gear doors were attached, and the propellers were glued in last. Astute readers will notice that I did not include the ILS radio aerial on the top of the nose. I made one from scratch, but it is so delicate that I knew it wouldn’t last ten minutes in such a prominent place.
|
CONCLUSIONS |
Large kits like this often languish in the corner of our model stashes, almost never seeing the light of day. The most frequent comment I heard from people when I told them that I was building the B-36 kit was, "I’ve never seen one of the those built." Well, I built it and had a good time. It clocked in at just about 80 hours of effort. I have been working on my natural metal finish skills for a couple years, and I’m pretty happy that I was able to apply my hard-earned lessons on this kit, which is sort of the ultimate metallic test. There was a tremendous amount of seam work and an enormous amount of masking. The model looks pretty good, the airplane represents a fascinating chapter in aviation history, and I was able to build something that few modelers do. I continue to be amazed at Monogram’s boldness at producing such a large kit, but I’m glad they did.
|
REFERENCES |
Bell, Dana: "Hi Vis! The Story Behind USAF Artic and Conspicuity Markings", Fine Scale Modeler, March 1996
Wachsmuth, Wayne: B-36 Peacemaker in Detail and Scale
Meyers Jacobson and Ray Wagner: B-36 Peacemaker in Action
Paramount Pictures: Strategic Air Command, 1955. Starring Jimmy Stewart and June Allyson, directed by Anthony Mann
Copyright ModelingMadness.com
If you would like your product reviewed fairly and fairly quickly, pleasecontact the editor or see other details in the Note to Contributors.