Cooperativa 1/72 La-15K
|
KIT # |
001 |
|
PRICE: |
$8.95 CDN |
|
DECALS: |
two options |
|
REVIEWER: |
Olivier Lacombe |
|
NOTES: |
|
HISTORY (FICTIONAL) |
In 1949, one year after the La-15 first flew, the Soviet Navy leaders became aware of the need to replace the obsolete Hellcats they were using on the Ukraine SSR and Lenin SSR. They tasked Lavochkin OKB to come up with a naval version of the La-15, which had lost out the fighter role in the VVS to the MiG-15, thus freeing the design bureau for different work. With the help of Major Olivienev Jakovitch Lacombski, a veteran pilot from the VVS who had on the Ely during the war, they made the following modifications to the plane:
 After extensive wind tunnel
trials, the second set of fences on the wings of the aircraft was deemed
superfluous and was removed. Conversion of the first aircraft was
undertaken by the KnAAPoOZQc plant on the
shores of
Lake
Baikal. Surprisingly, there was little to do to reinforce the gears,
since the aircraft had been built with unprepared runways in mind and was
thus very strong. Major Lacombski took the diminutive fighter in the air
for the first time in 1950, and the Derwent-powered fighter quickly
proved it had the right stuff, beating the MiG-15K in a face-off. The
MiG always suffered from damage caused to the fuselage when deck landing
due to the short stroke of the undercarriage.
After extensive wind tunnel
trials, the second set of fences on the wings of the aircraft was deemed
superfluous and was removed. Conversion of the first aircraft was
undertaken by the KnAAPoOZQc plant on the
shores of
Lake
Baikal. Surprisingly, there was little to do to reinforce the gears,
since the aircraft had been built with unprepared runways in mind and was
thus very strong. Major Lacombski took the diminutive fighter in the air
for the first time in 1950, and the Derwent-powered fighter quickly
proved it had the right stuff, beating the MiG-15K in a face-off. The
MiG always suffered from damage caused to the fuselage when deck landing
due to the short stroke of the undercarriage.
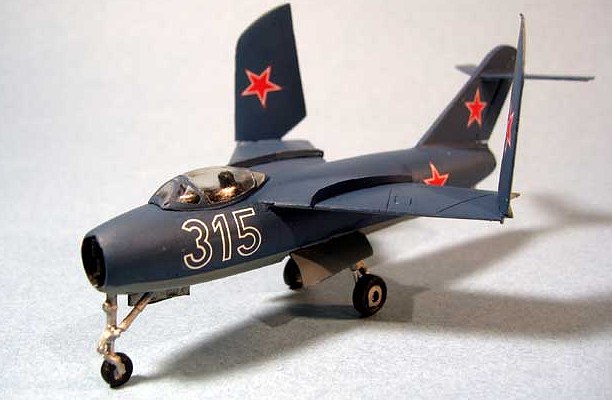
The first La-15K squadron took to the sea in 1951, on the rebuilt Lenin. It sailed to the Korean peninsula, where the Americans had the shock of their lives when the Panther pilots reported blue painted Soviet jet fighters…
|
THE KIT |
Please visit the Preview for a look at what comes in the box.
|
CONSTRUCTION |
Comrades! Welcome to the KnAAPoOZQc plant, located on the shores of Lake Baikal. You have been chosen for one task, that his to help the engineers at OKB Lavochkin build the first La-15K for our glorious Navy. I’m Major Olivienev Jakovitch Lacombski, SPD VVS (Special Projects Division), responsible for this project. I am empowered with full authority over all aspects of this project, from what you’ll be eating to the music you’ll be hearing. All requests and complaints will go through me. You might have noticed the tall serious looking man watching you at your descent from the patriotic train which brought from Moscow. That’s General Vespernalovich, local KGB chief. Take one false step and he’ll pay you a visit. Enough about that, Mother Russia is counting on us!
 The
repenting political prisoners of Forced Labour Camp #34 have erected this
plant for the very purpose of our task. Take good note of its
installations. To your right are located the parts needed for our
projects, that is a full Lavochkin La-15 taken from the production of the
Cooperativa plant in Siberia. The train that brought was served by a
stoker who went through Stalingrad! Three shots of Vodka for him! If we
walk closer to this glorious flying machine, we can take note of what is
to be done to transform it into a fearsome communist spearhead that will
send shivers through the Imperialist’s hearts. Firstly, the wings need
to be modified to allow folding, as our carriers need to be able to bring
as many as possible. Secondly, a hook must be fitted. It is extremely
desirable for your life that it be hidden during flight to improve the
top speed. Thirdly, test must be conducted on the under cart to
determine it’s suitability for naval service.
The
repenting political prisoners of Forced Labour Camp #34 have erected this
plant for the very purpose of our task. Take good note of its
installations. To your right are located the parts needed for our
projects, that is a full Lavochkin La-15 taken from the production of the
Cooperativa plant in Siberia. The train that brought was served by a
stoker who went through Stalingrad! Three shots of Vodka for him! If we
walk closer to this glorious flying machine, we can take note of what is
to be done to transform it into a fearsome communist spearhead that will
send shivers through the Imperialist’s hearts. Firstly, the wings need
to be modified to allow folding, as our carriers need to be able to bring
as many as possible. Secondly, a hook must be fitted. It is extremely
desirable for your life that it be hidden during flight to improve the
top speed. Thirdly, test must be conducted on the under cart to
determine it’s suitability for naval service.
The wings
can be separated where the ailerons meet the flaps. A panel was
conveniently placed there for us by our Lavochkin comrades. We should
not forget to thank them for that. Once they are parted, be sure not to
forget to sand the freshly cut part to remove any rim. We wouldn’t want
the wings to catch into a loose panel and consequently blow a folding
mechanism cylinder, do we? The fuselage is dealt with next. Since the
canopy provided by the workers at the Cooperativa plant is as obscure as
the Iron Curtain, we won’t need to spend a great deal of time with the
interior. Simply put it together, and then close the fuselage without
forgetting to add the wheel bays. What good is a jet fighter without
retractable under 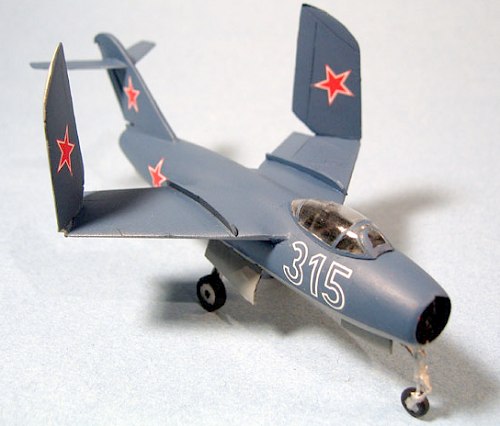 cart? I suggest you wait until the fuselage halves
have set before adding the intake splitter. You will note that a good
deal of work is needed to make it fit, the worst part of the kit until
now. Before heading to the zampolit’s local, putty and sand the
fuselage seam.
cart? I suggest you wait until the fuselage halves
have set before adding the intake splitter. You will note that a good
deal of work is needed to make it fit, the worst part of the kit until
now. Before heading to the zampolit’s local, putty and sand the
fuselage seam.
Back from the political lecture already? Good! Take the wings and put them on the fuselage. Oh, what is that? They do not fit? Traitors! Take this X-Acto and hack away at the slot on the fuselage while Comrade Dmitryi thins the tabs with his file. Done? Excellent! See how they fit nicely now! Copious amounts of a product known as Ambroid Pro-Weld (smuggled out of a capitalist country by our glorious KGB agents) is need to maintain the wings in place. It will allow a good safety margin through the transonic region. It’s now time to fit the stab. Once you pull it through the slot on the rudder, take time to align it perfectly to the horizontal to ensure good elevator response for the pilot. Now, put putty everywhere you see a seam and dispatch it, then prime everything to check for possible touch-ups.
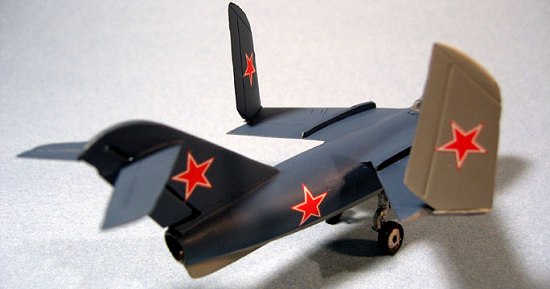
Remember the cloudy canopy? Well, this is the time we deal with it. As not much will be seen through it, Flat Black is the colour to use to paint the cockpit trapped in the fuselage. Next, grab those landing gears lying in that wooden crate over there. I can assure you that they have been found sufficiently resilient for installation on a naval aircraft. That Ambroid Pro-Weld is helpful again to secure them. Do not forget the little struts! Next step involves fitting the inner set of wing fences, which are hard to clean up if you’re under influence of Vodka. Be careful, if you break them, we’ll break you. Now, it’s time to fit the wings. Use small angles provided to us by Evergreenski in the Urals and glue the outer sections on them. Next, glue those to the wings and you have a naval fighter ready to be painted. If you look carefully, you’ll see that the folded wings are not much higher than the tail, so we are not wasting too much precious space.
The canopy is masked and installed on the fighter which is towed at night to the paint shop. We don’t want the Imperialist spy dogs to see it, do we?
|
COLORS AND MARKINGS |
 The
undercoat goes on first. Some left over paint stocks from the Great
Patriotic War will do just fine. This particular batch comes from the
Gunze plant in Imperialist Japan and his actually quite close to what our
then British friends painted under their fighters. They called it Medium
Sea Grey. Once dry, the belly is masked with another “imported” product,
Tamiya masking tape smuggled through the Kuril Islands. The top colour
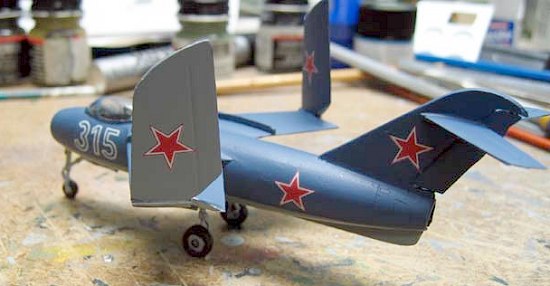
is our special blend of Light Blue and Tamiya Fat Blue.
The
undercoat goes on first. Some left over paint stocks from the Great
Patriotic War will do just fine. This particular batch comes from the
Gunze plant in Imperialist Japan and his actually quite close to what our
then British friends painted under their fighters. They called it Medium
Sea Grey. Once dry, the belly is masked with another “imported” product,
Tamiya masking tape smuggled through the Kuril Islands. The top colour
is our special blend of Light Blue and Tamiya Fat Blue.
|
CONSTRUCTION CONTINUES |
We now have a resplendescent La-15K, almost ready to fly. To protect the vulnerable inner components of this high-precision Soviet marvel of technology, we need to paint the landing and wing fold bays with high-strength aluminium dope. Do not forget to do the same to the wheels! Once done, fit the gear doors to the model and tow it back to the paint shop for application of what is known as “Future” over the Iron Curtain.
The airframe is now all glossy, and is ready to receive its nationality markings. The decal sheet was produced by our Comrades in Czechoslovaquia, and are very thin, so be extremely careful! The best way to proceed is to use saliva to place the transfers into place. Check often for symmetry, especially on the wings. Setting solution can be used, and it has been determined that Micro Set is a good place to start. The Bort number on the nose was found in an old Panzer sheet, again produced by Tamiya and smuggled the usual way (trawlers are really useful).
Another trip to the paint shop, and a flat varnish is used to seal the project. Flight testing can now begin! Za Rodina! Za Stalina!
|
CONCLUSIONS |
Well, this has been a very fun project. The What-If website organized a group build called Soviet Naval Aviation. I chose this kit as it always bugged me in the local shop and the low price made it a no-brainer. Am I happy with the results? Yes! It took me just under a month to pull that through, which is very good. The few parts fit surprisingly well and the lack of resin and photo-etch make it ideal for people looking for an introduction to the world of short-runs. The only low point are the decals, which are very easily shattered, my initial plan involved a much brighter paint scheme using the Tushino markings. Recommended!
|
REFERENCES |
What-If website http://www.whatifmodelers.com and what comes in the box.
March 2004
Copyright ModelingMadness.com. All rights reserved. No reproduction without express permission from the editor.
If you would like your product reviewed fairly and quickly, please contact the editor or see other details in the Note to Contributors.